当前位置:网站首页>【Appium】有道云app的unittest框架简单移植及驱动文件的设计
【Appium】有道云app的unittest框架简单移植及驱动文件的设计
2022-04-22 16:37:00 【BetterFate!】
- 学习目标:通过有道云项目的实践来熟悉appium的使用
- 如有不足,还望指出
- 若觉不错,希望不吝小手点赞、关注支持一波
目录
三、unittest-业务功能(新增、搜索、修改、删除)及测试套的使用
一、unittest-安装卸载功能
当已经完成面向对象类的设计之后,再进行unittest框架移植就是非常简单的一件事了,所要做的就是导入unittest类库,并继承unittest.TestCase。需要注意的是测试方法名必须以test_开头。
运行脚本时不再需要进行类的实例化,而只要直接使用unittest.main()即可运行当前类下所有测试方法了。
移植之后脚本如下:
# 使用unittest框架完成安装、卸载有道云的脚本
# 导入Appium类库
from appium.webdriver.webdriver import WebDriver
from selenium.webdriver.common.by import By
from selenium.webdriver.support.wait import WebDriverWait
import unittest
import warnings


class Test_Install_Remove(unittest.TestCase):
    @classmethod
    def setUpClass(cls):
        warnings.filterwarnings("ignore")  # 忽略警告信息
        cls.caps = {
            'automationName': 'UiAutomator2',
            'platformName': 'Android',
            'platformVersion': '6.0',
            'deviceName': '192.168.23.101:5555',
            'appPackage': 'com.youdao.note',
            'appActivity': '.activity2.MainActivity'}
        cls.driver = WebDriver('http://127.0.0.1:4723/wd/hub', cls.caps)
        cls.driver.implicitly_wait(10)

    # 安装、卸载功能用例
    def test_case1(self):
        # 卸载有道云app
        if self.driver.is_app_installed('com.youdao.note'):  # 判断是否已安装,若安装返回True
            self.driver.remove_app('com.youdao.note')
        # 安装有道云app
        self.driver.install_app(r'D:\PythonTest\AppiumTest\YouDaoYun\youdaoyunbiji_84.apk')

    # 判断是否安装成功
    def test_case2(self):
        # S1:安装后用程序启动有道云
        self.caps['appPackage'] = 'com.youdao.note'
        self.caps['appActivity'] = '.activity2.MainActivity'
        self.driver = WebDriver('http://127.0.0.1:4723/wd/hub', self.caps)
        # S2:弹出界面上抓取’拒绝‘链接
        # 添加显式等待
        el = WebDriverWait(self.driver, 10).until(
            lambda x: x.find_element(By.ID, 'com.android.packageinstaller:id/permission_deny_button'))
        self.assertIsNotNone(el, '安装失败')

    @classmethod
    def tearDownClass(cls):
        cls.driver.quit()


if __name__ == '__main__':
    unittest.main()
二、unittest-新增笔记功能
# 使用unittest框架完成新增笔记的脚本
# 导入Appium类库
import time
from appium.webdriver.webdriver import WebDriver
from selenium.webdriver.common.by import By
from selenium.webdriver.support.wait import WebDriverWait
import unittest
import warnings


# 定义测试类
class TestAddnote(unittest.TestCase):
    def setUp(self):
        warnings.filterwarnings("ignore")
        self.caps = {
            'automationName': 'UiAutomator2',
            'platformName': 'Android',
            'platformVersion': '6.0',
            'deviceName': '192.168.23.101:5555',
            'appPackage': 'com.youdao.note',
            'appActivity': '.activity2.MainActivity'}
        self.driver = WebDriver('http://127.0.0.1:4723/wd/hub', self.caps)
        self.driver.implicitly_wait(10)

    def test_case1(self):
        el = WebDriverWait(self.driver, 10).until(
            lambda x: x.find_element(By.ID, 'com.android.packageinstaller:id/permission_allow_button'))
        if el:
            # 点击同意
            self.driver.find_element(By.ID, 'com.android.packageinstaller:id/permission_allow_button').click()
            # 点击+号
            self.driver.find_element(By.ID, 'com.youdao.note:id/add_note').click()
            # 点击新建笔记
            self.driver.find_element(By.ID, 'com.youdao.note:id/add_note_floater_add_note').click()
            # 点击取消
            self.driver.find_element(By.ID, 'com.youdao.note:id/btn_cancel').click()
            # 输入内容
            self.driver.find_element(By.XPATH,
                                     '//*[@resource-id="com.youdao.note:id/note_content"]/android.widget.EditText').send_keys(
                'testcontext1234')
            # 输入标题
            self.driver.find_element(By.ID, 'com.youdao.note:id/note_title').send_keys('testtitle')
            # 点击完成
            self.driver.find_element(By.ID, 'com.youdao.note:id/actionbar_complete_text').click()
            time.sleep(1)
            # 获取新增成功后的标题内容
            real_title = self.driver.find_element(By.ID, 'com.youdao.note:id/title').text
            self.assertEqual(real_title, 'testtitle', '新增笔记测试失败')

    def tearDown(self):
        self.driver.quit()


if __name__ == '__main__':
    unittest.main()
三、unittest-业务功能(新增、搜索、修改、删除)及测试套的使用
当一个类中有多个测试方法时,我们可以使用测试套的方法,有选择的执行其中一个测试方法。
基本过程就是:
- 实例化测试套件:suite = unittest.TestSuite()
- 把测试用例加入测试套中:suite.addTest('test_case1')
- 实例化TestRunner类:runner = unittest.TextTestRunner()
- 运行测试套:runner.run(suite)
脚本如下:
# 使用测试框架完成业务场景测试(新增/搜索/修改/删除笔记)
import time
import unittest
from selenium.webdriver.common.by import By
from selenium.webdriver.support.wait import WebDriverWait
from appium.webdriver.webdriver import WebDriver
import warnings


class TestSuite_ydflow(unittest.TestCase):
    @classmethod
    def setUpClass(cls):
        warnings.filterwarnings("ignore")
        cls.caps = {
            'automationName': 'UiAutomator2',
            'platformName': 'Android',
            'platformVersion': '6.0',
            'deviceName': '192.168.23.101:5555',
            'appPackage': 'com.youdao.note',
            'appActivity': '.activity2.MainActivity'}
        cls.driver = WebDriver('http://127.0.0.1:4723/wd/hub', cls.caps)
        cls.driver.implicitly_wait(10)

    # 新增功能测试用例
    def test_case1(self):
        el = WebDriverWait(self.driver, 10).until(
            lambda x: x.find_element(By.ID, 'com.android.packageinstaller:id/permission_allow_button'))
        if el:
            # 点击同意
            self.driver.find_element(By.ID, 'com.android.packageinstaller:id/permission_allow_button').click()
            # 点击+号
            self.driver.find_element(By.ID, 'com.youdao.note:id/add_note').click()
            # 点击新建笔记
            self.driver.find_element(By.ID, 'com.youdao.note:id/add_note_floater_add_note').click()
            # 点击取消
            self.driver.find_element(By.ID, 'com.youdao.note:id/btn_cancel').click()
            # 输入内容
            self.driver.find_element(By.XPATH,
                                     '//*[@resource-id="com.youdao.note:id/note_content"]/android.widget.EditText').send_keys(
                'testcontext1234')
            # 输入标题
            self.driver.find_element(By.ID, 'com.youdao.note:id/note_title').send_keys('testtitle')
            # 点击完成
            self.driver.find_element(By.ID, 'com.youdao.note:id/actionbar_complete_text').click()
            time.sleep(1)
            # 获取新增成功后的标题内容
            real_title = self.driver.find_element(By.ID, 'com.youdao.note:id/title').text
            self.assertEqual(real_title, 'testtitle', '新增笔记测试失败')

    # 搜索功能测试用例
    def test_case2(self):
        # 点击搜索按钮
        self.driver.find_element(By.ID, 'com.youdao.note:id/search').click()
        # 输入搜索关键字
        self.driver.find_element(By.ID, 'com.youdao.note:id/search_edit_view').send_keys("test")
        # 点击搜索按钮
        self.driver.find_element(By.ID, 'com.youdao.note:id/clear_search_text_btn').click()
        # 抓取查询结果对应的界面图
        self.driver.get_screenshot_as_file('searchnote.png')
        time.sleep(3)

    # 修改功能测试用例
    def test_case3(self):
        self.driver.find_element(By.ID, 'com.youdao.note:id/title').click()
        self.driver.find_element(By.ID, 'com.youdao.note:id/edit').click()
        # 修改内容
        self.driver.find_element(By.XPATH,
                                 "//*[@resource-id='com.youdao.note:id/note_content']/android.widget.EditText").send_keys(
            'editcon')

        # 输入标题
        self.driver.find_element(By.ID, 'com.youdao.note:id/note_title').send_keys('editt')
        # 点击完成
        self.driver.find_element(By.CLASS_NAME, 'android.support.v7.widget.LinearLayoutCompat').click()
        # 获取修改后的标题
        time.sleep(1)
        rtitle = self.driver.find_element(By.ID, 'com.youdao.note:id/note_title').text
        print(rtitle)
        if (rtitle == "editt"):
            print("修改成功")
        else:
            print("修改失败")
        time.sleep(3)

    # 删除功能测试用例
    def test_case4(self):
        self.driver.find_element(By.ID, 'com.youdao.note:id/menu_more').click()
        self.driver.find_element(By.ID, 'com.youdao.note:id/delete').click()
        self.driver.find_element(By.ID, 'com.youdao.note:id/btn_ok').click()
        num = self.driver.find_elements(By.CLASS_NAME, 'android.widget.LinearLayout')
        print(num)
        if len(num) > 0:
            print("删除不成功")
            self.driver.get_screenshot_as_file('deleteerror.png')
        else:
            print("删除成功")
            self.driver.get_screenshot_as_file('deletesucc.png')

    @classmethod
    def tearDownClass(cls):
        cls.driver.quit()


if __name__ == '__main__':
    # 实例化测试套件
    suite = unittest.TestSuite()
    # 把测试用例加入测试套中
    suite.addTest('test_case1')
    suite.addTest('test_case2')
    suite.addTest('test_case3')
    suite.addTest('test_case4')
    # 实例化TestRunner类
    runner = unittest.TextTestRunner()
    runner.run(suite)
四、使用HtmlTestRunner生成测试报告
下载适用于python3.0的HtmlTestRunner将其放在项目的根目录下,同时在根目录新建一个执行脚本。
上面我们使用的是添加类中单独的测试方法来生成测试套件。
我们这里使用另外一种方法,也可以直接将类作为一个整体来制作测试套。基本过程如下:
- 生成测试套:suite = unittest.makeSuite(类名) # 如果不是在一个文件下的话记得要导入该类所在的路径
- 创建测试报告文件:file = open('文件名.html', 'wb') # 文件名前面也可以加上路径,这里一定要使用wb方法。
- 实例化HTMLTestRunner类:runner = HTMLTestRunner(stream=file, title='标题名', description='测试描述')
- 运行测试套:runner.run(suite)
脚本如下:
# 使用HtmlTestRunner生成测试报告
import unittest
from HTMLTestRunner import HTMLTestRunner
from AppiumTest.unittest_fram.unittest_testsuite_flow import TestSuite_ydflow

if __name__ == '__main__':
    # 生成测试套
    suite = unittest.makeSuite(TestSuite_ydflow)
    # 创建测试报告文件
    file = open('report_yd.html', 'wb')
    # 实例化HTMLTestRunner类
    runner = HTMLTestRunner(stream=file, title='业务流程测试', description='新增、搜索、修改、删除笔记')
    runner.run(suite)
五、设计驱动程序
随着后面脚本不断的新增,不断的完善,我们不可能每次都执行所有的脚本,所以有选择的执行我们需要的脚本就很必要了。
我们可以将所有的脚本进行框架化之后,将其路径,脚本名以及其他需要的参数写入文件中,要执行的脚本就写Run,不需要执行的脚本就写notRun,我们只需要读取是否执行状态即可。后期的维护只需要维护文件,而不需要再去修改脚本了。
5.1、通过生成测试套来执行脚本
简易驱动文件如下:

由于makeSuite需要传入的是一个类,但是从csv文件中读取出来的是str类型,所以我们需要用到vars()函数,将str转化为类。
脚本如下:
# 通过驱动程序使用HtmlTestRunner生成测试报告
import unittest
from HTMLTestRunner import HTMLTestRunner
import csv
from AppiumTest.unittest_fram.unittest_testsuite_flow import TestSuite_ydflow
from AppiumTest.unittest_fram.unittest_install_remove import Test_Install_Remove
from AppiumTest.unittest_fram.unittest_test_addnote import TestAddnote

if __name__ == '__main__':
    file1 = open('test_run1.csv', 'r')
    table = csv.reader(file1)
    for row in table:
        # 判断是否执行
        if row[1] == 'Run':
            print('执行测试用例:', row[0])
            print(type(row[0]))
            # 生成测试套
            suite = unittest.makeSuite(vars()[row[0]])
            # 创建测试报告文件
            file2 = open(row[2], 'wb')
            # 实例化TestRunner类
            runner = HTMLTestRunner(stream=file2, title=row[3], description=row[4])
            runner.run(suite)
        else:
            continue
5.2、通过找到测试文件来执行脚本
简易驱动文件如下:

我们这次使用的方法是通过找到对应的脚本文件名来执行脚本,而不再需要去生成测试套。
脚本如下:
# 通过驱动程序使用HtmlTestRunner生成测试报告
import unittest
from HTMLTestRunner import HTMLTestRunner
import csv

if __name__ == '__main__':
    file1 = open('test_run.csv', 'r')
    table = csv.reader(file1)
    for row in table:
        # 判断是否执行
        if row[2] == 'Run':
            print('执行测试用例:', row[1])
            # 声明文件所在路径
            file_dir = row[0]
            # 定义discover对象打开相关的脚本文件
            discover = unittest.defaultTestLoader.discover(file_dir, pattern=row[1])
            # 创建测试报告文件
            file2 = open(row[3], 'wb')
            # 实例化TestRunner类
            runner = HTMLTestRunner(stream=file2, title=row[4], description=row[5])
            runner.run(discover)
        else:
            continue
总结
使用vars()将字符串类型转换为变量。
版权声明
本文为[BetterFate!]所创,转载请带上原文链接,感谢
https://blog.csdn.net/weixin_42297382/article/details/124298027
边栏推荐
- 经销商组团检阅欧尚Z6:为高能产品力点赞
- 80386汇编_寄存器 & 寻址方式介绍
- Experiment 4: KNN, naive Bayes of data mining
- [arm assembly] how to judge the input data?
- C语言插入排序
- RT-Thread Studio 对代码进行格式化
- 8.1 序列模型
- Gome's new actions "true selection" and "strict selection" enable multi-dimensional escort quality consumption
- Bidirectional circular linked list creation
- Solidity:合约结构
猜你喜欢

RT-Thread Studio 工作区编码设置为UTF-8

小练习:二分查找及实现
![[b01lers2020]Life on Mars](/img/4c/c21f74153d6a668349d39f54e95e26.png)
[b01lers2020]Life on Mars

BACKBONE,NECK,HEAD

Times superior AC servo driver settings

蓝桥杯练习017

Solidworks斜参考面
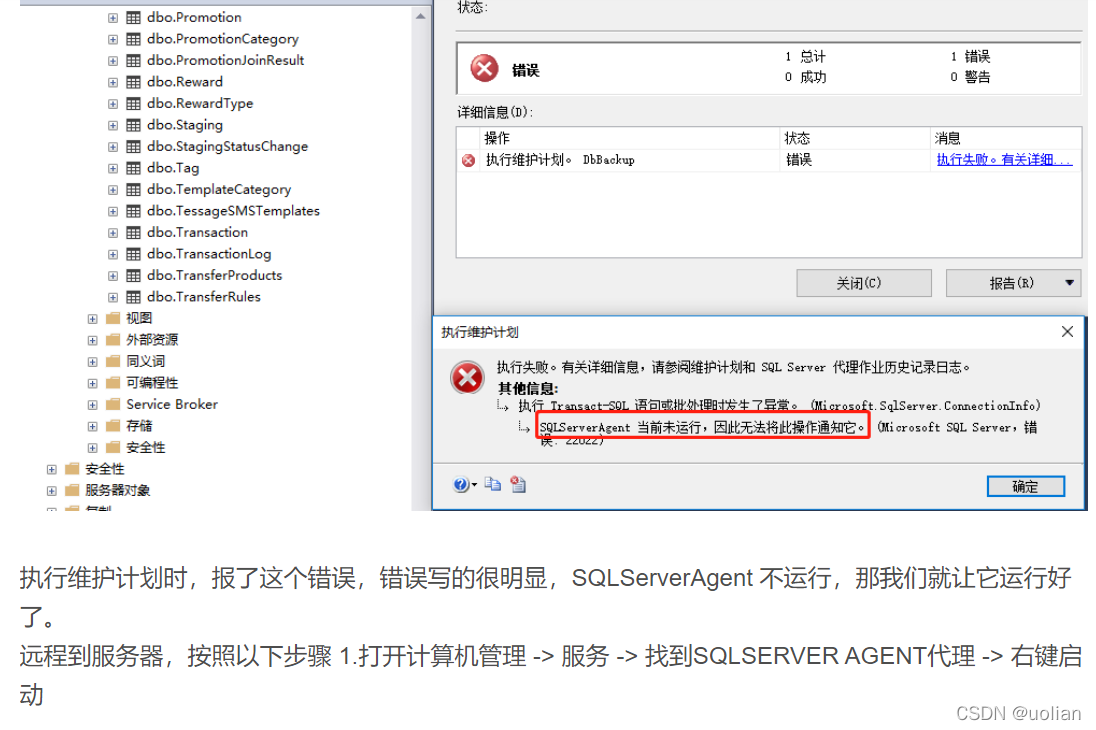
An error is reported in the automatic database backup, indicating that SQLServerAgent is not currently running, so it cannot be notified of this operation.

领域驱动模型DDD(三)——使用Saga管理事务

Talk about the general problem of substitution between TL431 and az431 (personal experience)
随机推荐
numpy基础大全(创建、索引、常用函数)
Niu Ke SQL question brushing record
蓝桥杯练习016
An analysis and treatment of abnormal growth of Oracle database table space
领域驱动模型DDD(三)——使用Saga管理事务
Blue Bridge Cup practice 020
2023年武汉理工大学能源动力(085800)考研上岸前辈备考经验指导
蓝桥杯练习011
蓝桥杯练习015
Test life | less than 2 years after graduation, 0 experience and won the 30W annual salary of a well-known Internet enterprise. How did he do it?
ICMP and IPv6 global unicast address dynamic allocation
时间戳有什么作用,如何申请?
DB107-ASEMI整流桥详细数据
Leetcode题库62. 不同路径(递归 c实现)
Transforme结构:位置编码 | Transformer Architecture: The Positional Encoding
Industry research: the development trend of domestic databases from the perspective of manufacturers
From thinking to practice, digital transformation is the successful path of it operation
solidworks中为什么线性草图阵列我只能设置方向1,不能设置方向2?
How to select one of the two lines that coincide in SolidWorks
MINIUSB pin interface pin definition