当前位置:网站首页>bgp双平面实验 路由策略控制流量
bgp双平面实验 路由策略控制流量
2022-08-10 12:16:00 【愤愤的卷毛】
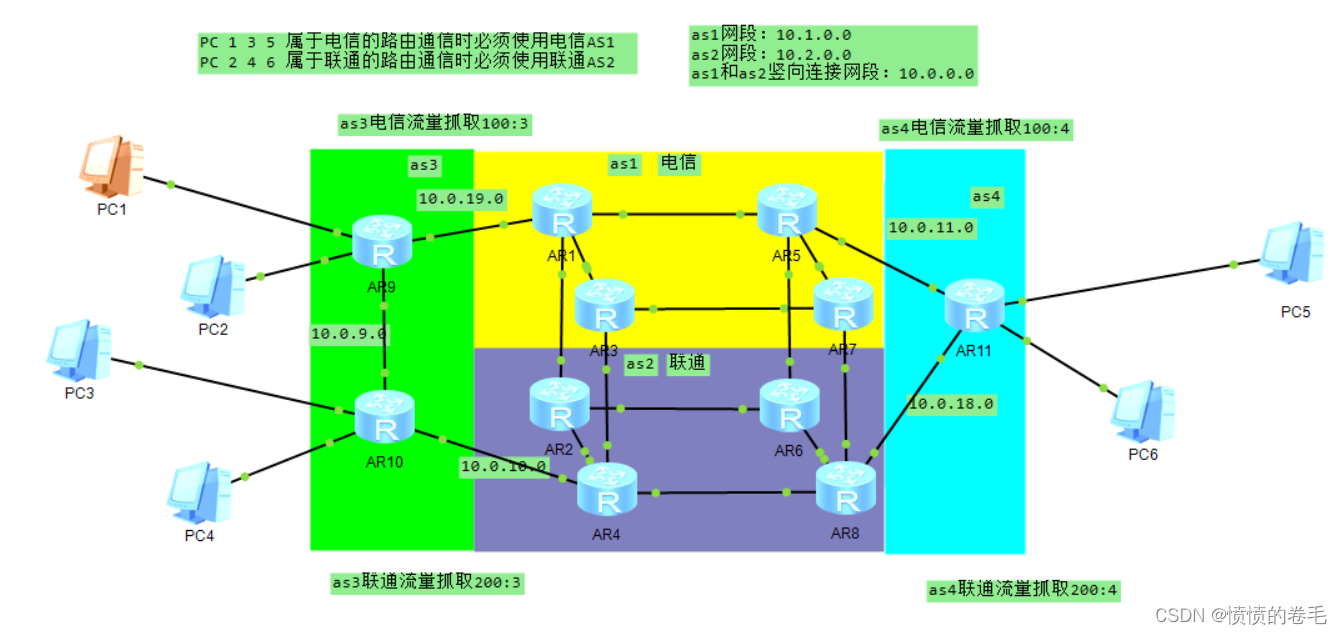
完成下图实验
实验要求:
1.合理IP地址
2.AS 1 2 3 内部使用OSPF 协议 , AS 1 AS 2内部建立全互联的IBGP邻居 ,AS之间建立全部的EBGP邻居
3.PC 1 3 5 属于电信的路由,通信时必须使用电信AS 1 ;PC 2 4 6 属于联通的路由,通信时必须使用联通的 AS 2
4.若 R1-R9之间链路断开,电信的路由依然通过电信 AS 1 通信

规划实验拓扑图划分IP地址
配置各个 路由器接口合法的IP地址
r1

r2

r3

r4

r5

r6

r7

r8

r9

r10

r11

pc1-pc6的IP地址分别为10.0.1.2 10.0.2.2 10.0.3.2 10.0.4.2 10.0.5.2 10.0.6.2
在配置完ip地址之后可以测试直连设备检查IP地址是否配置有误
将每个as区域内的路由器启动ospf协议并进行宣告完成路由可达并修改建临的环回接口类型
as1:
r1:
[r1]ospf 100 router-id 1.1.1.1
[r1-ospf-100]area 0
[r1-ospf-100-area-0.0.0.0]network 1.1.1.1 0.0.0.0
[r1-ospf-100-area-0.0.0.0]network 10.0.15.1 0.0.0.0 宣告
[r1-ospf-100-area-0.0.0.0]network 10.1.13.1 0.0.0.0[r1]int lo0
[r1-LoopBack0]ospf network-type broadcast 修改接口类型r3:
[r3]ospf 100 router-id 3.3.3.3
[r3-ospf-100]area 0
[r3-ospf-100-area-0.0.0.0]network 10.1.13.2 0.0.0.0
[r3-ospf-100-area-0.0.0.0]network 10.0.37.1 0.0.0.0
[r3-ospf-100-area-0.0.0.0]network 3.3.3.3 0.0.0.0
[r3]int lo0
[r3-LoopBack0]ospf network-type broadcastr5:
[r5]ospf 100 router-id 5.5.5.5
[r5-ospf-100]area 0
[r5-ospf-100-area-0.0.0.0]network 10.0.15.2 0.0.0.0
[r5-ospf-100-area-0.0.0.0]network 10.1.57.1 0.0.0.0
[r5-ospf-100-area-0.0.0.0]network 5.5.5.5 0.0.0.0
[r5]int l0
[r5-LoopBack0]ospf network-type broadcastr7:
[r7]ospf 100 router-id 7.7.7.7
[r7-ospf-100]area 0
[r7-ospf-100-area-0.0.0.0]network 7.7.7.7 0.0.0.0
[r7-ospf-100-area-0.0.0.0]network 10.1.57.2 0.0.0.0
[r7-ospf-100-area-0.0.0.0]network 10.0.37.2 0.0.0.0
[r7]int l0
[r7-LoopBack0]ospf network-type broadcast
as2:
r2:
[r2]ospf 200 router-id 2.2.2.2
[r2-ospf-200]area 0
[r2-ospf-200-area-0.0.0.0]network 2.2.2.2 0.0.0.0
[r2-ospf-200-area-0.0.0.0]network 10.0.26.1 0.0.0.0 宣告
[r2-ospf-200-area-0.0.0.0]network 10.1.24.1 0.0.0.0
[r2]int l0
[r2-LoopBack0]ospf network-type broadcast 修改接口类型
r4:
[r4]ospf 200 router-id 4.4.4.4
[r4-ospf-200]area 0
[r4-ospf-200-area-0.0.0.0]network 4.4.4.4 0.0.0.0
[r4-ospf-200-area-0.0.0.0]network 10.1.24.2 0.0.0.0
[r4-ospf-200-area-0.0.0.0]network 10.0.48.1 0.0.0.0
[r4]int l0
[r4-LoopBack0]ospf network-type broadcastr6:
[r6]ospf 200 router-id 6.6.6.6
[r6-ospf-200]area 0
[r6-ospf-200-area-0.0.0.0]network 6.6.6.6 0.0.0.0
[r6-ospf-200-area-0.0.0.0]network 10.0.26.2 0.0.0.0
[r6-ospf-200-area-0.0.0.0]network 10.1.68.1 0.0.0.0
[r6]int l0
[r6-LoopBack0]ospf network-type broadcastr8:
[r8]ospf 200 router-id 8.8.8.8
[r8-ospf-200]area 0
[r8-ospf-200-area-0.0.0.0]network 8.8.8.8 0.0.0.0
[r8-ospf-200-area-0.0.0.0]network 10.0.48.2 0.0.0.0
[r8-ospf-200-area-0.0.0.0]network 10.1.68.2 0.0.0.0
[r8]int l0
[r8-LoopBack0]ospf network-type broadcast
as3:
r9:
[r9]ospf 300 router-id 9.9.9.9
[r9-ospf-300]area 0
[r9-ospf-300-area-0.0.0.0]network 9.9.9.9 0.0.0.0
[r9-ospf-300-area-0.0.0.0]network 10.0.9.1 0.0.0.0 宣告
[r9]int l0
[r9-LoopBack0]ospf network-type broadcast 修改接口类型r10:
[r10]ospf 300 router-id 10.10.10.10
[r10-ospf-300]area 0
[r10-ospf-300-area-0.0.0.0]network 10.10.10.10 0.0.0.0
[r10-ospf-300-area-0.0.0.0]network 10.0.9.2 0.0.0.0
[r10-ospf-300-area-0.0.0.0]q
[r10-LoopBack0]ospf network-type broadcast
在配置完成ospf的宣告之后可以查看ospf的邻居表检查是否配置出错
例如下图:

在各个as区域内使用对等组peer group定义BGP邻居关系建立
在各个as内建立ibgp邻居关系 as之间建立ebgp邻居关系
as1:
r1:
[r1]bgp 1
[r1-bgp]router-id 1.1.1.1
[r1-bgp]peer 10.0.19.2 as-number 3 ebgp 邻居关系建立
[r1-bgp]peer 10.2.18.2 as-number 2
[r1-bgp]group r1
[r1-bgp]peer r1 connect-interface lo0 使用peer group 建立ibgp邻居关系
[r1-bgp]peer r1 next-hop-local
[r1-bgp]peer r1 advertise-community
[r1-bgp]peer 3.3.3.3 group r1
[r1-bgp]peer 5.5.5.5 group r1
[r1-bgp]peer 7.7.7.7 group r1
[r1-bgp]peer 10.0.19.2 advertise-community
[r1-bgp]peer 10.2.12.2 advertise-community
r3:[r3]bgp 1
[r3-bgp]router-id 3.3.3.3
[r3-bgp]peer 10.2.34.2 as-number 2
[r3-bgp]group r2
[r3-bgp]peer r2 connect-interface lo0
[r3-bgp]peer r2 next-hop-local
[r3-bgp]peer r2 advertise-community
[r3-bgp]peer 1.1.1.1 group r2
[r3-bgp]peer 5.5.5.5 group r2
[r3-bgp]peer 7.7.7.7 group r2
[r3-bgp]peer 10.2.34.2 advertise-communityr5:
[r5]bgp 1
[r5-bgp]router-id 5.5.5.5
[r5-bgp]peer 10.0.11.2 as-number 4 ebgp 邻居关系建立
[r5-bgp]peer 10.2.56.2 as-number 2[r5-bgp]group r5
[r5-bgp]peer r5 connect-interface lo0
[r5-bgp]peer r5 next-hop-local
[r5-bgp]peer r5 advertise-community 使用peer group 建立ibgp邻居关系
[r5-bgp]peer 1.1.1.1 group r5
[r5-bgp]peer 3.3.3.3 group r5
[r5-bgp]peer 7.7.7.7 group r5
[r5-bgp]peer 10.0.11.2 advertise-community
[r5-bgp]peer 10.2.56.2 advertise-community
r7:
[r7]bgp 1
[r7-bgp]router-id 7.7.7.7
[r7-bgp]peer 10.2.78.2 as-number 2
[r7-bgp]peer 10.2.78.2 advertise-community
[r7-bgp]group r7
[r7-bgp]peer r7 connect-interface lo0
[r7-bgp]peer r7 next-hop-local
[r7-bgp]peer r7 advertise-community
[r7-bgp]peer 1.1.1.1 group r7
[r7-bgp]peer 3.3.3.3 group r7
[r7-bgp]peer 5.5.5.5 group r7
as2:
r2:
[r2]bgp 2
[r2-bgp]router-id 2.2.2.2
[r2-bgp]peer 10.2.12.1 as-number 1
[r2-bgp]peer 10.2.12.1 advertise-community
[r2-bgp]group r2
[r2-bgp]peer r2 connect-interface lo0
[r2-bgp]peer r2 next-hop-local
[r2-bgp]peer r2 advertise-community
[r2-bgp]peer 4.4.4.4 group r2
[r2-bgp]peer 6.6.6.6 group r2
[r2-bgp]peer 8.8.8.8 group r2
r4:
[r4]bgp 2
[r4-bgp]router-id 4.4.4.4
[r4-bgp]peer 10.0.10.2 as-number 3
[r4-bgp]peer 10.2.34.1 as-number 1 ebgp 邻居关系建立
[r4-bgp]peer 10.2.34.1 advertise-community 开启ebgp邻居的社团属性
[r4-bgp]peer 10.0.10.2 advertise-community
[r4-bgp]group r4
[r4-bgp]peer r4 connect-interface lo0
[r4-bgp]peer r4 next-hop-local
[r4-bgp]peer r4 advertise-community 使用peer group 建立ibgp邻居关系
[r4-bgp]peer 2.2.2.2 group r4
[r4-bgp]peer 6.6.6.6 group r4
[r4-bgp]peer 8.8.8.8 group r4r6:
[r6]bgp 2
[r6-bgp]router-id 6.6.6.6
[r6-bgp]peer 10.2.56.1 as-number 1
[r6-bgp]peer 10.2.56.1 advertise-community
[r6-bgp]group r6
[r6-bgp]peer r6 connect-interface lo0
[r6-bgp]peer r6 next-hop-local
[r6-bgp]peer r6 advertise-community
[r6-bgp]peer 2.2.2.2 group r6
[r6-bgp]peer 4.4.4.4 group r6
[r6-bgp]peer 8.8.8.8 group r6r8:
[r8]bgp 2
[r8-bgp]router-id 8.8.8.8
[r8-bgp]peer 10.2.78.1 as-number 1 s
[r8-bgp]peer 10.0.18.2 as-number 4 ebgp 邻居关系建立
[r8-bgp]peer 10.2.78.1 advertise-community 开启ebgp邻居的社团属性
[r8-bgp]peer 10.0.18.2 advertise-community[r8-bgp]group r8
[r8-bgp]peer r8 connect-interface lo0
[r8-bgp]peer r8 next-hop-local
[r8-bgp]peer r8 advertise-community 使用peer group 建立ibgp邻居关系
[r8-bgp]peer 2.2.2.2 group r8
[r8-bgp]peer 4.4.4.4 group r8
[r8-bgp]peer 6.6.6.6 group r8
as3:
r9:
[r9]bgp 3
[r9-bgp]router-id 9.9.9.9
[r9-bgp]peer 10.0.19.1 as-number 1
[r9-bgp]peer 10.0.19.1 advertise-community 开启ebgp邻居的社团属性
[r9-bgp]peer 10.10.10.10 as-number 3
[r9-bgp]peer 10.10.10.10 next-hop-local
[r9-bgp]peer 10.10.10.10 connect-interface lo0
[r9-bgp]peer 10.10.10.10 advertise-community 开启ebgp邻居的社团属性r10:
[r10]bgp 3
[r10-bgp]router-id 10.10.10.10
[r10-bgp]peer 9.9.9.9 as-number 3
[r10-bgp]peer 9.9.9.9 next-hop-local
[r10-bgp]peer 9.9.9.9 connect-interface lo0
[r10-bgp]peer 9.9.9.9 advertise-community 开启ebgp邻居的社团属性
[r10-bgp]peer 10.0.10.1 as-number 2
[r10-bgp]peer 10.0.10.1 advertise-community 开启ebgp邻居的社团属性
as4:
r11:
[r11]bgp 4
[r11-bgp]router-id 11.11.11.11
[r11-bgp]peer 10.0.11.1 as-number 1
[r11-bgp]peer 10.0.11.1 advertise-community
[r11-bgp]peer 10.0.18.1 as-number 2
[r11-bgp]peer 10.0.18.1 advertise-community
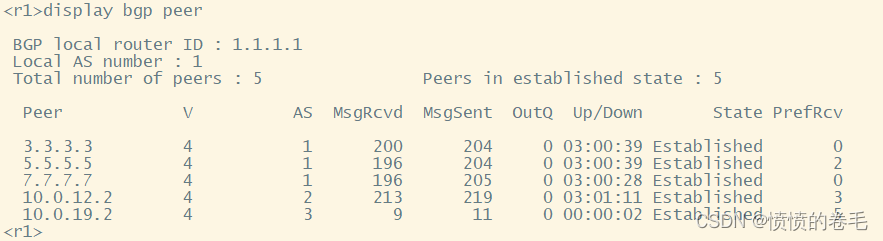
在配置完成bgp的配置之后可以查看bgp的邻居表检查是否配置出错
例如下图:
在r9,r10,r11 上进行bgp宣告来查看选路情况
r9:
[r9]bgp 3
[r9-bgp]network 10.0.1.0 24
[r9-bgp]network 10.0.2.0 24r10:
[r10]bgp 3
[r10-bgp]network 10.0.3.0 24
[r10-bgp]network 10.0.4.0 24
r11:
[r11]bgp 4
[r11-bgp]network 10.0.5.0 24
[r11-bgp]network 10.0.6.0 24
查看选路情况:

使用前缀列表抓取流量,启用对应的社团属性并在被bgp上启用路由策略
[r9]ip ip-prefix c1 permit 10.0.1.0 24
[r9]ip ip-prefix c1 permit 10.0.3.0 24
[r9]ip ip-prefix c2 permit 10.0.2.0 24 抓取流量
[r9]ip ip-prefix c2 permit 10.0.4.0 24
[r9]route-policy com permit node 10
[r9-route-policy]if-match ip-prefix c1
[r9-route-policy]apply community 100:3 给电信as1区域加上100:3的社团属性
[r9-route-policy]route-policy com permit node 20 建立空表
[r9-route-policy]if-match ip-prefix c2
[r9-route-policy]apply community 200:3 给联通as2区域加上200:3的社团属性
[r9]route-policy com permit node 30 建立空表
[r9]bgp 3
[r9-bgp]peer 10.0.19.1 route-policy com export 在bgp中对邻居在接口出向上进行调用[r10]ip ip-prefix c1 permit 10.0.1.0 24
[r10]ip ip-prefix c1 permit 10.0.3.0 24
[r10]ip ip-prefix c2 permit 10.0.2.0 24 抓取流量
[r10]ip ip-prefix c2 permit 10.0.4.0 24
[r10]route-policy com permit node 10
[r10-route-policy]if-match ip-prefix c1
[r10-route-policy]apply community 100:3 给电信as1区域加上100:3的社团属性
[r10-route-policy]route-policy com permit node 20 建立空表
[r10-route-policy]if-match ip-prefix c2
[r10-route-policy]apply community 200:3 给联通as2区域加上200:3的社团属性
[r10-route-policy]route-policy com permit node 30 建立空表
[r10]bgp 3
[r10-bgp]peer 10.0.10.1 route-policy com export 在bgp中对邻居在接口出向上进行调用
pc1-4去向pc56的路由策略
根据实验要求 PC 1 3 5 属于电信的路由,通信时必须使用电信AS 1 PC 2 4 6 属于联通的路由,通信时必须使用联通的 AS 2 在r11 修改local-preference 来干涉选路
[r11]ip community-filter advanced com1 permit 100:.*
[r11]ip community-filter advanced com2 permit 200:.* 在r11上接收电信联通的流量
[r11]route-policy com1 permit node 10
[r11-route-policy]if-match community-filter com1 在r11上抓取电信的流量
[r11-route-policy]apply local-preference 105 修改电信流量的本地优先级
[r11]route-policy com1 permit node 20
[r11]bgp 4
[r11-bgp]peer 10.0.11.1 route-policy com1 import 在bgp中对邻居在接口入向上进行调用
[r11]route-policy com2 permit node 10
[r11-route-policy]if-match community-filter com2 在r11上抓取联通的流量
[r11-route-policy]apply local-preference 110 修改联通流量的本地优先级
[r11]route-policy com2 permit node 20
[r11]bgp 4
[r11-bgp]peer 10.0.12.1 route-policy com2 import 在bgp中对邻居在接口入向上进行调用
进行修改完成后我们再次查看bgp路由表来观察是否出错

pc56去向pc1-4 的路由策略
[r11]ip ip-prefix c1 permit 10.0.5.0 24
[r11]ip ip-prefix c2 permit 10.0.6.0 24 抓取pc5、pc6的流量
[r11]route-policy com3 permit node 10
[r11-route-policy]if-match ip-prefix c1 抓取电信pc5 的流量
[r11-route-policy]apply community 100:4 给电信pc5的流量加上100:4的社团属性
[r11-route-policy]route-policy com3 permit node 20 建立空表
[r11-route-policy]if-match ip-prefix c2
[r11-route-policy]route-policy com3 permit node 20 抓取电信pc5 的流量
[r11-route-policy]apply community 200:4 给联通pc6的流量加上200:4的社团属性
[r11-route-policy]route-policy com3 permit node 30 建立空表
[r11]bgp 4
[r11-bgp]peer 10.0.11.1 route-policy com3 export
[r11-bgp]peer 10.0.12.1 route-policy com3 export 在bgp中对邻居进行路由策略的调用
[r9]ip community-filter advanced hcia permit 100:.* 允许电信的流量通信
[r9]route-policy hcia permit node 10
[r9-route-policy]if-match community-filter hcia 抓取电信的流量
[r9-route-policy]apply local-preference 200 修改本地优先级
[r9]route-policy hcia permit node 20 建立空表
[r9]bgp 3
[r9-bgp]peer 10.0.19.1 route-policy hcia import 在bgp中对邻居进行路由策略的调用
[r10]ip community-filter advanced hcia permit 200.* 允许联通的流量通信
[r10]route-policy hcia permit node 10
[r10-route-policy]if-match community-filter hcia 抓取联通的流量
[r10-route-policy]apply local-preference 200 修改本地优先级
[r10]route-policy hcia permit node 20 建立空表
[r10]bgp 3
[r10-bgp]peer 10.0.10.1 route-policy hcia import 在bgp中对邻居进行路由策略的调用
在配置完上述的路由策略之后我们可以查看r9的路由表

可以发现电信和联通的流量分别从as1as2通信
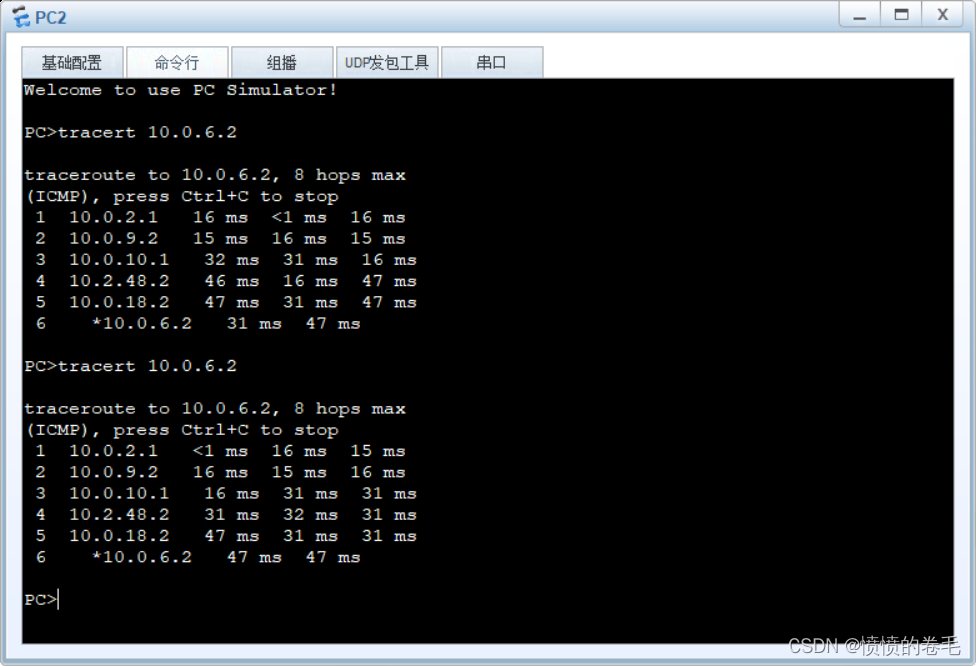
我们可以在pc端来测试
电信


联通

完成上述实验要求电信流量走电信联通流量走联通后我们开始进行下一个实验要求R1-R9之间链路断开,电信的路由依然通过电信 AS 1 通信
因为as2与as1内传输流量时会出现ebgp优于ibgp的情况导致电信的流量不去电信as1区域所以我们需要进行如下路由策略
[r2]ip community-filter advanced hcie permit 100:.*
[r4]ip community-filter advanced hcie permit 100:.*
[r6]ip community-filter advanced hcie permit 100:.*
[r8]ip community-filter advanced hcie permit 100:.* 在r2,r4,r6,r8上进行对电信流量的抓取
[r2]route-policy hcie permit node 10
[r2-route-policy]if-match community-filter hcie
[r2-route-policy]apply preferred-value 9 修改电信流量的优先级
[r2]route-policy hcie permit node 20 建立空表
[r4]route-policy hcie permit node 10
[r4-route-policy] if-match community-filter hcie
[r4-route-policy] apply preferred-value 9 修改电信流量的优先级
[r4-route-policy]route-policy hcie permit node 20 建立空表
[r6]route-policy hcie permit node 10
[r6-route-policy] if-match community-filter hcie
[r6-route-policy] apply preferred-value 9 修改电信流量的优先级
[r6-route-policy]route-policy hcie permit node 20 建立空表
[r8]route-policy hcie permit node 10
[r8-route-policy] if-match community-filter hcie
[r8-route-policy] apply preferred-value 9 修改电信流量的优先级
[r8-route-policy]route-policy hcie permit node 20 建立空表
在各个路由器上进行路由策略的调用
[r2]bgp 2
[r2-bgp]peer 10.2.12.1 route-policy hcie import
[r4]bgp 2
[r4-bgp]peer 10.2.34.1 route-policy hcie import
[r6]bgp 2
[r6-bgp]peer 10.2.56.1 route-policy hcie import
[r8]bgp 2
[r8-bgp]peer 10.2.78.1 route-policy hcie import
这个时候我们查看路由表发现流量到r5 走的路是10.0.121

我们断开链路查看流量走向发现依然走的是电信

我们在r4上传递路由时增加As-path
[r4]route-policy as permit node 10
[r4-route-policy]if-match community-filter hcie 抓取电信流量
[r4-route-policy]apply as-path 3 3 3 additive 增加aspath
[r4]route-policy as permit node 20 建立空表
[r4]bgp 2
[r4-bgp]peer r4 route-policy as export 在bgp中对邻居进行调用
再次查看我们发现修改后的路由

进行测试

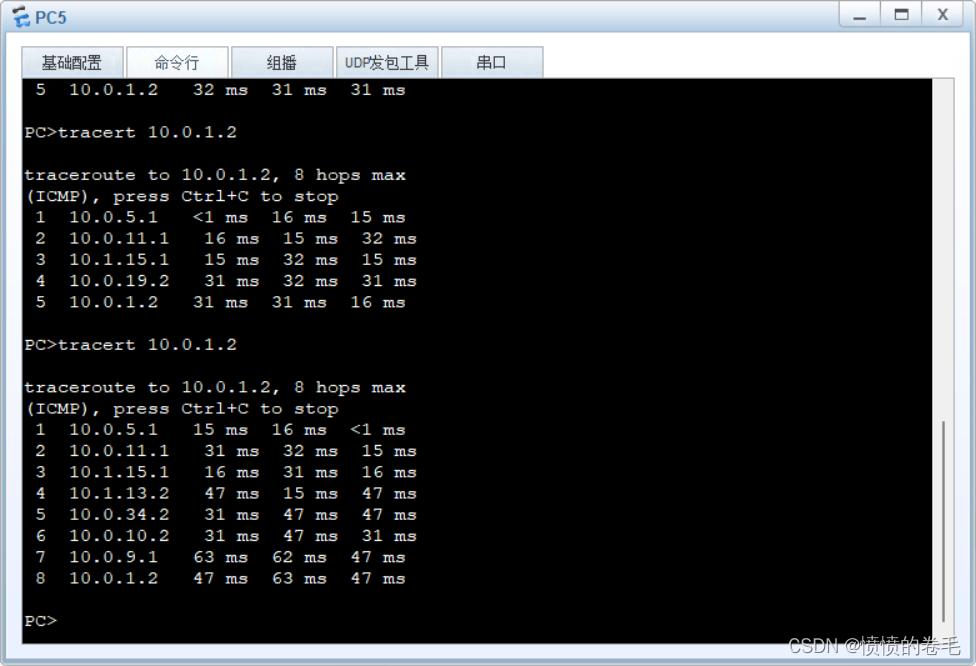
至此上述实验要求全部完成实验结束!
边栏推荐
- AtCoder初学者比赛077 D -小多
- Proprietary cloud ABC Stack, the real strength!
- 【jstack、jps命令使用】排查死锁
- 如何培养ui设计师的设计思维?
- 把相亲角搬到海外,不愧是咱爸妈
- jenkins数据迁移和备份
- Deploy the project halfway through the follow-up
- LeetCode·每日一题·640.求解方程·模拟构造
- 【黑马早报】雷军称低谷期曾想转行开酒吧;拜登正式签署芯片法案;软银二季度巨亏230亿美元;北京市消协约谈每日优鲜...
- 基于PLECS的离网(孤岛)并联逆变器的Droop Control下垂控制仿真
猜你喜欢

Solve the idea that unit tests cannot use Scanner

CURRENT_TIMESTAMP(6) 函数是否存在问题?

2022 Recruitment Notice for Academician Zhao Guoping Group of Shenzhen Institute of Advanced Technology, Chinese Academy of Sciences

神经网络可视化有3D版本了,美到沦陷!(已开源)

Polygon zkEVM工具——PIL和CIRCOM

LT8911EXB MIPI CSI/DSI to EDP signal conversion

G1和CMS的三色标记法及漏标问题

多线程下自旋锁设计基本思想

Custom filters and interceptors implement ThreadLocal thread closure

浙大、阿里提出DictBERT,字典描述知识增强的预训练语言模型
随机推荐
shell:常用小工具(sort、uniq、tr、cut)
Mysql—— 内连接、左连接、右连接以及全连接查询
神经网络学习-正则化
Behind IDC's No. 1 position, what kind of "video cloud" is Alibaba Cloud building?
48MySQL数据库基础
郭晶晶家的象棋私教,好家伙是个机器人
【jstack、jps命令使用】排查死锁
A detailed explanation of implementation api embed
rpn:def concat_box_prediction_layers
机器学习实战(2)——端到端的机器学习项目
漏洞管理计划的未来趋势
娄底干细胞制备实验室建设须知要求
Loudi Sewage Treatment Plant Laboratory Construction Management
在web页面播放rtsp流视频(webrtc)
解决 idea 单元测试不能使用Scanner
什么是云流化?
娄底农产品检验实验室建设指南盘点
IM即时通讯开发WebSocket从入门到精通
Detailed explanation of es6-promise object
Digicert EV证书签名后出现“证书对于请求用法无效”的解决方案