当前位置:网站首页>ESP32_GPIO输入、输出和中断
ESP32_GPIO输入、输出和中断
2022-04-22 02:56:00 【流年_cth】
目录
一、GPIO输出
1.方式一:基本方式
编程逻辑:
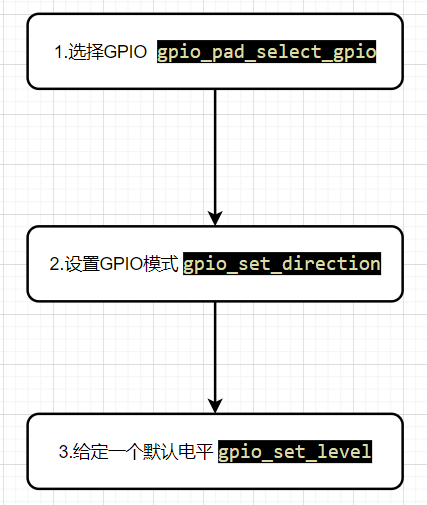
以初始化LED为例,代码如下:
void LED_GPIO_Init(void)
{
    gpio_pad_select_gpio(GPIO_LED);                 // 选择GPIO口
    gpio_set_direction(GPIO_LED, GPIO_MODE_OUTPUT); // GPIO作为输出
    gpio_set_level(GPIO_LED, 0);                    // 默认低电平
}2.方式二:配置 gpio_config_t 结构体方式
gpio_config_t结构体:
typedef struct {
    uint64_t pin_bit_mask;          /*!< GPIO pin: set with bit mask, each bit maps to a GPIO */
    gpio_mode_t mode;               /*!< GPIO mode: set input/output mode                     */
    gpio_pullup_t pull_up_en;       /*!< GPIO pull-up                                         */
    gpio_pulldown_t pull_down_en;   /*!< GPIO pull-down                                       */
    gpio_int_type_t intr_type;      /*!< GPIO interrupt type                                  */
} gpio_config_t;
以初始化LED为例,代码如下:
void LED_GPIO_Init(void)
{
    gpio_config_t io_config;
    io_config.mode = GPIO_MODE_OUTPUT;               //输入模式
    io_config.pin_bit_mask = (1ull << 15);           //引脚15
    io_config.pull_down_en = GPIO_PULLDOWN_DISABLE; //下拉失能
    io_config.pull_up_en = GPIO_PULLUP_DISABLE;      //上拉失能
    io_config.intr_type = GPIO_INTR_DISABLE;        //中断失能
    gpio_config(&io_config);
    gpio_set_level(GPIO_LED, 1); // 高电平
}
3.测试代码:
LED每隔一秒闪烁:
方式一:前后台方式(不使用操作系统)
#include <stdio.h>
#include "sdkconfig.h"
#include "freertos/FreeRTOS.h"
#include "freertos/task.h"
#include "esp_system.h"
#include "driver/gpio.h"
#include "esp_spi_flash.h"
#include "freertos/queue.h"


#define GPIO_LED  GPIO_NUM_2

//led初始化
void LED_GPIO_Init(void)
{
    gpio_pad_select_gpio(GPIO_LED);                 // 选择GPIO口
    gpio_set_direction(GPIO_LED, GPIO_MODE_OUTPUT); // GPIO作为输出
    gpio_set_level(GPIO_LED, 0);                    // 默认低电平
}

//主函数
int app_main()
{
    LED_GPIO_Init();
    while(1)
    {
       gpio_set_level(GPIO_LED,1);//开灯
       vTaskDelay(1000/portTICK_PERIOD_MS);//延时一秒
       gpio_set_level(GPIO_LED,0);//关灯
       vTaskDelay(1000/portTICK_PERIOD_MS);//延时一秒
    }

}
方式二:使用FreeRTOS操作系统
#include <stdio.h>
#include "sdkconfig.h"
#include "freertos/FreeRTOS.h"
#include "freertos/task.h"
#include "esp_system.h"
#include "driver/gpio.h"
#include "esp_spi_flash.h"
#include "freertos/queue.h"


#define GPIO_LED GPIO_NUM_2

// LED任务函数
void led_task(void *pvParam)
{
    while (1)
    {

        gpio_set_level(GPIO_LED, 1); // 高电平
        printf("LED OFF !\n");
        vTaskDelay(50 / portTICK_PERIOD_MS); //延时
        gpio_set_level(GPIO_LED, 0);          //低电平
        printf("LED ON !\n");
        vTaskDelay(50 / portTICK_PERIOD_MS); //延时
    }
}

//LED初始化
void LED_GPIO_Init(void)
{
    gpio_pad_select_gpio(GPIO_LED);                 // 选择GPIO口
    gpio_set_direction(GPIO_LED, GPIO_MODE_OUTPUT); // GPIO作为输出
    gpio_set_level(GPIO_LED, 0);                    // 默认低电平
}

void app_main(void)
{
    LED_GPIO_Init();
    xTaskCreate(led_task,"ledtask",1024,NULL,4,NULL);
}
4.实验现象:
二、GPIO输入
1.方式一:基本方式
编程逻辑:

以初始化按键为例:
void KEY_GPIO_Init(void)
{
    gpio_pad_select_gpio(GPIO_KEY);//选择keyIO口
    gpio_set_direction(GPIO_KEY, GPIO_MODE_INPUT);//将该口设置为输入模式

}2.方式二:配置 gpio_config_t 结构体方式
以初始化按键为例:
void KEY_GPIO_Init(void)
{
    gpio_config_t io_config;
    io_config.mode = GPIO_MODE_INPUT;               //输入模式
    io_config.pin_bit_mask = (1ull << 0);           //key引脚
    io_config.pull_down_en = GPIO_PULLDOWN_DISABLE; //下拉失能
    io_config.pull_up_en = GPIO_PULLUP_ENABLE;      //上拉使能
    io_config.intr_type = GPIO_INTR_NEGEDGE;        //下降沿触发中断
    gpio_config(&io_config);
}
3.测试代码:
以按键点灯为例:
#include <stdio.h>
#include "sdkconfig.h"
#include "freertos/FreeRTOS.h"
#include "freertos/task.h"
#include "esp_system.h"
#include "driver/gpio.h"
#include "esp_spi_flash.h"

//----------宏定义-----------
#define GPIO_LED GPIO_NUM_2
#define GPIO_KEY GPIO_NUM_0

// LED初始化
void LED_GPIO_Init(void)
{
    gpio_pad_select_gpio(GPIO_LED);                 // 选择GPIO口
    gpio_set_direction(GPIO_LED, GPIO_MODE_OUTPUT); // GPIO作为输出
    gpio_set_level(GPIO_LED, 0);                    // 默认低电平
}

//KEY初始化
void KEY_GPIO_Init(void)
{
    gpio_pad_select_gpio(GPIO_KEY);
    gpio_set_direction(GPIO_KEY, GPIO_MODE_INPUT);

}

//按键扫描
uint8_t key_scan(void)
{
    if(gpio_get_level(GPIO_KEY)==0)
    {
        while(gpio_get_level(GPIO_KEY)==0);
        return 1;
    }
    return 0;
}

//主函数
void app_main(void)
{
    uint8_t key_value;
    uint8_t ledflag=0;
    LED_GPIO_Init();
    KEY_GPIO_Init();
    while (1)
    {
        key_value = key_scan();
        if (key_value == 1 && ledflag == 0)
        {
            ledflag = 1;
            gpio_set_level(GPIO_LED,0);
        }
        else if (key_value == 1 && ledflag == 1)
        {
            ledflag = 0;
            gpio_set_level(GPIO_LED,1);
        }
        vTaskDelay(10/portTICK_PERIOD_MS);//防止看门狗复位
    }
}
三、GPIO中断
编程逻辑:

示例:
//key中断初始化
void KEY_Intr_Init(void)
{
    gpio_config_t io_config;
    io_config.mode = GPIO_MODE_INPUT;               //输入模式
    io_config.pin_bit_mask = (1ull << 0);           // key引脚
    io_config.pull_down_en = GPIO_PULLDOWN_DISABLE; //下拉失能
    io_config.pull_up_en = GPIO_PULLUP_ENABLE;      //上拉使能
    io_config.intr_type = GPIO_INTR_NEGEDGE;        //下降沿触发中断
    gpio_config(&io_config);

    gpio_install_isr_service(1); //注册中断服务

    gpio_isr_handler_add(GPIO_KEY, key_isr_handler, (void *)NULL); //设置中断回调函数
}
测试代码:
以按键中断点灯为例:
注意:中断回调函数内不能有任何延时操作,包括printf也不能有,如果要打印信息可以使用 esp_rom_printf(const char *fmt, ...)函数.
#include <stdio.h>
#include "sdkconfig.h"
#include "freertos/FreeRTOS.h"
#include "freertos/task.h"
#include "esp_system.h"
#include "driver/gpio.h"
#include "esp_spi_flash.h"

//----------宏定义-----------
#define GPIO_LED GPIO_NUM_2
#define GPIO_KEY GPIO_NUM_0

char LED_FLAG = 0;

// led初始化
void LED_GPIO_Init(void)
{
    gpio_pad_select_gpio(GPIO_LED);                 // 选择GPIO口
    gpio_set_direction(GPIO_LED, GPIO_MODE_OUTPUT); // GPIO作为输出
    gpio_set_level(GPIO_LED, 0);                    // 默认低电平
}

//中断处理函数
static void IRAM_ATTR key_isr_handler(void *arg)
{
    if (LED_FLAG == 0)
    {
        LED_FLAG = 1;
        gpio_set_level(GPIO_LED, 0);
        esp_rom_printf("LED is ON!\n");
    }
    else
    {
        LED_FLAG = 0;
        gpio_set_level(GPIO_LED, 1);
        esp_rom_printf("LED is OFF!\n");
    }}

//key中断初始化
void KEY_Intr_Init(void)
{
    gpio_config_t io_config;
    io_config.mode = GPIO_MODE_INPUT;               //输入模式
    io_config.pin_bit_mask = (1ull << 0);           // key引脚
    io_config.pull_down_en = GPIO_PULLDOWN_DISABLE; //下拉失能
    io_config.pull_up_en = GPIO_PULLUP_ENABLE;      //上拉使能
    io_config.intr_type = GPIO_INTR_NEGEDGE;        //下降沿触发中断
    gpio_config(&io_config);

    gpio_install_isr_service(1); //注册中断服务

    gpio_isr_handler_add(GPIO_KEY, key_isr_handler, (void *)NULL); //设置中断回调函数
}

void app_main(void)
{
    LED_GPIO_Init();
    KEY_Intr_Init();
    while (1)
    {
        vTaskDelay(1000 / portTICK_PERIOD_MS);
    }
}
运行结果:

总结:
GPIO的配置两方式:基本方式、配置结构体方式。
GPIO中断:1.配置IO口为中断 2.注册中断服务 3.设置中断回调函数
版权声明
本文为[流年_cth]所创,转载请带上原文链接,感谢
https://blog.csdn.net/weixin_46364710/article/details/124304675
边栏推荐
- MySQL execution process
- Favorite tips link
- Interval merging board
- 【※ LeetCode 剑指 Offer 13. 机器人的运动范围(简单)】
- Web网站访问响应慢可能的原因
- The sequence table implements the operation of the stack
- Decomposing temporary variables in code refactoring
- Or1k startup file analysis
- DOS 命令行基本命令及实践
- After four years of outsourcing, it was abandoned
猜你喜欢

(advanced usage) C language string function

Performance test and comparison of oceanbase and MariaDB using dbt-3
网络和多媒体知识(3)

How did opensea become the most popular NFT market?

Authentication and access control
![[Xiao Yang takes you to play with C language] circular structure (detailed explanation)](/img/78/407cfec7557c42bc66e55360436605.png)
[Xiao Yang takes you to play with C language] circular structure (detailed explanation)

After four years of outsourcing, it was abandoned

Golang dependency injection wire. When executing the wire command, an error is reported: bash: Wire: command not found

C指针和数组深度汇总

Will you "sell" SQL?
随机推荐
Decomposing temporary variables in code refactoring
【经验】tf1.x迁移到tf2.x教程
Creation of circular linked list and controllable output
Five cool login pages that can be used
[TIANTI competition] l2-040 Zhezhi game (25 points (s)) (simulation)
Why does MySQL index use B + tree instead of jump table?
UE4 obtains the complete map path according to the map name
【Laravel系列4.7】连接redis以及缓存应用
(advanced usage) C language string function
The traffic lights made by enumeration have an interface
How to restrict the unity of code
好友没看到怎么加,先记下来。
刷题计划——动态规划dynamic programming(二)
How long can we rely on play to earn economic profits?
Code refactoring removes the assignment of parameters
How to batch modify file names and photo file names
Problem brushing plan -- dynamic programming (I)
用普通Modem制作拨号应答,原来写在大富翁,汇总过来
收藏的技巧链接
Golang dependency injection wire. When executing the wire command, an error is reported: bash: Wire: command not found