当前位置:网站首页>使用百度智能云人脸检测接口实现照片质量检测
使用百度智能云人脸检测接口实现照片质量检测
2022-04-23 05:58:00 【杜小瑞】
首先创建百度账号,登录百度AI开放平台,进入开发者中心,进入控制台,选择产品服务中的人脸识别。然后创建一个应用。

创建成功得到API Key和Secret Key

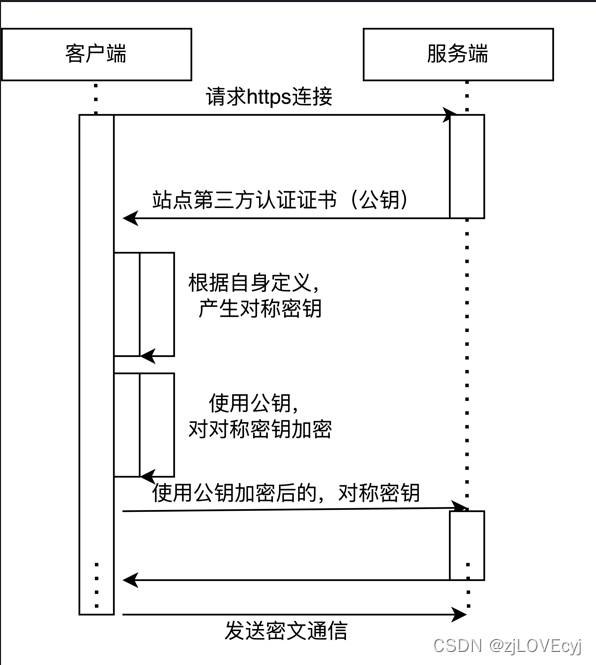
接下来使用刚刚得到的API Key和Secret Key获取access_token。
向授权服务地址https://aip.baidubce.com/oauth/2.0/token发送请求(推荐使用POST),并在URL中带上以下参数:
- grant_type: 必须参数,固定为client_credentials;
- client_id: 必须参数,应用的API Key;
- client_secret: 必须参数,应用的Secret Key;
使用postman模拟请求得到access_token,如下:

测试接口
人脸检测接口
能力介绍
- 人脸检测:检测图片中的人脸并标记出位置信息。
- 人脸关键点:展示人脸的核心关键点信息,及150个关键点信息。
- 人脸属性值:展示人脸属性信息,如年龄、性别等。
- 人脸质量信息:返回人脸各部分的遮挡、光照、模糊、完整度、置信度等信息。
调用接口
在postman中调用接口,url中添加参数access_token,值为自己刚刚申请的token。设置Header中Content-Type参数为application/json。然后在body中添加参数image和image_type,分别表示图片信息和图片类型,如下图所示:

这里由于没有购买所有返回错误信息。
python调用
领取了百度的免费资源后再来试一试。
使用python调用人脸检测接口实现人脸照片质量的检测。

使用接口文档中前三项指标来对照片质量做一个评价,满足所有以上三个条件的就认为照片是合格的。
接下来使用python来实现:
# encoding:utf-8

import requests
import base64
import os
import json

''' 人脸检测与属性分析 '''
# 获取access_token
# client_id 为官网获取的AK, client_secret 为官网获取的SK
# host = 'https://aip.baidubce.com/oauth/2.0/token?grant_type=client_credentials&client_id=【】&client_secret=【】'
# response = requests.get(host)
# if response:
# print(response.json())

# api地址:https://cloud.baidu.com/doc/FACE/s/yk37c1u4t?_=1628489078955

""" occlusion: left_eye : 0.6, #左眼被遮挡的阈值 right_eye : 0.6, #右眼被遮挡的阈值 nose : 0.7, #鼻子被遮挡的阈值 mouth : 0.7, #嘴巴被遮挡的阈值 left_cheek : 0.8, #左脸颊被遮挡的阈值 right_cheek : 0.8, #右脸颊被遮挡的阈值 chin_contour : 0.6, #下巴被遮挡阈值 blur:小于0.7 illumination:大于40 """

# 检查一张图片是否合格
def is_ok(img):
    request_url = "https://aip.baidubce.com/rest/2.0/face/v3/detect"

    params = {
    "image":img, "image_type":"BASE64", "face_field":"faceshape,facetype,age,quality,angle"}
    access_token = '你自己从官网获取的access_token'
    request_url = request_url + "?access_token=" + access_token
    headers = {
    'content-type': 'application/json'}
    response = requests.post(request_url, data=params, headers=headers)
    # 因为免费领取的资源有吞吐量限制,所以如果超过吞吐量会报错,这里输出一下错误。当然也可以在让程序每次运行都休眠1秒,这样就不会超过qps了。
    if response.json()['error_code'] != 0:
        print(response.json()['error_msg'])
        return False
    if response:
        res = response.json()['result']
    else:
        print('无响应')

    res = res['face_list'][0]
    occlusion = res['quality']['occlusion']
    left_eye = occlusion['left_eye']
    right_eye = occlusion['right_eye']
    nose = occlusion['nose']
    mouth = occlusion['mouth']
    left_cheek = occlusion['left_cheek']
    right_cheek = occlusion['right_cheek']
    chin_contour = occlusion['chin_contour']
    blur = res['quality']['blur']
    illumination = res['quality']['illumination']


    if left_eye < 0.6 and right_eye < 0.6 and nose < 0.7 and mouth < 0.7 and left_cheek < 0.8 and right_cheek < 0.8 and chin_contour < 0.6 and blur < 0.7 and illumination > 40:
        return True
    else:
        return False

if __name__=='__main__':

    path = '存放照片的文件夹路径'
    files = os.listdir(path)
    for file in files:
        f = open(path + '/' + file, 'rb')
        img = base64.b64encode(f.read())
        if is_ok(img):
            print('合格')
        else:
            print('不合格')
从网上下载一些图片来进行测试,如下图的九张图片:

运行了两次,看一下结果:

版权声明
本文为[杜小瑞]所创,转载请带上原文链接,感谢
https://blog.csdn.net/DXRfighting/article/details/119568877
边栏推荐
猜你喜欢


随机推荐
自用学习笔记-connectingString配置
批量修改/批量更新数据库某一个字段的值
China creates vast research infrastructure to support ambitious climate goals
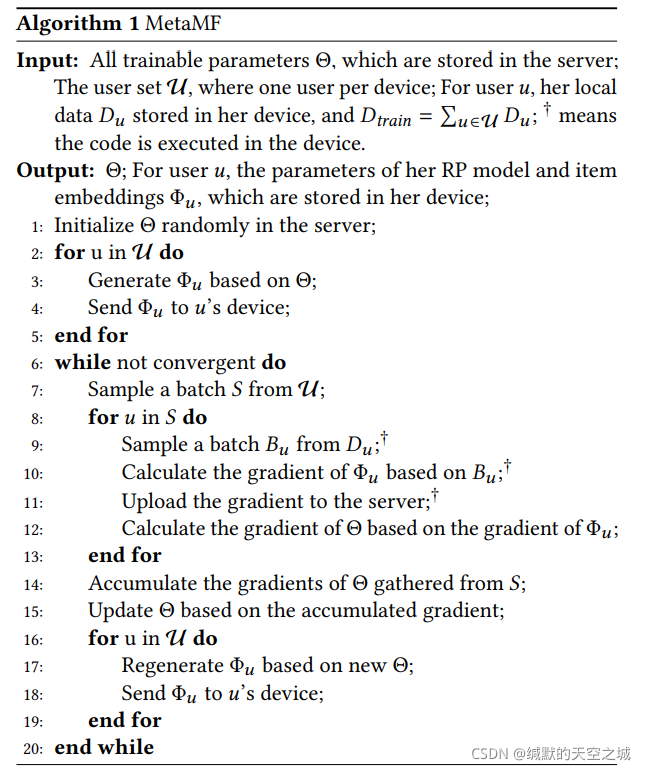
【代码解析(3)】Communication-Efficient Learning of Deep Networks from Decentralized Data
自用学习笔记-连接式与非连接式访问数据库
.Net Core 下使用 Quartz —— 【7】作业和触发器之简单触发器
模仿扇贝短文阅读页面
数据可视化百度地图进一步优化
Add serial number to El table
深入理解控制反转和依赖注入
端口占用1
freeCodeCamp----budget & category 练习
JQ序列化后PHP后台解析
sql中的 IF 条件语句的用法
Typescript (top)
Centos8 builds php8 0.3 operating environment
JS正则匹配先行断言和后行断言
1-2 JSX语法规则
1-2 NodeJS的特点
New formdata() when importing files