当前位置:网站首页>SSM框架系列——数据源配置day2-1
SSM框架系列——数据源配置day2-1
2022-04-23 12:39:00 【简明编程】
SSM框架系列——数据源配置
数据源
数据源(连接池)作用
数据源(连接池)是提高程序性能而出现的
事先实例化数据源,初始化部分连接资源
使用连接资源时从数据源中获取
使用完毕后将连接资源归还给数据源
开发步骤
- 导入数据源的坐标和数据库驱动坐标
- 创建数据源对象
- 设置数据源的基本连接数据
- 使用数据源获取连接资源和归还连接资源
示例代码(Druid)
由于现在druid是最热门的所以我就用druid,其他的也差不多,不过我基本没用过
1. 导入数据源的坐标和数据库驱动坐标
去maven中央仓库找到相应的坐标
仓库地址:https://mvnrepository.com

找到对应的版本
我mysql的版本是8.0.16

选择maven坐标复制

<!-- https://mvnrepository.com/artifact/mysql/mysql-connector-java -->
<dependency>
    <groupId>mysql</groupId>
    <artifactId>mysql-connector-java</artifactId>
    <version>8.0.16</version>
</dependency>
进入项目pom.xml文件导入并刷新maven

Druid也是一样
<!-- https://mvnrepository.com/artifact/com.alibaba/druid-spring-boot-starter -->
<dependency>
    <groupId>com.alibaba</groupId>
    <artifactId>druid-spring-boot-starter</artifactId>
    <version>1.2.9</version>
</dependency>
2. 创建数据源对象
 //创建数据源对象
DruidDataSource source = new DruidDataSource();
3. 设置数据源的基本连接数据
        source.setDriverClassName("com.mysql.cj.jdbc.Driver");
        source.setUrl("jdbc:mysql://localhost:3306/syf?useUnicode=true&characterEncoding=UTF-8&useSSL=false&serverTimezone=Asia/Shanghai&zeroDateTimeBehavior=CONVERT_TO_NULL&allowPublicKeyRetrieval=true");
        source.setUsername("root");
        source.setPassword("syf20020816");
4. 使用数据源获取连接资源和归还连接资源
 // 4. 使用数据源获取连接资源和归还连接资源
DruidPooledConnection connection = source.getConnection();
System.out.println(connection);
connection.close();
完整代码
package com.exampl.testUtil;
import com.alibaba.druid.pool.DruidDataSource;
import com.alibaba.druid.pool.DruidPooledConnection;
import org.junit.jupiter.api.Test;
import java.sql.SQLException;
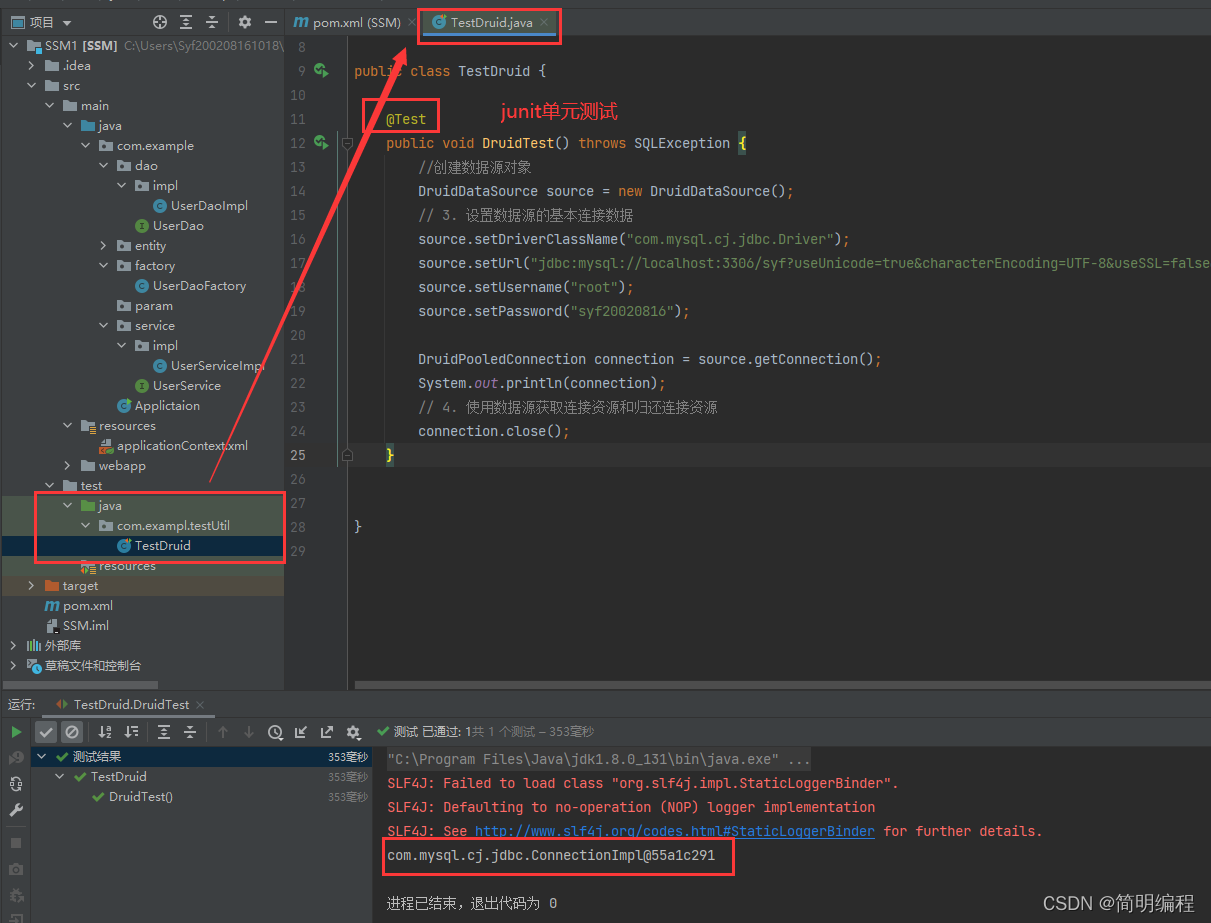
public class TestDruid {
@Test
public void DruidTest() throws SQLException {
//创建数据源对象
DruidDataSource source = new DruidDataSource();
// 3. 设置数据源的基本连接数据
source.setDriverClassName("com.mysql.cj.jdbc.Driver");
source.setUrl("jdbc:mysql://localhost:3306/syf?useUnicode=true&characterEncoding=UTF-8&useSSL=false&serverTimezone=Asia/Shanghai&zeroDateTimeBehavior=CONVERT_TO_NULL&allowPublicKeyRetrieval=true");
source.setUsername("root");
source.setPassword("syf20020816");
// 4. 使用数据源获取连接资源和归还连接资源
DruidPooledConnection connection = source.getConnection();
System.out.println(connection);
connection.close();
}
}
结果以及说明截图
配置文件抽取(jdbcDruid.properties)
1.在test.resources下新建资源包


2.抽取配置
driverClassName=com.mysql.cj.jdbc.Driver
url:jdbc:mysql://localhost:3306/syf?useUnicode=true&characterEncoding=UTF-8&useSSL=false&serverTimezone=Asia/Shanghai&zeroDateTimeBehavior=CONVERT_TO_NULL&allowPublicKeyRetrieval=true
username:root
password:syf20020816

3.使用配置文件进行数据库连接
package com.exampl.testUtil;

import com.alibaba.druid.pool.DruidDataSourceFactory;
import com.alibaba.druid.pool.DruidPooledConnection;
import org.junit.jupiter.api.Test;

import javax.sql.DataSource;
import java.io.IOException;
import java.io.InputStream;
import java.sql.Connection;
import java.util.Properties;
import java.util.ResourceBundle;

public class TestDruidPro {


    @Test
    public void testDruidPro() throws Exception {

        //读取配置文件
        Properties properties = new Properties();
        InputStream resourceAsStream = TestDruidPro.class.getClassLoader().getResourceAsStream("jdbcDruid.properties");
        properties.load(resourceAsStream);
        System.out.println(resourceAsStream);
        //连接
        DataSource dataSource = DruidDataSourceFactory.createDataSource(properties);
        Connection connection = dataSource.getConnection();
        System.out.println(connection);

    }
}
结果截图

Spring配置数据源
使用set方法注入
1.导入依赖
这里是我所有的依赖,mysql,druid,junit,spring你们自己找没有的加进去就行
<dependencies>
        <!-- https://mvnrepository.com/artifact/mysql/mysql-connector-java -->
        <dependency>
            <groupId>mysql</groupId>
            <artifactId>mysql-connector-java</artifactId>
            <version>8.0.16</version>
        </dependency>

        <!-- https://mvnrepository.com/artifact/com.alibaba/druid-spring-boot-starter -->
        <dependency>
            <groupId>com.alibaba</groupId>
            <artifactId>druid-spring-boot-starter</artifactId>
            <version>1.2.9</version>
        </dependency>

        <dependency>
            <groupId>org.springframework</groupId>
            <artifactId>spring-context</artifactId>
            <version>5.2.9.RELEASE</version>
        </dependency>

        <dependency>
            <groupId>org.junit.jupiter</groupId>
            <artifactId>junit-jupiter-api</artifactId>
            <version>${
    junit.version}</version>
            <scope>test</scope>
        </dependency>
        <dependency>
            <groupId>org.junit.jupiter</groupId>
            <artifactId>junit-jupiter-engine</artifactId>
            <version>${
    junit.version}</version>
            <scope>test</scope>
        </dependency>
    </dependencies>
2.编写applicationContext.xml


注意点
在xml中&符要使用&进行代替
<property name="url" value="jdbc:mysql://localhost:3306/syf?useUnicode=true&characterEncoding=UTF-8&useSSL=false&serverTimezone=Asia/Shanghai&zeroDateTimeBehavior=CONVERT_TO_NULL&allowPublicKeyRetrieval=true"></property>
完整配置
<?xml version="1.0" encoding="UTF-8"?>
<beans xmlns="http://www.springframework.org/schema/beans"
xmlns:xsi="http://www.w3.org/2001/XMLSchema-instance"
xsi:schemaLocation="http://www.springframework.org/schema/beans http://www.springframework.org/schema/beans/spring-beans.xsd">
<bean id="dataSource" class="com.alibaba.druid.pool.DruidDataSource">
<property name="driverClassName" value="com.mysql.cj.jdbc.Driver"></property>
<property name="username" value="root"></property>
<property name="password" value="syf20020816"></property>
<property name="url" value="jdbc:mysql://localhost:3306/syf?useUnicode=true&characterEncoding=UTF-8&useSSL=false&serverTimezone=Asia/Shanghai&zeroDateTimeBehavior=CONVERT_TO_NULL&allowPublicKeyRetrieval=true"></property>
</bean>
</beans>
3.测试
package com.exampl.testUtil;

import com.alibaba.druid.pool.DruidDataSource;
import com.alibaba.druid.pool.DruidPooledConnection;
import org.junit.jupiter.api.Test;
import org.springframework.context.support.ClassPathXmlApplicationContext;

import javax.sql.DataSource;
import java.sql.Connection;
import java.sql.SQLException;

public class TestDruid {


    @Test
    public void springDruid() throws SQLException {

        //加载spring配置文件
        ClassPathXmlApplicationContext app = new ClassPathXmlApplicationContext("applicationContext.xml");
        DataSource dataSource = (DataSource) app.getBean("dataSource");
        Connection connection = dataSource.getConnection();
        System.out.println(connection);
        connection.close();
    }


}
结果

优化Spring配置数据源
我们优化方案就是将jdbc配置文件和spring的配置文件分离,形成独立的两个域,再把域进行调用即可
1.引入命名空间和地址
<?xml version="1.0" encoding="UTF-8"?>
<beans xmlns="http://www.springframework.org/schema/beans"
       xmlns:xsi="http://www.w3.org/2001/XMLSchema-instance"
       xmlns:context="http://www.springframework.org/schema/context"
       xsi:schemaLocation="http://www.springframework.org/schema/beans http://www.springframework.org/schema/beans/spring-beans.xsd
       http://www.springframework.org/schema/context http://www.springframework.org/schema/context/spring-context.xsd">

2.加载外部properties
<context:property-placeholder location="classpath:jdbcDruid.properties"></context:property-placeholder>
3.改写< property >
<bean id="dataSource" class="com.alibaba.druid.pool.DruidDataSource">
        <property name="driverClassName" value="${driverClassName}"></property>
        <property name="username" value="${username}"></property>
        <property name="password" value="${password}"></property>
        <property name="url"
                  value="${url}"></property>
    </bean>
完整applicationContext.xml
<?xml version="1.0" encoding="UTF-8"?>
<beans xmlns="http://www.springframework.org/schema/beans"
       xmlns:xsi="http://www.w3.org/2001/XMLSchema-instance"
       xmlns:context="http://www.springframework.org/schema/context"
       xsi:schemaLocation="http://www.springframework.org/schema/beans http://www.springframework.org/schema/beans/spring-beans.xsd
       http://www.springframework.org/schema/context http://www.springframework.org/schema/context/spring-context.xsd">
    <context:property-placeholder location="classpath:jdbcDruid.properties"></context:property-placeholder>
    <bean id="dataSource" class="com.alibaba.druid.pool.DruidDataSource">
        <property name="driverClassName" value="${driverClassName}"></property>
        <property name="username" value="${username}"></property>
        <property name="password" value="${password}"></property>
        <property name="url"
                  value="${url}"></property>
    </bean>
</beans>
版权声明
本文为[简明编程]所创,转载请带上原文链接,感谢
https://blog.csdn.net/qq_51553982/article/details/124358527
边栏推荐
- Jiachen chapter Genesis "inner universe" joint Edition
- uni-app 原生APP-云打包集成极光推送(JG-JPUSH)详细教程
- 万事有你 未来可期 | ONES 2022校园招聘正式开启
- [vulnhub range] - DC2
- Flash project cross domain interception and DBM database learning [Baotou cultural and creative website development]
- Stacks and queues a
- 解决disagrees about version of symbol device_create
- How to solve the computer system card?
- 传统企业如何应对数字化转型?这些书给你答案
- Symmetric encryption, certificate encryption
猜你喜欢

实现一个盒子在父盒子中水平垂直居中的几种“姿势”
Zigbee之CC2530最小系统及寄存器配置(1)

STM32工程移植:不同型号芯片工程之间的移植:ZE到C8
![[daily question] chessboard question](/img/70/54a924d07c935965e54b96d9b07278.png)
[daily question] chessboard question
Realize several "Postures" in which a box is horizontally and vertically centered in the parent box

Introduction to kubernetes

Qt绘制图像

QT interprocess communication
Kubernets Getting started tutoriel

0基础可以考CPDA数据分析师证书吗
随机推荐
风尚云网学习-h5的input:type属性的image属性
对话PostgreSQL作者Bruce:“转行”是为了更好地前行
Trier les principales utilisations de l'Agent IP réseau
[unity note] basic lighting in l4unity
标签与路径
云原生KubeSphere部署Redis
Analysis of InnoDB execution process in MySQL
Qt双缓冲绘图
Worder font page font comparison table
梳理網絡IP代理的幾大用途
Introduction to metalama 4 Use fabric to manipulate items or namespaces
On using go language to create websocket service
Lesson 23 temporary objects
Can I take the CPDA data analyst certificate for 0 foundation
How much does software testing help reduce program bugs?
Message queuing overview
Flash project cross domain interception and DBM database learning [Baotou cultural and creative website development]
CGC: contractual graph clustering for community detection and tracking
Labels and paths
AI video cloud vs narrowband HD, who is the darling of the video era