当前位置:网站首页>MySQL Server单机部署手册
MySQL Server单机部署手册
2022-04-23 05:59:00 【Sebastien23】
MySQL Server单机部署手册
部署操作系统环境为CentOS 7,数据库版本为MySQL 5.7。
安装前环境检查
停止已有的mysql服务并清理环境(如果是全新环境,可以跳过)
# stop mysql service
systemctl status mysqld.service
systemctl stop mysqld.service


# delete mysql files
rm /var/spool/mail/mysql
rm /home/mysql
rm /mysql/data
rm /mysql/log
rm /mysql/tmp
移除系统自带的MariaDB
# remove mariadb
rpm -qa | grep mariadb
yum remove mariadb-libs -y
关闭防火墙和SELinux(关闭SELinux后需要重启操作系统)
# stop iptables
systemctl stop firewalld
systemctl disable firewalld

# disbale selinux
sed -i 's/enforcing/disabled/' /etc/sysconfig/selinux
#or modify directly selinux file with vim
setenforce 0
reboot
创建用户目录并挂载LVM
创建mysql用户和组,创建MySQL安装目录并挂载LV。
# create mysql group & user
groupadd mysql
useradd -g mysql -s /bin/bash mysql
# 按需设置mysql用户密码
#echo 'myPassword' | passwd --stdin mysql

## create mysql installation dir
mkdir /mysql
chmod 0755 /mysql

# create pv/vg/lvm
pvcreate /dev/sdc
pvs
vgcreate dbvg /dev/sdc
vgdisplay dbvg
lvcreate -L 30G -n lv_mysql dbvg
lvs

# create filesystem
mkfs.xfs /dev/dbvg/lv_mysql

# mount MySQL basedir
#mount /dev/dbvg/lv_mysql /mysql

# auto-mount on reboot
cp /etc/fstab /root/fstab.bak
echo "/dev/mapper/dbvg-lv_mysql /mysql xfs defaults 0 0" >> /etc/fstab
mount -a
df -Th
在安装目录下分别创建data、log和tmp子目录,用于存储数据、日志和临时文件。
# create data, log, tmp subdirectories
cd /mysql
mkdir data
mkdir log
mkdir tmp

# 授权给mysql用户
chmod 0755 /mysql/data
chmod 0755 /mysql/log
chmod 0755 /mysql/tmp
chown -R mysql:mysql /mysql
解压安装介质
需要提前准备好MySQL 5.7的安装介质,拷贝到安装目录并解压。
# unarchiv mysql
cp /root/mysql-advanced-5.7.16-linux-glibc2.5-x86_64.tar.gz  /mysql
tar -zxvf mysql-advanced-5.7.16-linux-glibc2.5-x86_64.tar.gz

# rename basedir
mv mysql-advanced-5.7.16-linux-glibc2.5-x86_64 mysql-5.7
将MySQL可执行文件的存放路径配置到环境变量中。
cp /etc/profile /root/profile.bak
echo "export PATH=/mysql/mysql-5.7/bin:$PATH" >> /etc/profile
source /etc/profile
配置文件my.cnf
创建MySQL配置文件
# create my.cnf
vim /etc/my.cnf
chmod 0660 /etc/my.cnf
chown mysql:mysql /etc/my.cnf
配置文件my.cnf可以参考如下配置(具体参数未作优化)
[mysqld]
symbolic-links=0
user = mysql
basedir = /mysql/mysql-5.7
datadir = /mysql/data
port = 3306
server-id = 108
core-file
log_bin = /mysql/log/mysql-bin
binlog_format = ROW
socket = /tmp/mysql.sock
log_output = FILE
character_set_server = utf8
slow_query_log_file = /mysql/log/slow.log
query_cache_type = 0
long_query_time = 5
max_connections = 1024
max_connect_errors = 1024
local_infile = 0
general_log = OFF
slow_query_log = ON
relay-log = /mysql/log/relay-log
expire_logs_days = 15
innodb_io_capacity = 500
innodb_flush_method = O_DIRECT
innodb_file_format = Barracuda
innodb_file_format_max = Barracuda
innodb_log_file_size = 1G
innodb_file_per_table = ON
innodb_lock_wait_timeout = 5
innodb_buffer_pool_size = 5G
innodb_print_all_deadlocks = ON
#innodb_additional_mem_pool_size = 32M
innodb_data_file_path = ibdata1:512M:autoextend
innodb_autoextend_increment = 64
innodb_thread_concurrency = 0
innodb_old_blocks_time = 1000
innodb_buffer_pool_instances = 8
thread_cache_size = 200
innodb_lru_scan_depth = 512
innodb_flush_neighbors = 1
innodb_checksum_algorithm = crc32
table_definition_cache = 400
innodb_buffer_pool_dump_at_shutdown = ON
innodb_buffer_pool_load_at_startup = ON
innodb_read_io_threads = 4
innodb_adaptive_flushing = ON
innodb_log_buffer_size = 8388608
innodb_purge_threads = 4
performance_schema = ON
innodb_write_io_threads = 4
skip-name-resolve = ON
skip_external_locking = ON
max_allowed_packet = 16M
table_open_cache = 400
innodb_flush_log_at_trx_commit = 1
log_bin_trust_function_creators = 1
sync_binlog = 1
slave_net_timeout = 30
relay_log_info_repository = TABLE # slave SQL thread crash safe
master_info_repository = FILE
relay_log_recovery = ON
lower_case_table_names = 1
sql_mode = NO_ENGINE_SUBSTITUTION
log_error = /mysql/log/mysqld_err.log
pid-file= mysqld.pid
tmpdir=/mysql/tmp

[mysql]
socket = /tmp/mysql.sock
注意其中basedir、datadir、log_bin、slow_query_log_file、relay-log、tmpdir的路径需要与前面的设定一致。
配置服务mysqld.service
为MySQL配置systemd系统服务
# set mysql boot scripts
vim /usr/lib/systemd/system/mysqld.service
chmod 644 mysqld.service
mysqld.service内容参考如下:
[Unit]
Description=MySQL Server
Documentation=man:mysqld(8)
Documentation=http://dev.mysql.com/doc/refman/en/using-systemd.html
After=network.target
After=syslog.target

[Install]
WantedBy=multi-user.target

[Service]
User=mysql
Group=mysql

Type=forking

# Disable service start and stop timeout logic of systemd for mysqld service.
TimeoutSec=0

# Start main service
ExecStart=/mysql/mysql-5.7/bin/mysqld --defaults-file=/etc/my.cnf --daemonize

# Use this to switch malloc implementation
EnvironmentFile=-/etc/sysconfig/mysql

# Sets open_files_limit
LimitNOFILE = 60000

#Restart=on-failure  #这里最好先注释掉这一行,否则初始化失败时会不停地自动重启服务
RestartPreventExitStatus=1

PrivateTmp=false
重载系统服务
# enable systemd for mysqld daemon-reload
systemctl daemon-reload
初始化MySQL
使用配置文件my.cnf初始化MySQL
# init mysql meta data
su - mysql
/mysql/mysql-5.7/bin/mysqld --defaults-file=/etc/my.cnf --initialize
exit

# boot mysqld
systemctl start mysqld
systemctl status mysqld
修改root用户密码
初始化时如果未指定密码,数据库root用户的临时密码会保存在日志中。利用该临时密码登录数据库,修改密码后才能正常使用。
# 修改root密码
cat /mysql/log/mysqld_err.log | grep  'temporary password'
mysqladmin -uroot -p tempPassord password newPassword
常见错误处理
错误一:使用mysqladmin命令修改密码时报错:error: 'Your password has expired. To log in you must change it using a client that supports expired passwords。
解决办法:使用mysql命令登录数据库后修改密码。
mysql -uroot -p 临时密码
alter user 'root'@'localhost' identified by 'newPassword';
select user,host from mysql.user;
show grants for 'root'@'localhost';
exit
错误二:使用mysql登录数据库时报错缺少依赖包:mysql: error while loading shared libraries: libncurses.so.5: cannot open shared object file: No such file or directory。
解决办法:安装相关依赖包,或者创建已有文件的软链接文件。
find / -name libncurses*
ll /usr/lib64 | grep libncurses
ln -s /usr/lib64/libncurses.so.6  /usr/lib64/libncurses.so.5
重启数据库服务
最后的最后,别忘了取消注释这一行”Restart=on-failure”并重载服务。
vim /usr/lib/systemd/system/mysqld.service
#取消注释Restart=on-failure

systemctl daemon-reload
systemctl restart mysqld
版权声明
本文为[Sebastien23]所创,转载请带上原文链接,感谢
https://blog.csdn.net/Sebastien23/article/details/122517919
边栏推荐
- Promise(二)
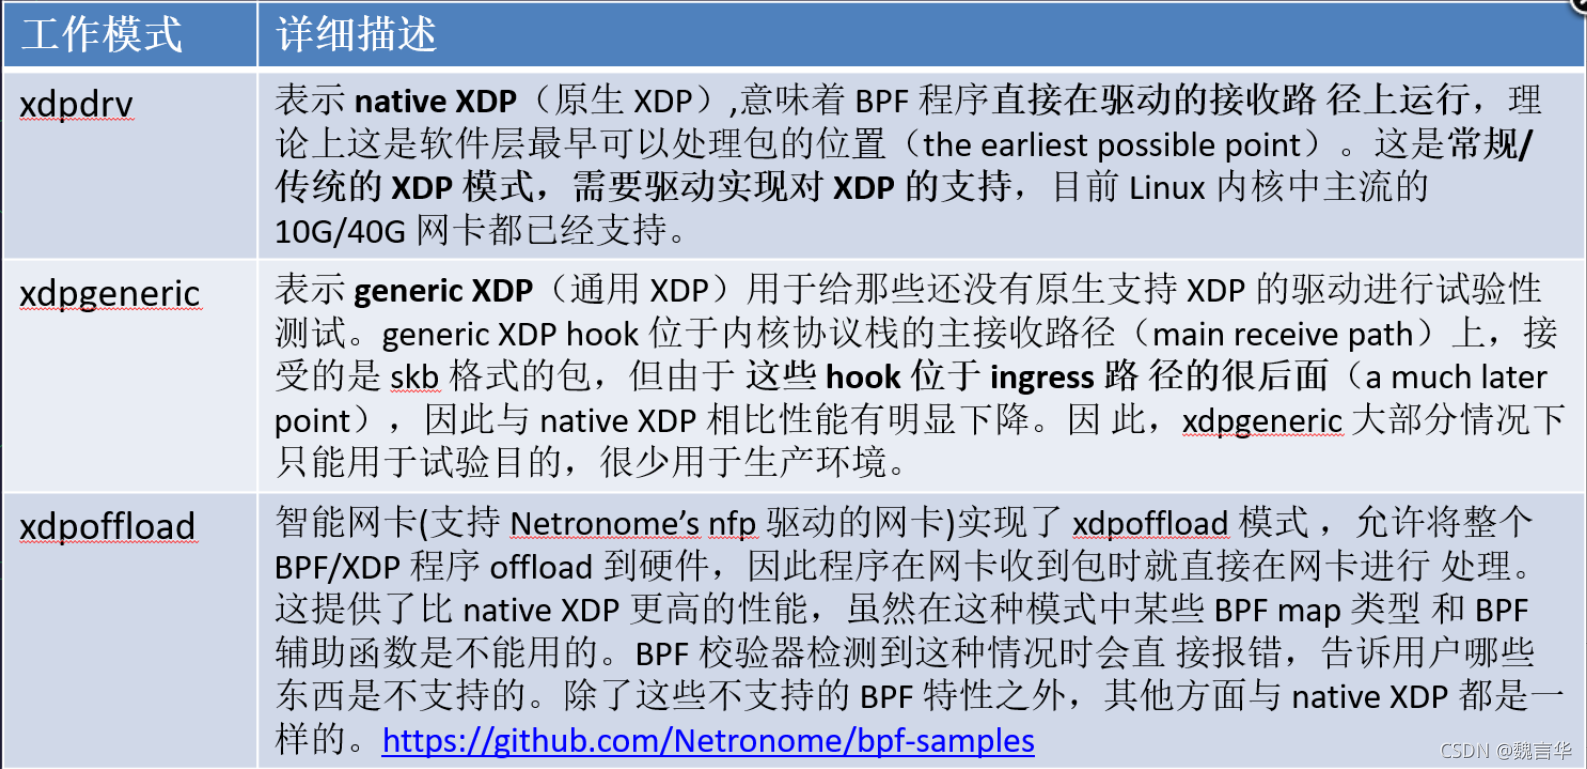
- tc ebpf 实践
- surprise库中evaluate函数弃用解决方法
- 阅读笔记:FedGNN: Federated Graph Neural Network for Privacy-Preserving Recommendation
- file_get_contents 访问 ssl 错误的两种解决方法
- Multi cycle verification of El form
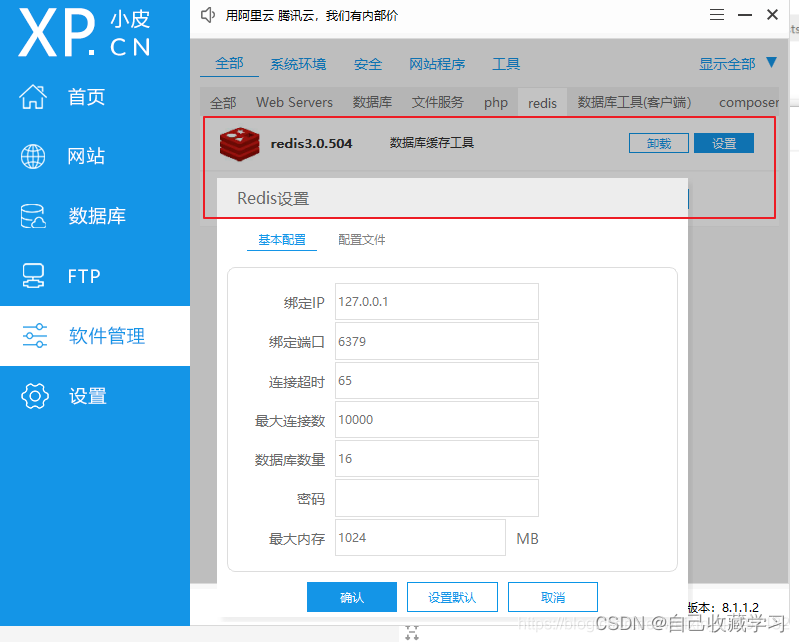
- ubuntu下搭建mysql环境 & 初识SQL
- 虚拟环境中使用jupyter notebook
- Leak detection and vacancy filling (IX) -- Procedure
- leetcode刷题之二进制求和
猜你喜欢


随机推荐
offset和client獲取dom元素比特置信息
端口占用1
Multi cycle verification of El form
The arithmetic square root of X in leetcode
ebfp编程常用API介绍
LeetCode刷题|897递增顺序搜索树
mysql中sum (if)_mysql 中sum (if())
China creates vast research infrastructure to support ambitious climate goals
微信小程序
JS性能优化
rdam 原理解析
Kids and COVID: why young immune systems are still on top
Baidu map coordinates, Google coordinates and Tencent coordinates are mutually transformed
Oracle数据库性能分析之常用视图
Solution to page cache problem (use with caution)
leetcode刷题之x的算术平方根
【代码解析(1)】Communication-Efficient Learning of Deep Networks from Decentralized Data
js中entries(),keys(),values() , some(), Object.assign()遍历数组用法
JS implementation of web page rotation map
Offset et client pour obtenir des informations sur l'emplacement des éléments Dom