当前位置:网站首页>Detailed explanation of kubernetes (IV) -- kubernetes deployment based on kubedm
Detailed explanation of kubernetes (IV) -- kubernetes deployment based on kubedm
2022-04-21 18:11:00 【Always a teenager】
Today I will continue to introduce Linux Operation and maintenance related knowledge , The main content of this paper is based on kubeadm Of Kubernetes Deploy .
One 、Kubeadm brief introduction
kubeadm yes Kubernetes The cluster construction tool provided by the cluster , utilize Kubeadm Can quickly build a Kubernetes colony , And can achieve Kubernetes Cluster upgrade 、 Degradation and removal . utilize Kubeadm Way to deploy Kubernetes In the cluster , Most of the resources are Pod How to run .
Kubeadm Official address: :https://kubernetes.io/docs/reference/setup-tools/kubeadm, Its page is as follows :
Kubeadm The project is hosted to Github On , Its address is :https://github.com/kubernetes/kubeadm, The page is as follows :

Two 、 Preparation before installation
Next , We will use it Kubeadm To deploy Kubernetes colony .
our Kubernetes The cluster installation and deployment environment is as follows :
192.168.136.15 Master
192.168.136.14 Node1
192.168.136.12 Node2
We modified the of three devices /etc/hosts file , Make its host name and IP The address corresponds to .
Next , We carry out Kubernetes Preparations before cluster installation and deployment .
On the above three nodes , Let's install Docker.
First , Let's first install some dependent environments and auxiliary tools , Carry out orders :
yum -y install yum-utils device-mapper-persistent-data lvm2
In the software installed above ,yum-utils Provides yum Management commands for yum-config-manager,device-mapper-persistent-data yes Linux2.6 General device mapping mechanism supporting logical volume management in kernel , It provides a highly modular kernel architecture for the implementation of block device driver for storage resource management .
after , We configure our YUM Warehouse , Make it point to Alibaba cloud , Carry out orders :
yum-config-manager --add-repo https://mirrors.aliyun.com/docker-ce/linux/centos/docker-ce.repo
Next , We can install it Docker 了 , Carry out orders :
yum -y install docker-ce-18.09.7 docker-ce-cli-18.09.7 containerd.io
Can finish Docker Installation .
install Docker After completion , Because we are running in a virtual machine scenario , Hardware resources are in short supply , So we need to modify Cgroup The driver , Change it to systemd, This can make the server node more stable under the premise of resource shortage .
open /etc/docker/daemon.json file ( If not, create ), Enter the following in this file :
{

        "exec-opts":["native.cgroupdriver=systemd"]
}
After completion , We have to restart Docker, Carry out orders :
systemctl restart docker
Then let's look at Cgroup drive , Carry out orders :
docker info | grep Cgroup
The results are shown below :

You can see , We have successfully modified Docker The driver .
3、 ... and 、kubeadm install
Next , Let's install Kubeadm.
First , Let's configure Kubernetes Of YUM Warehouse , ad locum , We use alicloud's YUM Warehouse . Create a new one /etc/yum.repo.d/kubernetes.repo file , And write the following contents in the file :
[kubernetes]
name=Kubernetes
baseurl=https://mirrors.aliyun.com/kubernetes/yum/repos/kubernetes-el7-x86_64/
enabled=1
gpgcheck=1
repo_gpgcheck=0
After completion , You can install kubeadm 了 , Carry out orders :
yum -y install kubelet-1.15.2 kubeadm-1.15.2 kubectl-1.15.2 --nogpgcheck
such , our kubeadm The installation is complete , The reason YUM The command is followed by –nogpgcheck, It's because we don't configure verification .
Because we use virtual machines for configuration , In order to make Kubernetes The cluster can run normally , Therefore, it is possible to use SWAP Partition , At this time , We are Master When initializing on , You cannot configure disable SWAP, So you have to configure to ignore SWAP Partition error reporting .
open /etc/sysconfig/kubelet, Modify the contents of the file as follows :
KUBELET_EXTRA_ARGS="--fail-swap-on=false"
that will do .
Four 、Master Node initialization
Next , We need to be in Master Initialization on node Kubernetes colony . stay Master On the node , Carry out orders :
kubeadm init --kubernetes-version=v1.15.2 --image-repository registry.aliyuncs.com/google_containers --pod-network-cidr=10.10.0.0/16 --service-cidr=10.20.0.0/12 --ignore-preflight-errors=Swap
In the above order ,–kubernetes-version The parameter specifies Kubernetes Version of ;–image-repository The parameter specifies Kubernetes The image download address of the cluster , Here, due to the network , We Kubernetes The official image of cannot be used , We can only use the image of domestic Alibaba cloud ;–pod-network-cidr The parameter specifies pod Of the resource object IP Address segment ;–service-cidr Parameter specifies service Of the resource object IP Address segment ;–ignore-preflight-errors Parameter specifies ignore Swap Partition error reporting .
The specified execution takes a long time , The results are shown below :
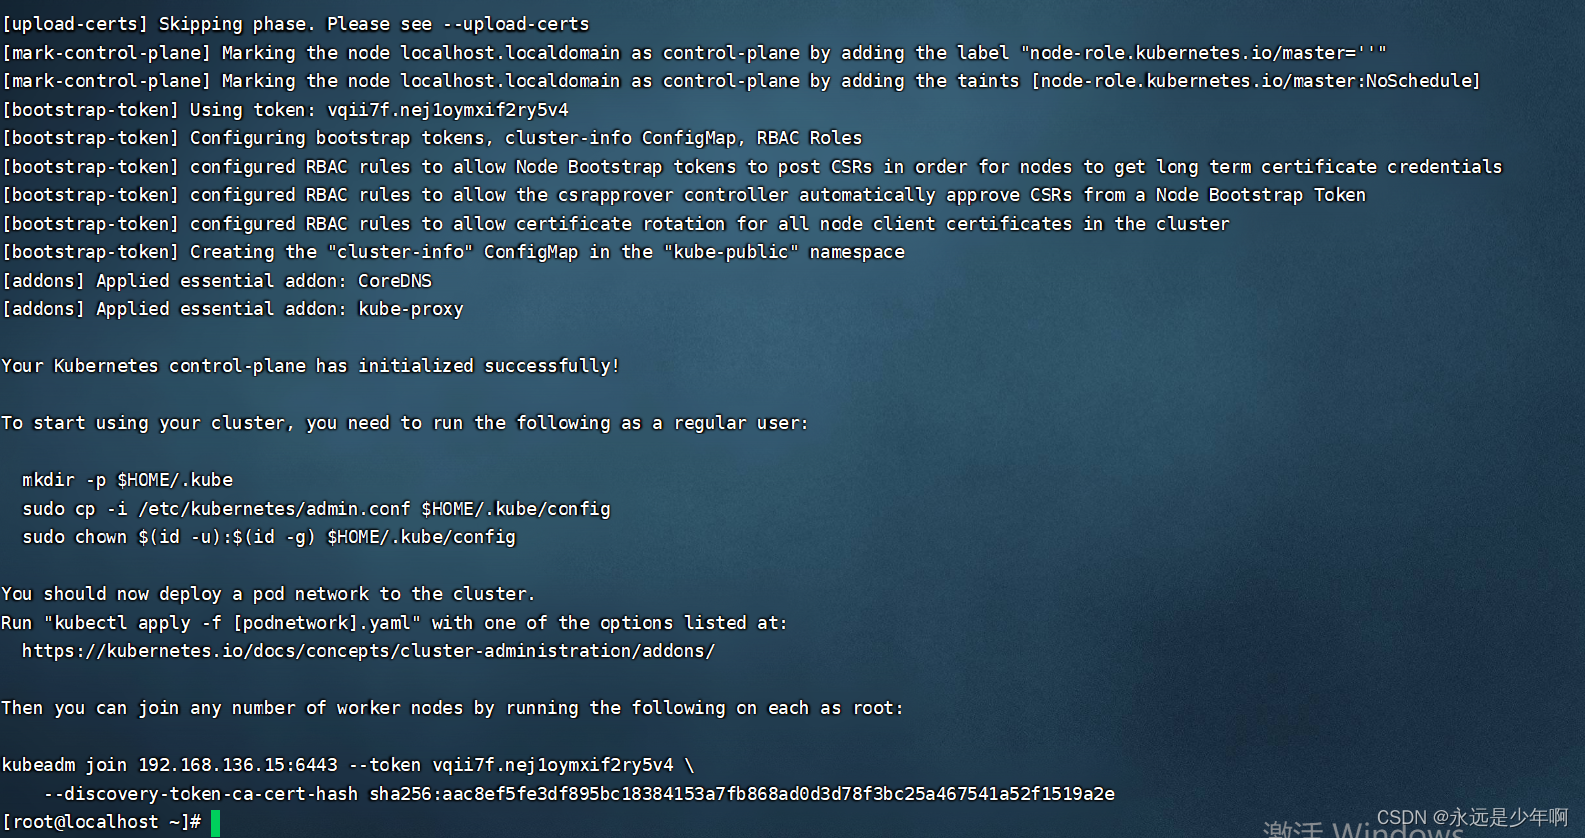
You can see , The command was executed successfully , At the end of the execution result, we give some operations we need to do , as well as Node Commands for nodes to join the cluster .
We do the above , Carry out orders :
mkdir -p $HOME/.kube
cp -i /etc/kubernetes/admin.conf $HOME/.kube/config
chown $(id -u):$(id -g) $HOME/.kube/config
After execution , Let's check the currently downloaded image , Carry out orders :
docker images
The results are as follows :

after , We have to download flannel Components , Download the component first , Download at :https://raw.githubusercontent.com/coreos/flannel/master/Documentation/kube-flannel.yml
Carry out orders :
wget https://raw.githubusercontent.com/coreos/flannel/master/Documentation/kube-flannel.yml
Download the file to your local , And then execute the command :
kubectl apply -f kube-falnnel.yml
The results are as follows :

such ,Master The node configuration is completed .
5、 ... and 、Node Node join
Next , We have to control Node Node join Kubernetes colony . We copy directly in Master Display after cluster initialization , The display is to join Kubernetes Cluster command . however , Because we enabled Swap The problem of zoning , So we need to add –ignore-preflight-errors=Swap, therefore , Carry out orders :
kubeadm join 192.168.136.15:6443 --token zc7nhx.96pky3iq2qwiztox --discovery-token-ca-cert-hash sha256:0cadb638b11d86854ea85114cc1c900c28490a49cc8d17c1cd9583dac1fa1dc6 --ignore-preflight-errors=Swap
The execution result of this command is as follows :

You can see , our Node Join the cluster successfully !
6、 ... and 、 Effect display
Last , Let's test the effect of our configuration .
stay Master And two Node After all nodes are configured , We are Master On the node , Carry out orders :
kubectl get nodes
give the result as follows :

You can see , After a period of time , our Master and Node1、Node2 The node is working normally .
Originality is not easy. , Reprint please explain the source :https://blog.csdn.net/weixin_40228200
版权声明
本文为[Always a teenager]所创,转载请带上原文链接,感谢
https://yzsam.com/2022/04/202204211809242145.html
边栏推荐
- Look at how the technology house saves Xueba machine. I repaired my laptop with 10 yuan
- Laxcus distributed operation redundancy and fault tolerance node
- 吃了这个开源小玩意让单片机开发和Arduino一样高效
- [brush force buckle] questions 51-60
- You must understand and can understand microservice series 3: service invocation
- VS2019 visual studio 终端调试乱码问题
- Pytorch数据封装进入网络前的几种方式
- Shallow comparison between oceanbase and tidb - implementation plan
- Is qiniu financial management useful? Is it safe?
- mysql8.0设置忽略大小写后无法启动
猜你喜欢

还剩下载次数,可留链接+邮箱
![[npj | digital medicine] machine learning of medical images: failure of methodology and suggestions for the future](/img/8e/918e4e500a62be5ba5480829a32081.png)
[npj | digital medicine] machine learning of medical images: failure of methodology and suggestions for the future

刚拿的字节跳动offer“打水漂”

VS2019 visual studio 终端调试乱码问题

Google has been unable to collect the transformation target on the mobile terminal. What's the matter?

Headline we media operation secret script. If you stick to it, you can beat 90% of the people

MySQL——远程连接非本地MySQL数据库服务器,报错ERROR 1130: Host 192.168.3.100 is not allowed to connect to this MySQL s

Interface

你已经用 SharedPrefrence 的 apply() 替换 commit() 了吗?
Pytorch数据封装进入网络前的几种方式
随机推荐
You must understand and can understand microservice series 3: service invocation
Summary of mongodb user permissions
Intermediary model
Educational Codeforces Round 116 (Rated for Div. 2) E. Arena
LogStash~LogStash的filter(过滤)
你已经用 SharedPrefrence 的 apply() 替换 commit() 了吗?
Finally complete the dream of student age - make a handheld machine and teach you with single chip microcomputer STM32
Appium source code analysis of dry goods app automated testing
综述:CFD的未来之路
Linux~libc.so.6(GLIBC_2.28)(64bit) 被 redis-5.0.3-1.nfs.x86_64 需要
移动平台WorkPlus集成化办公,打造企业全场景业务生态
LogStash~LogStash的目录布局
Create a local development cluster using k3s
Modify the van dropdown menu default height
LogStash~LogStash的input(input)
【NPJ|数字医药】医学影像的机器学习:方法学的失败和对未来的建议
JSON. Stringify() and JSON parse()
Q:excel制作折线图
PMP每日一练 | 考试不迷路-4.21
【无标题】