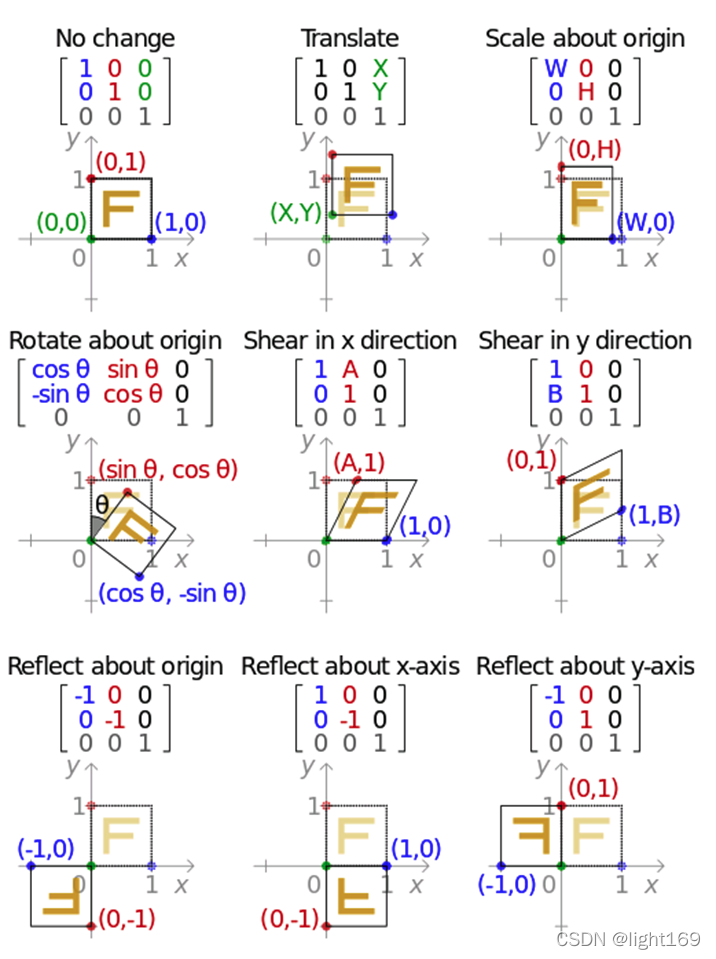
当前位置:网站首页>人脸识别 (4) 人脸对齐
人脸识别 (4) 人脸对齐
2022-04-22 15:00:00 【light169】
参考:FaceDetector/face_align.ipynb at master · faciallab/FaceDetector · GitHub
Face Alignment Step-by-Step
1、Align Faces by Spatial Transform Operation
import cv2
import matplotlib.pyplot as plt
import numpy as np

img_file = '../tests/asset/images/roate.jpg'
img = cv2.imread(img_file)
img = cv2.cvtColor(img, cv2.COLOR_RGB2BGR)
plt.figure(figsize=(10, 10))
plt.imshow(img)
plt.show()
2、Load the mtcnn model
import mtcnn
from mtcnn.utils import draw


# First we create pnet, rnet, onet, and load weights from caffe model.
pnet, rnet, onet = mtcnn.get_net_caffe('../output/converted')

# Then we create a detector
detector = mtcnn.FaceDetector(pnet, rnet, onet, device='cpu')
3、Crop the face from original image.
img = cv2.imread(img_file)
boxes, landmarks = detector.detect(img, minsize=24)
face = draw.crop(img, boxes=boxes, landmarks=landmarks)[0]
face = cv2.cvtColor(face, cv2.COLOR_RGB2BGR)
plt.figure(figsize=(5, 5))
plt.imshow(face)
plt.show()
4、Align face through facial landmark points.
How can we get the transform matrix.
首先假设我们最后要截取一张(112,96)大小的正脸,那么人脸的五个关键点分别在什么位置才算是正脸呢?所以我们需要五个参考点
# Define the correct points.
REFERENCE_FACIAL_POINTS = np.array([
    [30.29459953,  51.69630051],
    [65.53179932,  51.50139999],
    [48.02519989,  71.73660278],
    [33.54930115,  92.3655014],
    [62.72990036,  92.20410156]
], np.float32)

# Lets create a empty image|
empty_img = np.zeros((112,96,3), np.uint8)
draw.draw_landmarks(empty_img, REFERENCE_FACIAL_POINTS.astype(int))

plt.figure(figsize=(5, 5))
plt.imshow(empty_img)
plt.show()

那么这些特征点在我们图片中的人脸什么位置呢
img_copy = img.copy()
landmark = landmarks[0]

img_copy[:112, :96, :] = empty_img
img_copy = cv2.cvtColor(img_copy, cv2.COLOR_RGB2BGR)
draw.draw_landmarks(img_copy, landmark)

plt.figure(figsize=(15, 15))
plt.imshow(img_copy)
plt.show()

5、需要通过一个变换矩阵将蓝色点转换到红色点位置
我们知道三个参考点可以决定一个变换矩阵,选取一双眼睛对应的两个点和鼻子对应的一个点共的三个点计算变换矩阵,可以通过cv2.getAffineTransform 仿射变换函数获得变换矩阵。仿射变换参考这篇文章.
trans_matrix = cv2.getAffineTransform(landmark[:3].cpu().numpy().astype(np.float32), REFERENCE_FACIAL_POINTS[:3])
Next step, apply transformation to origin image and crop the interested region.
aligned_face = cv2.warpAffine(img.copy(), trans_matrix, (112, 112))
aligned_face = cv2.cvtColor(aligned_face, cv2.COLOR_RGB2BGR)

plt.figure(figsize=(5, 5))
plt.imshow(aligned_face)
plt.show()

人脸已经被大致对齐了,但是效果似乎不是很理想,人脸有一些变形
6、更精准对齐
上面这个简单的算法有几个问题。一是我们有5个点的对应关系,却只用了三个。二是上述操作可能会造成对图像的剪切拉伸变换,这样会使图像变形。怎么解决这个问题呢
首先我们先来回顾一下怎样做一个仿射变换
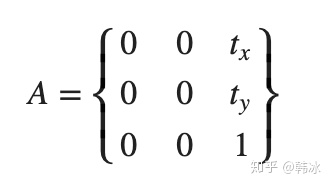
如果我们想对一个图像在x轴方向平移 tx 个像素,在y轴方向平移ty个像素,我们的变换矩阵长什么样子呢?
如果我们想顺时针旋转一定角度呢

同时平移和旋转( )呢
)呢

给定一个点 ,经过mctnn转换为对应的点
 ,因此我们需要一个最优的参数(
)满足
 ,如何解下面这个方程呢?

这是一个线性方程,我们用Least Squares Method(最小二乘法)来求解五个点的最优估计:
(可以用numpy的内置函数 numpy.linalg.lstsq)
from numpy.linalg import inv, norm, lstsq
from numpy.linalg import matrix_rank as rank

def findNonreflectiveSimilarity(uv, xy, K=2):

    M = xy.shape[0]
    x = xy[:, 0].reshape((-1, 1))  # use reshape to keep a column vector
    y = xy[:, 1].reshape((-1, 1))  # use reshape to keep a column vector

    tmp1 = np.hstack((x, y, np.ones((M, 1)), np.zeros((M, 1))))
    tmp2 = np.hstack((y, -x, np.zeros((M, 1)), np.ones((M, 1))))
    X = np.vstack((tmp1, tmp2))

    u = uv[:, 0].reshape((-1, 1))  # use reshape to keep a column vector
    v = uv[:, 1].reshape((-1, 1))  # use reshape to keep a column vector
    U = np.vstack((u, v))

    # We know that X * r = U
    if rank(X) >= 2 * K:
        r, _, _, _ = lstsq(X, U)
        r = np.squeeze(r)
    else:
        raise Exception('cp2tform:twoUniquePointsReq')

    sc = r[0]
    ss = r[1]
    tx = r[2]
    ty = r[3]

    Tinv = np.array([
        [sc, -ss, 0],
        [ss,  sc, 0],
        [tx,  ty, 1]
    ])


    T = inv(Tinv)

    T[:, 2] = np.array([0, 0, 1])

    T = T[:, 0:2].T

    return T

similar_trans_matrix = findNonreflectiveSimilarity(landmark.cpu().numpy().astype(np.float32), REFERENCE_FACIAL_POINTS)

aligned_face = cv2.warpAffine(img.copy(), similar_trans_matrix, (112, 112))
aligned_face = cv2.cvtColor(aligned_face, cv2.COLOR_RGB2BGR)

plt.figure(figsize=(5, 5))
plt.imshow(aligned_face)
plt.show()

版权声明
本文为[light169]所创,转载请带上原文链接,感谢
https://blog.csdn.net/light169/article/details/124337695
边栏推荐
猜你喜欢
![[elt.zip] openharmony's paper growth plan -- multidimensional exploration and universal lossless compression](/img/76/73c92acd32a51aa6e054da44205e23.png)
[elt.zip] openharmony's paper growth plan -- multidimensional exploration and universal lossless compression

【ELT.ZIP】《CCF开源高校行第一期》观后感

机器学习模型融合大法!

redis优化系列(一)基于docker搭建Redis主从

Saving notes 20: transforming notebook computer (ASUS a555l)

运输层——运输层概述(1)

golang入门笔记—redis

爱站网关键词挖掘查询工具-批量网站关键词挖掘导出软件免费下载
Leetcode interview question 17.16 Masseur (simple)

C#安装opencv
随机推荐
【刷题日记】笔试经典编程题目(三)
@Resources and constructors
数学——贝塞尔曲线
带你了解极具弹性的Spark架构的原理
Construction of information research and judgment analysis platform and development of information, guidance and logistics integrated management system
如何通过云效Projex项目协同提高团队更高效的协作能力
快捷键删除浏览器缓存,windows组合键,cmd快捷命令
SVG系列——3,强大的路径
When border collapse is collapse, why doesn't the padding of the outermost box work
net::ERR_INCOMPLETE_CHUNKED_ENCODING 200 EL表达式字符串拼接
C#安装opencv
Saving notes 20: transforming notebook computer (ASUS a555l)
【ELT.ZIP】OpenHarmony啃论文俱乐部——这些小风景你不应该错过
vscode settings. JSON location
Go语言简介,环境安装,基本结构
2022焊工(初级)操作证考试题库及答案
SMB+MSSQL
[ELT. Zip] openharmony paper club -- turn over those immortal poems
数学史有没有必要读?关于数学教育,我们忽视了太多
Upgrade the source database to version 5.0, restart the mongoshake service, and then report an error