当前位置:网站首页>Redis源码剖析之字典(dict)
Redis源码剖析之字典(dict)
2022-08-09 12:23:00 【xindoo】
Dict在redis中是最为核心的一个数据结构,因为它承载了redis里的所有数据,你可以简单粗暴的认为redis就是一个大的dict,里面存储的所有的key-value。
redis中dict的本质其实就是一个hashtable,所以它也需要考虑所有hashtable所有的问题,如何组织K-V、如何处理hash冲突、扩容策略及扩容方式……。实际上Redis中hashtable的实现方式就是普通的hashtable,但Redis创新的引入了渐进式hash以减小hashtable扩容是对性能带来的影响,接下来我们就来看看redis中hashtable的具体实现。
Redis中Dict的实现
dict的定义在dict.h中,其各个字段及其含义如下:
typedef struct dict {

    dictType *type;  // dictType结构的指针,封装了很多数据操作的函数指针,使得dict能处理任意数据类型(类似面向对象语言的interface,可以重载其方法)
    void *privdata;  // 一个私有数据指针(privdata),由调用者在创建dict的时候传进来。
    dictht ht[2];  // 两个hashtable,ht[0]为主,ht[1]在渐进式hash的过程中才会用到。
    long rehashidx; /* 增量hash过程过程中记录rehash执行到第几个bucket了,当rehashidx == -1表示没有在做rehash */
    unsigned long iterators; /* 正在运行的迭代器数量 */
} dict;
重点介绍下dictType *type字段(个人感觉命名为type不太合适),其作用就是为了让dict支持各种数据类型,因为不同的数据类型需要对应不同的操作函数,比如计算hashcode 字符串和整数的计算方式就不一样, 所以dictType通过函数指针的方式,将不同数据类型的操作都封装起来。从面相对象的角度来看,可以把dictType当成dict中各种数据类型相关操作的interface,各个数据类型只需要实现其对应的数据操作就行。 dictType中封装了以下几个函数指针。
typedef struct dictType {

    uint64_t (*hashFunction)(const void *key);  // 对key生成hash值
    void *(*keyDup)(void *privdata, const void *key); // 对key进行拷贝
    void *(*valDup)(void *privdata, const void *obj);  // 对val进行拷贝
    int (*keyCompare)(void *privdata, const void *key1, const void *key2); // 两个key的对比函数
    void (*keyDestructor)(void *privdata, void *key); // key的销毁
    void (*valDestructor)(void *privdata, void *obj); // val的销毁
} dictType;
dict中还有另外一个重要的字段dictht ht[2],dictht其实就是hashtable,但这里为什么是ht[2]? 这就不得不提到redis dict的渐进式hash,dict的hashtable的扩容不是一次性完成的,它是先建立一个大的新的hashtable存放在ht[1]中,然后逐渐把ht[0]的数据迁移到ht[1]中,rehashidx就是ht[0]中数据迁移的进度,渐进式hash的过程会在后文中详解。
这里我们来看下dictht的定义:
typedef struct dictht {

    dictEntry **table;  // hashtable中的连续空间
    unsigned long size; // table的大小
    unsigned long sizemask;  // hashcode的掩码
    unsigned long used; // 已存储的数据个数
} dictht;
其中dictEntry就是对dict中每对key-value的封装,除了具体的key-value,其还包含一些其他信息,具体如下:
typedef struct dictEntry {

    void *key;
    union {
       // dictEntry在不同用途时存储不同的数据
        void *val;
        uint64_t u64;
        int64_t s64;
        double d;
    } v;
    struct dictEntry *next; // hash冲突时开链,单链表的next指针
} dictEntry;
dict中的hashtable在出现hash冲突时采用的是开链方式,如果有多个entry落在同一个bucket中,那么他们就会串成一个单链表存储。
如果我们将dict在内存中的存储绘制出来,会是下图这个样子。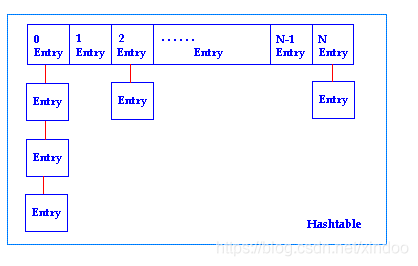
扩容
在看dict几个核心API实现之前,我们先来看下dict的扩容,也就是redis的渐进式hash。 何为渐进式hash?redis为什么采用渐进式hash?渐进式hash又是如何实现的?
要回答这些问题,我们先来考虑下hashtable扩容的过程。如果熟悉java的同学可能知道,java中hashmap的扩容是在数据元素达到某个阈值后,新建一个更大的空间,一次性把旧数据搬过去,搬完之后再继续后续的操作。如果数据量过大的话,HashMap扩容是非常耗时的,所有有些编程规范推荐new HashMap时最好指定其容量,防止出现自动扩容。
但是redis在新建dict的时候,没法知道数据量大小,如果直接采用java hashmap的扩容方式,因为redis是单线程的,势必在扩容过程中啥都干不了,阻塞掉后面的请求,最终影响到整个redis的性能。如何解决? 其实也很简单,就是化整为零,将一次大的扩容操作拆分成多次小的步骤,一步步来减少扩容对其他操作的影响,其具体实现如下:
上文中我们已经看到了在dict的定义中有个dictht ht[2],dict在扩容过程中会有两个hashtable分别存储在ht[0]和ht[1]中,其中ht[0]是旧的hashtable,ht[1]是新的更大的hashtable。
/* 检查是否dict需要扩容 */
static int _dictExpandIfNeeded(dict *d)
{

    /* 已经在渐进式hash的流程中了,直接返回 */
    if (dictIsRehashing(d)) return DICT_OK;

    /* If the hash table is empty expand it to the initial size. */
    if (d->ht[0].size == 0) return dictExpand(d, DICT_HT_INITIAL_SIZE);

    /* 当配置了可扩容时,容量负载达到100%就扩容。配置不可扩容时,负载达到5也会强制扩容*/
    if (d->ht[0].used >= d->ht[0].size &&
        (dict_can_resize ||
         d->ht[0].used/d->ht[0].size > dict_force_resize_ratio))
    {

        return dictExpand(d, d->ht[0].used*2); // 扩容一倍容量
    }
    return DICT_OK;
}
Redis在每次查找某个key的索引下标时都会检查是否需要对ht[0]做扩容,如果配置的是可以扩容 那么当hashtable使用率超过100%(uesed/size)就触发扩容,否则使用率操作500%时强制扩容。执行扩容的代码如下:
/* dict的创建和扩容 */
int dictExpand(dict *d, unsigned long size)
{

    /* 如果size比hashtable中的元素个数还小,那size就是无效的,直接返回error */
    if (dictIsRehashing(d) || d->ht[0].used > size)
        return DICT_ERR;

    dictht n; /* 新的hashtable */
    // 扩容时新table容量是大于当前size的最小2的幂次方,但有上限
    unsigned long realsize = _dictNextPower(size);

    // 如果新容量和旧容量一致,没有必要继续执行了,返回err
    if (realsize == d->ht[0].size) return DICT_ERR;

    /* 新建一个容量更大的hashtable */
    n.size = realsize;
    n.sizemask = realsize-1;
    n.table = zcalloc(realsize*sizeof(dictEntry*));
    n.used = 0;

    // 如果是dict初始化的情况,直接把新建的hashtable赋值给ht[0]就行
    if (d->ht[0].table == NULL) {

        d->ht[0] = n;
        return DICT_OK;
    }

    // 非初始化的情况,将新表赋值给ht[1], 然后标记rehashidx 0
    d->ht[1] = n;
    d->rehashidx = 0; // rehashidx表示当前rehash到ht[0]的下标位置
    return DICT_OK;
}
这里dictExpand只是创建了新的空间,将rehashidx标记为0(rehashidx==-1表示不在rehash的过程中),并未对ht[0]中的数据迁移到ht[1]中。数据迁移的逻辑都在_dictRehashStep()中。 _dictRehashStep()是只迁移一个bucket,它在dict的查找、插入、删除的过程中都会被调到,每次调用至少迁移一个bucket。 而dictRehash()是_dictRehashStep()的具体实现,代码如下:
 /* redis渐进式hash,采用分批的方式,逐渐将ht[0]依下标转移到ht[2],避免了hashtable扩容时大量 * 数据迁移导致的性能问题 * 参数n是指这次rehash只做n个bucket */
int dictRehash(dict *d, int n) {

    int empty_visits = n*10; /* 最大空bucket数量,如果遇到empty_visits个空bucket,直接结束当前rehash的过程 */
    if (!dictIsRehashing(d)) return 0;

    while(n-- && d->ht[0].used != 0) {

        dictEntry *de, *nextde;

        /* Note that rehashidx can't overflow as we are sure there are more * elements because ht[0].used != 0 */
        assert(d->ht[0].size > (unsigned long)d->rehashidx);
        while(d->ht[0].table[d->rehashidx] == NULL) {

            d->rehashidx++;
            if (--empty_visits == 0) return 1; // 如果遇到了empty_visits个空的bucket,直接结束
        }
        // 遍历当前bucket中的链表,直接将其移动到新的hashtable中
        de = d->ht[0].table[d->rehashidx];
        /* 把所有的key从旧的hash桶移到新的hash桶中 */
        while(de) {

            uint64_t h;

            nextde = de->next;
            /* 获取到key在新hashtable中的下标 */
            h = dictHashKey(d, de->key) & d->ht[1].sizemask;
            de->next = d->ht[1].table[h];
            d->ht[1].table[h] = de;
            d->ht[0].used--;
            d->ht[1].used++;
            de = nextde;
        }
        d->ht[0].table[d->rehashidx] = NULL;
        d->rehashidx++;
    }

    /* 检测是否已对全表做完了rehash */
    if (d->ht[0].used == 0) {

        zfree(d->ht[0].table);  // 释放旧ht所占用的内存空间
        d->ht[0] = d->ht[1];  // ht[0]始终是在用ht,ht[1]始终是新ht,ht0全迁移到ht1后会交换下
        _dictReset(&d->ht[1]);
        d->rehashidx = -1;
        return 0;  // 如果全表hash完,返回0
    }

    /* 还需要继续做hash返回1 */
    return 1;
}
可以看出,rehash就是分批次把ht[0]中的数据搬到ht[1]中,这样将原有的一个大操作拆分为很多个小操作逐步进行,避免了redis发生dict扩容是瞬时不可用的情况,缺点是在redis扩容过程中会占用俩份存储空间,而且占用时间会比较长。
核心API
插入
/* 向dict中添加元素 */
int dictAdd(dict *d, void *key, void *val)
{

    dictEntry *entry = dictAddRaw(d,key,NULL);
    //
    if (!entry) return DICT_ERR;
    dictSetVal(d, entry, val);
    return DICT_OK;
}

/* 添加和查找的底层实现: * 这个函数只会返回key对应的entry,并不会设置key对应的value,而是把设值权交给调用者。 * * 这个函数也作为一个API直接暴露给用户调用,主要是为了在dict中存储非指针类的数据,比如 * entry = dictAddRaw(dict,mykey,NULL); * if (entry != NULL) dictSetSignedIntegerVal(entry,1000); * * 返回值: * 如果key已经存在于dict中了,直接返回null,并把已经存在的entry指针放到&existing里。否则 * 为key新建一个entry并返回其指针。 */
dictEntry *dictAddRaw(dict *d, void *key, dictEntry **existing)
{

    long index;
    dictEntry *entry;
    dictht *ht;

    if (dictIsRehashing(d)) _dictRehashStep(d);

    /* 获取到新元素的下标,如果返回-1标识该元素已经存在于dict中了,直接返回null */
    if ((index = _dictKeyIndex(d, key, dictHashKey(d,key), existing)) == -1)
        return NULL;

    /* 否则就给新元素分配内存,并将其插入到链表的头部(一般新插入的数据被访问的频次会更高)*/
    ht = dictIsRehashing(d) ? &d->ht[1] : &d->ht[0];
    entry = zmalloc(sizeof(*entry));
    entry->next = ht->table[index];
    ht->table[index] = entry;
    ht->used++;

    /* 如果是新建的entry,需要把key填进去 */
    dictSetKey(d, entry, key);
    return entry;
}
插入过程也比较简单,就是先定位bucket的下标,然后插入到单链表的头节点,注意这里也需要考虑到rehash的情况,如果是在rehash过程中,新数据一定是插入到ht[1]中的。
查找
dictEntry *dictFind(dict *d, const void *key)
{

    dictEntry *he;
    uint64_t h, idx, table;

    if (dictSize(d) == 0) return NULL; /* dict为空 */
    if (dictIsRehashing(d)) _dictRehashStep(d);
    h = dictHashKey(d, key);
    // 查找的过程中,可能正在rehash中,所以新老两个hashtable都需要查
    for (table = 0; table <= 1; table++) {

        idx = h & d->ht[table].sizemask;
        he = d->ht[table].table[idx];
        while(he) {

            if (key==he->key || dictCompareKeys(d, key, he->key))
                return he;
            he = he->next;
        }
        // 如果ht[0]中没找到,且不再rehas中,就不需要继续找了ht[1]了。
        if (!dictIsRehashing(d)) return NULL;
    }
    return NULL;
}
查找的过程比较简单,就是用hashcode做定位,然后遍历单链表。但这里需要考虑到如果是在rehash过程中,可能需要查找ht[2]中的两个hashtable。
删除
/* 查找并删除一个元素,是dictDelete()和dictUnlink()的辅助函数。*/
static dictEntry *dictGenericDelete(dict *d, const void *key, int nofree) {

    uint64_t h, idx;
    dictEntry *he, *prevHe;
    int table;

    if (d->ht[0].used == 0 && d->ht[1].used == 0) return NULL;

    if (dictIsRehashing(d)) _dictRehashStep(d);
    h = dictHashKey(d, key);

    // 这里也是需要考虑到rehash的情况,ht[0]和ht[1]中的数据都要删除掉
    for (table = 0; table <= 1; table++) {

        idx = h & d->ht[table].sizemask;
        he = d->ht[table].table[idx];
        prevHe = NULL;
        while(he) {

            if (key==he->key || dictCompareKeys(d, key, he->key)) {

                /* 从列表中unlink掉元素 */
                if (prevHe)
                    prevHe->next = he->next;
                else
                    d->ht[table].table[idx] = he->next;
                // 如果nofree是0,需要释放k和v对应的内存空间
                if (!nofree) {

                    dictFreeKey(d, he);
                    dictFreeVal(d, he);
                    zfree(he);
                }
                d->ht[table].used--;
                return he;
            }
            prevHe = he;
            he = he->next;
        }
        if (!dictIsRehashing(d)) break;
    }
    return NULL; /* 没找到key对应的数据 */
}
其它API
其他的API实现都比较简单,我在dict.c源码中做了大量的注释,有兴趣可以自行阅读下,我这里仅列举并说明下其大致的功能。
dict *dictCreate(dictType *type, void *privDataPtr);  // 创建dict
int dictExpand(dict *d, unsigned long size);  // 扩缩容
int dictAdd(dict *d, void *key, void *val);  // 添加k-v
dictEntry *dictAddRaw(dict *d, void *key, dictEntry **existing); // 添加的key对应的dictEntry
dictEntry *dictAddOrFind(dict *d, void *key); // 添加或者查找
int dictReplace(dict *d, void *key, void *val); // 替换key对应的value,如果没有就添加新的k-v
int dictDelete(dict *d, const void *key);  // 删除某个key对应的数据
dictEntry *dictUnlink(dict *ht, const void *key); // 卸载某个key对应的entry
void dictFreeUnlinkedEntry(dict *d, dictEntry *he); // 卸载并清除key对应的entry
void dictRelease(dict *d);  // 释放整个dict
dictEntry * dictFind(dict *d, const void *key);  // 数据查找
void *dictFetchValue(dict *d, const void *key);  // 获取key对应的value
int dictResize(dict *d);  // 重设dict的大小,主要是缩容用的
/************ 迭代器相关 *********** */
dictIterator *dictGetIterator(dict *d);
dictIterator *dictGetSafeIterator(dict *d);
dictEntry *dictNext(dictIterator *iter);
void dictReleaseIterator(dictIterator *iter);
/************ 迭代器相关 *********** */
dictEntry *dictGetRandomKey(dict *d);  // 随机返回一个entry
dictEntry *dictGetFairRandomKey(dict *d);   // 随机返回一个entry,但返回每个entry的概率会更均匀
unsigned int dictGetSomeKeys(dict *d, dictEntry **des, unsigned int count); // 获取dict中的部分数据
本文是Redis源码剖析系列博文,同时也有与之对应的Redis中文注释版,有想深入学习Redis的同学,欢迎star和关注。
Redis中文注解版仓库:https://github.com/xindoo/Redis
Redis源码剖析专栏:https://zxs.io/s/1h
如果觉得本文对你有用,欢迎一键三连。
边栏推荐
- Report: The number of students who want to learn AI has increased by 200%, and there are not enough teachers
- 一甲子,正青春,CCF创建六十周年庆典在苏州举行
- The batch size does not have to be a power of 2!The latest conclusions of senior ML scholars
- Flutter Getting Started and Advanced Tour (2) Hello Flutter
- 数据挖掘-06
- Nature:猪死亡1小时后,器官再次运转
- WeChat payment development process
- Introduction to Flutter advanced trip Dialog&Toast (10)
- 卷积神经网络表征可视化研究综述(1)
- JVM常用监控工具解释以及使用
猜你喜欢

两分钟录音就可秒变语言通!火山语音音色复刻技术如何修炼而成?
ViewPager fragments of nested data blank page abnormal problem analysis
The grep command Shell regular expressions, the three musketeers
十分钟教会你如何使用VitePress搭建及部署个人博客站点

Intranet penetration tool ngrok usage tutorial
史上最猛“员工”,疯狂吐槽亿万富翁老板小扎:那么有钱,还总穿着同样的衣服!...

李开复花上千万投的缝纫机器人,团队出自大疆
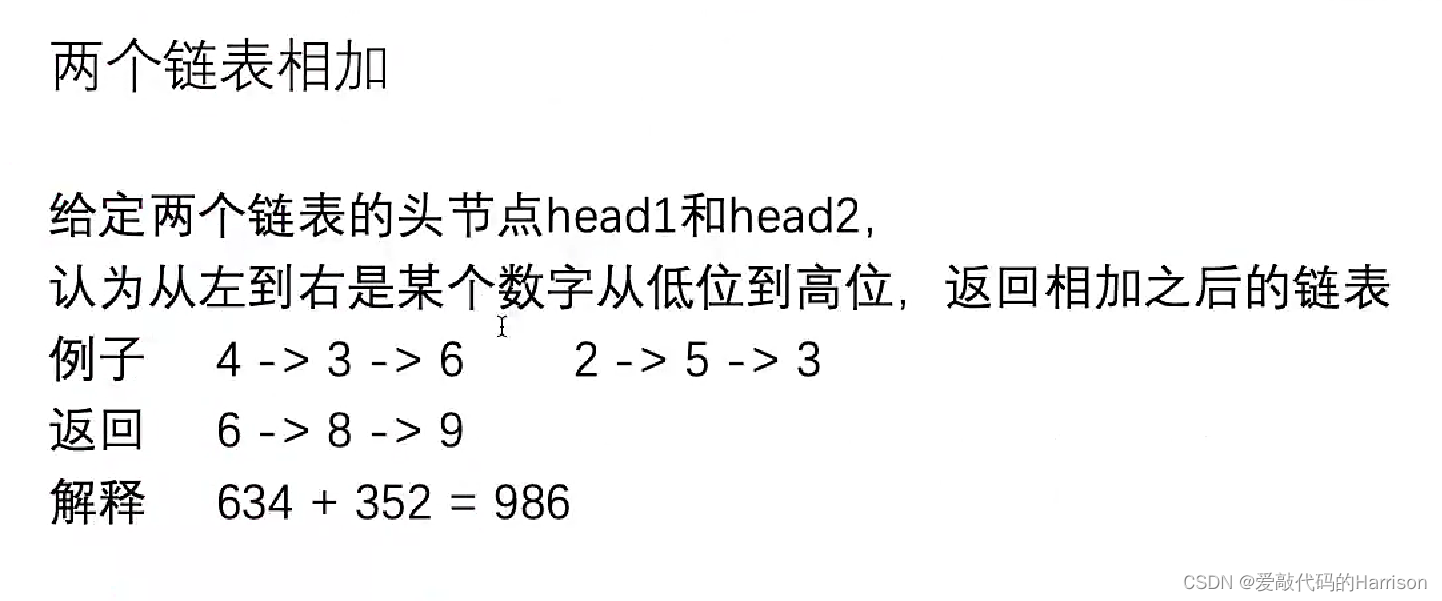
两个链表相加

曼城推出可检测情绪的智能围巾,把球迷给整迷惑了

国产抗新冠口服药每瓶不超300元/ 我国IPv6网络全面建成/ 谷歌入局折叠屏手机...今日更多新鲜事在此...
随机推荐
使用注解将EventBus封装抽取到基类
激光熔覆在农机修复强化中的应用及研究方向
00后写个暑假作业,被监控成这笔样
HAproxy: load balancing
Scala Advanced (7): Collection Content Summary (Part 1)
荣耀携手Blue Yonder,加快企业战略增长
中断系统结构及中断控制详解
The batch size does not have to be a power of 2!The latest conclusions of senior ML scholars
go基础之web获取参数
Data Mining-05
【HCIP持续更新】IS-IS协议原理与配置
ABAP 报表中如何以二进制方式上传本地文件试读版
造自己的芯,让谷歌买单!谷歌再度开源 180nm 工艺的芯片
Rust从入门到精通04-数据类型
win10编译x264库(也有生成好的lib文件)
Extract EventBus encapsulation to base class using annotations
Flutter Getting Started and Advanced Tour (8) Button Widget
内网穿透工具ngrok使用教程
Two minutes recording can pass by second language!The volcano how to practice and become voice tone reproduction technology?
1小时直播招募令:行业大咖干货分享,企业报名开启丨量子位·视点