当前位置:网站首页>[esp32] esp8266 connects to Xiao Ai to control the relay
[esp32] esp8266 connects to Xiao Ai to control the relay
2022-08-05 22:05:00 【a glowing flower】
Foreword
Go to https://www.heanny.cn/post-520.html
Steps
- Configuring the arduino
# This content is from https://bbs.bemfa.com/291. Install ArduinoIDE, download it from the official website: https://www.arduino.cc/en/Main/Software, download the Windows installation version, and install it normally.2. Download and install the esp32 installation packageBafa download: https://file.bemfa.com/bemfa_com/esp/esp32V2_0_3.zip .Baidu network disk: https://pan.baidu.com/s/1tqRbFQqT8m0KdQwxOcrJlQ, extraction code 12343. Unzip the downloaded esp32 installation package, close the arduino ide software, and click "one-click installation" in the installation package. The installation will take about 5 minutes, please wait patiently.4. Open the arduino IDE."Tools" - "Development Board", you can choose your own development board type.5. The programming setting is default, plug in the development board, and select the com port of your own development board in "Tools"--"Development Board"--"Port".Return to the IDE and click the arrow pointing to the right above to burn.********************************************************************************Method Two1. Install ArduinoIDE, download from the official website: click jump to download the Windows installation version, and then install it normally.2. After downloading and installing, open the arduino IDE.Open "File" - "Preferences" - "Additional Development Board Manager URL" in the upper right corner and fill in https://ai.bemfa.com/esp32/stable/package_esp32_index.json Click "OK" to confirm.3. Restart the arduino IDE.Open "Tools" - "Development Board" - "Development Board Manager" in the upper work bar, search for esp32, and find the installation (if it fails, try again or continue, and wait for the installation to complete)..4. Open the arduino IDE."Tools" - "Development Board", you can choose your own development board type.5. The programming setting is default, plug in the development board, and select the com port of your own development board in "Tools"--"Development Board"--"Port".Return to the IDE and click the arrow pointing to the right above to burn.- Use arduino to flash the script first to configure the esp8266 related, I forgot the details, please refer to https://editor.csdn.net/md/?articleId=122320855,
Go to Tools->Manage Libraries, install blinker, and upload code
#define BLINKER_MIOT_LIGHT#define BLINKER_WIFI#include char auth[] = "XXXXXXXXXX"; //Enter the keychar ssid[] = "XXXXXXXXXXX"; //wifi namechar pswd[] = "XXXXXXXX"; //wifi passwordint GPIO=0;//Define the GPIO port to control the relay#define BUTTON_1 "ButtonKey"BlinkerButton Button1("btn-abc");//This needs to be changed according to the name you set in BLINKER// This function will be executed when the button is pressedvoid button1_callback(const String & state){BLINKER_LOG("get button state: ", state);digitalWrite(GPIO,!digitalRead(GPIO));Blinker.vibrate();}//Access the code of Xiaoai classmate, this part of the code is modified according to the official website of BLINKERvoid miotPowerState(const String & state){BLINKER_LOG("need set power state: ",state);if (state == BLINKER_CMD_OFF) {//If the voice is received and the light is turned off, set the GPIO port to high leveldigitalWrite(GPIO, HIGH);BlinkerMIOT.powerState("off");BlinkerMIOT.print();}else if (state == BLINKER_CMD_ON) {digitalWrite(GPIO, LOW);BlinkerMIOT.powerState("on");BlinkerMIOT.print();}}void setup() {Serial.begin(115200);pinMode(GPIO,OUTPUT);digitalWrite(GPIO,HIGH);//Initialization, since the relay is triggered by a low level.So just set it to high at firstBlinker.begin(auth, ssid, pswd);Button1.attach(button1_callback);BlinkerMIOT.attachPowerState(miotPowerState);//This code must be added, without Xiaoai students can not control, be sure to feedback the control state in the callback function}void loop(){Blinker.run();} - Install the light blinker on the phone https://diandeng.tech/home to register, add devices, independent devices, copy the key to the above code
- Access to Xiaoai Open Mijia, mine, other platform devices, select the light device, and bind
- Call your classmate Xiao Ai to turn on the lights
Other
It is said that the light equipment is unstable, and there are up to 5 free equipments, and the equipment status cannot be obtained yet
边栏推荐
猜你喜欢
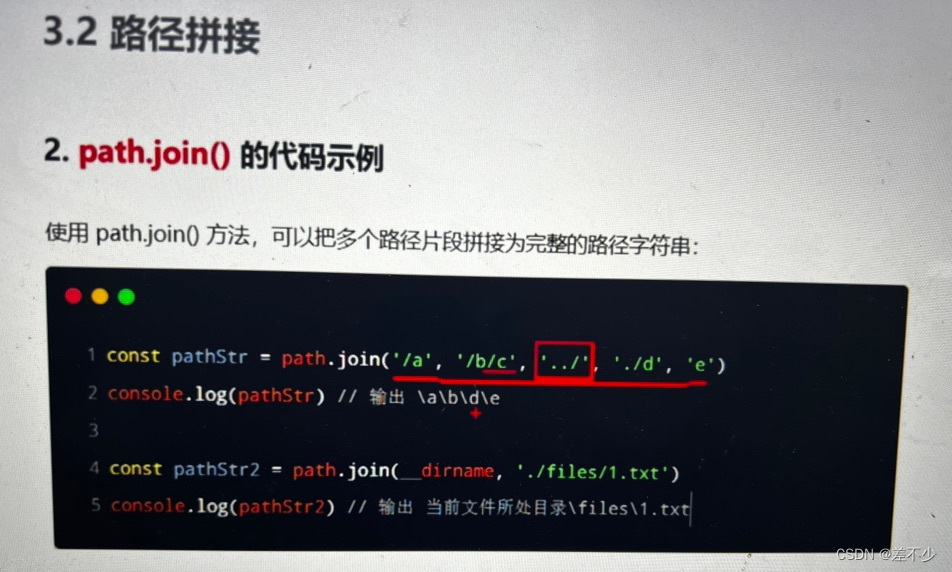
nodejs(一)fs模块(操作文件的模块),path路径模块,路径拼接path.join,抵消两层路径的写法,浏览器中的js

Hualang's re-reading connection camp is an inspirational camp!The full lineup of famous teachers escorts and interprets the key to success in the college entrance examination

ESP8266-Arduino编程实例-红外寻迹传感器驱动

我劝!这位年轻人不讲MVCC,耗子尾汁!

C语言基础演练(9)

家具行业APS解决方案

CTO不让用Calendar,那用啥?

【开课预告】下半年软考(中/高级)认证将于8月20日开班

CAN-Oe 通道配置方法

Smart Warehouse Manager - WMS
随机推荐
第12章_数据库其它调优策略
[OMV] Xiaomi camera cannot get the network storage of OMV6 installed on Debian 11 is unknown
网页提示此站点不安全,还能打开吗?
C语言基础演练(9)
[ESP32]ESP8266连接小爱同学控制继电器二
重新定义分析 - EventBridge 实时事件分析平台发布
Euler's Theorem and Fermat's Little Theorem
聚簇索引之B+Tree是如何长高的
百家号打击挂载恶意导流链接行为,必须严厉打击恶意挂链灰产
模板的特化
APS在印刷行业的应用前景和应用效益
橡胶制造业APS解决方案
Qt uses wget to download file case
CDGA|政务部门这样进行数据治理真不错!!!
大家常说的表空间到底是什么?究竟什么又是数据表呢?
树莓派红外控制空调
Axure Rp激活码
APS Solutions for Furniture Industry
印刷行业APS解决方案
基于数组结构刷题