当前位置:网站首页>[Free column] Xposed plug-in development for Android security [from scratch] tutorial
[Free column] Xposed plug-in development for Android security [from scratch] tutorial
2022-08-09 21:30:00 【Pineapple_Orange】
欢迎新同学的光临
… …
人若无名,便可专心练剑
我不是一条咸鱼,而是一条死鱼啊!
0x01 前言
1.1 The android operating system architecture
Android是一种基于Linux的自由及开放源代码的操作系统.而Android系统构架是安卓系统的体系结构,The system architecture and its operating system,采用了分层的架构,Will be divided into four levels five parts,Refers to the four layers from high to low wereAndroid应用层,Android应用框架层,Android系统运行层和Linux内核层;Part five isLinux Kernel、Android Runtime、Libraries、Application Framework、Applications.
1.1.1 Linux Kernel
In all layers of the bottom is Linux,It provides basic system function,比如进程管理,内存管理,设备管理(如摄像头,键盘,显示器).
1.1.2 Android Runtime
Android Runtime also provides a set of core libraries for Android Application developers use the standard Java 语言来编写 Android 应用程序.Dalvik Virtual machine makes every Android The application is running in their own independent virtual machine process.Dalvik虚拟机可执行文件格式是.dex,dex格式是专为Dalvik设计的一种压缩格式,适合内存和处理器速度有限的系统.
1.1.3 Libraries
Android包含一个C/C++库的集合,供Android系统的各个组件使用.这些功能通过Android的应用程序框架(application framework)暴露给开发者.
1.1.4 Application Framework
通过提供开放的开发平台,Android使开发者能够编制极其丰富和新颖的应用程序.
1.1.5 Applications
应用框架层以 Java 类的形式为应用程序提供许多高级的服务.
1.2 安卓应用程序组件
应用程序组件是一个Android应用程序的基本构建块.在AndroidManifest.xmlDescribe the application of each component,以及他们如何交互.
1.2.1 AndroidThe four main components in the application
| 组件名 | 描述 |
|---|---|
| Activities | 描述UI,并且处理用户与机器屏幕的交互 |
| Services | 处理与应用程序关联的后台操作 |
| Broadcast Receivers | 处理Android操作系统和应用程序之间的通信 |
| Content Providers | 处理数据和数据库管理方面的问题 |
1.2.2 附加组件
| 组件名 | 描述 |
|---|---|
| Fragments | 代表活动中的一个行为或者一部分用户界面 |
| Views | 绘制在屏幕上的UI元素,包括按钮,列表等 |
| Layouts | 控制屏幕格式,展示视图外观的View的继承 |
| Intents | 组件间的消息连线 |
| Resources | 外部元素,例如字符串资源、常量资源及图片资源等 |
| Manifest | 应用程序的配置文件 |
1.3 什么是 Hook?
Hook 又叫“钩子”,它可以在事件传送的过程中截获并监控事件的传输,将自身的代码与系统方法进行融入
这样当这些方法被调用时,也就可以执行我们自己的代码,这也是面向切面编程的思想(AOP)
1.4 Hook 分类
1)根据Android开发模式,Native模式(C/C++)和Java模式(Java)区分,在Android平台上
- Java层级的Hook
- Native层级的Hook
2)根 Hook 对象与 Hook 后处理事件方式不同,Hook还分为:
- 消息Hook
- API Hook
3)针对Hook的不同进程上来说,还可分为:
- 全局Hook
- 单个进程Hook
1.5 Hook原理
HookTechnology is essentially a function call,由于处于Linux用户状态,Each process has its own separate process control,So must first injection toHook的进程空间,Modify the code in memory process,Replace the process table symbolic address,通过ptrace函数附加进程,To the remote process injectionso库,从而达到监控以及远程进程关键函数挂钩
Hook工作流程:
AndroidThe kernel function:
- ptrace函数:Tracking a target process,End of tracking a target process,Access memory byte,Like a memory write address
- dlopen函数:To specify the mode to open the specified dynamic link library file
- mmap函数:Allocate a temporary memory to complete the code to store
After injection of code to the target process summary procedure is divided into the following a few steps:
- 用ptrace函数attchOn the target process
- Find Shared libraries are loadedso函数
- 装载指定的.so
- Let the target process execution flow to jump to the injected code execution
- 使用ptrace函数的detachRelease the target integration
1.6 常见 Hook 框架
在Android开发中,有以下常见的一些Hook框架:
1)Xposed
Xposed 是国外大牛开发的一个工具,Xposed通过拦截安卓程序运行过程来达到修改程序行为的目的.不需要修改安卓源文件,而是通过分析程序运行来拦截并影响运行情况.具体需要把安卓apk逆向后然后分析代码,定位到具体的类,方法等,然后通过xposed来拦截修改方法等.
使用XposedModule two conditions:
- 手机必须root(Xposed需要往/systemWrite something in)
- 安装Xposed Installer
通过替换 /system/bin/app_process 程序控制 Zygote 进程,使得 app_process 在启动过程中会加载 XposedBridge.jar 这个 Jar 包,从而完成对 Zygote 进程及其创建的 Dalvik 虚拟机的劫持.
Xposed 在开机的时候完成对所有的 Hook Function 的劫持,在原 Function 执行的前后加上自定义代码.
下载地址:
下面这个仅适用于 Android 4.0.3 至 Android 4.4 上的 root 访问
https://repo.xposed.info/module/de.robv.android.xposed.installer
对于 Android 5.0 或更高版本改用下面这个
https://forum.xda-developers.com/t/official-xposed-for-lollipop-marshmallow-nougat-oreo-v90-beta3-2018-01-29.3034811/
2)Cydia Substrate
Cydia Substrate是一个基于Hook的代码修改框架,其可以在Android、iOS平台使用,并实现修改系统默认代码
Cydia Substrate 框架为苹果用户提供了越狱相关的服务框架,当然也推出了 Android 版 .Cydia Substrate 是一个代码修改平台,它可以修改任何进程的代码.
不管是用 Java 还是 C/C++(native代码)编写的,而 Xposed 只支持 Hook app_process 中的 Java 函数.
下载地址:
http://www.cydiasubstrate.com
3)Legend
Legend 是 Android 免 Root 环境下的一个 Apk Hook 框架,该框架代码设计简洁,通用性高,适合逆向工程时一些 Hook 场景.大部分的功能都放到了 Java 层,这样的兼容性就非常好
原理是这样的,直接构造出新旧方法对应的虚拟机数据结构,然后替换信息写到内存中即可
下载地址:
https://github.com/asLody/legend
4)VirtualXposed
VirtualXposed 是基于VirtualApp 和 epic 在非ROOT环境下运行Xposed模块的实现(支持5.0~10.0).
与 Xposed 相比,目前 VirtualXposed 有两个限制:
不支持修改系统(可以修改普通APP中对系统API的调用),因此重力工具箱,应用控制器等无法使用
暂不支持资源HOOK,因此资源钩子不会起任何作用;使用资源HOOK的模块,相应的功能不会生效
下载地址:
https://github.com/android-hacker/VirtualXposed
1.7 Hook 必须掌握的知识
反射
java 的动态代理
动态代理是指在运行时动态生成代理类,不需要我们像静态代理那个去手动写一个个的代理类.在 java 中,可使用 InvocationHandler 实现动态代理
1.8 Hook 选择的关键点
Hook 的选择点:尽量静态变量和单例,因为一旦创建对象,它们不容易变化,非常容易定位
Hook 过程:
- 寻找 Hook 点,原则是尽量静态变量或者单例对象,尽量 Hook public 的对象和方法
- 选择合适的代理方式,如果是接口可以用动态代理
- 偷梁换柱 —— 用代理对象替换原始对象
Android 的 API 版本比较多,方法和类可能不一样,所以要做好 API 的兼容工作
1.9 XposedThe introduction of some of the classes
- IXposedHookLoadPackage.java
Loading callback interface,在xposed入口类继承,实现handleLoadPackage方法
IXposedHookLoadPackage接口.该接口提供了一个名为handleLoadPackage的方法,这个方法在Android系统每次加载一个包的时候都会被调用
| handleLoadPackage | For when loading the application package to perform user operation |
|---|---|
| LoadPackageParam loadPackageParam | Contains a load of the application of some basic information |
- IXposedHookInitPackageResources.java
Loading callback interface,用于修改app的资源文件,在xposed入口类继承,实现handleInitPackageResources(InitPackageResourcesParam resparam)方法
| handleInitPackageResources | For when loading the application package to perform user operation |
|---|---|
| InitPackageResourcesParam resparam | Contains the loading some resources of the application of the basic information |
- XposedHelpers.java
一些辅助方法,Simplify the connection and call methods/构造函数,获取和设置字段
HOOK无参数的方法,XposedHelpers.findAndHookMethod()方法一般四个参数,分别为完整类名、ClassLoader对象、方法名以及一个回调接口
XposedHelpers.findAndHookMethod("com.example.demo.MortgageActivity", loadPackageParam.classLoader,
        "showLoan", new XC_MethodHook() {

	//……
});
HOOK有参数的方法,比如要传入两个int参数,则:
XposedHelpers.findAndHookMethod("com.example.demo.MortgageActivity", loadPackageParam.classLoader,
        "showLoan", int.class, int.class, new XC_MethodHook() {

	//……
});
PS:new XC_MethodHook()有两个重要的内部函数beforeHookedMethod()和afterHookedMethod(),通过重写它们可以实现对任意方法的挂钩,它们的区别在于Hook前调用还是后调用
beforeHookedMethod 该方法在hook目标方法执行前调用,
其中,参数paramRefers to the related parameters of the target method、回调、方法等信息

afterHookedMethod 该方法在hook目标方法执行后调用,
其中,参数paramRefers to the related parameters of the target method、回调、方法等信息.

XposedRun multiple modules on the same methodhook时,
框架就会根据XposedThe priority of the module to sort
XposedBridge类中hookAllMethods和logMethod is mainly used in ahookEach class all the methods or make enough function
hookAllMethods(
	Class<?> hookClass,//需要进行hook的类
	String methodName,//需要进行hook的方法名
	XC_MethodHook callback//回调函数
)
XposedHookLoadPackage中的handleLoadPackageMethod is mainly used for loading the application package to perform user operation.
| findAndHookMethod | hook一个类中的方法 |
|---|---|
| className | 要hookMethods in the class |
| classloader | 要hook的包的classLoader,一般都写loadPackageParam.classLoader |
| methodName | 要hook的方法 |
| parameterTypesAndCallback | Method of parameter and listener |
| callMethod | 在目标app中调用方法 |
|---|---|
| Object | To call a method in the class |
| methodName | 要调用的方法名称 |
| args | 方法的参数 |
| findClass | 获取class类实例 |
|---|---|
| className | 类名 |
| classLoader | 类加载器 |
- XposedBridge.java
| log | 在Xposed的appIn the logging output log |
|---|---|
| text | 要输出的内容 |
- XC_MethodHook中定义了回调方法
1.10 AndroidApplication shows the parts
1.10.1 MainActivity.java文件
The main activities code,The actual application file,将被转化为Dalvik可执行文件并运行.R.layout.activity_main引用res/layout/activity_main.xml文件.
onCreate() Activity is one of a number of the called method after loading.

1.10.2 AndroidManifest.xml文件
AndroidManifest.xmlFile is the information of the entire application description file,定义了应用程序中包含的Activity、Service、Content provider和BroadcastReceiver组件信息.每个应用程序在根目录下必须包含一个AndroidManifest.xml文件,且文件名不能修改.在AndroidManifest.xml文件中,First of all see yes<manifest>节点,It is the basic attribute of the application,Covers the process of the default name,应用程序标识,安装位置,The requirement to the system and the application of version and so on.
- android:iconIs a common icon
- android:roundIconIs a round icon
- android:labelThe name of the attribute to specify the application
- android:name属性指定一个Activity类子类的全名
意图过滤器的action被命名为android.intent.action.MAIN,表明这个活动被用做应用程序的入口.
意图过滤器的category被命名为android.intent.category.LAUNCHER,表明应用程序可以通过设备启动器的图标来启动.
@string指的是strings.xml,因此@string/app_name指的是定义在strings.xml中的app_name,这里实际为"HO22K"

1.10.3 activity_main.xml文件
activity_main.xmlMay frequently modify this file to change the layout of the application.
TextViewThe graphical interface is used to build a userAndroid控件.它包含有许多不同的属性,诸如android:layout_width,android:layout_height等用来设置它的宽度和高度等.Here we give it shows a word“Orange flavorHook”,引用自strings.xml文件

1.11 Android layout属性大全
activity_main.xml When need to use
1.11.1 第一类:属性值 true或者 false
| 属性 | 描述 |
|---|---|
| android:layout_centerHrizontal | 水平居中 |
| android:layout_centerVertical | 垂直居中 |
| android:layout_centerInparent | 相对于父元素完全居中 |
| android:layout_alignParentBottom | 贴紧父元素的下边缘 |
| android:layout_alignParentLeft | 贴紧父元素的左边缘 |
| android:layout_alignParentRight | 贴紧父元素的右边缘 |
| android:layout_alignParentTop | 贴紧父元素的上边缘 |
| android:layout_alignWithParentIfMissing | 如果对应的兄弟元素找不到的话就以父元素做参照物 |
| android:layout_alignParentStart | 紧贴父元素结束位置开始 |
| android:layout_alignParentEnd | 紧贴父元素结束位置结束 |
| android:animateLayoutChanges | 布局改变时是否有动画效果 |
| android:clipChildren | 定义子布局是否一定要在限定的区域内 |
| android:clipToPadding | 定义布局间是否有间距 |
| android:animationCache | 定义子布局也有动画效果 |
| android:alwaysDrawnWithCache | 定义子布局是否应用绘图的高速缓存 |
| android:addStatesFromChildren | 定义布局是否应用子布局的背景 |
| android:splitMotionEvents | 定义布局是否传递touch事件到子布局 |
| android:focusableInTouchMode | 定义是否可以通过touch获取到焦点 |
| android:isScrollContainer | 定义布局是否作为一个滚动容器 可以调整整个窗体 |
| android:fadeScrollbars | 滚动条自动隐藏 |
| android:fitsSystemWindows | 设置布局调整时是否考虑系统窗口(如状态栏) |
| android:visibility | 定义布局是否可见 |
| android:requiresFadingEdge | 定义滚动时边缘是否褪色 |
| android:clickable | 定义是否可点击 |
| android:longClickable | 定义是否可长点击 |
| android:saveEnabled | 设置是否在窗口冻结时(如旋转屏幕)保存View的数据 |
| android:filterTouchesWhenObscured | 所在窗口被其它可见窗口遮住时,是否过滤触摸事件 |
| android:keepScreenOn | 设置屏幕常亮 |
| android:duplicateParentState | 是否从父容器中获取绘图状态(光标,按下等) |
| android:soundEffectsEnabled | 点击或触摸是否有声音效果 |
| android:hapticFeedbackEnabled | 设置触感反馈 |
1.11.2 第二类:属性值必须为id的引用名“@id/id-name”
| 属性 | 描述 |
|---|---|
| android:layout_alignBaseline | 本元素的文本与父元素文本对齐 |
| android:layout_below | 在某元素的下方 |
| android:layout_above | 在某元素的的上方 |
| android:layout_toLeftOf | 在某元素的左边 |
| android:layout_toRightOf | 在某元素的右边 |
| android:layout_toStartOf | 本元素从某个元素开始 |
| android:layout_toEndOf | 本元素在某个元素结束 |
| android:layout_alignTop | 本元素的上边缘和某元素的的上边缘对齐 |
| android:layout_alignLeft | 本元素的左边缘和某元素的的左边缘对齐 |
| android:layout_alignBottom | 本元素的下边缘和某元素的的下边缘对齐 |
| android:layout_alignRight | 本元素的右边缘和某元素的的右边缘对齐 |
| android:layout_alignStart | 本元素与开始的父元素对齐 |
| android:layout_alignEnd | 本元素与结束的父元素对齐 |
| android:ignoreGravity | 指定元素不受重力的影响 |
| android:layoutAnimation | 定义布局显示时候的动画 |
| android:id | 为布局添加ID方便查找 |
| android:tag | 为布局添加tag方便查找与类似 |
| android:scrollbarThumbHorizontal | 设置水平滚动条的drawable |
| android:scrollbarThumbVertical | 设置垂直滚动条的drawable |
| android:scrollbarTrackHorizontal | 设置水平滚动条背景(轨迹)的色drawable |
| android:scrollbarTrackVertical | 设置垂直滚动条背景(轨迹)的色drawable |
| android:scrollbarAlwaysDrawHorizontalTrack | 设置水平滚动条是否含有轨道 |
| android:scrollbarAlwaysDrawVerticalTrack | 设置垂直滚动条是否含有轨道 |
| android:nextFocusLeft | 设置左边指定视图获得下一个焦点 |
| android:nextFocusRight | 设置右边指定视图获得下一个焦点 |
| android:nextFocusUp | 设置上边指定视图获得下一个焦点 |
| android:nextFocusDown | 设置下边指定视图获得下一个焦点 |
| android:nextFocusForward | 设置指定视图获得下一个焦点 |
| android:contentDescription | 说明 |
| android:OnClick | 点击时从上下文中调用指定的方法 |
1.11.3 第三类:属性值为具体的像素值,如30dip,40px,50dp
| 属性 | 描述 |
|---|---|
| android:layout_width | 定义本元素的宽度 |
| android:layout_height | 定义本元素的高度 |
| android:layout_margin | 本元素离上下左右间的距离 |
| android:layout_marginBottom | 离某元素底边缘的距离 |
| android:layout_marginLeft | 离某元素左边缘的距离 |
| android:layout_marginRight | 离某元素右边缘的距离 |
| android:layout_marginTop | 离某元素上边缘的距离 |
| android:layout_marginStart | 本元素里开始的位置的距离 |
| android:layout_marginEnd | 本元素里结束位置的距离 |
| android:scrollX | 水平初始滚动偏移 |
| android:scrollY | 垂直初始滚动偏移 |
| android:background | 本元素的背景 |
| android:padding | 指定布局与子布局的间距 |
| android:paddingLeft | 指定布局左边与子布局的间距 |
| android:paddingTop | 指定布局上边与子布局的间距 |
| android:paddingRight | 指定布局右边与子布局的间距 |
| android:paddingBottom | 指定布局下边与子布局的间距 |
| android:paddingStart | 指定布局左边与子布局的间距与android:paddingLeft相同 |
| android:paddingEnd | 指定布局右边与子布局的间距与android:paddingRight相同 |
| android:fadingEdgeLength | 设置边框渐变的长度 |
| android:minHeight | 最小高度 |
| android:minWidth | 最小宽度 |
| android:translation | X水平方向的移动距离 |
| android:translation | Y垂直方向的移动距离 |
| android:transformPivot | X相对于一点的水平方向偏转量 |
| android:transformPivot | Y相对于一点的垂直方向偏转量 |
1.11.4 第四类:属性值为Android内置值
| 属性 | 描述 |
|---|---|
| android:gravity | 控件布局方式 |
| android:layout_gravity | 布局方式 |
| android:persistentDrawingCachehua | 定义绘图的高速缓存的持久性 |
| android:descendantFocusability | 控制子布局焦点获取方式 常用于listView的itemInclude multiple controls click is invalid |
| android:scrollbars | 设置滚动条的状态 |
| android:scrollbarStyle | 设置滚动条的样式 |
| android:fitsSystemWindows | 设置布局调整时是否考虑系统窗口(如状态栏) |
| android:scrollbarFadeDuration | 设置滚动条淡入淡出时间 |
| android:scrollbarDefaultDelayBeforeFade | 设置滚动条N毫秒后开始淡化,以毫秒为单位 |
| android:scrollbarSize | 设置滚动调大小 |
| android:fadingEdge | 设置拉滚动条时,边框渐变的放向 |
| android:drawingCacheQuality | 设置绘图时半透明质量 |
| android:OverScrollMode | 滑动到边界时样式 |
| android:alpha | 设置透明度 |
| android:rotation | 旋转度数 |
| android:rotation | X水平旋转度数 |
| android:rotation | Y垂直旋转度数 |
| android:scale | X设置X轴缩放 |
| android:scale | Y设置Y轴缩放 |
| android:verticalScrollbarPosition | 摄者垂直滚动条的位置 |
| android:layerType | 设定支持 |
| android:layoutDirection | 定义布局图纸的方向 |
| android:textDirection | 定义文字方向 |
| android:textAlignment | 文字对齐方式 |
| android:importantForAccessibility | 设置可达性的重要行 |
| android:labelFor | 添加标签 |
0x02 Xposed环境搭建
下载Xposed APK:
https://dl-xda.xposed.info/modules/de.robv.android.xposed.installer_v33_36570c.apk


Open just installedXposed


Here for the convenience of select remember forever


安装Xposed可能会出现如下情况:

After the installation may appear inactive, 拉入JustTrustMe.apk, And then restart the emulator can
然后修改wifi的ip和端口
- 下载
xposed-x86_64.zip
下载xposed作者模拟器是x86_64的
https://github.com/youling257/XposedTools/files/1931996/xposed-x86_64.zip
如果模拟器是x86下载下面这个
https://dl-xda.xposed.info/framework/
- 下载
script.sh
找到安卓对应版本,作何雷电模拟器是7.1,搜索对应为安卓7.1 sdk
x86_64的下载这个:
https://forum.xda-developers.com/attachment.php?attachmentid=4489568&d=1525092710
x86的下载这个,script.txt:
https://forum.xda-developers.com/attachments/script-txt.4489568/,改名为script.sh
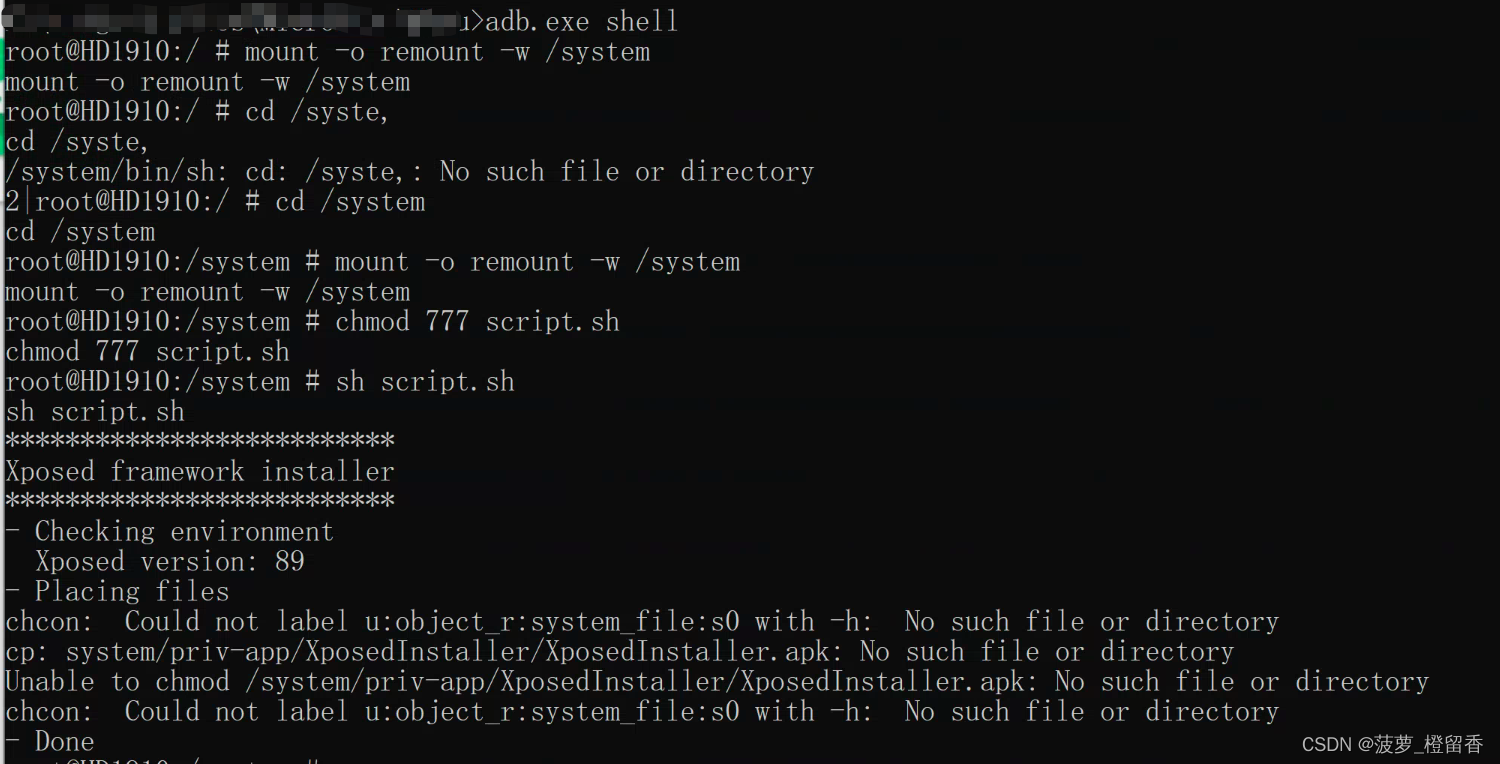
创建文件夹xposed,然后解压一下xposed压缩包,最后把xposed压缩包中的system文件夹和script.shIn the newly createdxposed文件夹,The last of the last to perform the following commands:
adb.exe remount
adb.exe push D:\test\xposed  /system
adb.exe shell
cd /system
mount -o remount -w /system
chmod 777 script.sh
sh script.sh
0x03 Xposed原理分析
XposedThe principle of framework is to modify system files,替换了/system/bin/app_process可执行文件,在启动ZygoteWhen loading the extrajar文件(/data/data/de.robv.android.xposed.installer/bin/XposedBridge.jar),And performs some initialization(执行XposedBridge的main方法).Then developers can in thisZygoteThe context for someHook操作.
在Android中,zygote是整个系统创建新进程的核心进程.zygote进程在内部会先启动Dalvik虚拟机,继而加载一些必要的系统资源和系统类,最后进入一种监听状态.
在之后的运作中,While the rest of the system module(比如AMS)Want to create a new process,只需向zygote进程发出请求,zygoteProcess after listening to this request,Accordinglyfork出新的进程,So the new process at the time of the primary,Is born with their ownDalvikThe virtual machine and system resources.
zygote进程是由init进程启动起来,由init.rc 脚本中关于zygote的描述可知:zygoteCorresponding to the executable file is/system/bin/app_process,That is to say, when system start execution to the executable filemain()函数里
Xposed Provides several interface classes forxposed模块继承,Different interface classes for differenthook时机 IXposedHookZygoteInit zygote Initialized before they can perform hook,即loadModuleExecution is the hook IXposedHookLoadPackage apkPackage execution hook when loaded,First to save hook function,等加载apkAfter function performs the triggercallback (这里的callback是xposedFrame your hook function),Perform module and register the hook function IXposedHookInitPackageResources apkWhen resource instances to perform hook,同上
0x03 编写Xposed 模块
从本质上来讲,Xposed Module is a Android 程序.But unlike ordinary procedure,Want to writeAndroidApplication become aXposed 模块,To finish the following four extra hard task:
- Let the phonexposedKnow that we install the framework of this program is axposed模块
- In the module to includexposed的API的jar包,In order to realize the nexthook操作
- This module of target program to havehook操作的方法
- To make a mobile phonexposed框架知道,我们编写的xposed模块中,Which one method is to realize thehook操作的
This leads to the following four items(Compared with the first four steps one by one):
- AndroidManifest.xml
- XposedBridgeApi-xx.jar 与 build.gradle
- 实现hookOperation of the specific code
- xposed_Init
PS:Keep in mind the above four items,According to the order a an implementation,就能完成Xposed模块编写
3.1 创建一个Android项目
官网下载地址:https://developer.android.com/studio?hl=zh-cn
A key to fool little installation,The installation process to ignore don't write,Don't understand to baidu to search
首先打开AndroidStudio(以版本3.1为例),建立一个工程,提示我们选择“Activity”,那就选一个Empty Activity吧.(This is a module interface,随意选择即可)

After the completion of the new download depend on,可能会出现如下报错(是没有科学上网导致的,Either you science online,要么你把gradleVersion to install downloaded to a local


To the following address:
distributionUrl=file:///C:/Users/xxxxx/.gradle/wrapper/dists/gradle-7.2-bin.zip
Then may findgradleThe plug-in download problems again,解决办法如下:

如上图,注释掉google(),新增如下maven:
        //google()
        maven {
     url 'https://maven.aliyun.com/repository/google'}
        maven {
     url 'https://maven.aliyun.com/repository/jcenter'}
        maven {
     url 'https://maven.aliyun.com/repository/public'}
And the following position:

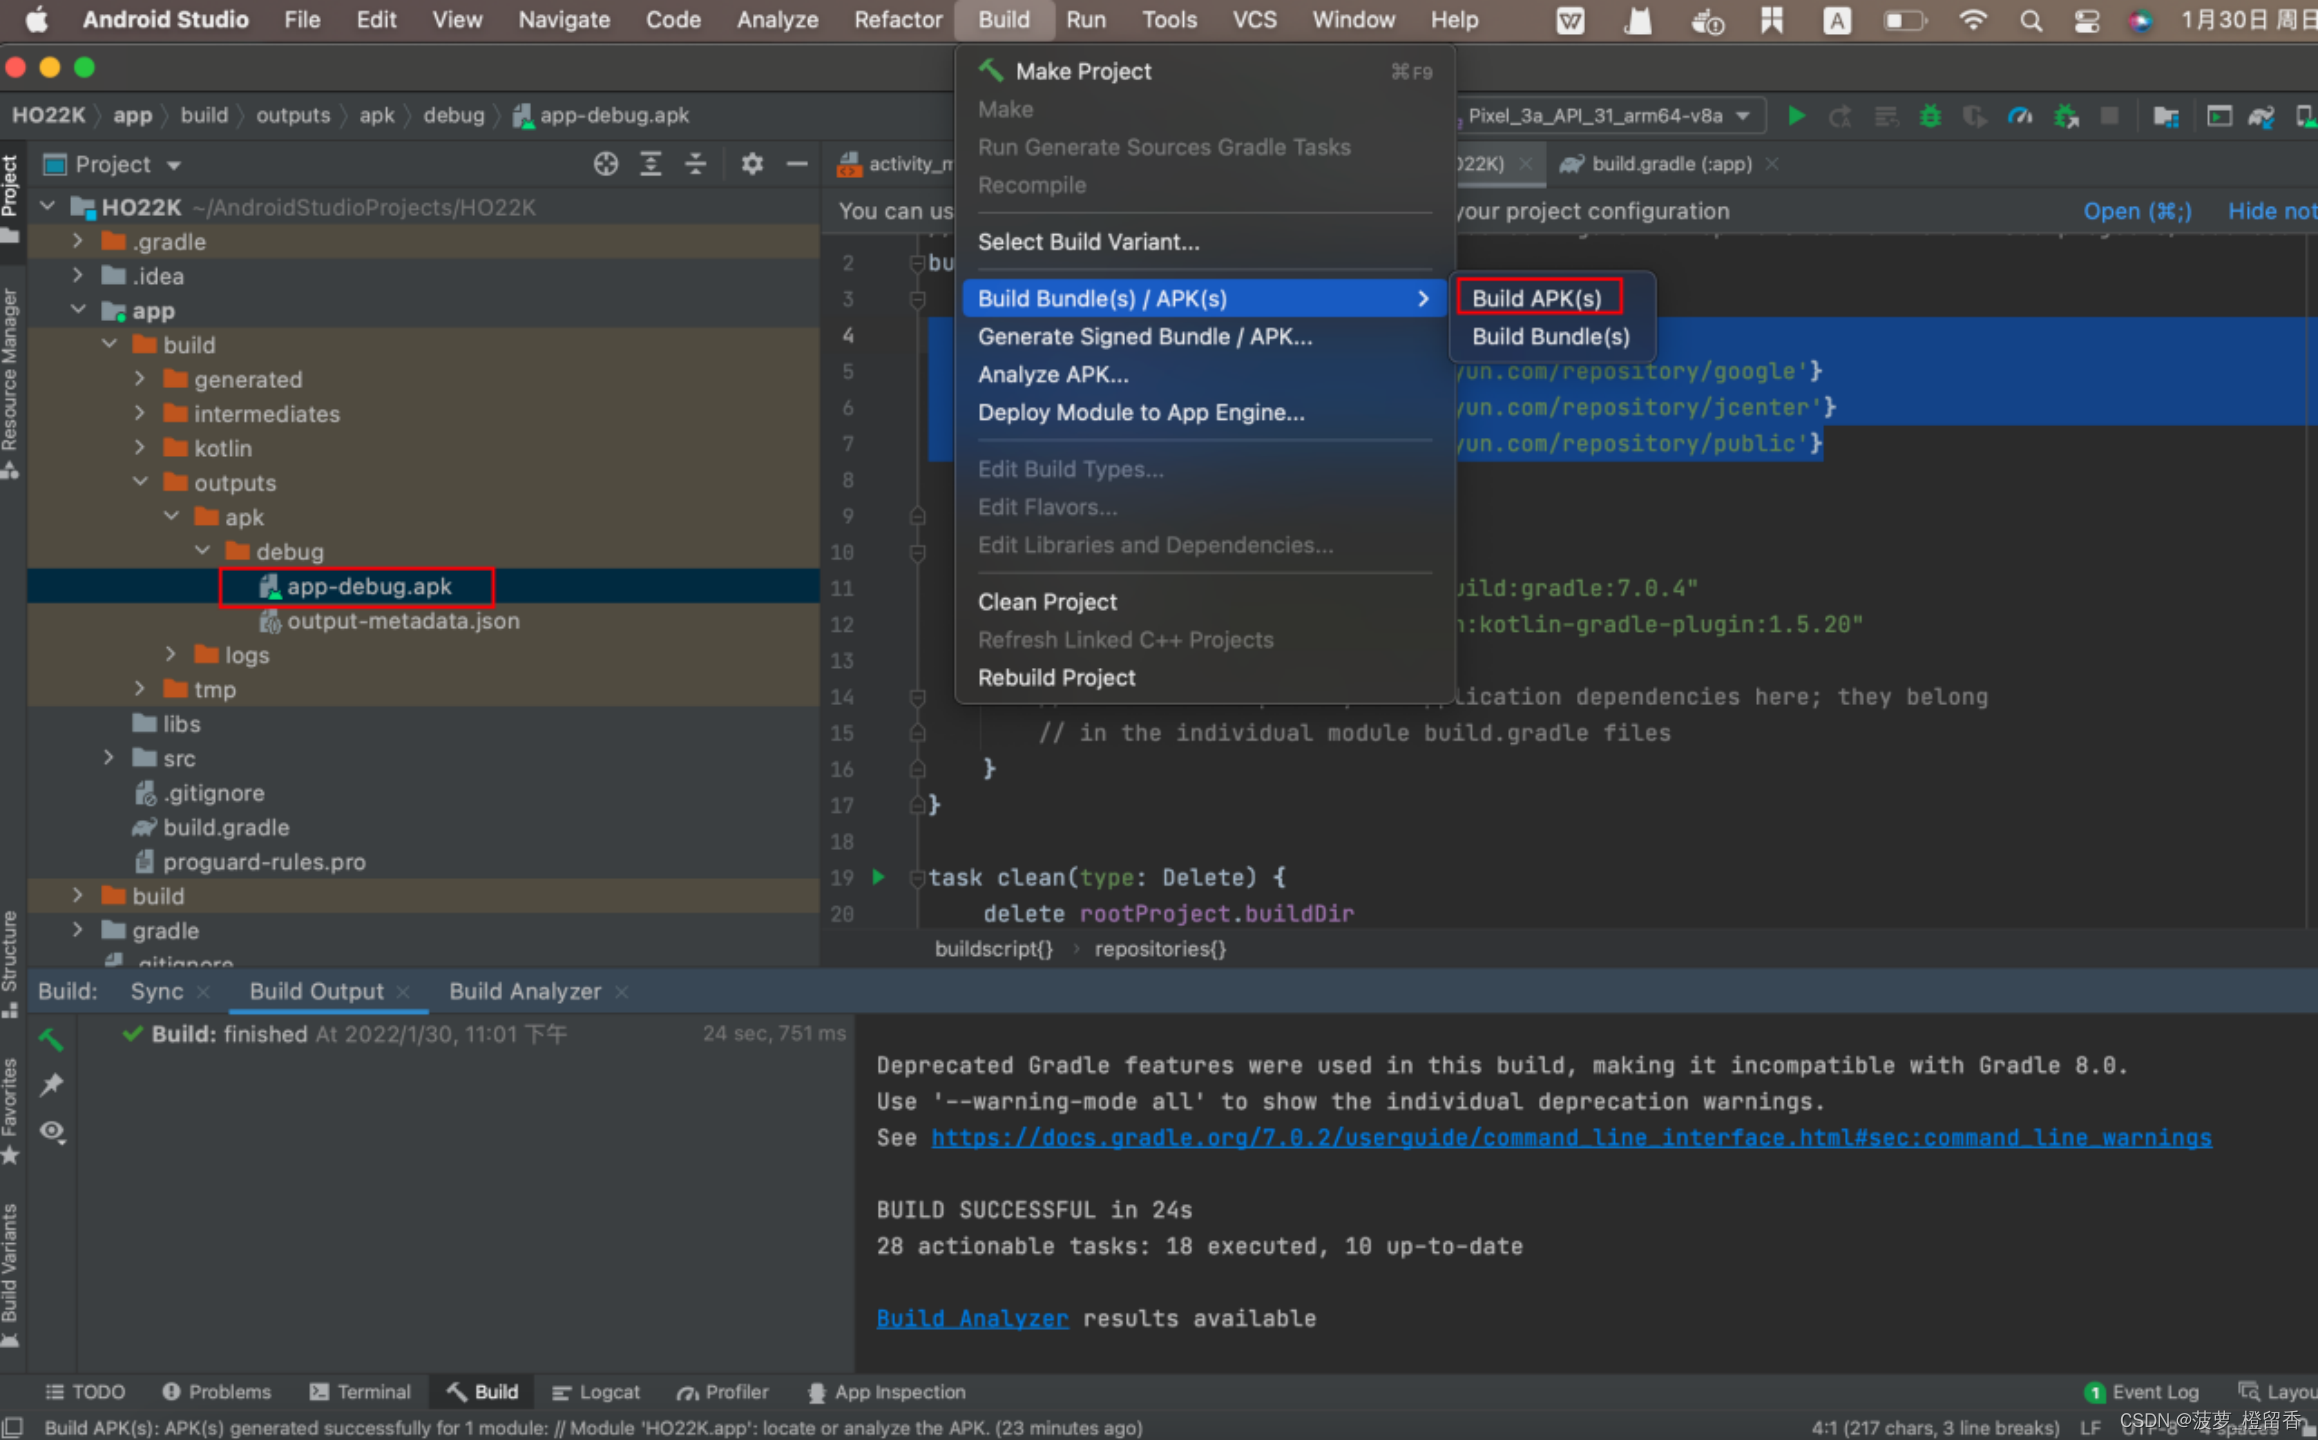
最后关闭Android Studio,Open the project again automatically load,If there is no more red warning means at this timeOK了,And then directly compiled aDemo的APK(app/build/outputs/apk/debug目录下,可以看到app-debug.apk),看看是否能正常运行,如下图:
On the emulator,Can find normal installation and operation,如下图:

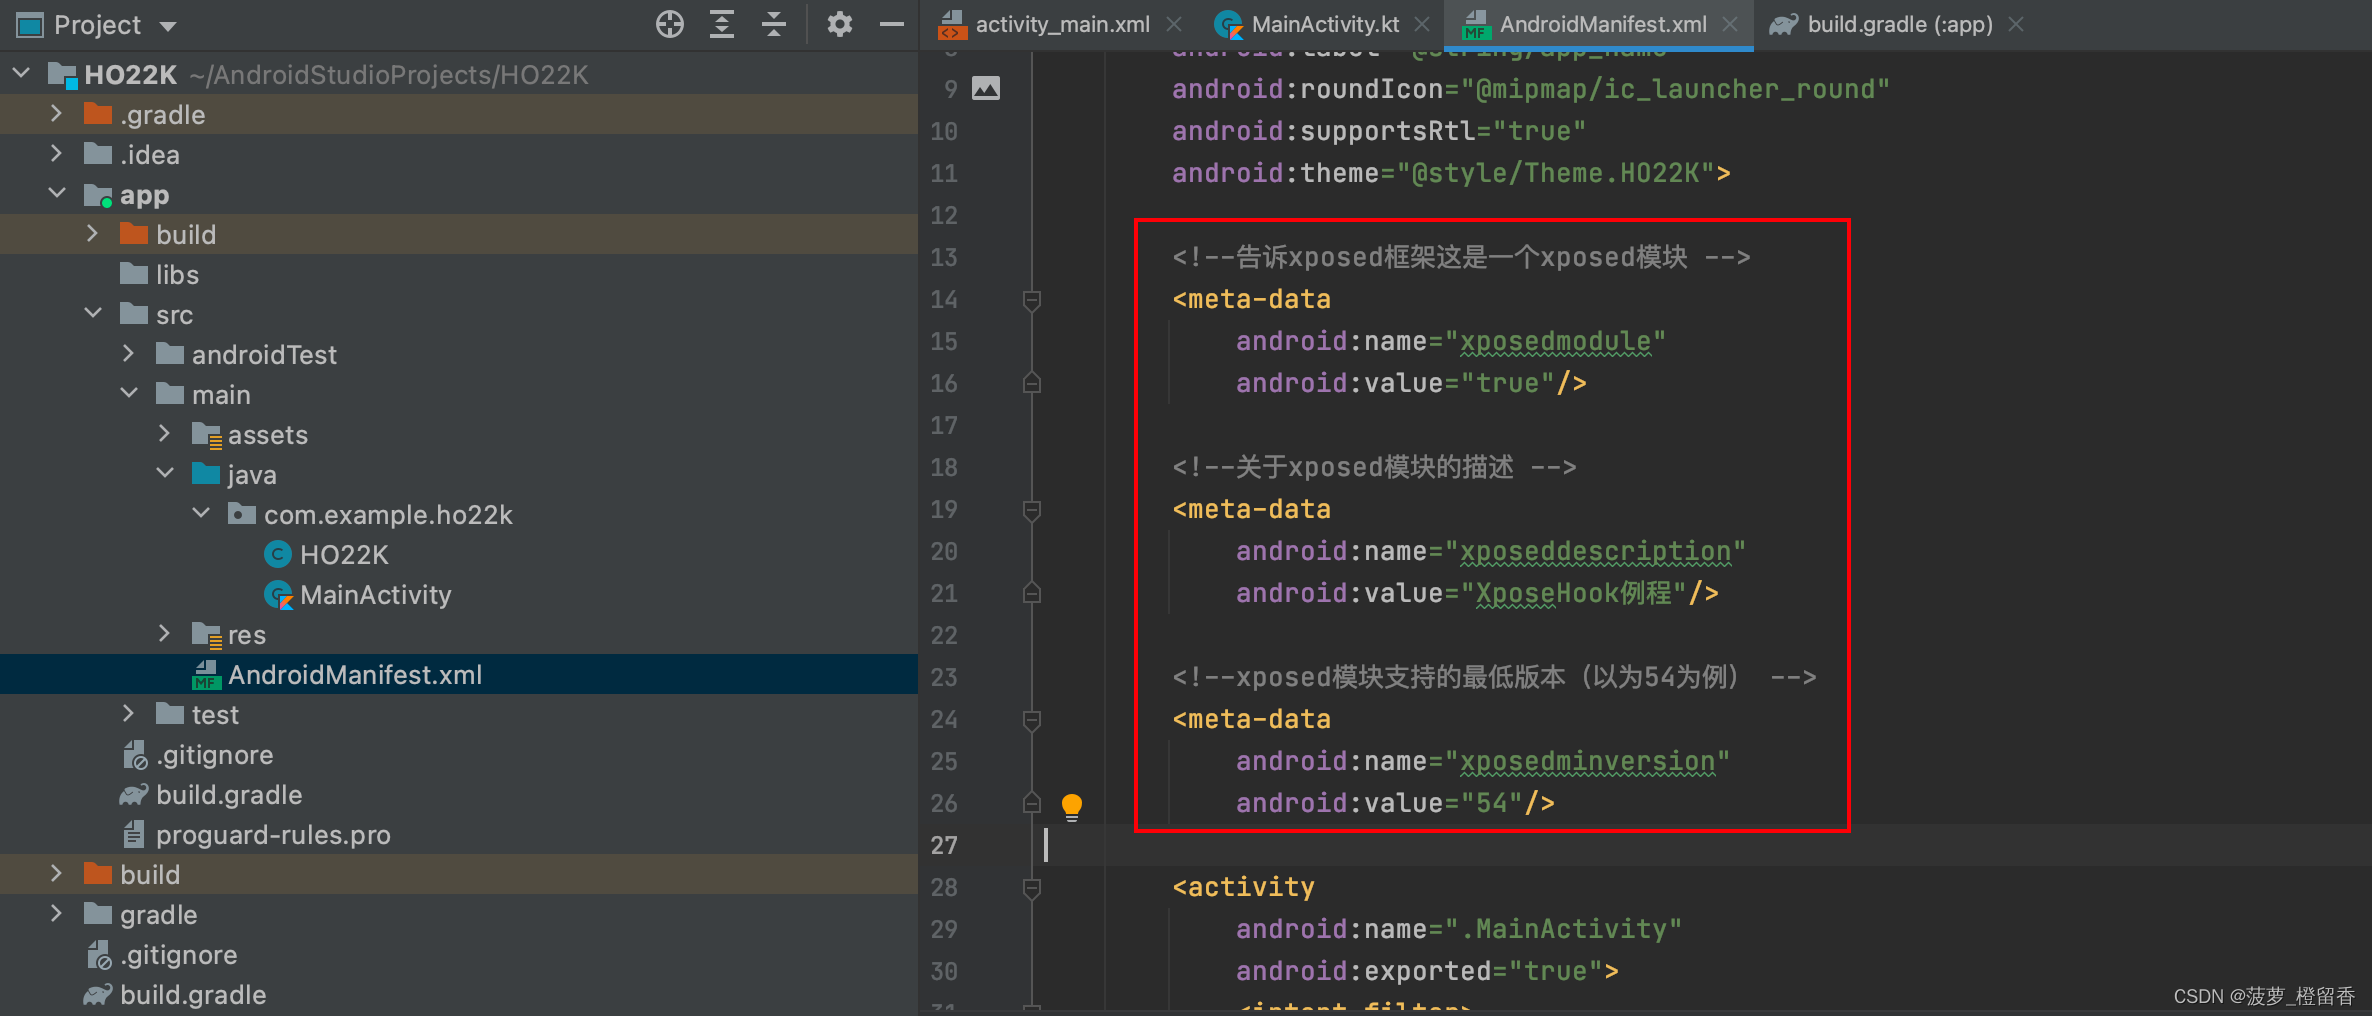
3.2 配置AndroidManifest.xml
为了让Xposed Identify aXposed模块,需要添加如下内容:
        <!--告诉xposed框架这是一个xposed模块 -->
        <meta-data
            android:name="xposedmodule"
            android:value="true"/>

        <!--关于xposed模块的描述 -->
        <meta-data
            android:name="xposeddescription"
            android:value="XposeHook例程"/>

        <!--xposed模块支持的最低版本(以为54为例) -->
        <meta-data
            android:name="xposedminversion"
            android:value="54"/>
Modify text content as:Orange flavorHooK

The compiled at this timeAPK丢进去,打开后,如下

PS:See from above has been,XposedFramework has been spotted just write program,But now this module have nothing to do,Because we haven't changed
3.3 配置XposedBridgeApi-xx.jar与build.gradle
XposedMain function module is used toHookOther programs of various functions.
- 接下来,How to let you just created theXposed“一穷二白”The function of the module to add some other?
引入 XposedBridgeApi.jar包,Can understand the package is a weapon,XposedThe module with this rare artifacts to cast outHook武功.
3.x以前,All need to manually download such asXposedBridgeApi的jar包,Then manually import tolibs目录里
- XposedBridgeApi-54下载
https://forum.xda-developers.com/attachment.php?s=5903ce1b3edb1032faba7292b21e1801&attachmentid=2748878&d=1400342298
PS:除了XposedBridgeApi-54,还有XposedBridgeApi-82.jar、XposedBridgeApi-87.jar、XposedBridgeApi-89.jar等版本
官网下载:https://bintray.com/rovo89/de.robv.android.xposed/api
在AndroidStudio 3.1里面,只需要一行代码,AndroidStuido就会自动配置XposedBridgeApi.jar
- 方法1:
Android Studio的依赖:
XposedFramework needs to use a third-party library,在 app --> build-gradle 添加依赖(最后一行)
repositories {

    // 告诉AndroidStuido使用jcenter作为代码仓库,
    // From the warehouse in remote looking for
    // de.robv.android.xposed:api:82 这个API
    // 但最新版的3.x版本已不推荐使用
    jcenter();
}

dependencies {

    provided 'de.robv.android.xposed:api:82'
}
注:
   此处要用compileOnly这个修饰符,
   Some of the writing is onlineprovide,
   已经停用了
    compileOnly 'de.robv.android.xposed:api:82'
    compileOnly 'de.robv.android.xposed:api:82:sources'
修改完成后,build.gradleYou will be prompted file has been modified,是否同步.点击 “sync now”,同步即可,如下:

3.4 实现hook操作修改
在MainActivityThe path at the same level of a new class“HO22K.java”,操作如下图:


代码如下:
package com.example.ho22k;

import de.robv.android.xposed.IXposedHookLoadPackage;
import de.robv.android.xposed.XposedBridge;
import de.robv.android.xposed.callbacks.XC_LoadPackage;

public class HO22K implements IXposedHookLoadPackage
{

    /** * xpose插件入口点 * @param lpparam * @throws Throwable */
    @Override
    public void handleLoadPackage(XC_LoadPackage.LoadPackageParam loadPackageParam) throws Throwable {

        // 获取加载的apk程序包名
        XposedBridge.log("当前启动的应用程序是: " + loadPackageParam.packageName);
        XposedBridge.log("Hook成功咯,宝们~_~!");
    }
}

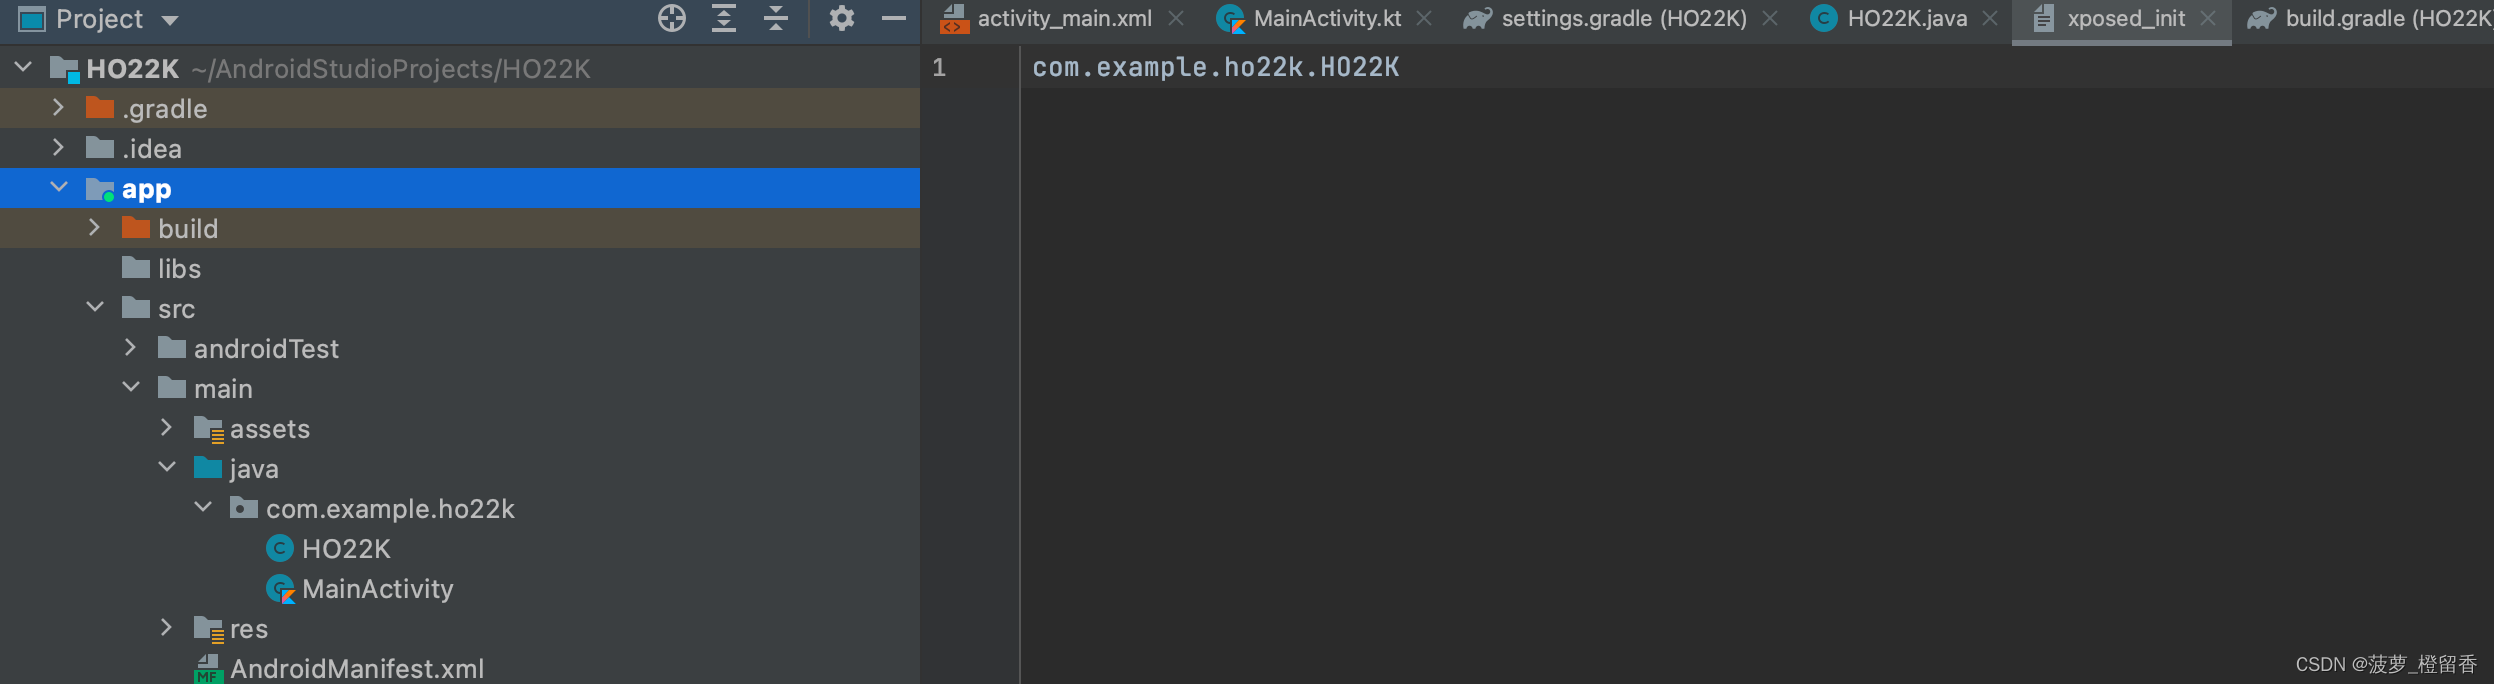
3.5 Add the entry pointxposed_Init
右键点击 “main” 文件夹 , 选择new --> Folder -->Assets Folder,新建assets 文件夹:

然后右键点击 assets文件夹, new–> file,文件名为xposed_init(文件类型选text),And write the entry class in which the full path of the(That one is write your ownHook类),这样, Xposed框架就能够从这个 xposed_init 读取信息来找到模块的入口,然后进行Hook操作了


xposed_initWrite in the path of the current class If there are multiple classes,So each write a,多个写多行
编译APK,在如下路径:

PS:Compile time needs to be closedAndroid Studio的instant Run功能(Don't know why want to shut down,I don't have closed as can normal use),注意注意Android Studio 3.5往后的版本,Instant Run被HotSwap代替,如下图

安装apk,在XposedCheck module plug-ins,重启,As the plug-in can be normal use

观察日志,可通过XposedFrame internal log module orLogCat 查看

PS:Windows CMDLook at the journal could have is stil,解决方法如下:
执行如下命令后,代码页就被变成UTF-8
chcp 65001

Then modify properties of the window,Change the font in the right click on the command line on the title bar,选择"属性"->“字体”,将字体修改为True Type字体"Lucida Console",然后点击确定将属性应用到当前窗口
adb.exe shell

logcat

- 方法2:下载jar文件,存放至libs目录,Other details to baidu to know
Not said separately set up onlinelib文件夹,That is a long time ago,然后右键“Add As Library” To add thisjar包.而compileOnly 'de.robv.android.xposed:api:82'和compileOnly 'de.robv.android.xposed:api:82:sources'Still as usual to add
0x04 In some other cases
4.1 Button heldHook
实现一个APK,Basic function is to click on the button interface,Will pop-up message you not hijacked a message,具体完整代码如下(test APK代码):
- MainActivity:
import androidx.appcompat.app.AppCompatActivity;
import android.os.Bundle;
import android.view.View;
import android.widget.Button;
import android.widget.Toast;


public class MainActivity extends AppCompatActivity {
    private Button button;

    public void onCreate(Bundle savedInstanceState) {
        super.onCreate(savedInstanceState);
        setContentView(R.layout.activity_main);

        button = (Button) findViewById(R.id.button);

        button.setOnClickListener(new View.OnClickListener() {
            public void onClick(View v) {
                Toast.makeText(MainActivity.this, toastMessage(), Toast.LENGTH_SHORT).show();
            }
        });
    }

    public String toastMessage() {
        return "想啥呢?同学,我未被劫持";
    }
}
- activity_main.xml:
<?xml version="1.0" encoding="utf-8"?>
<androidx.constraintlayout.widget.ConstraintLayout xmlns:android="http://schemas.android.com/apk/res/android"
    xmlns:app="http://schemas.android.com/apk/res-auto"
    xmlns:tools="http://schemas.android.com/tools"
    android:layout_width="match_parent"
    android:layout_height="match_parent"
    tools:context=".MainActivity">


    <Button
        android:id="@+id/button"
        android:layout_width="wrap_content"
        android:layout_height="wrap_content"
        android:text="按一下按钮,Confirm whether the hijacked"
        tools:layout_editor_absoluteX="78dp"
        tools:layout_editor_absoluteY="364dp" />
</androidx.constraintlayout.widget.ConstraintLayout>

然后在HO22K 项目里面创建Xposed插件,Bloggers to slack off here,Directly in a project to write,所以不加载Xposed,只要APKExecution is calledHO22K类,达到类似HO22K效果(Is not recommended as blogger,自己重新创建一个APK和插件APK,Don't write both together),代码和效果如下:
package com.example.ho22k;


import de.robv.android.xposed.IXposedHookLoadPackage;
import de.robv.android.xposed.XC_MethodHook;
import de.robv.android.xposed.XposedHelpers;
import de.robv.android.xposed.callbacks.XC_LoadPackage;

public class HO22K implements IXposedHookLoadPackage
{


    //Module继承了IXposedHookLoadPackage接口,When the system load of packages and adjust handleLoadPackage;
    public void handleLoadPackage(XC_LoadPackage.LoadPackageParam loadPackageParam) throws Throwable {

        //过滤包名,定位要Hook的包名
        if (loadPackageParam.packageName.equals("com.example.ho22k")) {


            //定位要HookThe specific name of the class
            Class clazz = loadPackageParam.classLoader.loadClass("com.example.ho22k.MainActivity");
            //Hook的方法为toastMessage,XposedHelpers的静态方法 findAndHookMethod就是hookThe method of function of the,The parameters corresponding to 类名+loadPackageParam.classLoader(照写)+方法名+参数类型(根据所hook方法的参数的类型,That is how many write how many,加上.class)+XC_MethodHook回调接口;
            XposedHelpers.findAndHookMethod(clazz, "toastMessage", new XC_MethodHook() {

                protected void beforeHookedMethod(MethodHookParam param) throws Throwable {

                    super.beforeHookedMethod(param);
                }

                protected void afterHookedMethod(XC_MethodHook.MethodHookParam param) throws Throwable {

                    //param.setResult("你已被劫持")Returns the result of the set has been hijacked you
                    param.setResult("哦吼,Students have been hijacked you");
                }
            });
        }
    }
}


4.2 登陆劫持
Log in to hijack this password,First write a simple login procedure,完整代码如下:
- MainActivity:
package com.example.ho22k;

import androidx.appcompat.app.AppCompatActivity;
import android.os.Bundle;
import android.view.View;
import android.widget.Button;
import android.widget.EditText;
import android.widget.Toast;

public class MainActivity extends AppCompatActivity {

    EditText Name;   //定义Plain Test控件第一个输入框的名字
    EditText Pass;   //定义Plain Test控件第二个输入框的名字

    protected void onCreate(Bundle savedInstanceState) {

        super.onCreate(savedInstanceState);
        setContentView(R.layout.activity_main);
        Name = (EditText) findViewById(R.id.TEXT_NAME); //通过findViewById找到输入框控件对应的id并给它起一个名字
        Pass = (EditText) findViewById(R.id.TEXT_PASS);//通过findViewById找到输入框控件对应的id并给它起一个名字
        Button Login = (Button) findViewById(R.id.BTN_Login);//通过findViewById找到按钮控件对应的id并给它起一个名字
        Login.setOnClickListener(new View.OnClickListener() {
      //监听有没有点击按钮控件 如果点击了就会执行onClick函数
            @Override
            public void onClick(View view) {

                check(Name.getText().toString().trim(),Pass.getText().toString().trim()); //调用check函数
            }
        });
    }
    public void check(String name,String pass)   //自定义函数check 这里用来检查用户名和密码是否是cck和1234
    {

        if(name.equals("Orangey")&&pass.equals("123456"))
        {

            Toast.makeText(MainActivity.this,"登录成功", Toast.LENGTH_SHORT).show();//弹框
        }
        else
            Toast.makeText(MainActivity.this,"登录失败", Toast.LENGTH_SHORT).show();//弹框
    }
}
- activity_main.xml:
<?xml version="1.0" encoding="utf-8"?>
<androidx.constraintlayout.widget.ConstraintLayout xmlns:android="http://schemas.android.com/apk/res/android"
    xmlns:app="http://schemas.android.com/apk/res-auto"
    xmlns:tools="http://schemas.android.com/tools"
    android:layout_width="match_parent"
    android:layout_height="match_parent"
    tools:context=".MainActivity">

    <TextView
        android:id="@+id/textView"
        android:layout_width="wrap_content"
        android:layout_height="wrap_content"
        android:layout_marginEnd="23dp"
        android:text="账号:"
        app:layout_constraintBaseline_toBaselineOf="@+id/TEXT_NAME"
        app:layout_constraintEnd_toStartOf="@+id/TEXT_NAME"
        app:layout_constraintHorizontal_chainStyle="packed"
        app:layout_constraintStart_toStartOf="parent"
        tools:ignore="MissingConstraints" />

    <TextView
        android:id="@+id/textView2"
        android:layout_width="wrap_content"
        android:layout_height="wrap_content"
        android:layout_marginEnd="23dp"
        android:text="密码:"
        app:layout_constraintBaseline_toBaselineOf="@+id/TEXT_PASS"
        app:layout_constraintEnd_toStartOf="@+id/TEXT_PASS"
        app:layout_constraintHorizontal_chainStyle="packed"
        app:layout_constraintStart_toStartOf="parent"
        tools:ignore="MissingConstraints" />

    <EditText
        android:id="@+id/TEXT_NAME"
        android:layout_width="wrap_content"
        android:layout_height="wrap_content"
        android:layout_alignBottom="@+id/textView"
        android:layout_marginTop="180dp"
        android:layout_marginEnd="1dp"
        android:layout_toEndOf="@+id/textView"
        android:layout_toRightOf="@+id/textView"
        android:ems="10"
        android:inputType="textPersonName"
        app:layout_constraintEnd_toEndOf="parent"
        app:layout_constraintStart_toEndOf="@+id/textView"
        app:layout_constraintTop_toTopOf="parent"
        tools:ignore="MissingConstraints" />

    <EditText
        android:id="@+id/TEXT_PASS"
        android:layout_width="wrap_content"
        android:layout_height="wrap_content"
        android:layout_alignBottom="@+id/textView2"
        android:layout_marginTop="35dp"
        android:layout_marginEnd="1dp"
        android:layout_toEndOf="@+id/textView2"
        android:layout_toRightOf="@+id/textView2"
        android:ems="10"
        android:inputType="textPassword"
        app:layout_constraintEnd_toEndOf="parent"
        app:layout_constraintStart_toEndOf="@+id/textView2"
        app:layout_constraintTop_toBottomOf="@+id/TEXT_NAME"
        tools:ignore="MissingConstraints" />

    <Button
        android:id="@+id/BTN_Login"
        android:layout_width="wrap_content"
        android:layout_height="wrap_content"
        android:layout_marginTop="42dp"
        android:text="登录"
        app:layout_constraintEnd_toEndOf="@+id/TEXT_PASS"
        app:layout_constraintStart_toStartOf="@+id/TEXT_PASS"
        app:layout_constraintTop_toBottomOf="@+id/TEXT_PASS" />


</androidx.constraintlayout.widget.ConstraintLayout>
账号:Orangey 密码:123456
Correct account password below:

账号:a 密码:123456
Wrong account or password below:

PS:If there is an interface layout chaos,You just need to set up the constraint,如下图:

目的:No matter what input displays landing successful,Hook对应的方法,And the corresponding parameter modification,Or use the callback method above to implement
import de.robv.android.xposed.IXposedHookLoadPackage;
import de.robv.android.xposed.XC_MethodHook;
import de.robv.android.xposed.XposedBridge;
import de.robv.android.xposed.callbacks.XC_LoadPackage;
import static de.robv.android.xposed.XposedHelpers.findAndHookMethod;

public class HO22K implements IXposedHookLoadPackage {


    /** * Package the callback when loading */
    public void handleLoadPackage(final XC_LoadPackage.LoadPackageParam lpparam) throws Throwable {


        // Will the package name is not com.example.ho22k Out of the application of,Can reduce the management class
        if (!lpparam.packageName.equals("com.example.ho22k"))
            return;
        XposedBridge.log("当前APP应用程序是: " + lpparam.packageName);

        //第一个参数是className,Said being pumped into the method of class
        //The second parameter is the class loader,照抄就行
        //The third parameter is being pumped into the method name
        //DiSiWuGe parameter is the third parameter of two parameters of type
        //The last parameter is an anonymous inner class
        findAndHookMethod("com.example.ho22k.MainActivity", lpparam.classLoader, "check", String.class,
                String.class, new XC_MethodHook() {


                    /** * 该方法在check方法调用之前被调用,输出一些日志,And capture the value of the parameter. * The last two lines of purpose is to change the value of the parameter.That is to say, no matter what parameter is the value,都会被替换为name为Orangey,pass为123456 * @param param * @throws Throwable */
                    protected void beforeHookedMethod(MethodHookParam param) throws Throwable {

                        XposedBridge.log("同学,You are being people began to hijack");
                        XposedBridge.log("参数1 = " + param.args[0]);
                        XposedBridge.log("参数2 = " + param.args[1]);
                        param.args[0] = "Orangey";
                        param.args[1] = "123456";
                    }
                    /** * 该方法在check方法调用之后被调用 * @param param * @throws Throwable */

                    protected void afterHookedMethod(MethodHookParam param) throws Throwable {

                        XposedBridge.log("哦吼,Students hijacked is over");
                        XposedBridge.log("参数1 = " + param.args[0]);
                        XposedBridge.log("参数2 = " + param.args[1]);

                    }
                });
    }

}
Through the method of the parameters for the heavy assignment,效果如下图:


Github上的一些Xposed案例APK地址:
- 原始程序:https://github.com/Gordon0918/XposedHookTarget
- hookModify source program address:https://github.com/Gordon0918/XposedHook
参考链接:
https://blog.csdn.net/gdutxiaoxu/article/details/81459830
https://eastmoon.blog.csdn.net/article/details/103810710
https://blog.csdn.net/SouthWind0/article/details/100669530
https://blog.csdn.net/JBlock/article/details/84202240
https://www.cnblogs.com/mukekeheart/p/5662842.html
https://blog.csdn.net/song_lee/article/details/103299353
我自横刀向天笑,去留肝胆两昆仑
边栏推荐
- 没有 accept,TCP 连接可以建立成功吗?
- 字节二面,差点倒在了MySQL上面
- Win10系统80端口被占用的解决方法
- 2021 RoboCom 世界机器人开发者大赛-本科组(决赛)
- Intensive reading of the paper: VIT - AN IMAGE IS WORTH 16X16 WORDS: TRANSFORMERS FOR IMAGE RECOGNITION AT SCALE
- 阿里云架构师耗时几个月编写这份MySQL高可用和性能优化技术宝典
- 2022.08.08_每日一题
- 2022.08.05_每日一题
- C#/VB.NET:从PowerPoint文档中提取文本和图片
- An overview of Office 365 Groups and how to create them
猜你喜欢

你应该试着独自做个游戏
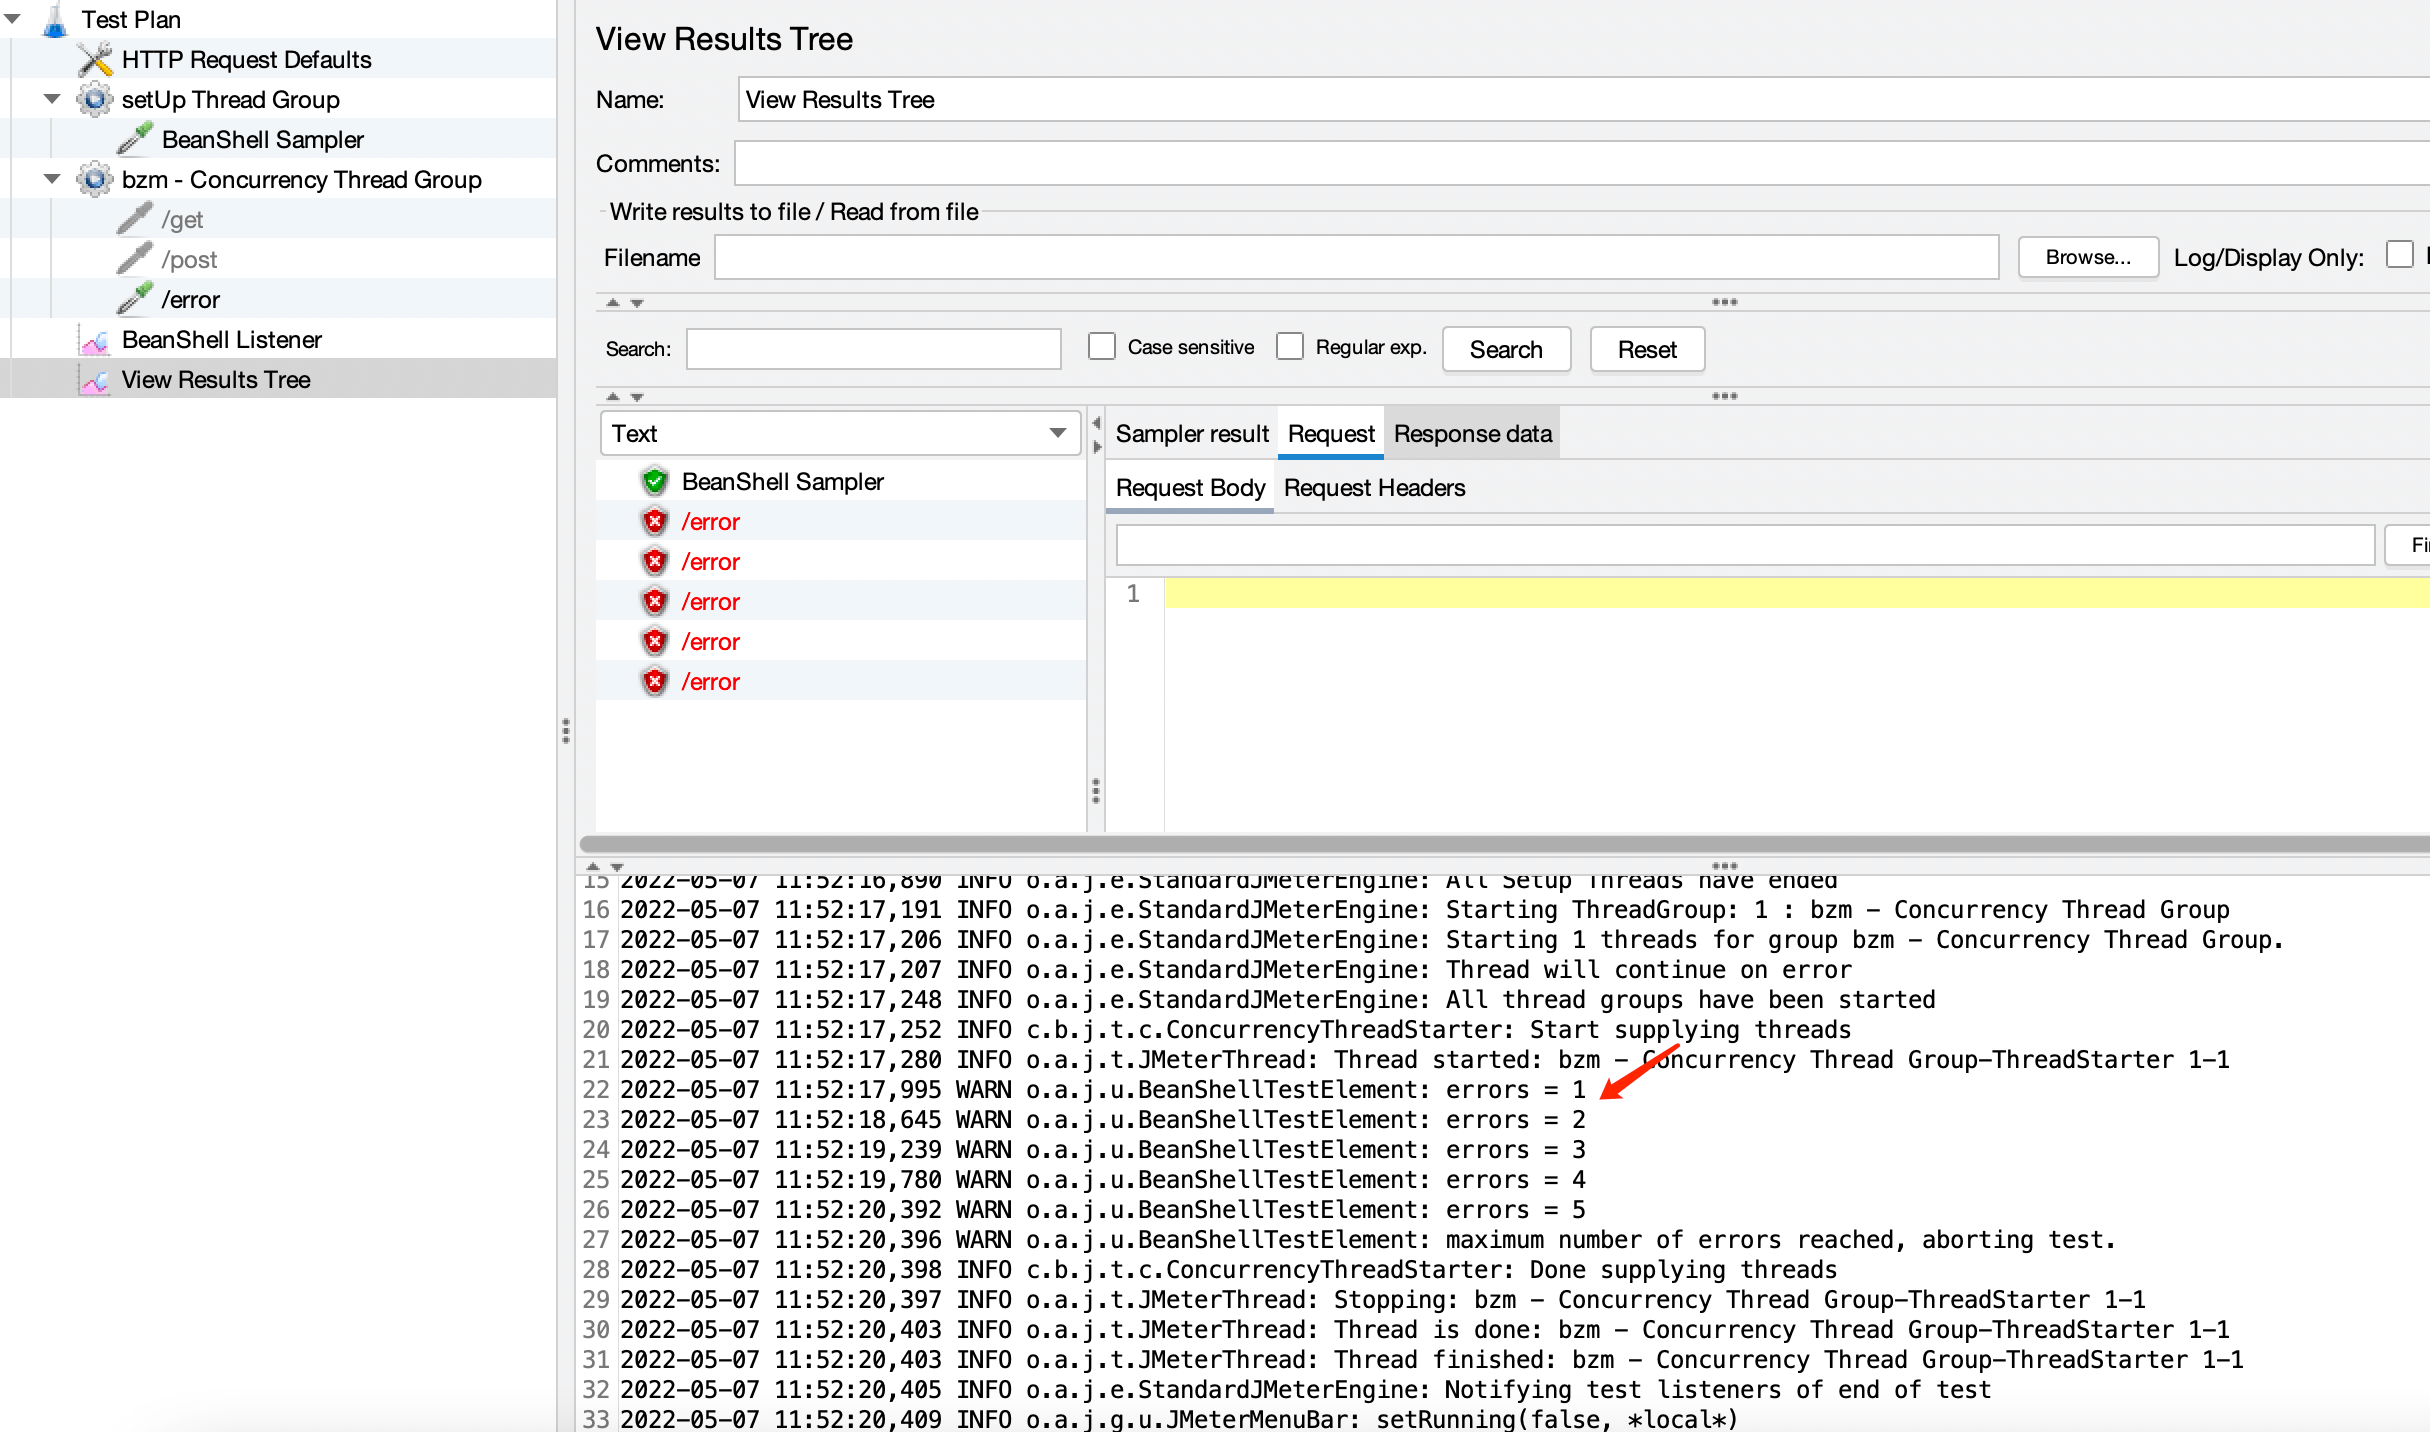
How to stop the test after reaching a given number of errors during stress testing in JMeter
![[免费专栏] Android安全之Android应用的汉化功能(修改so中的字符串内容)](/img/f6/7901b2cf6812a02c34c182fe33dd16.png)
[免费专栏] Android安全之Android应用的汉化功能(修改so中的字符串内容)
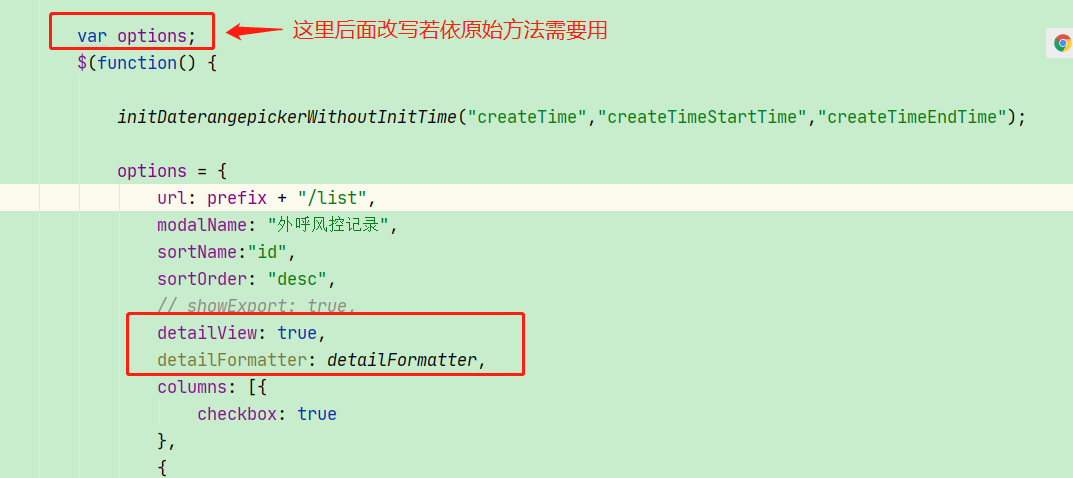
Open Source Summer | List Details Display Based on Ruoyi Architecture

国产抗新冠口服药每瓶不超300元/ 我国IPv6网络全面建成/ 谷歌入局折叠屏手机...今日更多新鲜事在此...

ebook download | "Business executives' IT strategy guide - why enterprises should implement DevOps"
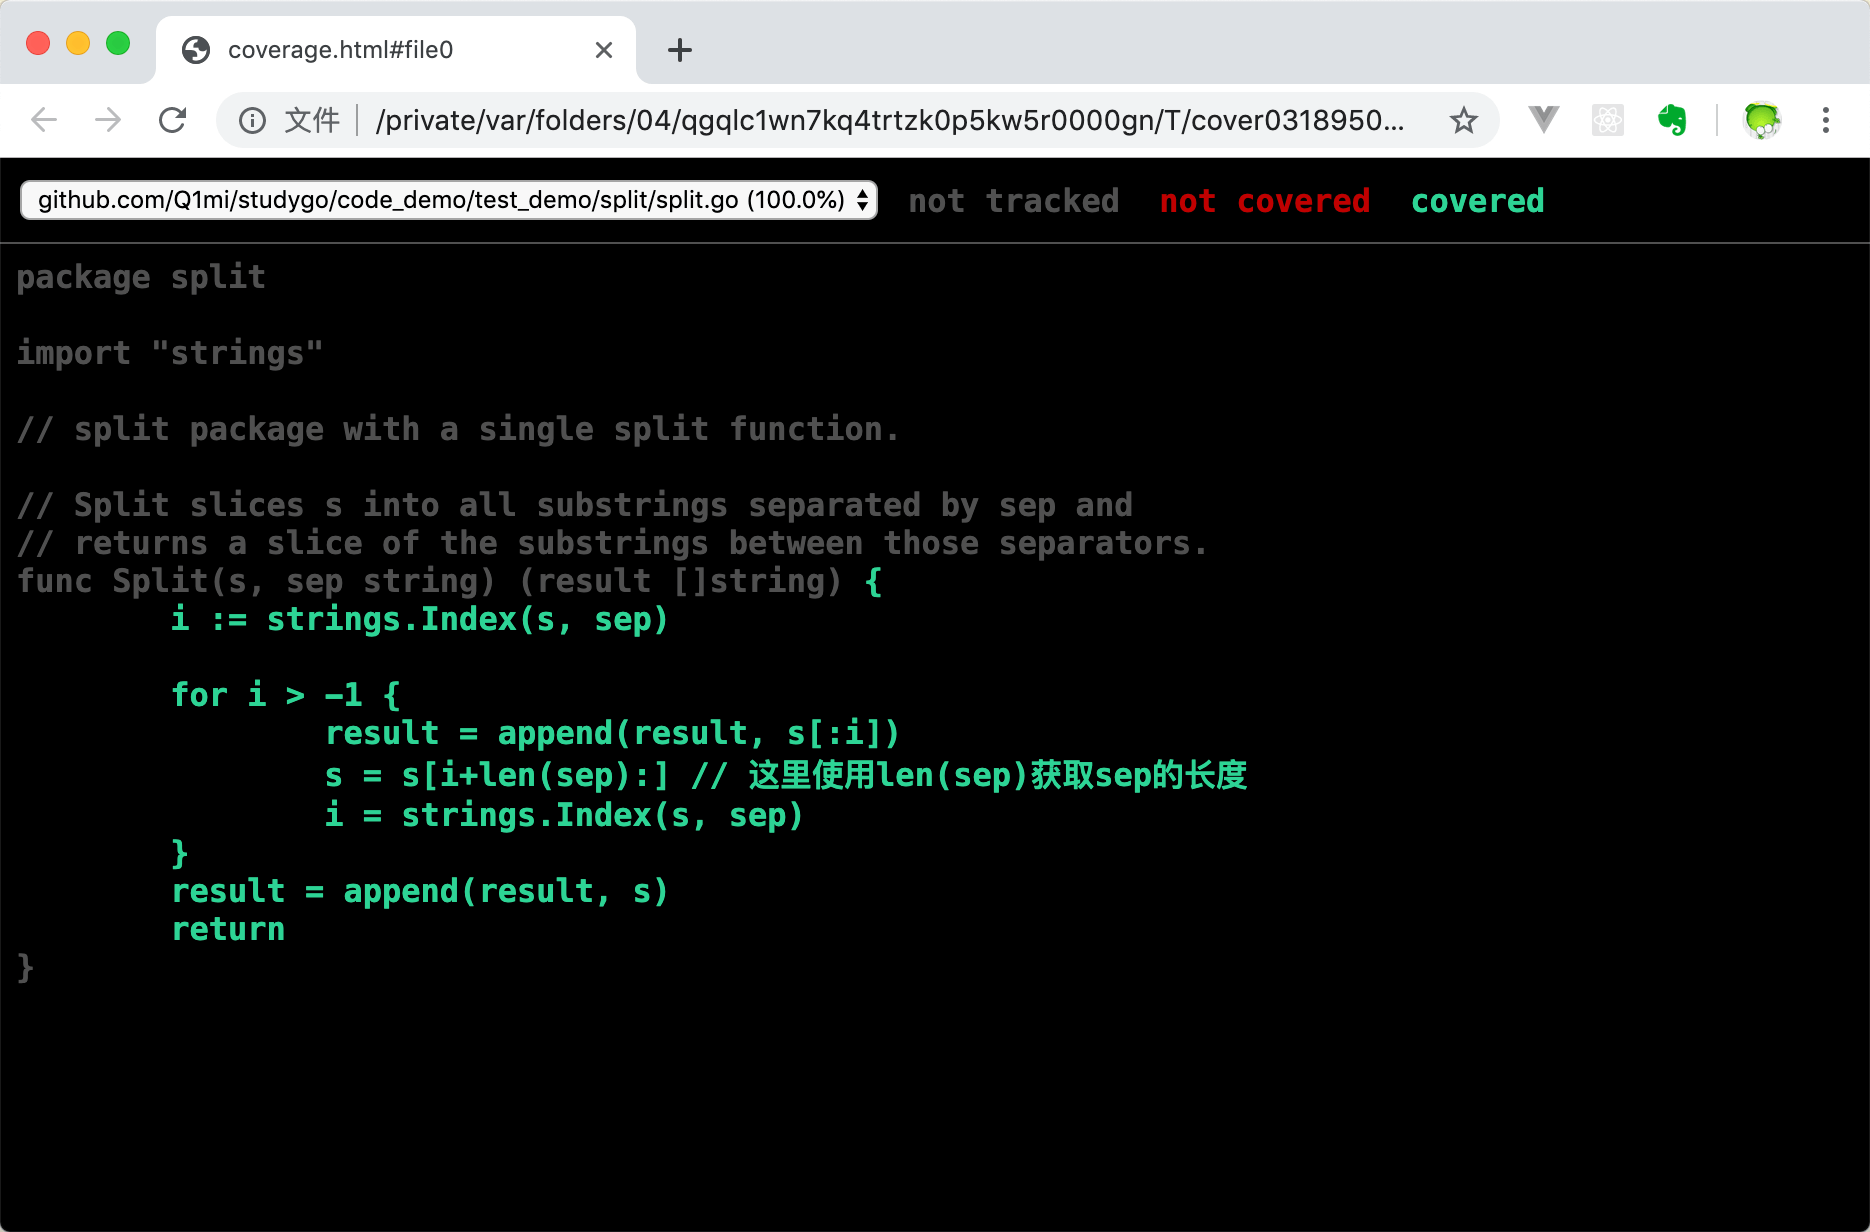
golang单元测试:testing包的基本使用
![[免费专栏] Android安全之和平精英(FZ)APK逆向分析](/img/22/a5129a310eec5ee1bf6f1cf90d05de.png)
[免费专栏] Android安全之和平精英(FZ)APK逆向分析

字节二面:可重复读隔离级别下,这个场景会发生什么?
2021 RoboCom 世界机器人开发者大赛-本科组(决赛)
随机推荐
Bi Sheng Compiler Optimization: Lazy Code Motion
启动 CM agent 报错——ImportError: libssl.so.10: cannot open shared object file: No such file or directory
AttributeError: module ‘click‘ has no attribute ‘get_os_args‘
阿里云架构师耗时几个月编写这份MySQL高可用和性能优化技术宝典
什么是ROS
电商项目架构图
韩国严厉监管元宇宙相关企业
MySQL备份与恢复
队列题目:用队列实现栈
sublime快速打开终端terminal
[免费专栏] Android安全之Root检测和绕过(浅析)
WPF 实现带蒙版的 MessageBox 消息提示框
C#/VB.NET: Extract text and pictures from PowerPoint document
2022深圳(软考高级)信息系统项目管理师认证报名
YOLO v3 source, rounding
C#/VB.NET:从PowerPoint文档中提取文本和图片
史上最全架构师知识图谱(纯干货)
Typora 结合 Picgo 自动上传图像
2022了你还不会『低代码』?数据科学也能玩转Low-Code啦!
RT-Thread推荐入围国赛及群体挑战赛名单