当前位置:网站首页>ARM Architecture 4: Embedded Hardware Platform Interface Development
ARM Architecture 4: Embedded Hardware Platform Interface Development
2022-08-11 05:17:00 【Lost your】
Here the blogger uses cortex_A9 as an example: the following is a picture introduction of the development board I use:

The components and interfaces in the development board are marked in detail in the figure. Below, I will briefly introduce a basic process of bare metal development using the development board by lighting the LED.
1. Look at the circuit diagram
First we need to find the device we need to operate in the circuit diagram of the provided development board data.And understand the principle of its operation. For example, we want to light up the LED lights on the development board. First, we find its circuit schematic diagram in the provided development board information as follows:

Let's analyze the following. To make our light-emitting diode turn on, our corresponding pin needs to provide a high level to the base of the triode, so that the diode can be turned on and the led will be lit.A resistor protects our chip and LED respectively.The transistor type is NPN.
2. Look at the chip manual
Then we find the corresponding control module in the chip schematic book. The control pins of the LED light such as GPX2_7, as shown below

You can see that the data provides us with information such as the starting address of the register. We need the chip to output a high level, then we need to select the mode as the OUTput output mode, then this is what we will do next!Look at the control register.
3. Programming
a. Define the macro of the register we want to control (corresponding to the register address in the manual)
b. Device initialization.(For example, in the operation of lighting up the LED, we need to set it to the output state, that is, set the 31-28 bits to 0x01)
c. Divide the function into the most basic small pieces. For example, if we want to realize the sequential lighting and extinguishing of LED lights, then we need to turn on the lights first, then turn off the lights, add delay, and flicker. Finally, we have completed aThe function of the marquee.
Then we show two pieces of code to show the operation of lighting the lamp, one is the assembly instruction used, and the other is implemented using our C language. In general bare metal development, we generally use the C language.
The lighting of the assembly instruction completion light:
@GPX2CON Register address: 0x11000000+0x0c40.textldr r0,=0x11000c40 @Move the register address to R0, then R0 represents GPX2CONldr r1,[r0]bic r1,#0xf0000000 @Clear bits 28-31orr r1,#0x10000000 @Set bit 28 to 1, other bits remain unchanged, set the output function of GPX2_7str r1,[r0]ldr r0,=0x114001e0 @Move the GPF3C0N register to R0ldr r1,[r0]bic r1,#0xf0000 @Clear bits 19-16orr r1,#0x10000 @Set bit 16 to 1, other bits remain unchanged, set GPX3-4 as output functionstr r1,[r0]@Light upwhile:ldr r2,=0x11000c44 @Move the register address of the register GPX2DAT to R2ldr r3,[r2]orr r3, #0x80 @set the 7th position of GPX2DAT to 1str r3,[r2]ldr r2,=0x114001e4ldr r3,[r2]orr r3,#0x10 @Set the 4th position of GPX3DAT to 1str r3,[r2]bl [email protected] offldr r2,=0x11000c44ldr r3,[r2]bic r3, #0x80str r3,[r2]ldr r2,=0x114001e4ldr r3,[r2]bic r3, #0x10str r3,[r2]bl delay_1msb whiledelay_1ms:ldr r5,=0x4fff0000loop:cmp r5,#0subgt r5,#1bgt loopmov pc,lr.endC language:
#define GPX2CON *(volatile unsigned int*)0x11000c40#define GPX2DAT *(volatile unsigned int*)0x11000c44void led2_init(){GPX2CON =GPX2CON &(~(0xf<<28))|(1<<28);}void led2_on(){GPX2DAT=GPX2DAT|(1<<7);}void led2_off(){GPX2DAT=GPX2DAT &(~(1<<7));}void delay(){int i,j;for(i=0;i<10000;i++)for(j=0;j<256;j++);}int main(){led2_init();while(1){led2_on();delay();led2_off();delay();}}The point is to find the corresponding module, pay attention to the control register, and realize our function by modifying the control register.
边栏推荐
- 关于CC 攻击
- guava RateLimiter uniform current limit
- Redis-使用jedis连接linux中redis服务器失败的解决方案
- Switch and Router Technology-29-OSPF Virtual Link
- Layered Architecture & SOA Architecture
- 【嵌入式开源库】cJSON的使用,高效精简的json解析库
- The shortest path out of the maze
- 2022年质量员-土建方向-通用基础(质量员)考试模拟100题及在线模拟考试
- 交换机和路由器技术-29-OSPF虚链路
- 【无2022上海市安全员A证考试题库及模拟考试
猜你喜欢

Switch and Router Technology - 25 - OSPF Multi-Area Configuration

Application layer protocol - DNS
【嵌入式开源库】MultiButton的使用,简单易用的事件驱动型按键驱动模块

普林斯顿微积分读本05第四章--求解多项式的极限问题

BGP综合实验
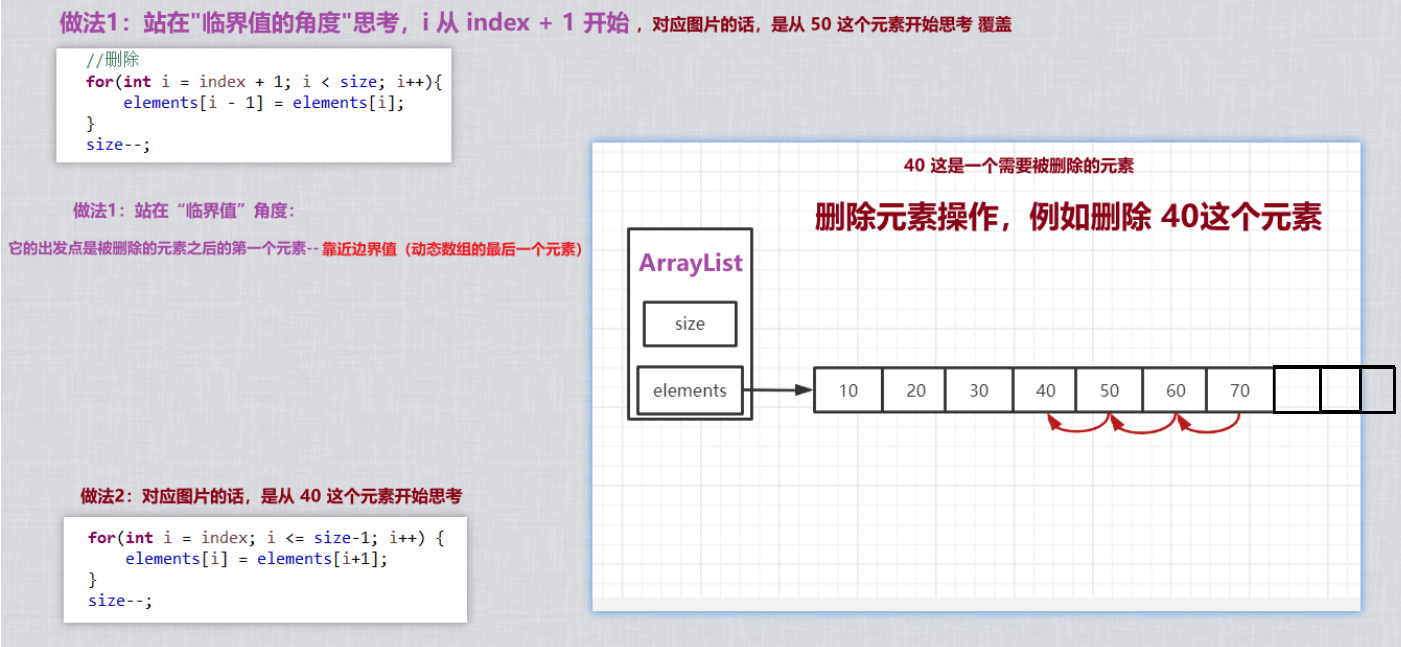
Optimization is a kind of habit low starting point is the "standing near the critical"

Delphi7学习记录-demo实例

元宇宙社交应用,靠什么吸引用户「为爱发电」?

IP-Guard如何禁止运行U盘程序

Switches and routers technologies - 30 - standard acls
随机推荐
Use Adobe genuine software for prostitution to reduce the slow employment and non-employment of fresh graduates
一个月闭关直接面进大厂,这份Android面试笔记是真的牛逼
MFC Interprocess Communication (Shared Memory)
Unity WebGL RuntimeError: integer overflow
交换机和路由器技术-29-OSPF虚链路
网络技能树
Switch and Router Technology-34-Dynamic NAT
Switches and routers technology - 21 - RIP routing protocol
The sword refers to offer_abstract modeling capabilities
应用层协议——DNS
[FPGA tutorial case 49] Control case 1 - FPGA-based PID controller verilog implementation
金仓数据库 KingbaseGIS 使用手册(6.10. 几何对象操作运算符)
报表控件Stimulsoft报告中的数据矩阵条形码介绍
Switch and Router Technology-33-Static NAT
-Fill in color-
交换机和路由器技术-32-命名ACL
FPGA engineer interview questions collection 121~130
元宇宙社交应用,靠什么吸引用户「为爱发电」?
Day38 LeetCode
交换机和路由器技术-31-扩展ACL