当前位置:网站首页>Rhino software plug-in rhino plug-in visual studio create your first plug-in
Rhino software plug-in rhino plug-in visual studio create your first plug-in
2022-04-21 10:53:00 【Plug in development】
List of articles
Rhinoceros software is a professional 3D design software . Simple, practical and convenient , It is widely used in the field of three-dimensional vector , Develop plug-ins to expand this software , It can facilitate designers to get rid of some heavy repetitive work , With realistic needs . The author translated a tutorial on the official website , Create a C++ Plug in process :
This guide will take you to C/C++ and Visual Studio Finish your first Windows Rhino plug-in unit . Suppose you have installed the necessary tools , And ready . If not already installed , See installation tools (Windows).Rhino SDK Including a Visual Studio Project wizard . The wizard generates code for a functioning plug-in . Follow these steps to build the plug-in :
1. Plug in Wizard
start-up Visual Studio 2019 And navigate to the file > newly build > project
stay New Project In the dialog box , Select... From the list of installed templates Rhino 7 Plug in templates , And then click Next.

Type the project name as shown below . If you like , You can enter different names . The wizard uses the project name when creating files and classes . If you enter a different name , The names of files and classes will be different from those mentioned in this tutorial . Don't forget to choose a location to store items . After completion , single click Create.

single click OK, Will appear Rhino 6 The overview page of the plug-in Wizard dialog box . This page provides an overview of the types of projects that the wizard will create .

Be careful , By default , The wizard will do the following : Create a general tool plug-in . If you are satisfied with the default settings , Just click Finish Button . If you want to change any of these settings , Please click on the “ next step ” Button .
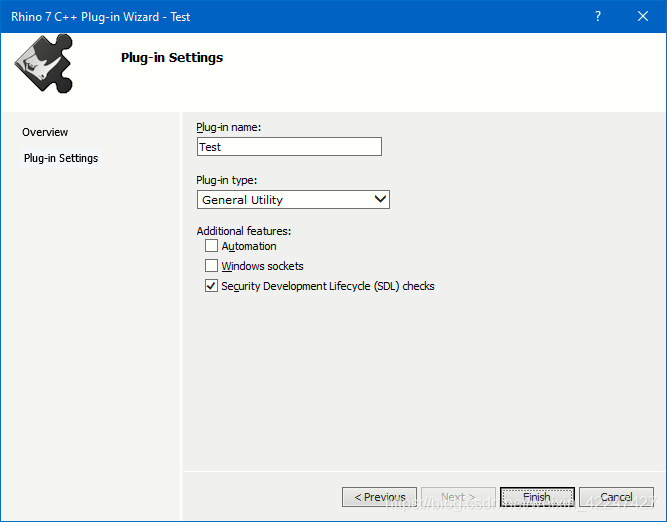
The plug-in settings page allows you to modify some of the settings used by the wizard when generating the plug-in source code :
The plug-in name : If you want to change the name of the plug-in , Please modify this field . Be careful : Modifying this field does not change the project name , It's modification Rhino Of PlugInManager The plug-in name listed in the dialog box . Plug in type : Select the type of plug-in you want the wizard to create . Source file comments : If you want the wizard to add detailed comments to the generated source file , Please select this option . Online help : If you want your plug-in to support online help , Please select this option . If checked, , A menu item will be displayed in Rhino On the help menu . automation : Selecting this option allows your program to manipulate objects implemented in another program . Selecting this option also exposes your program to other automation client plug-ins .Windows Socket : Selecting this option means that your program supports Windows Socket .Windows Sockets allow you to write through TCP/IP Network communication program . Security development lifecycle (SDL) Check : Select this option to add the recommended security development lifecycle to the project (SDL) Check . These checks include additional safety related warnings , If wrong , And additional secure code generation features . For more information , See enable additional security checks . For this tutorial , Only accept the default settings . single click Finish Button , The wizard will start to generate the folder of the plug-in project 、 Documents and classes . When the wizard is finished , Use Visual Studio View the plug-in project with the solution explorer .
The following documents are noteworthy :
Test.vcxproj It's a permit Visual c++ Build the project file for the plug-in .stdafx.h Is the main project head .stdafx.cpp Used to generate precompiled header files .TestApp.h Is included CTestApp Application class header declared by class .TestApp.cpp Is included CTestApp Application class implementation of member functions .TestAppIn.h Is included CTestPlugIn Class declaration plug-in class header file .TestAppIn.cpp Is included CTestPlugIn Plug in class implementation of member function .cmdTest.cpp It's a test Rhino Example command for .cmdTest.h It's a resource #define Constant definition .Test.rc and Test.rc2 It's a script resource Test.def Is the module definition .Test.ico Is the plug-in icon .
2. Project settings
stay Visual Studio 2019 in , You can click the item > [ProjectName] attribute … To view the project settings .

Review the above settings , Can you see 32 Bit platform . This is because Rhino 7 Only as 64 Bit applications use .
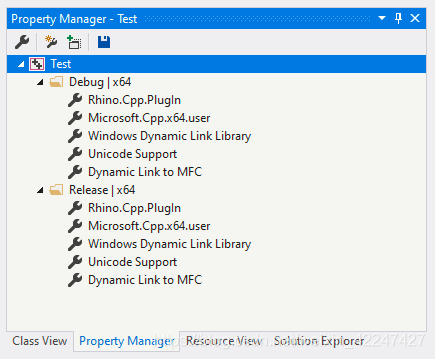
3. Property sheet
Visual Studio The project has hundreds of compiler switches and options to choose from . Using a custom project property sheet is a convenient way to synchronize or share these common settings among other projects . The plug-in wizard used to generate the plug-in project will Rhino Add a plug-in specific property sheet to the project . To view these property sheets , Please click on the view > Property Manager .
4. Template establishment
Rhino In addition to generating code, the plug-in wizard , A custom project file will also be created for the plug-in . This file , Test.vcxproj, Specify all file dependencies and compile and link Option logo . Before building the project , We need to fill in Rhino plugin developer Statement . These declarations will let the user of the plug-in know who generated the plug-in , if necessary , Where can they support information .
open TestPlugIn.cpp, Modify the following code line , Provide your company name and other supporting information .
 RHINO_PLUG_IN_DEVELOPER_ORGANIZATION(L"My Company Name");
 RHINO_PLUG_IN_DEVELOPER_ADDRESS(L"123 Developer Street\r\nCity State 12345-6789");
 RHINO_PLUG_IN_DEVELOPER_COUNTRY(L"My Country");
 RHINO_PLUG_IN_DEVELOPER_PHONE(L"123.456.7890");
 RHINO_PLUG_IN_DEVELOPER_FAX(L"123.456.7891");
 RHINO_PLUG_IN_DEVELOPER_EMAIL(L"[email protected]");
 RHINO_PLUG_IN_DEVELOPER_WEBSITE(L"http://www.mycompany.com");
 RHINO_PLUG_IN_UPDATE_URL(L"http://www.mycompany.com/support");
When finished , Delete the following code line , because #error Directive will prevent the construction of the project :
#error Developer declarations block is incomplete!
Be careful : If you don't delete this line , The plug-in will build . Now? , You can learn from build From the menu build Test To build the project . If the build is successful , A group called Test Plug in file for .rhp Create in the project Debug In the folder .
5. test
from Visual Studio, Navigate to debug > Start debugging . This will load Rhino. Starting up Rhino The version depends on the configuration you build . The wizard adds the following configuration to the project :
Debug: A project is a publishing project , It uses the compiler's program database (/Zi) Options and linker generation debugging information (/ Debug) Option to disable optimization and generate debugging information . These option settings allow you to use the debugger when developing custom plug-ins . The debug configuration is also linked to the release runtime library . Plug ins built with debug configuration will only load and Rhino Release version installed with .
Release: The release configuration of your program does not contain any symbol debugging information , And it is completely optimized . Debugging information can be found in PDB file (c++) In the middle of , It depends on the compiler options used . If you need to debug your distribution later , establish PDB Files can be very useful . The publishing configuration is also linked to the publishing runtime library . Plug ins built with publishing configuration will only load and Rhino Release version installed with .
For this guide , Build debug configuration .
Plug in installation : from Rhino Inside , Navigate to tools > Options . Navigate to Rhino Install the plug-in under the plug-in page .

After loading the plug-in , Close the options dialog box and run the test command . You have completed the creation of your first plug-in !
6. Add additional commands
Rhino A plug-in can contain any number of commands . The command is from CRhinoCommand Derive a new class to create . About CRhinoCommand Class details , Please see the rhinoSdkCommand.h.
Example
The following example code demonstrates a simple command class that basically does nothing :
// Do NOT put the definition of class CCommandTest in a header
// file. There is only ONE instance of a CCommandTest class
// and that instance is the static theTestCommand that appears
// immediately below the class definition.

class CCommandTest : public CRhinoCommand
{

public:
  // The one and only instance of CCommandTest is created below.
  // No copy constructor or operator= is required.
  // Values of member variables persist for the duration of the application.

  // CCommandTest::CCommandTest()
  // is called exactly once when static theTestCommand is created.
  CCommandTest() = default;

  // CCommandTest::~CCommandTest()
  // is called exactly once when static theTestCommand is destroyed.
  // The destructor should not make any calls to the Rhino SDK.
  // If your command has persistent settings, then override
  // CRhinoCommand::SaveProfile and CRhinoCommand::LoadProfile.
  ~CCommandTest() = default;

  // Returns a unique UUID for this command.
  // If you try to use an id that is already being used, then
  // your command will not work. Use GUIDGEN.EXE to make unique UUID.
  UUID CommandUUID() override
  {

    // {F502C783-C0CE-4118-8869-EFB0CB34CCCB}
    static const GUID TestCommand_UUID =
    {
     0xF502C783, 0xC0CE, 0x4118, {
     0x88, 0x69, 0xEF, 0xB0, 0xCB, 0x34, 0xCC, 0xCB } };
    return TestCommand_UUID;
  }

  // Returns the English command name.
  // If you want to provide a localized command name, then override

  // CRhinoCommand::LocalCommandName.
  const wchar_t* EnglishCommandName() override {
     return L"Test"; }

  // Rhino calls RunCommand to run the command.
  CRhinoCommand::result RunCommand(const CRhinoCommandContext& context) override;
};

// The one and only CCommandTest object
// Do NOT create any other instance of a CCommandTest class.
static class CCommandTest theTestCommand;

CRhinoCommand::result CCommandTest::RunCommand(const CRhinoCommandContext& context)
{

  // CCommandTest::RunCommand() is called when the user
  // runs the "Test".

  // TODO: Add command code here.

  // Rhino command that display a dialog box interface should also support
  // a command-line, or scriptable interface.

  ON_wString str;
  str.Format(L"The \"%s\" command is under construction.\n", EnglishCommandName());
  if (context.IsInteractive())
    RhinoMessageBox(str, TestPlugIn().PlugInName(), MB_OK);
  else
    RhinoApp().Print(str);

  // TODO: Return one of the following values:
  // CRhinoCommand::success: The command worked.
  // CRhinoCommand::failure: The command failed because of invalid input, inability
  // to compute the desired result, or some other reason
  // CRhinoCommand::cancel: The user interactively canceled the command
  // (by pressing ESCAPE, clicking a CANCEL button, etc.)
  // in a Get operation, dialog, time consuming computation, etc.

  return CRhinoCommand::success;
}
7. There are several things to consider :
The command class must return a unique UUID. If you try to use what is already in use UUID, Then the command will not work . Use Visual Studio Incidental GUIDGEN.EXE Create unique uuid. The command class must return a unique command name . If you try to use a command name that is already in use , Then the command will not work . A command class can only create one instance . That's why you should put the definition of the command class in .cpp In file .
Rhinoceros command generator :Rhino The command generator wizard is a stand-alone application , It will generate a new skeleton CRhinoCommand Derived class . The generated source code is copied to Windows On the clipboard , So you can easily paste it into the source file . stay Visual Studio 2019 Use this tool in :, start-up Visual Studio 2019. Navigate to tools > External tools , Use Add The button will RhinoCommandGenerator.exe Add file to list . The file can be found in the following location :C:\Program Files\Rhino 7.0 SDK\Wizards\Command.

Reasonable script code can effectively improve work efficiency , Reduce repetitive labor .
8. Author Q & A
If you have any questions , Please leave a message .
版权声明
本文为[Plug in development]所创,转载请带上原文链接,感谢
https://yzsam.com/2022/04/202204211052092924.html
边栏推荐
- AcWing 1737. 传送(分类讨论)
- 8通道CAN FD,更强大的数据记录仪GL3400
- pgpool-II 4.3 中文手册 - 入门教程
- hyperf 执行sql语句,参数会有两个单引号
- Problems needing attention when using scanf function in C language
- What if there are not enough mobile phones in Showcase? Cloud real machine platform atxserver2
- 第一个GO程序
- L1-045 cosmic invincible greeting (5 points)
- 后缀数组模版代码解析
- 润和大禹学习方案
猜你喜欢

Wonderful preview of the event 𞓜 Vitas + Long Zhi: building the "number one player" in the game industry digitally

NFT中的版权漏洞:产品设计需考虑法律层面

Enter the welcome interface when idea and pycharm are started
桶排序 ← C语言实现

解决Neo4j Browser导入节点后显示空白圆圈或非目标属性的问题

Println input and rewriting of toString method

Mysql 002 DDL

再战leetcode (392.判断子序列)

Pytoch learning notes (3) torch Autograd, logistic regression model, training

2-3. 注册selector
随机推荐
make the inifile support unicode in delphi
训练总结报告
使用对数器验证简单排序
torch. autograd. Function customization
Use of laravel redis
JS 實現置頂輸入文本框
Pytoch learning notes (3) torch Autograd, logistic regression model, training
pgpool-II 4.3 中文手册 - 入门教程
An error occurred while processing your request... enable the Development environment by setting ...
GO 使用channel进行同步 (channel 1)
Detailed explanation of the route of the shopping guide system based on Runhe Dayu development board
AcWing 1737. Transmission (classified discussion)
AC自动机专题训练
第一个GO程序
8通道CAN FD,更强大的数据记录仪GL3400
Modern Actuarial Risk Theory 07: risk measurement
Six practices of Windows operating system security attack and defense
00000000000000000000000
力扣(LeetCode)110. 平衡二叉树(2022.04.20)
2-3. 注册selector