当前位置:网站首页>Analysis on modification and customization of appium source code for automated testing of dry goods app
Analysis on modification and customization of appium source code for automated testing of dry goods app
2022-04-21 18:24:00 【Hua Weiyun】
Appium By Node.js To achieve HTTP service , It's not a new framework , Instead, it integrates the existing excellent framework , stay Selenium WebDriver agreement (JsonWireProtocol/Restful web service) The support of mobile terminal is added on the basis of , send Appium Meet a wide range of needs .
More detailed information is officially available Appium Structure description :https://appium.io/docs/en/contributing-to-appium/appium-packages/
Appium Frame structure
Appium It is composed of multiple sub projects ,github The access is as follows :
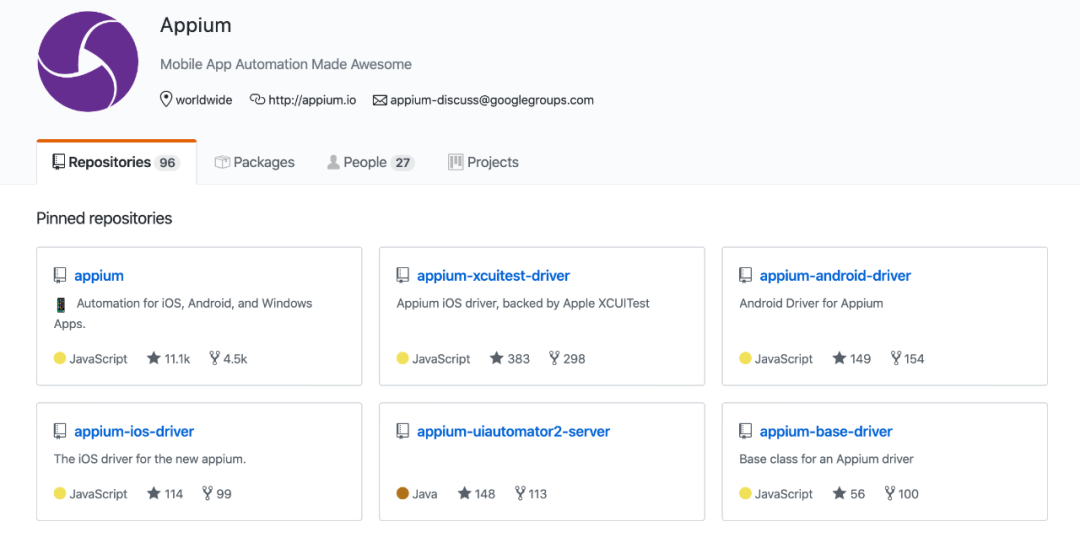
Appium from Appium And other work engines, including :appium-xcuitest-driver、appium-android-driver、appium-ios-driver、appium-uiautomator2-server、appium-base-driver Other components . download Appium This project is analyzed , Find out Appium It has a very complex directory structure , Here's the picture :
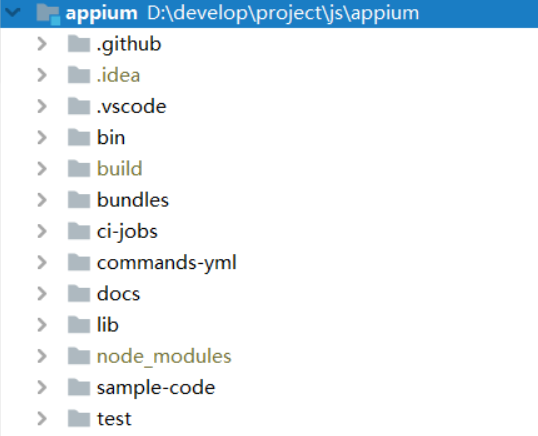
The important contents are as follows :
There are files in the project package.json , This file is the project description file . Description of the project or module package , Such as project name , Project version , Project execution entry file , Project contributors, etc .npm install The command will download all dependent modules according to this file , Looking at this file, you can see the following information :
"dependencies": { "@babel/runtime": "^7.6.0", "appium-android-driver": "^4.20.0", "appium-base-driver": "^5.0.0", "appium-espresso-driver": "^1.0.0", "appium-fake-driver": "^0.x", "appium-flutter-driver": "^0", "appium-ios-driver": "4.x", "appium-mac-driver": "1.x", "appium-support": "2.x", "appium-tizen-driver": "^1.1.1-beta.4", "appium-uiautomator2-driver": "^1.37.1", "appium-windows-driver": "1.x", "appium-xcuitest-driver": "^3.0.0", ... },dependencies Indicates the module and version information that this module depends on . It can be seen from this that it depends on a lot driver , such as appium-android-driver、appium-base-driver、appium-espresso-driver、appium-ios-driver、appium-uiautomator2-driver wait . Next we will according to appium-uiautomator2-driver Focus on Android Test driven source code analysis .
appium-uiautomator2-server
appium-uiautomator2-server Is aimed at UiAutomator V2 Services provided , Is a running on the device Netty The server , Used to listen for instructions and execute UiAutomator V2 command .
Early versions Appium adopt appium-android-bootstrap Realization and UiAutomator V1 Interaction ,UiAutomator2 Repair the UiAutomator V1 Most of the problems encountered in , The most important thing is to realize the connection with Android Separation of system updates .
Appium Bottom line execution Android Testing the real work engine is a JAVA project appium-uiautomator2-server. You can clone this project locally , Use Android Studio Tools or other JAVA project IDE Tool to open this project .
appium-uiautomator2-server start-up
from README The file can see how the service is started :
Starting server push both src and test apks to the device \ and execute the instrumentation tests. adb shell am instrument -w \ io.appium.uiautomator2.server.test/\ androidx.test.runner.AndroidJUnitRunner find AppiumUiAutomator2Server.java This file , Here's the picture :
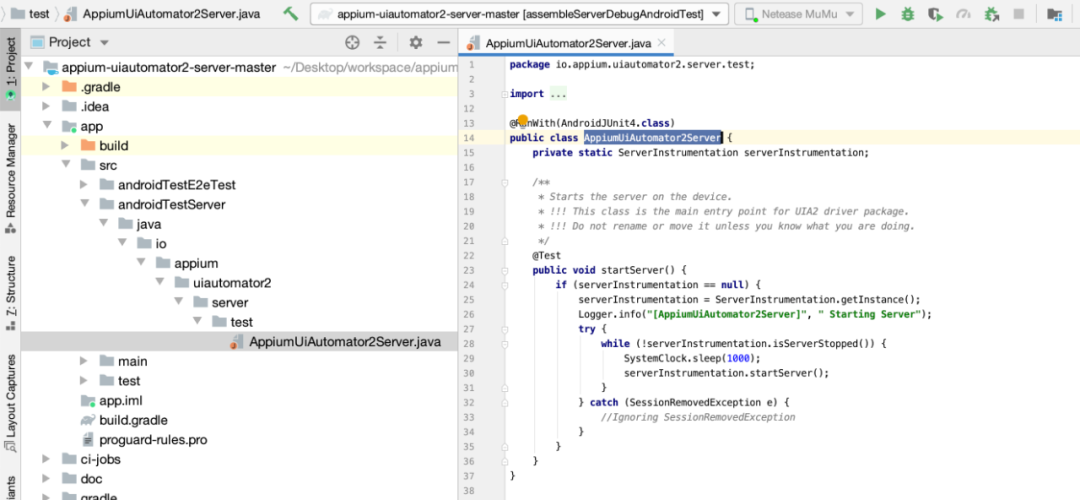
startServer( ) The method is to start its entry function . This function calls ServerInstrumentation The inside of the class startServer( ) Method . Here's the picture :
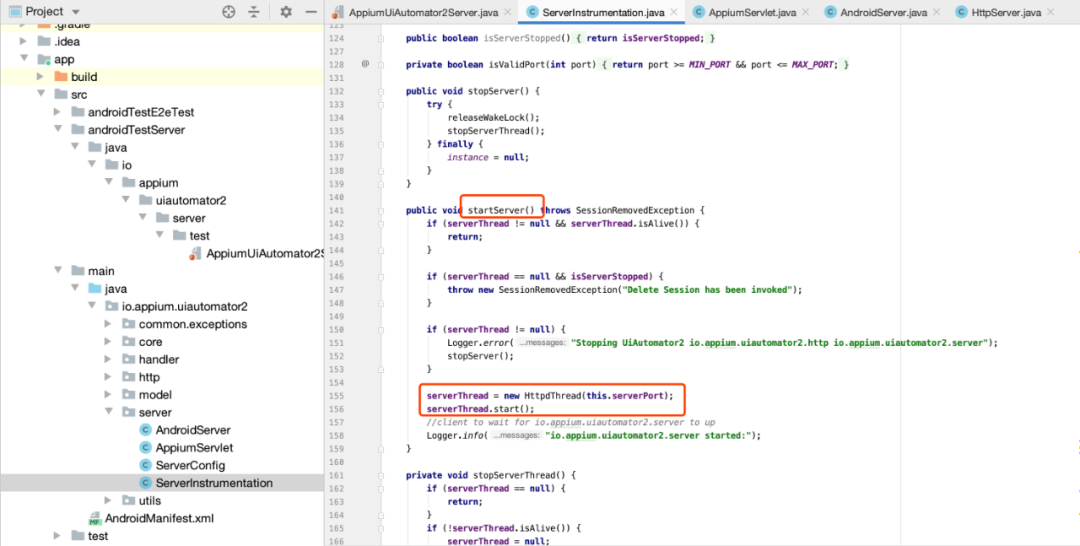
startServer( ) Method creates a new thread to handle a series of logic .
AppiumServlet analysis
AppiumServlet It's a typical HTTP Request processing protocol . Use AppiumServlet To manage requests , And will Driver Forward the incoming request to the corresponding RequestHandler, It will listen to the following URL
... register(postHandler, new FindElement(“/wd/hub/session/:sessionId/element”)); register(postHandler, new FindElements(“/wd/hub/session/:sessionId/elements”)); ...When these URL There's a request to come ,AppiumServlet It will be processed . Such as finding elements 、 Input 、 Click and so on . Take finding elements as an example , You can see the following code in the implementation class :
... final String method = payload.getString("strategy"); final String selector = payload.getString("selector"); final String contextId = payload.getString("context"); ...Through these three attributes “strategy”、“selector”、“context” To locate elements . stay Appium You can see this operation in the corresponding log .
2020-04-08 10:42:37:928 [HTTP] --> POST /wd/hub/session/f99fe38b-445b-45d2-bda0-79bf12e8910e/element 2020-04-08 10:42:37:929 [HTTP] {"using":"xpath",\ "value":"//*[@text=\" transaction \"]"} 2020-04-08 10:42:37:930 [W3C (f99fe38b)] Calling \ AppiumDriver.findElement() with args: ["xpath","//*[@text=\" transaction \"]","f99fe38b-445b-45d2-bda0-79bf12e8910e"] ... 2020-04-08 10:42:37:931 [WD Proxy] Matched '/element' to \ command name 'findElement' 2020-04-08 10:42:37:932 [WD Proxy] Proxying [POST /element] to \ [POST http://127.0.0.1:8200/wd/hub/session/\ 0314d14d-b580-4098-a559-602559cd7277/element] \ with body: {"strategy":"xpath","selector":\ "//*[@text=\" transaction \"]","context":"","multiple":false} ... 2020-04-08 10:42:39:518 [W3C (f99fe38b)] Responding \ to client with driver.findElement() \ result: {"element-6066-11e4-a52e-4f735466cecf":\ "c57c34b7-7665-4234-ac08-de11641c8f56",\ "ELEMENT":"c57c34b7-7665-4234-ac08-de11641c8f56"} 2020-04-08 10:42:39:519 [HTTP] <-- POST /wd/hub/session/f99fe38b-445b-45d2-bda0-79bf12e8910e/element 200 1590 ms - 137Above code , When locating an element, it will send a POST request ,Appium Will turn the request into UiAutomatorV2 The positioning of , Then forward it to UiAutomatorV2.
Extend the functionality
stay FindElement.java Implemented in the findElement( ) Method , Here's the picture :
private Object findElement(By by) throws UiAutomator2Exception, UiObjectNotFoundException { refreshAccessibilityCache(); if (by instanceof ById) { String locator = rewriteIdLocator((ById) by); return CustomUiDevice.getInstance().findObject(androidx.test.uiautomator.By.res(locator)); } else if (by instanceof By.ByAccessibilityId) { return CustomUiDevice.getInstance().findObject(androidx.test.uiautomator.By.desc(by.getElementLocator())); } else if (by instanceof ByClass) { return CustomUiDevice.getInstance().findObject(androidx.test.uiautomator.By.clazz(by.getElementLocator())); } else if (by instanceof By.ByXPath) { final NodeInfoList matchedNodes = getXPathNodeMatch(by.getElementLocator(), null, false); if (matchedNodes.isEmpty()) { throw new ElementNotFoundException(); } return CustomUiDevice.getInstance().findObject(matchedNodes); } ... }findElement( ) The method specifically provides ById、ByAccessibilityId、ByClass、ByXpath Other methods , This part of the function can be extended , If some functions are extended in the future , For example, you want to use pictures 、AI Positioning elements , Can be on top of findElement( ) Method to add else if (by instanceof ByAI) Method , To create a new type ByAI And increase the realization of functions . For example, in the future AI To locate the function of the element , have access to AI Plug in for ( be based on nodejs An encapsulated plug-in )test.ai plug-in unit (https://github.com/testdotai/appium-classifier-plugin)
usage :
driver.find_element('-custom', 'ai:cart');Project construction and apk install
After completing the modification of the code, you need to recompile to generate the corresponding apk file , And on the Appium In the corresponding directory .
Android Studio -> project Gradle -> appium-uiautomator2-server-master -> Task-other Next .
Double click assembleServerDebug And assembleServerDebugAndroidTest You can compile , After compilation, two corresponding files will be generated in the directory apk file .
- assembleServerDebugAndroidTest.apk
After construction apk In the directory :app/build/outputs/apk/androidTest/server/debug/appium-uiautomator2-server-debug-androidTest.apk This apk It's a driver module , Responsible for creating sessions , install UiAutomator2-server.apk Go to the device , Turn on Netty service . - assembleServerDebug
After construction apk In the directory :app/build/outputs/apk/server/debug/appium-uiautomator2-server-v4.5.5.apk, This is the server module , When the driver module is initialized , The server will listen PC End Appium Requests sent , Send the request to the real underlying UiAutomator2.
in addition , You can also use commands to build :
gradle clean assembleE2ETestDebug assembleE2ETestDebugAndroidTestThe APK, Cover Appium Corresponding to APK file . You need to use the command to find it first Appium Install under directory Uiautomator server Corresponding APK,MacOS The operation command is as follows :
find /usr/local/lib/node_modules/appium -name "*uiautomator*.apk"Use the above command to find out about Uiautomator Of the two apk file , as follows :
$ find /usr/local/lib/node_modules/appium -name \ "*uiautomator*.apk" /usr/local/lib/node_modules/appium/node_modules\ /appium-uiautomator2-server/apks/\ appium-uiautomator2-server-v4.5.5.apk /usr/local/lib/node_modules/appium/\ node_modules/appium-uiautomator2-server\ /apks/appium-uiautomator2-server-debug-androidTest.apk Will be compiled APK Replace this directory APK that will do .
The client will pass Desired Capabilities to Appium Server Create a session ,Appium Server Would call appium-uiautomator2-driver At the same time UiAutomator2 Server Of the two apk Install on the test equipment ( That is, the two generated above apk file ).
Link to the original text
Get more :https://qrcode.ceba.ceshiren.com/link?name=article&project_id=qrcode&from=hwyun×tamp=1650524546
版权声明
本文为[Hua Weiyun]所创,转载请带上原文链接,感谢
https://yzsam.com/2022/04/202204211818410772.html
边栏推荐
猜你喜欢

华为、TCL、大疆

Don't look for it. This is the clearest article on microservices so far! No one

靶机渗透练习74-DC6

年末我的Android面试复盘

Advanced formula 45 of C language: the secret of function parameters (Part 2)

Intermediary model

Huawei level 18 Daniel collates and summarizes: microservice design and distributed service framework principle practice document

IoT平台如何实现业务配置中心
![[牛客网刷题 Day4] JZ23 链表中环的入口结点](/img/80/eca8951f581dc27cce9597af13e47e.png)
[牛客网刷题 Day4] JZ23 链表中环的入口结点

靶机渗透练习70-DC2
随机推荐
Advanced formula 47 of C language: recursive function analysis
How to test Android WebView for automated testing of dry goods app
K-means, hierarchy, EM clustering introduction
【无标题】
Composant tooltip: déterminer si tooltip est affiché en fonction du débordement de contenu
k-means,层次,EM聚类介绍
C语言进阶第48式:函数设计原则
CDF global survey: stagnant software delivery performance
Intermediary model
MYCAT horizontal sub table (global table)
Mycat水平分表(E-R表)
别找了,这是迄今为止把微服务讲的最清楚的一篇!没有之一
[daiy4] jz76 delete duplicate nodes in the linked list (recursion)
Goldfish rhca memoirs: rh358 manages DNS and DNS servers -- configuring cache name servers using unbound
教你轻松解决CSRF跨站请求伪造攻击
Goodbye SharedPreferences, hello mmkv!
2021-5-1 第一天第一题
Collection小结
Collection summary
干货|app自动化测试之Appium WebView 技术原理