当前位置:网站首页>Advanced CAD practice (2)
Advanced CAD practice (2)
2022-08-08 18:57:00 【Dream CAD software】
Let's draw an advanced practice problem with CAD Dream Drawing.
Analysis Description
1. The circumference angle subtended by the diameter of the circle is equal to 90°. This geometric knowledge can determine the vertex of the right angle in the drawing.
2. The "divide" command can "divide" the object by a fixed number.
target audience

Operating Tools
Operating system: Windows10
CAD Software: CAD Dream Drawing
Steps
1. Click Point Style under the Format menu bar to open the "Point Style" dialog box, as shown below:
Open Point Styles dialog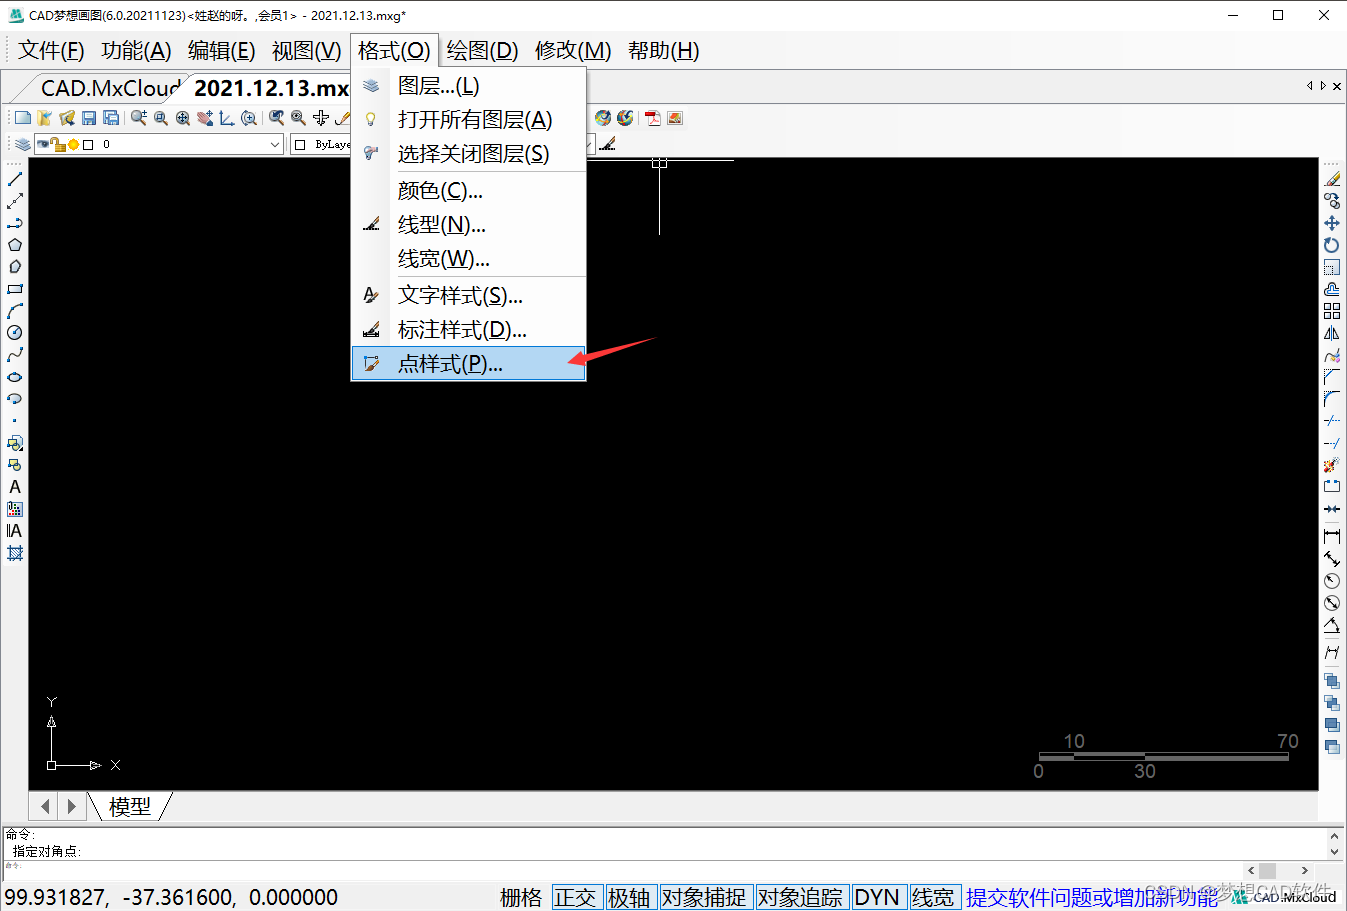
2. Select the display obvious point style and click OK, as shown below:
Select point style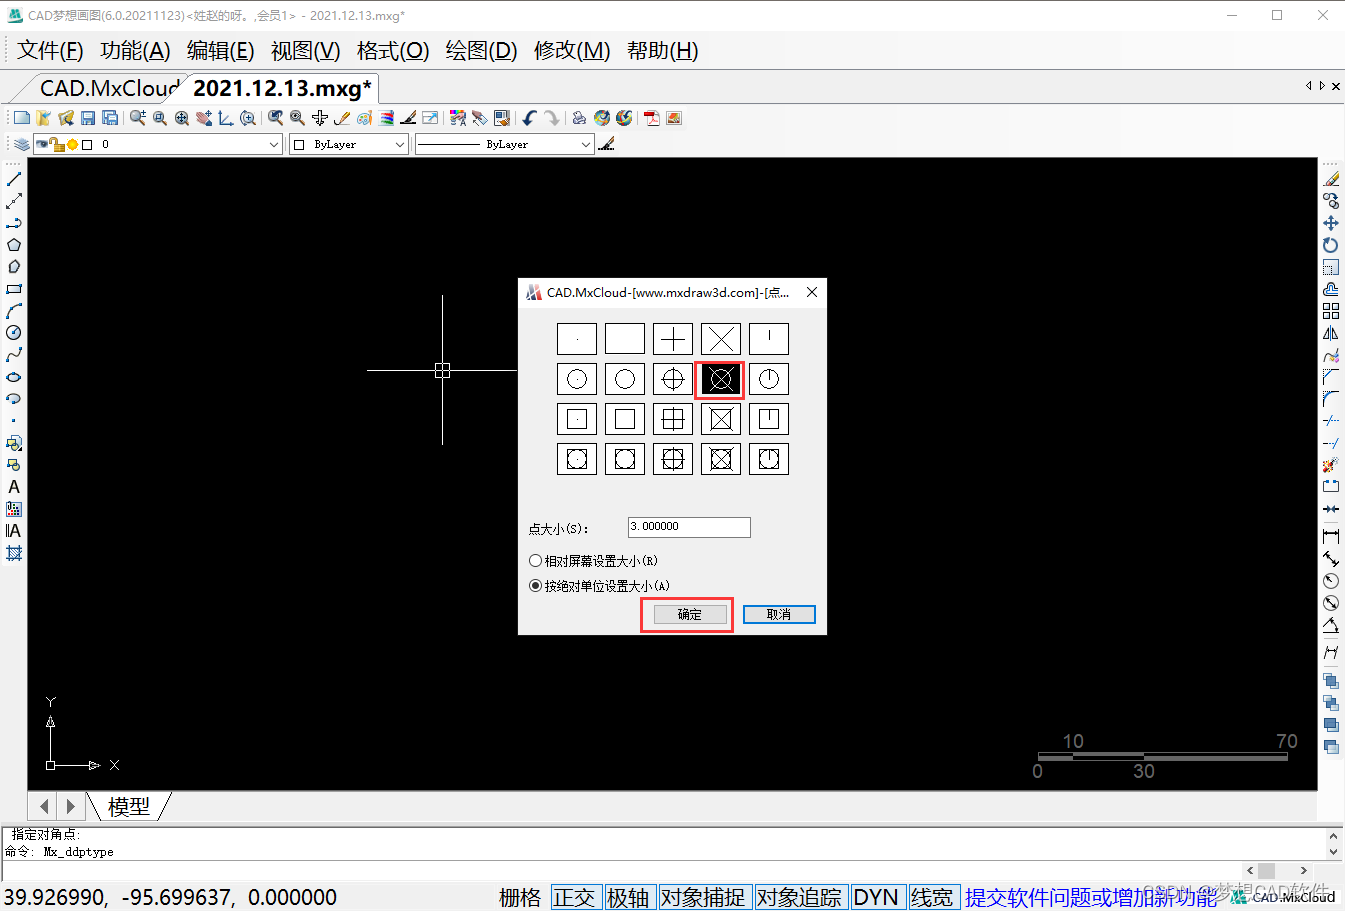
3. Enter the Rectangle (REC) command on the command line to draw an 80X80 square ABCD, as shown below:
Draw a square
4. Select the square ABCD and enter the decomposition (X) command to decompose the square, as shown in the following figure:
Breakdown Square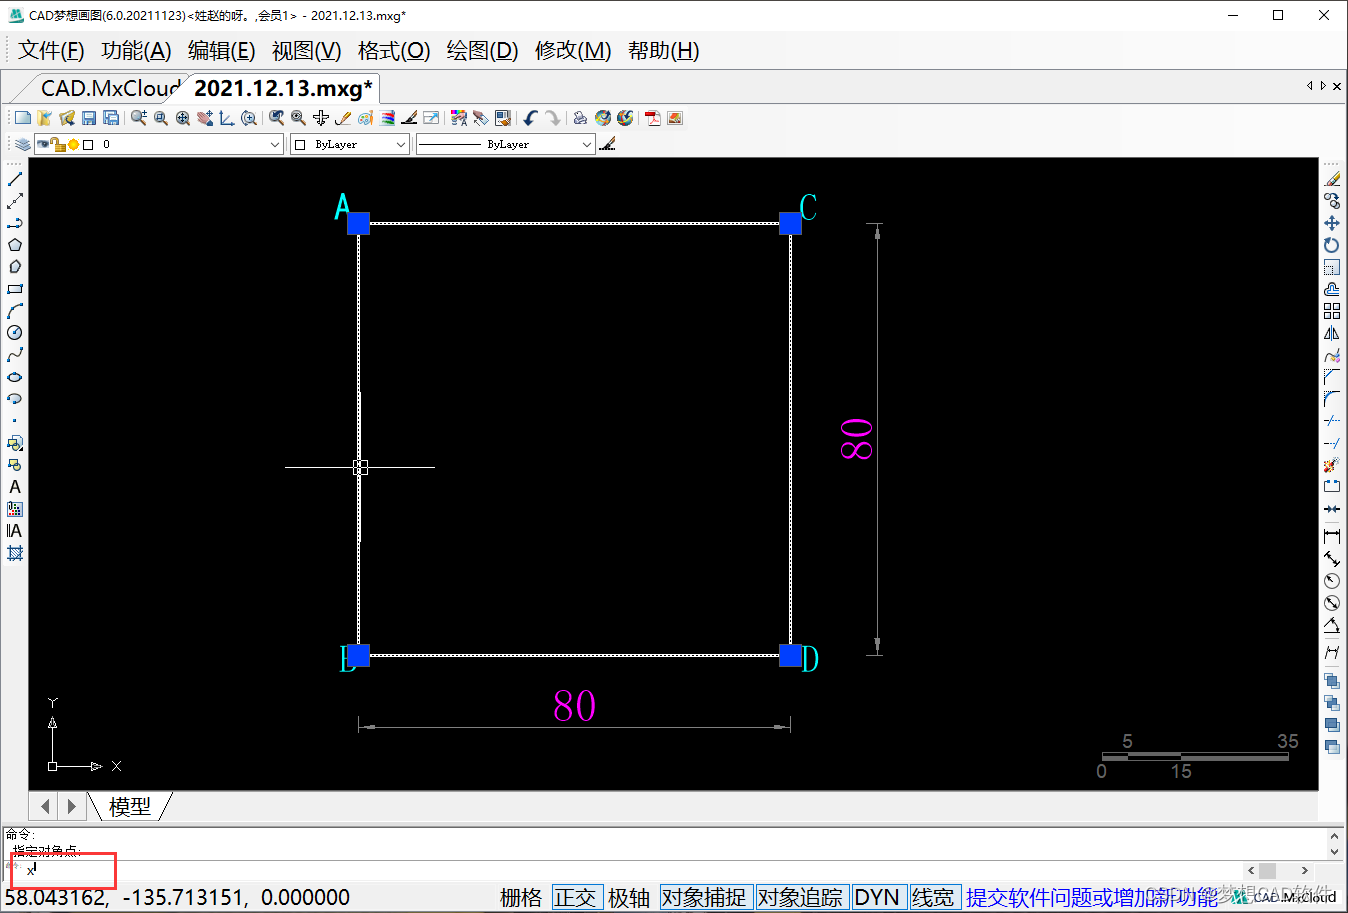
5. Enter the offset shortcut key on the command line to offset the line segment BD up by 30 units to obtain the intersection points of the line segment EF with the line segment AB, line segment CD and E, F, as shown in the following figure:
Offset line segment BD
6. Enter the circle (C) command on the command line and then choose to use (2P) two points to draw a circle, as shown in the following figure:
Select 2p circle command
7. Take points E and F as the first and second endpoints, draw a yellow circle with the line segment EF as the diameter, and intersect the line segment BD at point G on the left, as shown in the following figure:
Draw a yellow circle
8. Enter the line (L) command on the command line, and capture the points E, G, and F to draw the line segment EG and the line segment GF, because the line segment EF is the diameter of the circle, so ∠EGF=90°, as shown in the following figure:
p>Connect line segment EG, line segment GF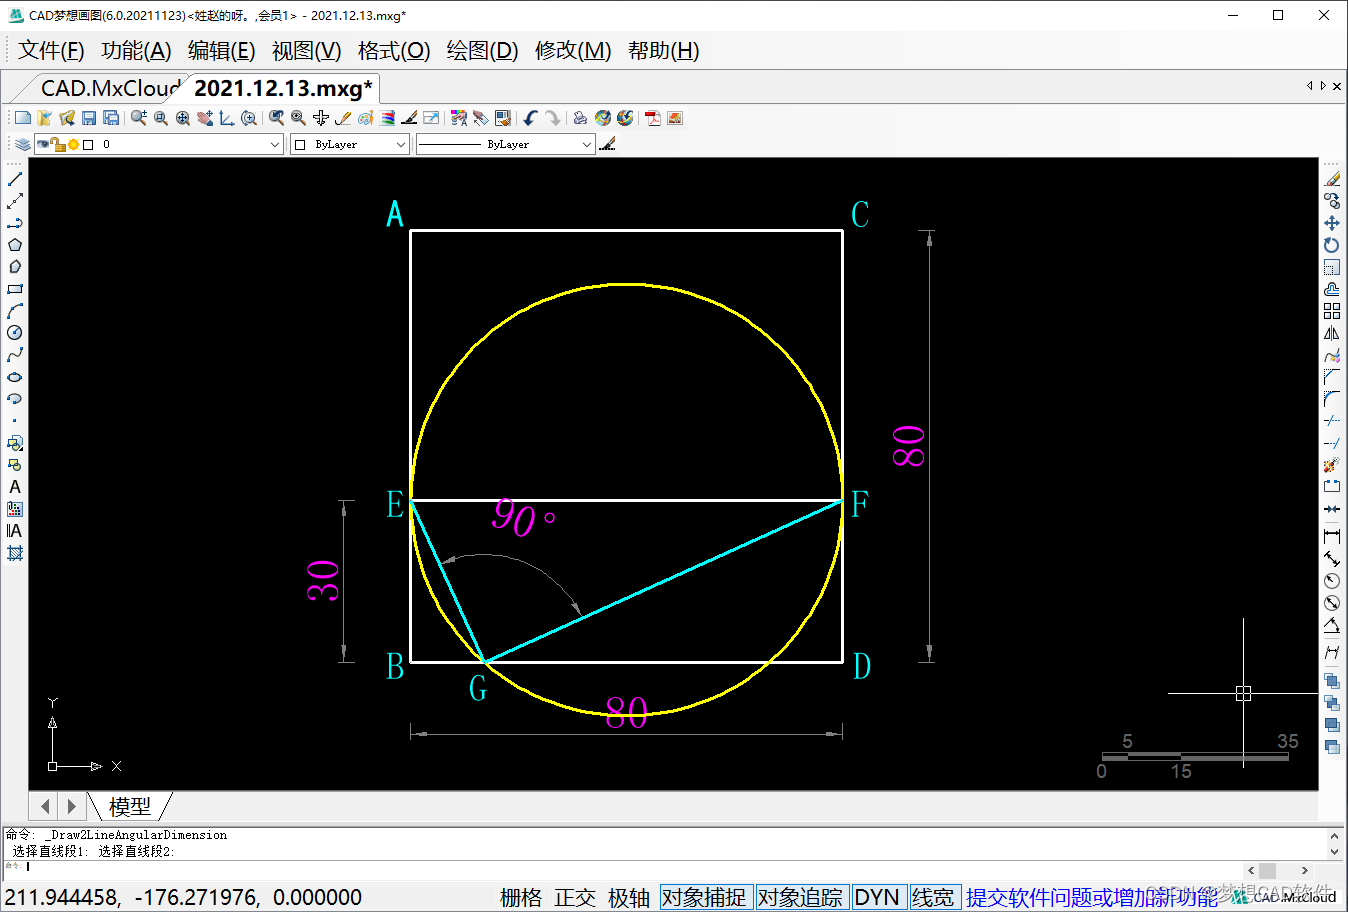
9. Select the circle to delete the circle, select the line segment GF, enter the rotation (RO) command on the command line, capture the point F as the base point of the rotation, and copy it at the input C, because it needs to rotate clockwise, so the input selectionThe angle is -75°, as shown below:
Rotate copy segment GF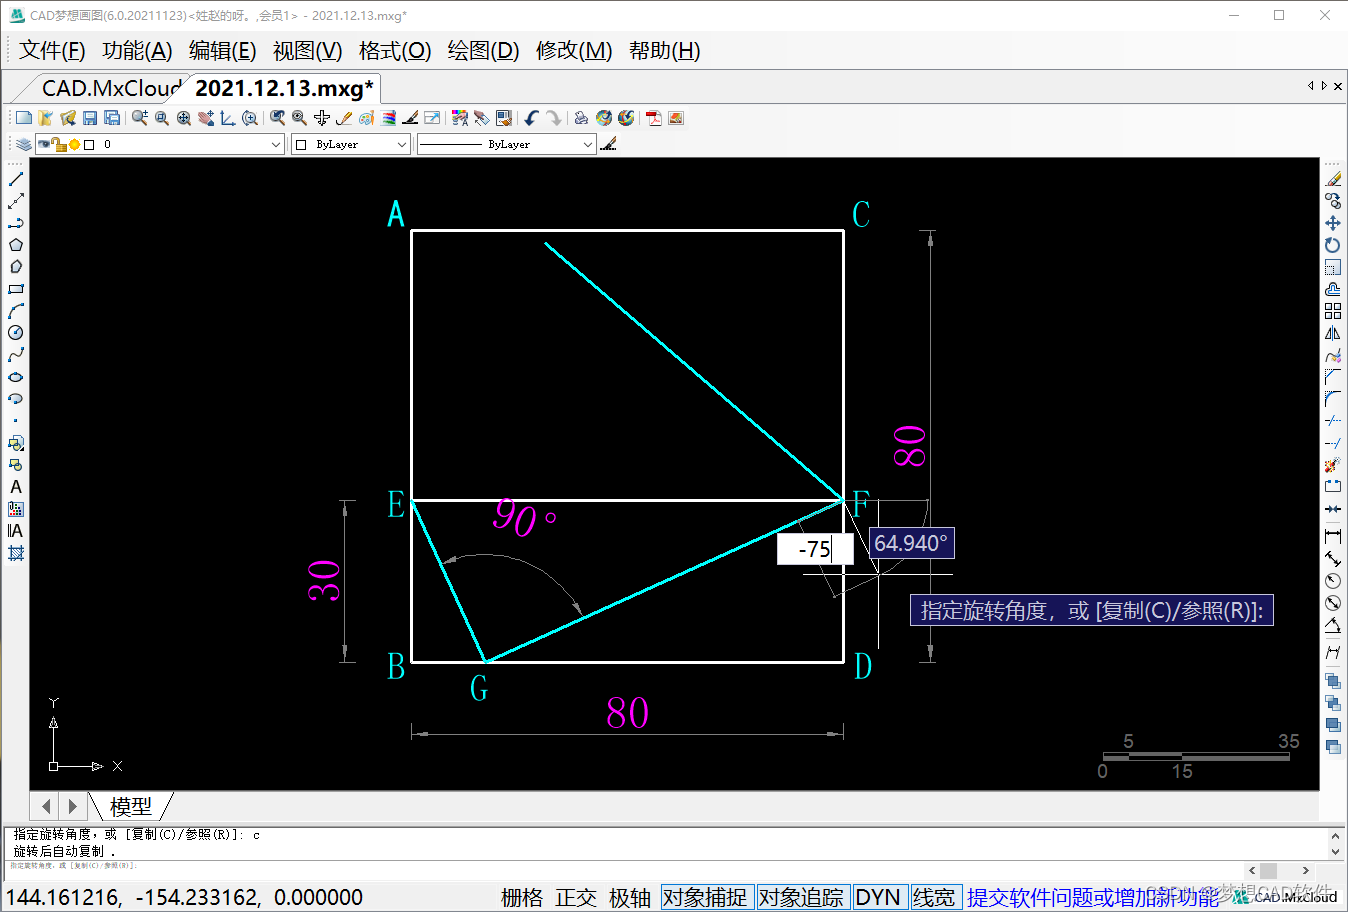
10. The line segment FH obtained after the rotation and copying is completed and the line segment AC intersect at point H, as shown in the following figure:
Rotation copy completed
11. Select the line segment EF, delete the line segment EF, and then use the line (L) command to capture point E and point H to draw first point EH, as shown in the following figure:
Connecting line segment EH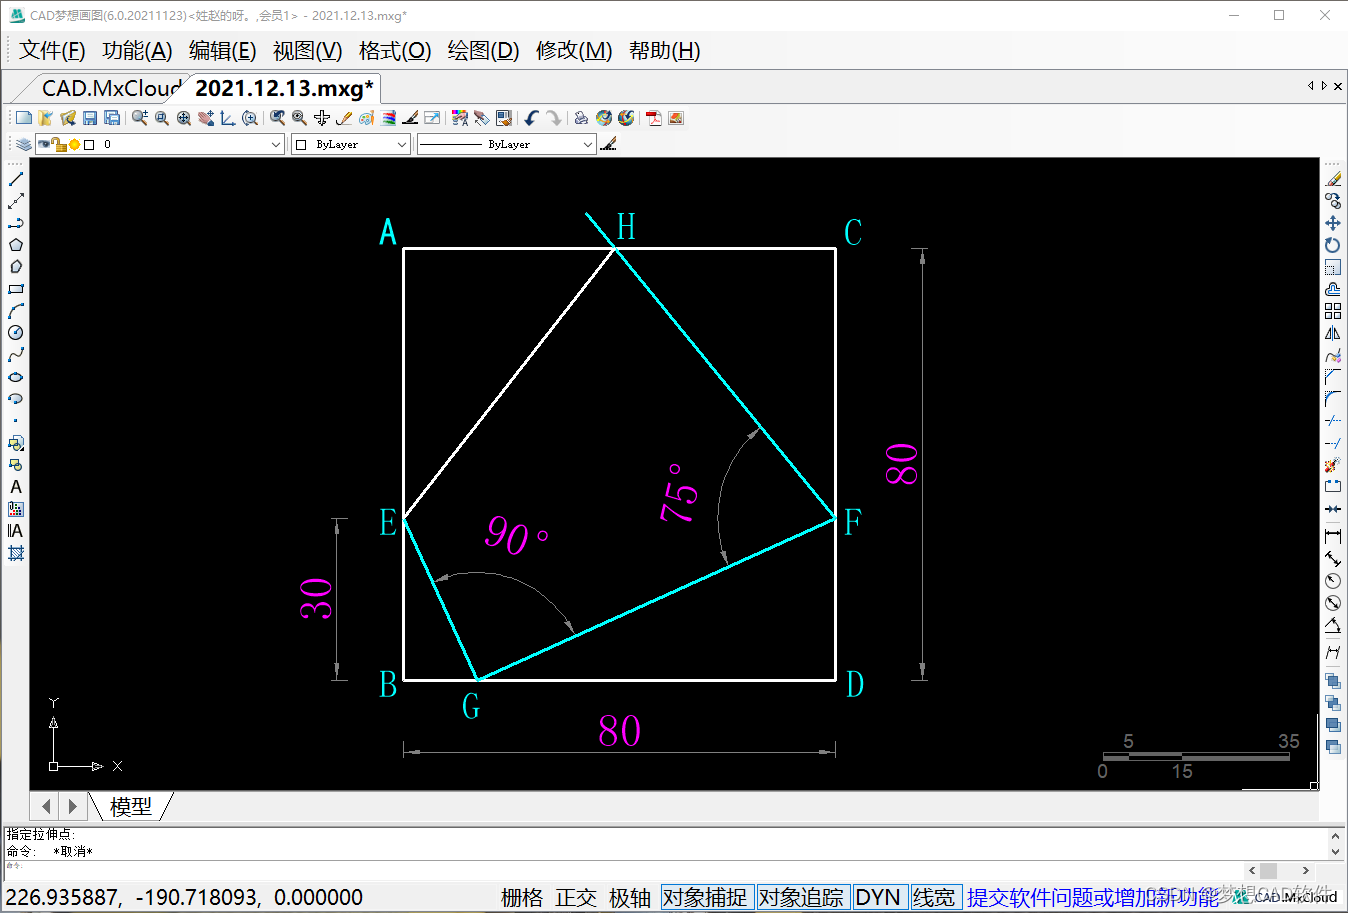
12. Use the trim (TR) command to trim according to the drawing needs, as shown below:
First trim object
13. Enter the OFFSET command on the command line to perform the following offsets, offset the line segment HE to the left by 10 units to obtain the line segment MN; offset the line segment MN to the left by 10 units to obtain the line segment PQ;Offset the line segment PQ to the left by 10 units to obtain the line segment RS.As shown below:
Offset by three segments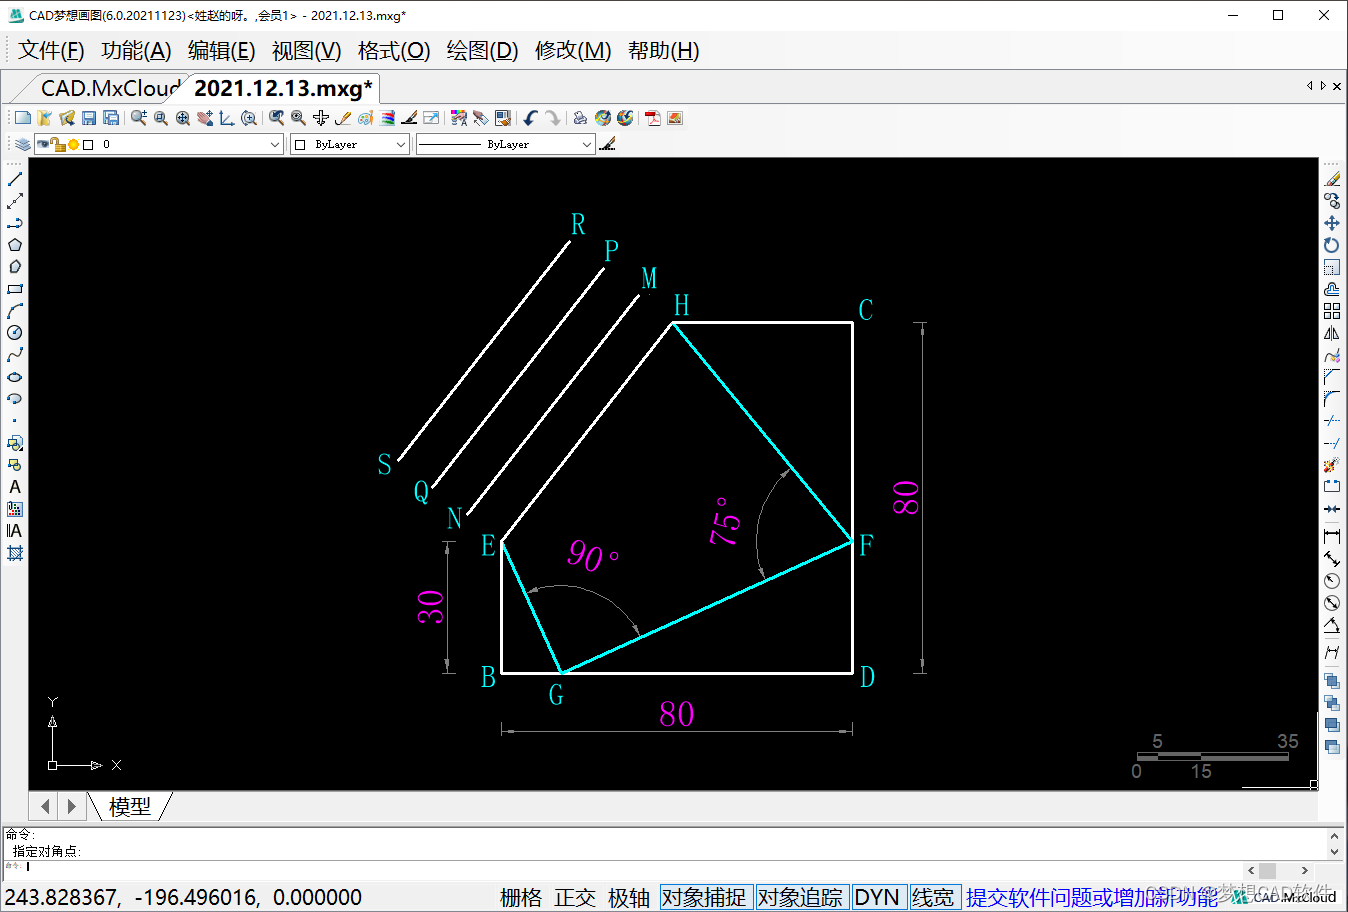
14. Enter the line (L) command on the command line, capture point H and point R to draw line segment HR; capture point E and point S to draw line segment ES, as shown in the following figure:
Connect line segment HR, line segment ES
15. Enter the DIVIDE command on the command line, select the line segment EH, and enter the number of constant divisions as 8 to draw 9 nodes. The 9 nodes divide the line segment EH into 8 segments.As shown below:
Equal Line Segment EH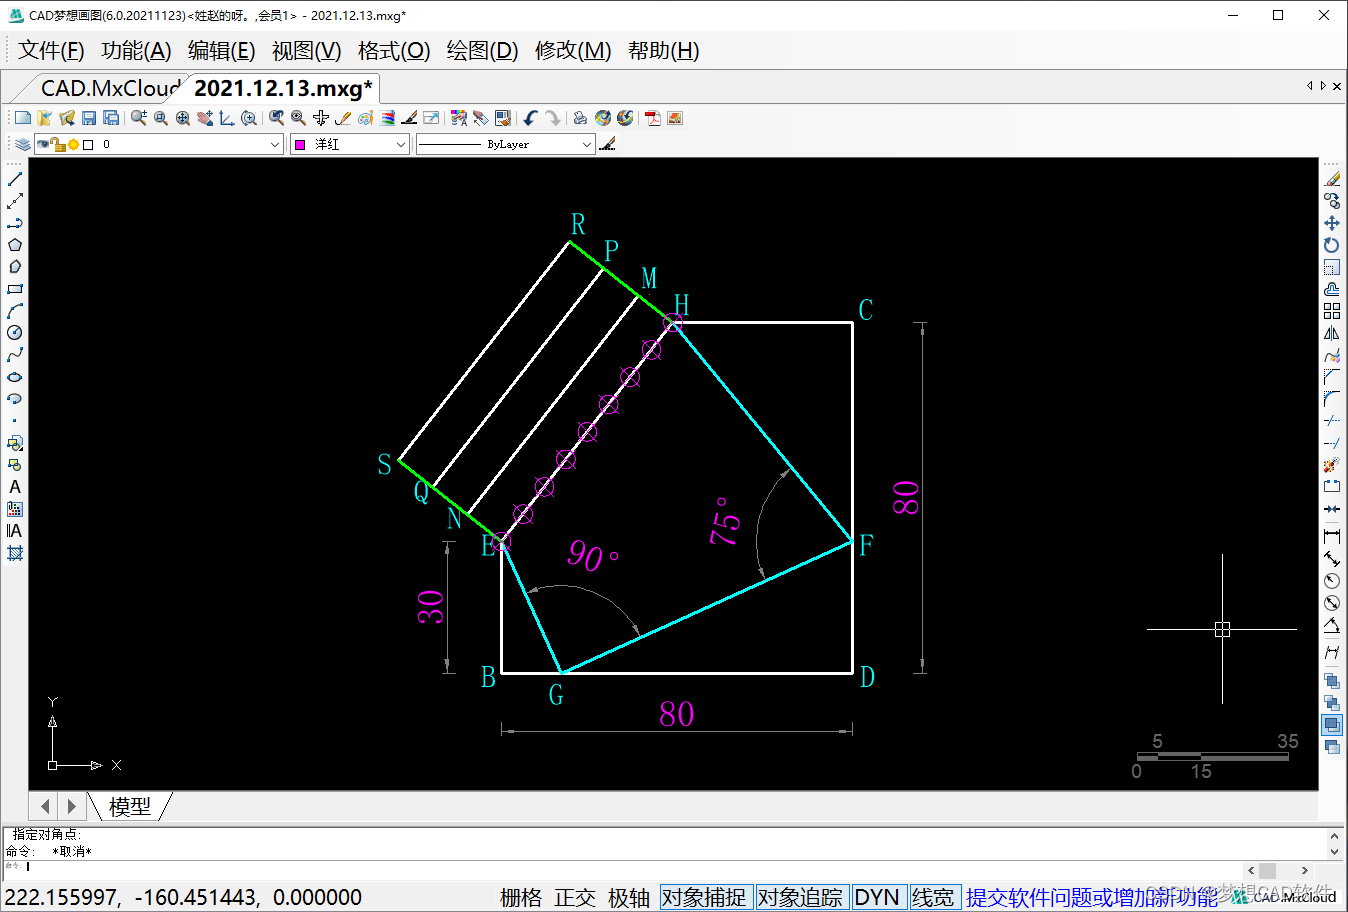
16. Select the line segment HR, enter the copy (CO) command, and copy the line segment HR 7 times with the equal point as the copy point, as shown in the following figure:
Copy line segment HR
17. Use the delete command in turn to delete the equal node and the trim command to trim the object to the object required for drawing, as shown in the following figure:
Secondary trim object
18. Enter the circle (C) command on the command line, the snap point D is the center of the circle, the snap point H specifies the radius, and the drawn circle D and the line segment DC intersect the point T, as shown in the following figure:
Draw a circle with point C as center and radius CH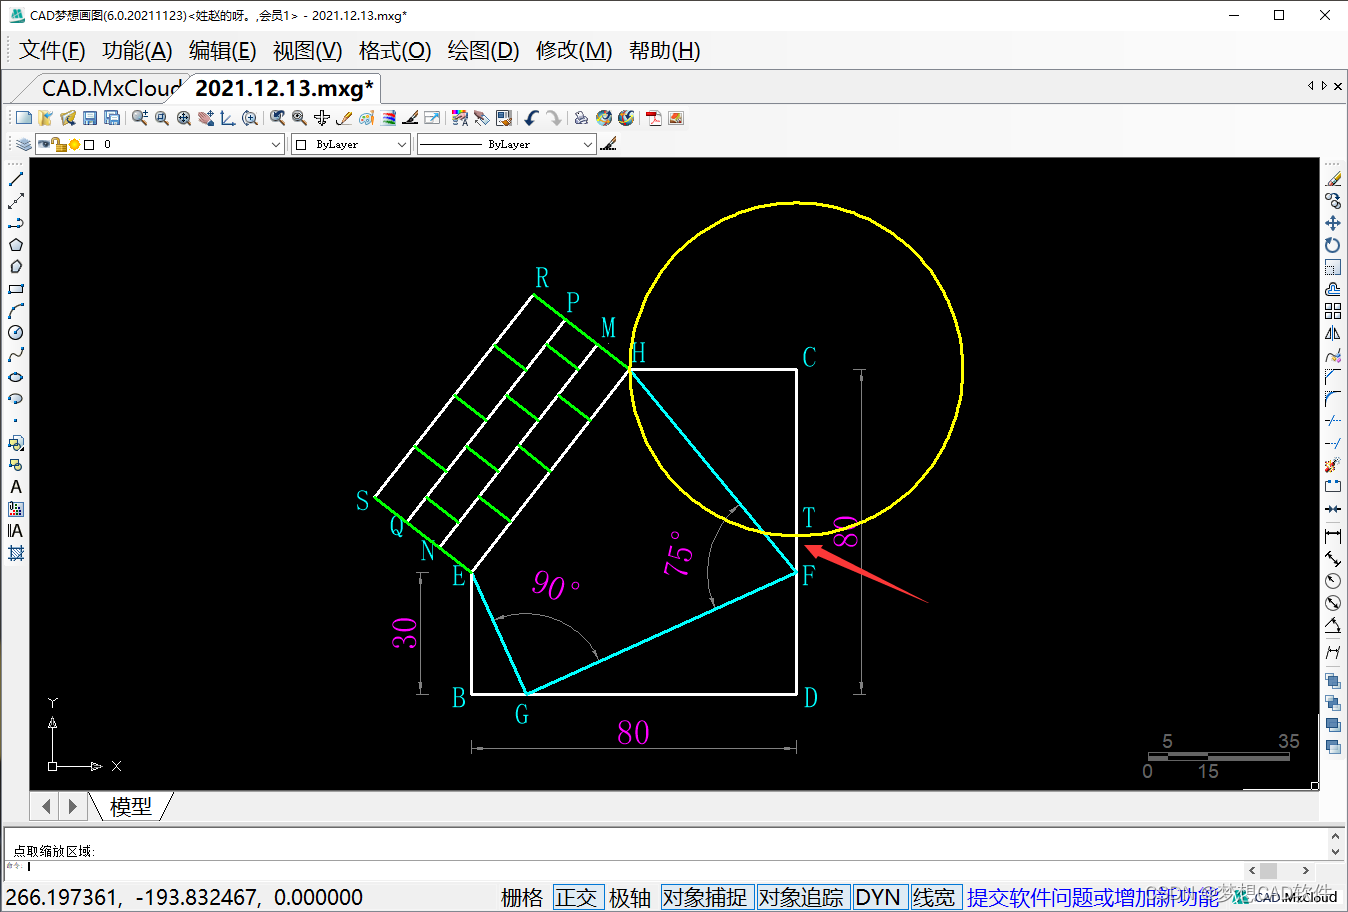
19. Press Enter directly, use the circle command again, capture point F as the center of the circle, capture point T to specify the radius, and the drawn circle F and line segment DC intersect at point V, as shown in the following figure:
Draw a circle with point F as center and FT as radius
20. Press Enter directly, enable the "Circle" command again, snap point D as the center of the circle, specify the radius of snap point V, and draw a circle D, as shown in the following figure:
Draw Circle D
21. Command input trim (TR) command, trim according to drawing needs, as shown in the following figure:
Three Trim Objects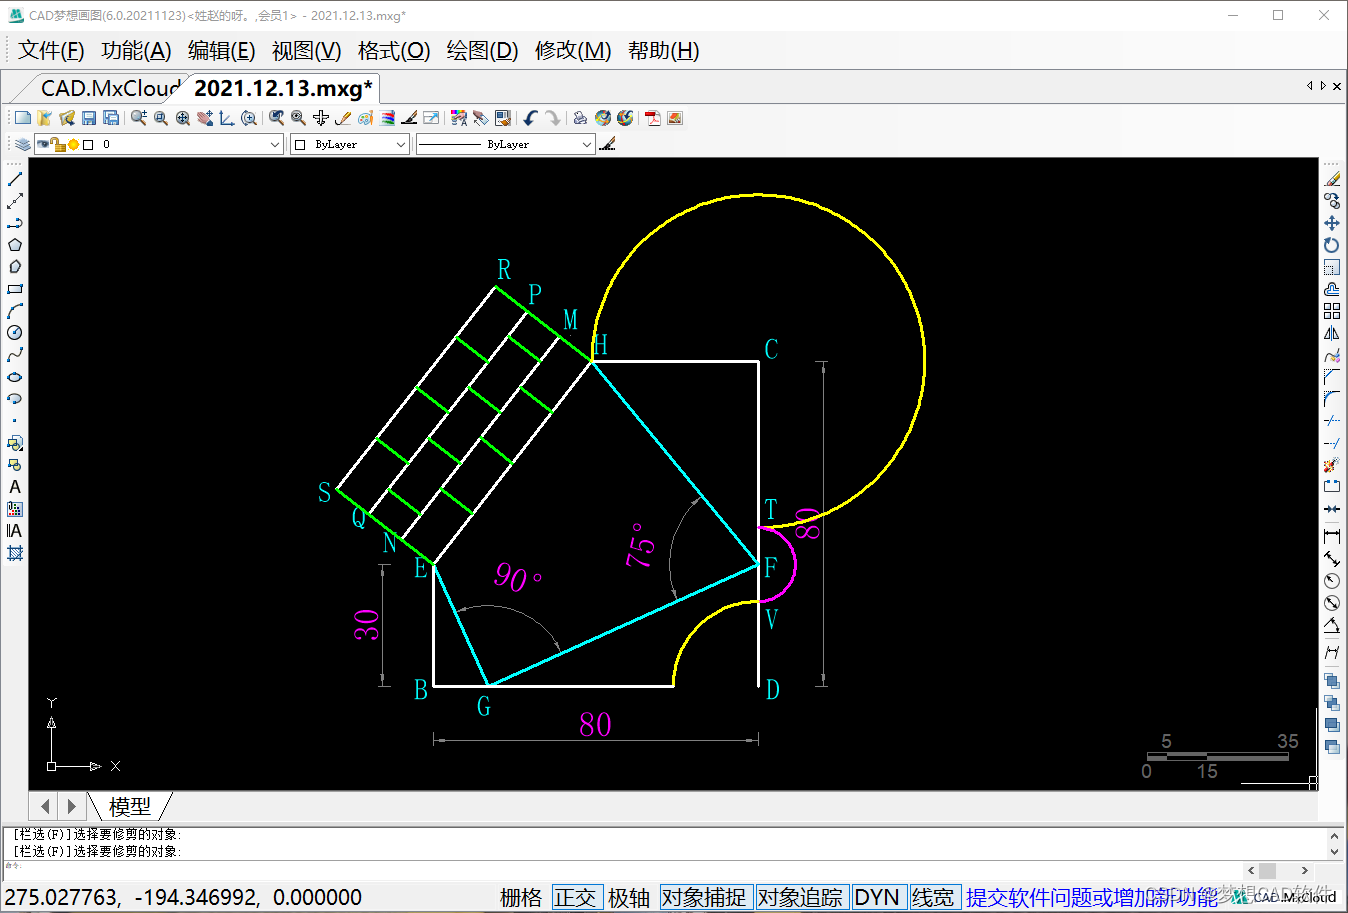
22. Finally, modify the color and dimension, and the final effect is as follows:
End result
边栏推荐
- 【761. Special binary sequence】
- 全栈开发可能需要的环境及工具
- How to add F4 Value Help trial version to the input parameters of the report in the ABAP report
- PX4模块设计之十九:Replay模块
- 为啥程序员下班后只关显示器从不关电脑?看看各大网站的答案~
- 数据库学习之表的操作
- Oracle存储修改以前的历史记录,怎么查找?
- Redis Server启动过程
- 干货技巧|如何用3DsMax制作笔记本电脑
- Fortinet new cloud native protection products launched amazon cloud platform of science and technology
猜你喜欢


随机推荐
Fortinet new cloud native protection products launched amazon cloud platform of science and technology
常用字符的编码
Redis Server启动过程
Lecture 4: Database Definition Language of DDL Type of SQL Statements
PG's huge page
Vue program of web cache problem after packaging
性能问题从发现到优化一般思路
传音控股:目前公司手机产品暂无明确计划进入中国市场
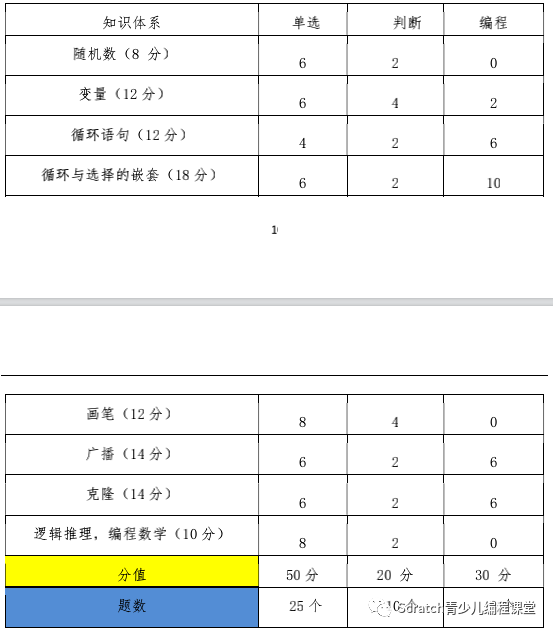
2021年9月电子学会图形化三级编程题解析含答案:绘制图形
数据压缩和归档(三)、tarfile
2022年美术生就业前景解析
搭建DG导致归档日志量变多问题排查
Numpy函数、模块、类列表
熬夜拜读349页阿里面试通关手册,成功闯入字节
Leetcode 23.合并K个升序链表 链表归并合并
oracle视图v$active_session_history,dba_hist_active_session_history如何记录IP地址
ABAP 报表中如何给报表的输入参数增添 F4 Value Help
JDBC最详讲解(快速入门)
卡通渲染的历史
Redhat 7 Maria DB installation and configuration