当前位置:网站首页>别再到处乱放配置文件了!试试我司使用 7 年的这套解决方案,稳的一秕
别再到处乱放配置文件了!试试我司使用 7 年的这套解决方案,稳的一秕
2022-08-08 11:55:00 【晨xi的光】
1 简述
官方文档对 Spring Cloud Config 的描述如下:
Spring Cloud Config 为分布式系统中的外部配置提供服务器和客户端支持,使用 Config Server ,您可以在所有环境中管理应用程序的外部属性。客户端和服务器上的概念映射与 Spring Environment 和 PropertySource 抽象相同。
因此它们与Spring应用程序非常契合,但可以与任何以任何语言运行的应用程序一起使用。随着应用程序通过从开发人员到测试和生产的部署流程,您可以管理这些环境之间的配置,并确定应用程序具有迁移时需要运行的一切。
服务器存储后端的默认实现使用git,因此它轻松支持标签版本的配置环境,以及可以访问用于管理内容的各种工具。很容易添加替代实现,并使用Spring配置将其插入。
1.1 配置中心存在的意义
一个应用中不只是代码,还需要连接资源和其它应用,经常有很多需要外部设置的项去调整应用行为,如切换不同的数据库,设置功能开关等。
随着系统微服务的不断增加,首要考虑的是系统的可伸缩、可扩展性好,随之就是一个配置管理的问题。各自管各自的开发时没什么问题,到了线上之后管理就会很头疼,到了要大规模更新就更烦了。
而且你不可能停止你的服务集群去更新的你配置,这是不现实的做法,因此Spring Cloud配置中心就是一个比较好的解决方案,下图就是一个Spring Cloud配置中心的解决方案:
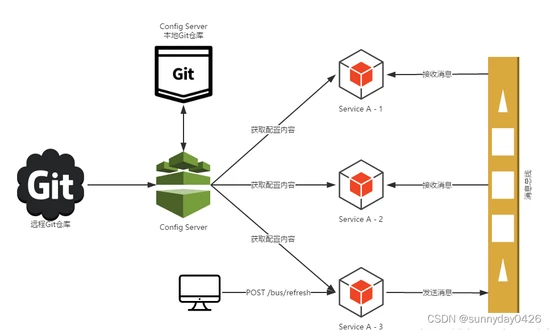
架构图如下:

常见的配置中心的实现方法有:
硬编码(缺点:需要修改代码,风险大)
放在xml等配置文件中,和应用一起打包(缺点:需要重新打包和重启)
文件系统中(缺点:依赖操作系统等)
环境变量(缺点:有大量的配置需要人工设置到环境变量中,不便于管理且依赖平台)
云端存储(缺点:与其他应用耦合)
Spring Cloud Config 就是云端存储配置信息的,它具有中心化、版本控制、支持动态更新、平台独立、语言独立等特性。其特点是:
提供服务端和客户端支持(
spring cloud config server和spring cloud config client)集中式管理分布式环境下的应用配置
基于Spring环境,无缝与Spring应用集成
可用于任何语言开发的程序
默认实现基于git仓库,可以进行版本管理
可替换自定义实现
1.1.1 Spring Cloud Config包括两部分
1、 Spring Cloud Config Server 作为配置中心的服务端:
拉取配置时更新git仓库副本,保证是最新结果
支持数据结构丰富,
yml、json、properties等配合 eureke 可实现服务发现,配合
cloud bus可实现配置推送更新配置存储基于 git仓库,可进行版本管理
简单可靠,有丰富的配套方案
2、 Spring Cloud Config Client 客户端:
Spring Boot项目不需要改动任何代码,加入一个启动配置文件指明使用 ConfigServer 上哪个配置文件即可
1.1.2 SpringCloud Config与百度的disconf之类注册中心区别
主要区别在于下面三点:
1、配置的存储方式不同:disconf是把配置信息保存在mysql、zookeeper中,而 spring cloud config 是将配置保存在 git/svn 上 (即:配置当成源代码一样管理)
2、配置的管理方式不同: spring cloud config 没有类似 disconf 的统一管理界面,既然把配置都当成git之类的源码来看待了,git的管理界面,就是配置的管理界面
3、配置变化的通知机制不同: disconf 中配置变化后,依赖zk的事件watcher来通知应用,而 spring cloud config 则是依赖git每次push后,触发webhook回调,最终触发 spring cloud bus (消息总线),然后由消息总线通知相关的应用。
从配置变化的通知机制上看,如果有100个应用节点,都依赖于统一配置,如果修改了配置,只想让某几个节点"灰度"更新配置, spring cloud config server 更容易做到,这一点相对disconf更灵活
1.2 代码示例
目前 SpringCloud Config 的使用主要是通过Git/SVN方式做一个配置中心,然后每个服务从其中获取自身配置所需的参数。 SpringCloud Config 也支持本地参数配置的获取。
如果使用本地存储的方式,在 application.properties 或 application.yml 文件添加 spring.profiles.active=native 配置即可,它会从项目的 resources 路径下读取配置文件。如果是读取指定的配置文件,那么可以使用 spring.cloud.config.server.native.searchLocations = file:D:/properties/ 来读取。
1.2.1 服务端
首先是服务端这块,首先创建一个注册中心,为了进行区分,创建一个 springcloud-config-eureka 的项目。
application.properties 配置信息:
配置信息:
<pre class="prettyprint hljs delphi" style="padding: 0.5em; font-family: Menlo, Monaco, Consolas, "Courier New", monospace; color: rgb(68, 68, 68); border-radius: 4px; display: block; margin: 0px 0px 1.5em; font-size: 14px; line-height: 1.5em; word-break: break-all; overflow-wrap: break-word; white-space: pre; background-color: rgb(246, 246, 246); border: none; overflow-x: auto;">spring.application.name=springcloud-hystrix-eureka-server
server.port=8005
eureka.client.register-with-eureka=false
eureka.client.fetch-registry=false
eureka.client.serviceUrl.defaultZone=http://localhost:8005/eureka/
</pre>
配置说明:
spring.application.name:这个是指定服务名称
server.port:服务指定的端口
eureka.client.register-with-eureka: 表示是否将自己注册到
Eureka Server,默认是trueeureka.client.fetch-registry: 表示是否从
Eureka Server获取注册信息,默认为trueeureka.client.serviceUrl.defaultZone: 这个是设置与
Eureka Server交互的地址,客户端的查询服务和注册服务都需要依赖这个地址
服务端这边只需要在SpringBoot启动类添加 @EnableEurekaServer 注解就可以了,该注解表示此服务是一个服务注册中心服务。
代码示例:
<pre class="prettyprint hljs less" style="padding: 0.5em; font-family: Menlo, Monaco, Consolas, "Courier New", monospace; color: rgb(68, 68, 68); border-radius: 4px; display: block; margin: 0px 0px 1.5em; font-size: 14px; line-height: 1.5em; word-break: break-all; overflow-wrap: break-word; white-space: pre; background-color: rgb(246, 246, 246); border: none; overflow-x: auto;">@SpringBootApplication
@EnableEurekaServer
public class ConfigEurekaApplication {
public static void main(String[] args) {
SpringApplication.run(ConfigEurekaApplication.class, args);
System.out.println("config 注册中心服务启动...");
}
}
</pre>
创建好了注册中心之后,我们再来创建一个配置中心,用于管理配置。
创建一个 springcloud-config-server 的项目。然后在 application.properties 配置文件添加如下配置:
配置信息:
<pre class="prettyprint hljs ruby" style="padding: 0.5em; font-family: Menlo, Monaco, Consolas, "Courier New", monospace; color: rgb(68, 68, 68); border-radius: 4px; display: block; margin: 0px 0px 1.5em; font-size: 14px; line-height: 1.5em; word-break: break-all; overflow-wrap: break-word; white-space: pre; background-color: rgb(246, 246, 246); border: none; overflow-x: auto;">spring.application.name=springcloud-config-server
server.port=9005
eureka.client.serviceUrl.defaultZone=http://localhost:8005/eureka/
spring.cloud.config.server.git.uri = https://github.com/xuwujing/springcloud-study/
spring.cloud.config.server.git.search-paths = /springcloud-config/config-repo
spring.cloud.config.server.git.username =
spring.cloud.config.server.git.password =
</pre>
配置说明:
spring.application.name:这个是指定服务名称
server.port:服务指定的端口
eureka.client.serviceUrl.defaultZone: 这个是设置与
Eureka Server交互的地址,客户端的查询服务和注册服务都需要依赖这个地址spring.cloud.config.server.git.uri:配置的Git仓库的地址
spring.cloud.config.server.git.search-paths:git仓库地址下的相对地址 多个用逗号","分割
spring.cloud.config.server.git.username:git仓库的账号
spring.cloud.config.server.git.password:git仓库的密码
注:如果想使用本地方式读取配置信息,那么只需将 spring.cloud.config.server.git 的配置改成 spring.profiles.active=native ,然后在 resources 路径下新增一个文件即可。
这里为了进行本地配置文件测试,新建一个 configtest.properties 配置文件,添加如下内容:
<pre class="prettyprint hljs ini" style="padding: 0.5em; font-family: Menlo, Monaco, Consolas, "Courier New", monospace; color: rgb(68, 68, 68); border-radius: 4px; display: block; margin: 0px 0px 1.5em; font-size: 14px; line-height: 1.5em; word-break: break-all; overflow-wrap: break-word; white-space: pre; background-color: rgb(246, 246, 246); border: none; overflow-x: auto;">word=hello world
</pre>
代码这块也很简单,在程序主类中,额外添加 @EnableConfigServer 注解,该注解表示启用config配置中心功能。代码如下:
<pre class="prettyprint hljs less" style="padding: 0.5em; font-family: Menlo, Monaco, Consolas, "Courier New", monospace; color: rgb(68, 68, 68); border-radius: 4px; display: block; margin: 0px 0px 1.5em; font-size: 14px; line-height: 1.5em; word-break: break-all; overflow-wrap: break-word; white-space: pre; background-color: rgb(246, 246, 246); border: none; overflow-x: auto;">@EnableDiscoveryClient
@EnableConfigServer
@SpringBootApplication
public class ConfigServerApplication {
public static void main(String[] args) {
SpringApplication.run(ConfigServerApplication.class, args);
System.out.println("配置中心服务端启动成功!");
}
}
</pre>
完成上述代码之后,我们的配置中心服务端已经构建完成了。
1.2.2 客户端
我们新建一个 springcloud-config-client 的项目,用于做读取配置中心的配置。pom依赖还是和配置中心一样,不过需要新增一个配置,用于指定配置的读取。
创建一个 bootstrap.properties 文件,并添加如下信息:
配置信息:
<pre class="prettyprint hljs delphi" style="padding: 0.5em; font-family: Menlo, Monaco, Consolas, "Courier New", monospace; color: rgb(68, 68, 68); border-radius: 4px; display: block; margin: 0px 0px 1.5em; font-size: 14px; line-height: 1.5em; word-break: break-all; overflow-wrap: break-word; white-space: pre; background-color: rgb(246, 246, 246); border: none; overflow-x: auto;">spring.cloud.config.name=configtest
spring.cloud.config.profile=pro
spring.cloud.config.label=master
spring.cloud.config.discovery.enabled=true
spring.cloud.config.discovery.serviceId=springcloud-config-server
eureka.client.serviceUrl.defaultZone=http://localhost:8005/eureka/
</pre>
配置说明:
spring.cloud.config.name:获取配置文件的名称
spring.cloud.config.profile:获取配置的策略
spring.cloud.config.label:获取配置文件的分支,默认是master。如果是是本地获取的话,则无用
spring.cloud.config.discovery.enabled:开启配置信息发现
spring.cloud.config.discovery.serviceId: 指定配置中心的
service-id,便于扩展为高可用配置集群eureka.client.serviceUrl.defaultZone: 这个是设置与
Eureka Server交互的地址,客户端的查询服务和注册服务都需要依赖这个地址
注:上面这些与spring-cloud相关的属性必须配置在 bootstrap.properties 中,config部分内容才能被正确加载。因为 bootstrap.properties 的相关配置会先于 application.properties ,而 bootstrap.properties 的加载也是先于 application.properties 。需要注意的是 eureka.client.serviceUrl.defaultZone 要配置在 bootstrap.properties ,不然客户端是无法获取配置中心参数的,会启动失败!
application.properties 配置
<pre class="prettyprint hljs verilog" style="padding: 0.5em; font-family: Menlo, Monaco, Consolas, "Courier New", monospace; color: rgb(68, 68, 68); border-radius: 4px; display: block; margin: 0px 0px 1.5em; font-size: 14px; line-height: 1.5em; word-break: break-all; overflow-wrap: break-word; white-space: pre; background-color: rgb(246, 246, 246); border: none; overflow-x: auto;">spring.application.name=springcloud-config-client
server.port=9006
</pre>
配置说明:
<pre class="prettyprint hljs css" style="padding: 0.5em; font-family: Menlo, Monaco, Consolas, "Courier New", monospace; color: rgb(68, 68, 68); border-radius: 4px; display: block; margin: 0px 0px 1.5em; font-size: 14px; line-height: 1.5em; word-break: break-all; overflow-wrap: break-word; white-space: pre; background-color: rgb(246, 246, 246); border: none; overflow-x: auto;">spring.application.name: 这个是指定服务名称
server.port:服务指定的端口
</pre>
程序主类代码,和之前的基本一致。代码如下:
代码示例:
<pre class="prettyprint hljs less" style="padding: 0.5em; font-family: Menlo, Monaco, Consolas, "Courier New", monospace; color: rgb(68, 68, 68); border-radius: 4px; display: block; margin: 0px 0px 1.5em; font-size: 14px; line-height: 1.5em; word-break: break-all; overflow-wrap: break-word; white-space: pre; background-color: rgb(246, 246, 246); border: none; overflow-x: auto;">@EnableDiscoveryClient
@SpringBootApplication
public class ConfigClientApplication {
public static void main(String[] args) {
SpringApplication.run(ConfigClientApplication.class, args);
System.out.println("配置中心客户端启动成功!");
}
}
</pre>
为了方便查询,在控制中进行参数的获取,并返回。 @Value 注解是默认是从 application.properties 配置文件获取参数,但是这里我们在客户端并没有进行配置,该配置在配置中心服务端,我们只需指定好了配置文件之后即可进行使用。
代码示例:
<pre class="prettyprint hljs kotlin" style="padding: 0.5em; font-family: Menlo, Monaco, Consolas, "Courier New", monospace; color: rgb(68, 68, 68); border-radius: 4px; display: block; margin: 0px 0px 1.5em; font-size: 14px; line-height: 1.5em; word-break: break-all; overflow-wrap: break-word; white-space: pre; background-color: rgb(246, 246, 246); border: none; overflow-x: auto;">@RestController
public class ClientController {
@Value("${word}")
private String word;
@RequestMapping("/hello")
public String index(@RequestParam String name) {
return name+","+this.word;
}
}
</pre>
到此,客户端项目也就构建完成了。
1.2.3 功能测试
完成如上的工程开发之后,我们来进行测试。
1.2.3.1 本地测试
首先我们把 springcloud-config-server 项目的 application.properties 配置文件添加 spring.profiles.active=native 配置,注释掉 spring.cloud.config.server.git 相关的配置,然后在 src/main/resources 目录下新建一个 configtest.properties 文件,然后在里面添加一个配置 word=hello world 。
添加完成之后,我们依次启动 springcloud-config-eureka 、 springcloud-config-server 、 springcloud-config-client 这三个项目。启动成功之前,先看来看看配置中心服务端的配置文件获取,在浏览器输入:
<pre class="hljs less" style="padding: 0.5em; font-family: Menlo, Monaco, Consolas, "Courier New", monospace; color: rgb(68, 68, 68); border-radius: 4px; display: block; margin: 0px 0px 0.75em; font-size: 14px; line-height: 1.5em; word-break: break-all; overflow-wrap: break-word; white-space: pre; background-color: rgb(246, 246, 246); border: none; overflow-x: auto;">http://localhost:9005/configtest-1.properties
</pre>
查看该文件的配置信息。
注:配置文件的名称是 configtest.properties ,但是如果直接该名称的话是获取不到的,因为在配置文件名需要通过-来进行获取,如果配置文件名称没有-,那么添加了-之后,会自动进行匹配搜索。
springcloud config 的URL与配置文件的映射关系如下:
<pre class="prettyprint hljs xquery" style="padding: 0.5em; font-family: Menlo, Monaco, Consolas, "Courier New", monospace; color: rgb(68, 68, 68); border-radius: 4px; display: block; margin: 0px 0px 1.5em; font-size: 14px; line-height: 1.5em; word-break: break-all; overflow-wrap: break-word; white-space: pre; background-color: rgb(246, 246, 246); border: none; overflow-x: auto;">/{application}/{profile}[/{label}]
/{application}-{profile}.yml
/{label}/{application}-{profile}.yml
/{application}-{profile}.properties
/{label}/{application}-{profile}.properties
</pre>
上面的url会映射 {application}-{profile}.properties 对应的配置文件, {label} 对应git上不同的分支,默认为master。
界面返回:
<pre class="prettyprint hljs http" style="padding: 0.5em; font-family: Menlo, Monaco, Consolas, "Courier New", monospace; color: rgb(68, 68, 68); border-radius: 4px; display: block; margin: 0px 0px 1.5em; font-size: 14px; line-height: 1.5em; word-break: break-all; overflow-wrap: break-word; white-space: pre; background-color: rgb(246, 246, 246); border: none; overflow-x: auto;">word: hello world
</pre>
然后调用客户端的接口,查看是否能够获取配置信息。在浏览器上输入:
<pre class="hljs less" style="padding: 0.5em; font-family: Menlo, Monaco, Consolas, "Courier New", monospace; color: rgb(68, 68, 68); border-radius: 4px; display: block; margin: 0px 0px 0.75em; font-size: 14px; line-height: 1.5em; word-break: break-all; overflow-wrap: break-word; white-space: pre; background-color: rgb(246, 246, 246); border: none; overflow-x: auto;">http://localhost:9006//hello?name=pancm
</pre>
界面返回:
<pre class="prettyprint hljs" style="padding: 0.5em; font-family: Menlo, Monaco, Consolas, "Courier New", monospace; color: rgb(68, 68, 68); border-radius: 4px; display: block; margin: 0px 0px 1.5em; font-size: 14px; line-height: 1.5em; word-break: break-all; overflow-wrap: break-word; white-space: pre; background-color: rgb(246, 246, 246); border: none; overflow-x: auto;">pancm,hello world
</pre>
示例图:


1.2.3.2 Git测试
在完成本地测试之后,我们把这个 spring.profiles.active=native 配置注释掉,解除 spring.cloud.config.server.git 相关的注释(账号和密码要填写真实的),然后在git仓库上建立一个 config-repo 文件夹,新建 configtest-pro.properties 、 configtest-dev.properties 两个配置,这两个的配置分别是 word=hello world!! 和 word=hello world! , 然后和 configtest.properties 配置文件一起上传到 config-repo 文件夹中。
首先在浏览器输入:
<pre class="hljs less" style="padding: 0.5em; font-family: Menlo, Monaco, Consolas, "Courier New", monospace; color: rgb(68, 68, 68); border-radius: 4px; display: block; margin: 0px 0px 0.75em; font-size: 14px; line-height: 1.5em; word-break: break-all; overflow-wrap: break-word; white-space: pre; background-color: rgb(246, 246, 246); border: none; overflow-x: auto;">http://localhost:9005/configtest-dev.properties
</pre>
浏览器返回:
<pre class="prettyprint hljs http" style="padding: 0.5em; font-family: Menlo, Monaco, Consolas, "Courier New", monospace; color: rgb(68, 68, 68); border-radius: 4px; display: block; margin: 0px 0px 1.5em; font-size: 14px; line-height: 1.5em; word-break: break-all; overflow-wrap: break-word; white-space: pre; background-color: rgb(246, 246, 246); border: none; overflow-x: auto;">word: hello world!
</pre>
然后再浏览器输入:
<pre class="hljs less" style="padding: 0.5em; font-family: Menlo, Monaco, Consolas, "Courier New", monospace; color: rgb(68, 68, 68); border-radius: 4px; display: block; margin: 0px 0px 0.75em; font-size: 14px; line-height: 1.5em; word-break: break-all; overflow-wrap: break-word; white-space: pre; background-color: rgb(246, 246, 246); border: none; overflow-x: auto;">http://localhost:9005/configtest-pro.properties
</pre>
浏览器返回:
<pre class="prettyprint hljs erlang-repl" style="padding: 0.5em; font-family: Menlo, Monaco, Consolas, "Courier New", monospace; color: rgb(68, 68, 68); border-radius: 4px; display: block; margin: 0px 0px 1.5em; font-size: 14px; line-height: 1.5em; word-break: break-all; overflow-wrap: break-word; white-space: pre; background-color: rgb(246, 246, 246); border: none; overflow-x: auto;">word: hello world!!
</pre>
上传了 configtest.properties 文件,但是这个文件名称没有-,我们想获取其中参数的信息的话,可以在然后-随意添加一个参数,它会自动进行匹配,在浏览器输入:
<pre class="hljs less" style="padding: 0.5em; font-family: Menlo, Monaco, Consolas, "Courier New", monospace; color: rgb(68, 68, 68); border-radius: 4px; display: block; margin: 0px 0px 0.75em; font-size: 14px; line-height: 1.5em; word-break: break-all; overflow-wrap: break-word; white-space: pre; background-color: rgb(246, 246, 246); border: none; overflow-x: auto;">http://localhost:9005/configtest-1.properties
</pre>
浏览器返回:
<pre class="prettyprint hljs http" style="padding: 0.5em; font-family: Menlo, Monaco, Consolas, "Courier New", monospace; color: rgb(68, 68, 68); border-radius: 4px; display: block; margin: 0px 0px 1.5em; font-size: 14px; line-height: 1.5em; word-break: break-all; overflow-wrap: break-word; white-space: pre; background-color: rgb(246, 246, 246); border: none; overflow-x: auto;">word: hello world
</pre>
然后进行客户端接口调用测试,在浏览器输入:
<pre class="hljs less" style="padding: 0.5em; font-family: Menlo, Monaco, Consolas, "Courier New", monospace; color: rgb(68, 68, 68); border-radius: 4px; display: block; margin: 0px 0px 0.75em; font-size: 14px; line-height: 1.5em; word-break: break-all; overflow-wrap: break-word; white-space: pre; background-color: rgb(246, 246, 246); border: none; overflow-x: auto;">http://localhost:9006/hello?name=pancm
</pre>
浏览器返回:
<pre class="prettyprint hljs erlang-repl" style="padding: 0.5em; font-family: Menlo, Monaco, Consolas, "Courier New", monospace; color: rgb(68, 68, 68); border-radius: 4px; display: block; margin: 0px 0px 1.5em; font-size: 14px; line-height: 1.5em; word-break: break-all; overflow-wrap: break-word; white-space: pre; background-color: rgb(246, 246, 246); border: none; overflow-x: auto;">pancm,Hello World!!
</pre>
由于这里我配置的前缀是 pro ,所以读取的是 configtest-pro.properties 文件的数据,想要获取其他的配置,修改 spring.cloud.config.profile 配置即可。
示例图:

看完本文有收获?请转发分享给更多人
边栏推荐
- Kunpeng Developer Creation Day 2022: Kunpeng Full-Stack Innovation and Developers Build Digital Hunan
- 在半小时内从无到有开发并调试一款Chrome扩展(Chrome插件/谷歌浏览器插件)
- 学习与尝试 --&gt; 事件风暴
- 力扣(LeetCode)219. 存在重复元素 II(2022.08.07)
- LeetCode_1004_最大连续1的个数Ⅲ
- 《show your work》 从现在开始!
- 一文搞懂│XSS攻击、SQL注入、CSRF攻击、DDOS攻击、DNS劫持
- 使用ApacheBench来对美多商城的秒杀功能进行高并发压力测试
- 你的 golang 程序正在悄悄内存泄漏
- day01 -Web API介绍—DOM 介绍—获取元素—事件基础—操作元素—排他操作—自定义属性操作—节点操作—案例:动态生成表格—创建元素的三种方式(经典面试题)
猜你喜欢

5S软件就是将软件应用全维度简单化的软件系统
Alibaba微服务组件Nacos注册中心
皕杰报表之数据校验与处理

爱可可AI前沿推介(8.8)

Combining "xPlus" to discuss the innovation and change of software architecture

.NET Community Toolkit 8.0.0 版本发布
深度剖析-class的几个对象(utlis,component)-瀑布流-懒加载(概念,作用,原理,实现步骤)

leetcode:761. 特殊的二进制序列【递归 + 转换有效括号】

#yyds干货盘点#【愚公系列】2022年08月 Go教学课程 005-变量

五心红娘6月成功案列

随机推荐
STM32的内存管理相关(内存架构,内存管理,map文件分析)
在半小时内从无到有开发并调试一款Chrome扩展(Chrome插件/谷歌浏览器插件)
PG核心篇--物理存储结构
【重构map】【重构filter】【重构Some】【重构reduce方法】【重构flat函数】
shell之常用小工具
硬盘数据恢复工具
node中package解析、npm 命令行npm详解,node中的common模块化,npm、nrm两种方式查看源和切换镜像
如何上线TB级推荐模型
部署spark2.2集群(standalone模式)
【AI系统前沿动态第45期】Hinton:深度学习的下一个大事件;一块GPU训练TB级推荐模型不是梦;AI-GPU显存优化发展史
odps sql被删除了,能找回来吗
#yyds Dry Goods Inventory#【Yugong Series】August 2022 Go Teaching Course 005-Variable
华中科大提出VGNetG:“不做选择,全都要”轻量化主干网络!
Mysql索引优化实战
MeterSphere--开源持续测试平台
为你的网站加上live2d的动态小挂件,博君一晒
nvm的使用 nodejs版本管理,解决用户名是汉字的问题
3 million tenders!Qingdao Medical Security Bureau host database middleware operation and maintenance service project
Oracle ASM disk group replaces old storage scheme with new storage
LeetCode_1004_最大连续1的个数Ⅲ