当前位置:网站首页>Download, install and configure Huawei integrated development environment ide deveco device tool
Download, install and configure Huawei integrated development environment ide deveco device tool
2022-04-23 22:02:00 【Know what you know and slowly understand what you don't know】
Install it step by step Make a note of Many places don't understand If there is something wrong, please give me more advice
windows yes win11 Ubuntu20.04
( I just started ubuntu yes 16.04 Start again halfway through the installation )
1. Download script
( Respectively in windows and ubuntu Lower installation )
Huawei integrated development environment IDE DevEco Device Tool download | HarmonyOS Equipment development
Official website Click to download
After downloading and decompressing

(1) install windows Under the exe file
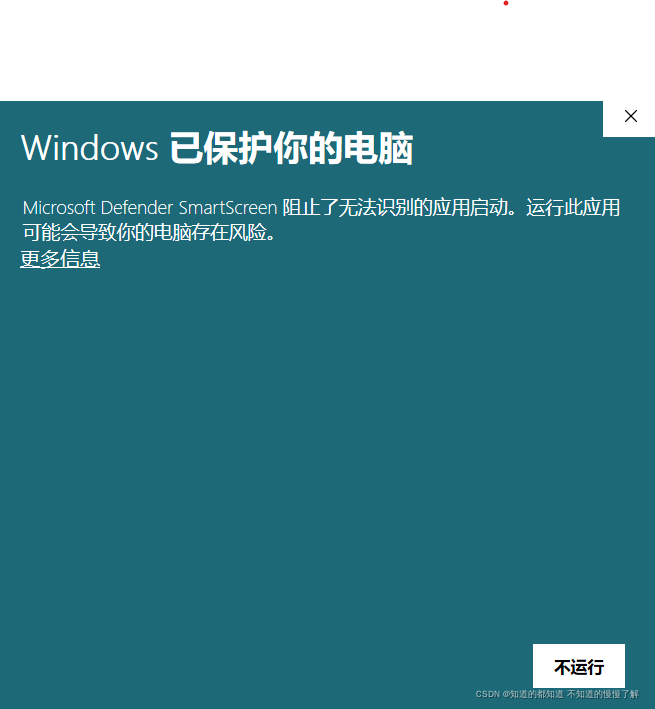
This page may appear Click on more information ---> Still running ----->next
Will detect whether there is... In the computer python If you don't click, it will help you install
The next step is to detect whether there is vxcode
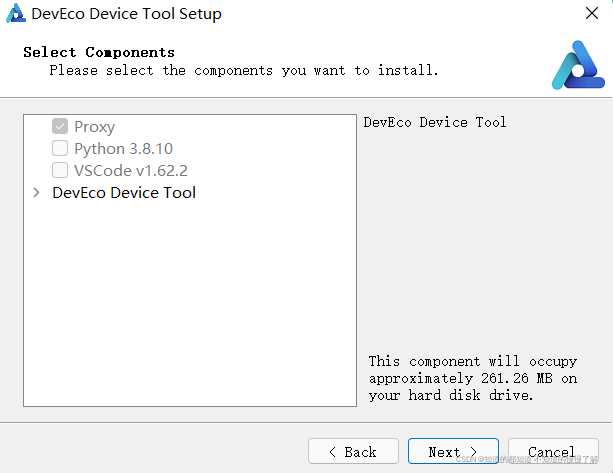
If you don't, click Install I'm here python and vscode It's all installed next next
finsh
windows The installation of version is completed
(2)linux Lower installation
First of all, I will download linux File copy to Ubuntu Next
( Copy the past self Baidu ha )
stay ubuntu Right click to open the terminal
Input ls see file
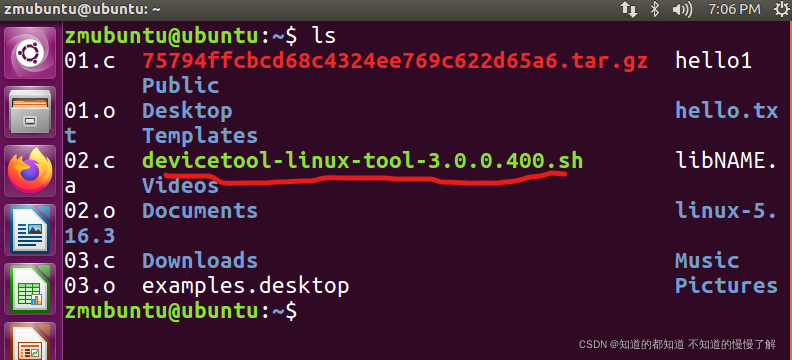
The one with the red line The installation script has arrived Ubuntu In the
Add an executable to the installation script
chmod u+x devicetool-linux-tool-3.0.0.400.sh( This one in the back is my own You need to change your
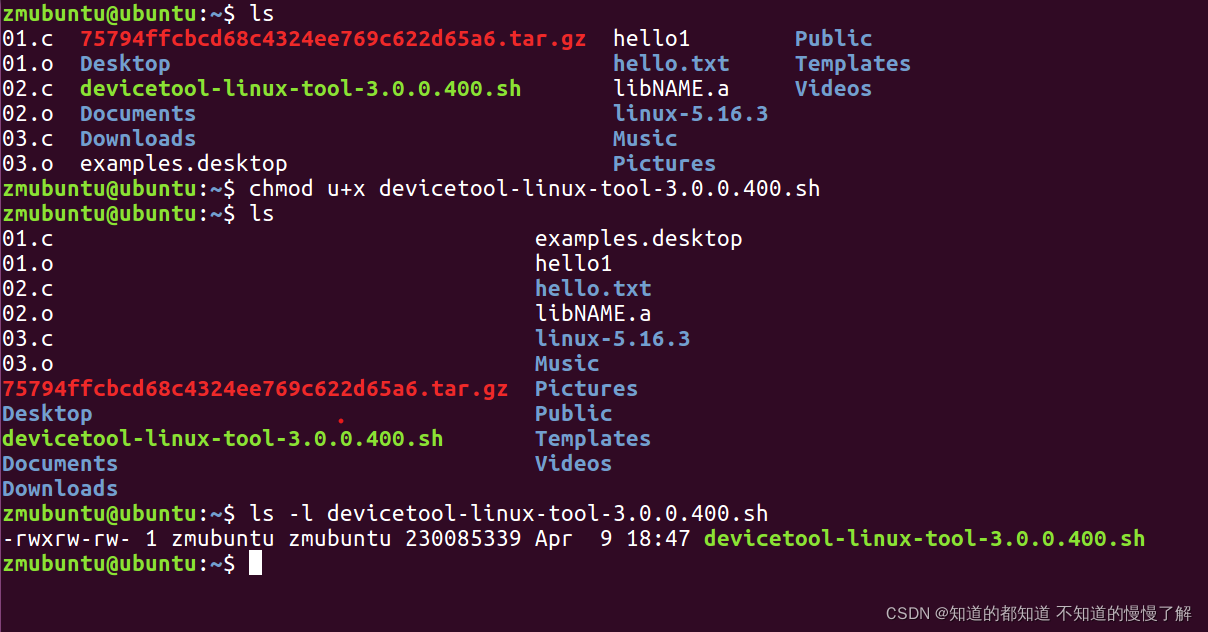
ls -l Add your linux This address After the Enter key
appear -rwxrw The script file already has an executable
Next sudo Command to install

Prompt for password during installation Enter the password here It's not shown You just enter the completion and enter
I made a mistake here my ubuntu yes 16.04
need 20.04 Version of
So I did it again
The picture below is ubuntu20.04 Upper
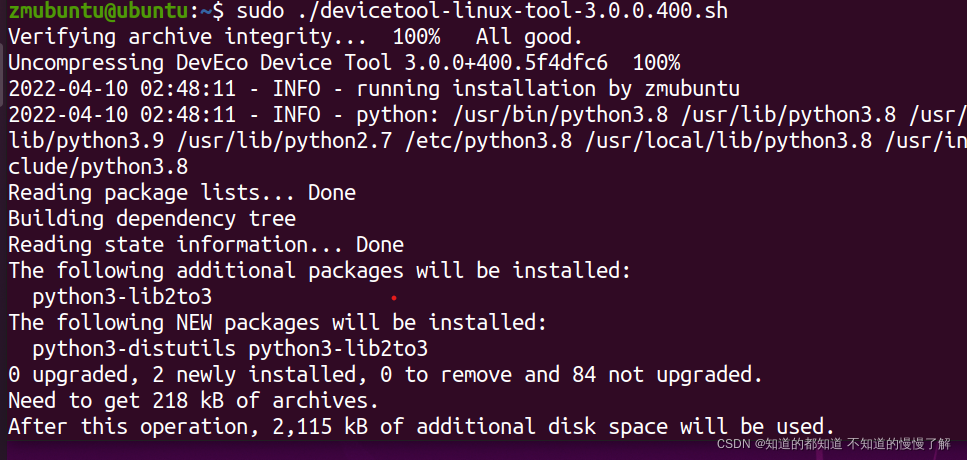
Waiting for the installation In the process, you need to input y To continue with the installation
...
After a long wait
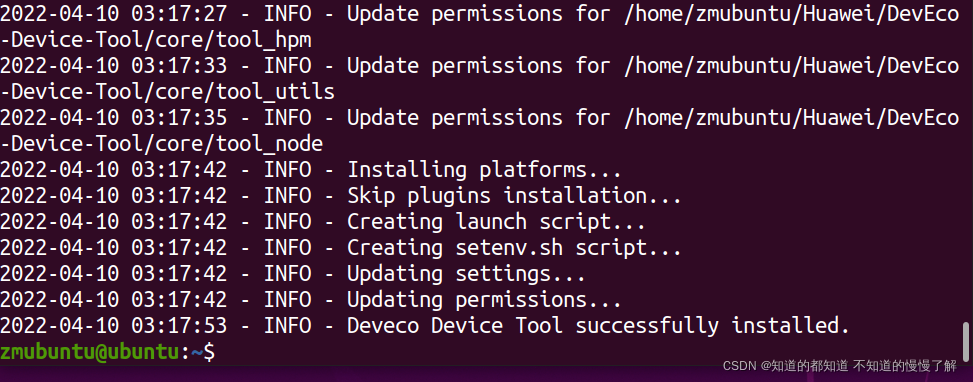
You can see it The script installation succeeded This step is temporarily over
This step took me about an afternoon Mainly wasted to ubuntu16.04 To 20.04 Yes .
2.vscode
open vscode
In the expansion store on the left Can see DevEco Device Tool installed There should be two plug-ins
Re search remote ssh install

After installation One more icon will appear in the left column

The one marked in red is remote ssh The icon
Then you need to do ubuntu Preparation for next year .
3.ubuntu Lower installation openssh service
sudo apt-get update
sudo apt-get install openssh-server
After installation Start with the next command
sudo systemctl start ssh
When using the start command I made a mistake
ubuntuSSH Unable to remote login problem Failed to start ssh.service: Unit ssh.service not found.
Refer to the link below to see
ubuntuSSH Unable to remote login problem Failed to start ssh.service: Unit ssh.service not found.
need remote Remote development Need to know ubuntu Under the ip Address
Input ifconig To query
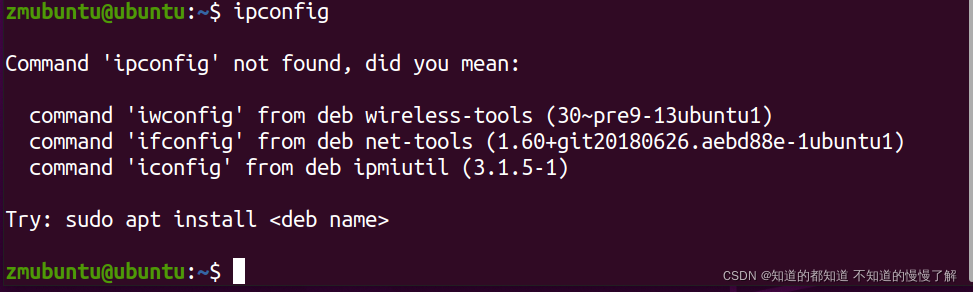
Got an error report ifconfig Not recognized ( And I have the wrong number on it
We need to install the software
sudo apt-get install net-tools
Input again ifconfig

You can query the of the current remote machine ip yes 192.168.179.255
4. Set up ubuntu Network mode under
In order not to affect our development , Give Way ubuntu Can merge two network modes , Need to be in vmware Add a network card
See the link below for specific steps
linux How to add a new network card and modify the network card configuration file
Again ifconfig
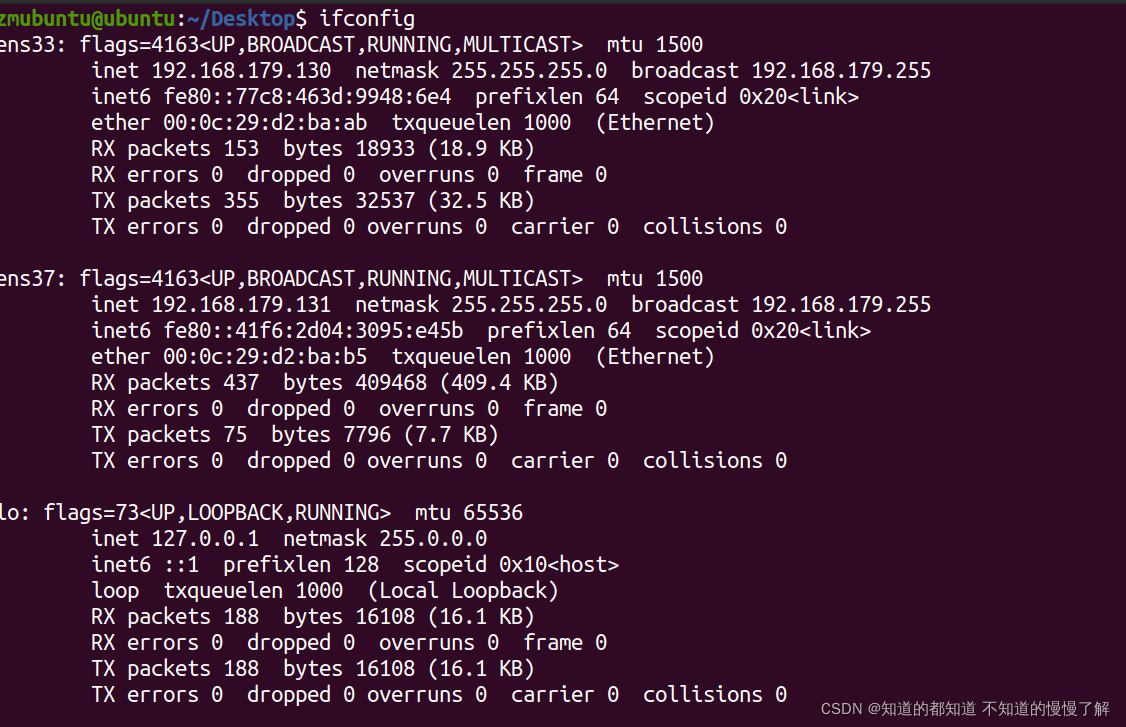
At this time, we can see one more ip Address , Is a local address
By entering the command whomai, You can get the user name of the remote machine
whoami

5. stay windows Remote connection under .
open vscode Click on the left remote shh Button
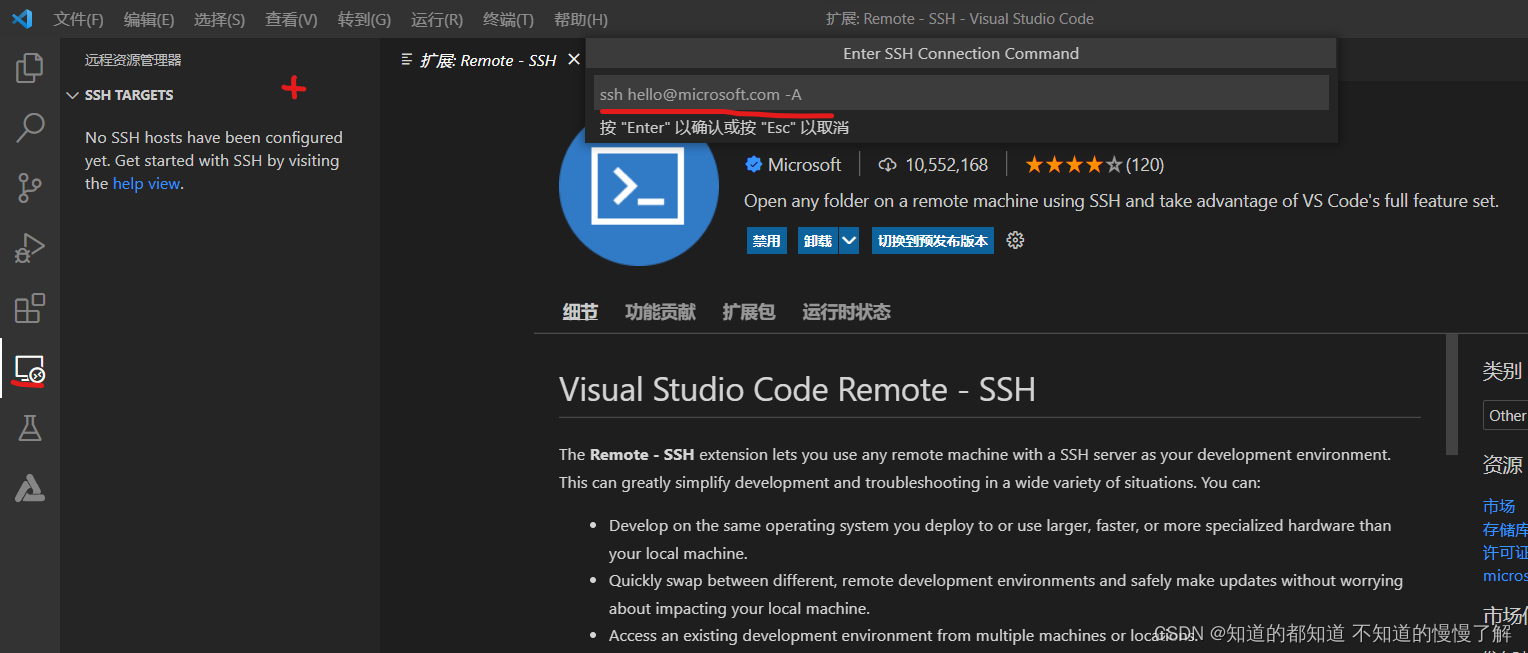
Click on the plus sign
Where the red line is drawn there ip The address is above 192.168.173.131( Just look at your own and change it
ssh user name @ip Address
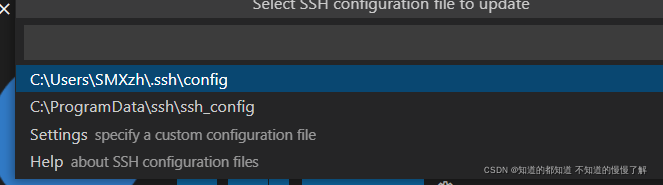
This is a choice that will SSH The file path where the configuration file is stored , Choose the default one
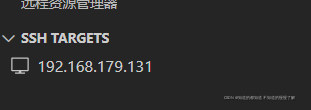
Add after completion SSH There is one more remote machine here
Click to connect
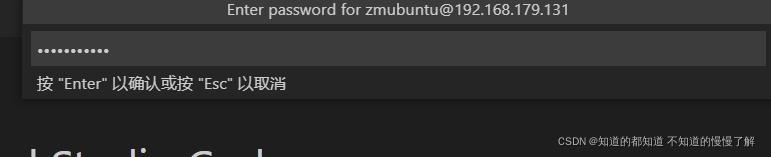
Choose here linux Enter the password again

It can be seen in the lower right corner that the is being installed
After connecting to the remote server , A user agreement will appear
Open the terminal in the toolbar above , Input ls
You can see that it is connected to the terminal , Can be in windows Operation down

6. Set up SSH Public key
stay windows Next Open file explorer
Find a disk open git bush 【cmd It seems to be OK 】
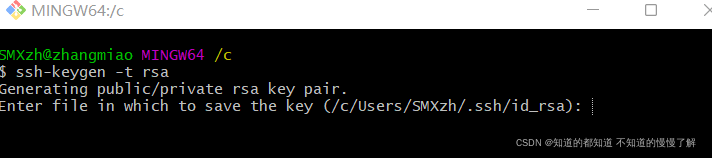
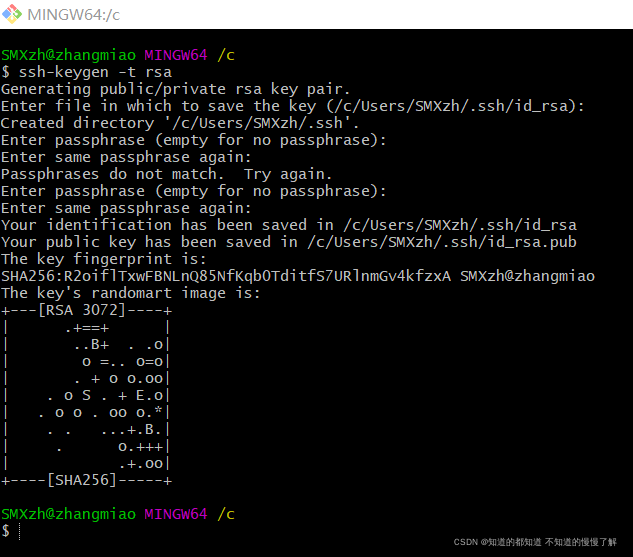
(1) After the open Enter the first instruction
ssh-keygen -t rsa
In the middle, we will choose the storage address of the public key file , Press enter to confirm without special requirements
have to Something went wrong
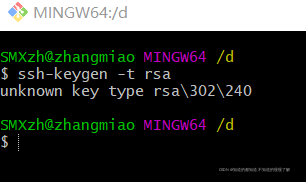
I checked it on the Internet It means .ssh Folder deletion Try again
To configure git Public key error :unknown key type -rsa
my git bush Is in d Disk open After deletion, the same error is found
Try in c Disk open ok 了
Keep returning, returning
(2) The second order
ssh-copy-id -i ~/.ssh/id_rsa.pub [email protected]
username Fill in your own user name As mentioned above, use whoami Inquire about
remotehost fill ip Address
Wrong here again

Well, I found out where I was wrong The letter is wrong Damn it But it's not over Wrong again.

Finally solved Well, do it yourself, have plenty of food and clothing
bash:$'\302\223ssh-copy-id':command not found The solution is as follows
-bash: ssh-copy-id: command not found
I used the second Need the network

(3) Open the configuration file just now
vscode open
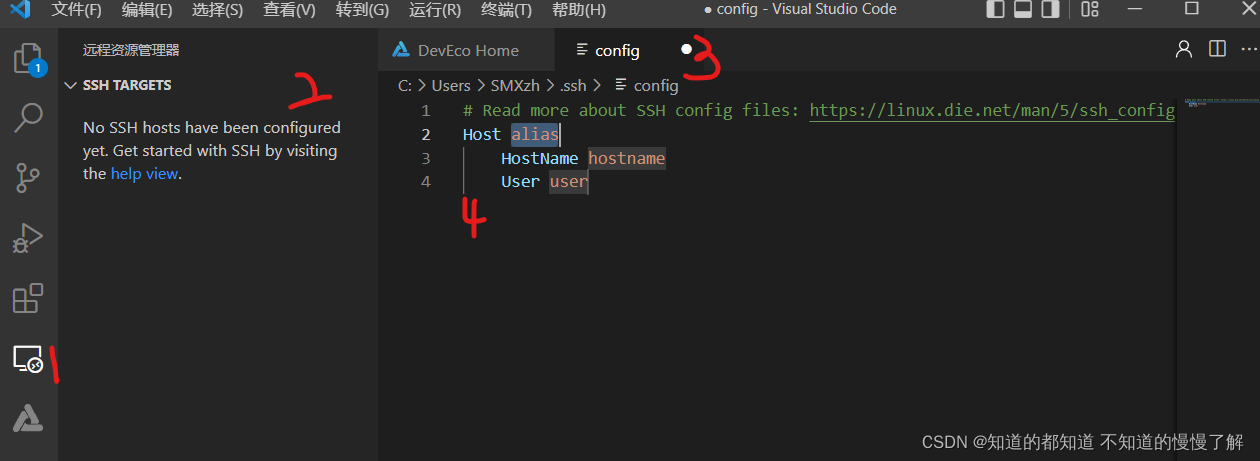
stay 4 Add a line of code where
IdentityFile C:/Users/account/.ssh/id_rsa
account Is everyone's username , No ubuntu The name in the
You can take a look at the... In front of you gitbush in It's the user name
If there has been a custom path before , Draw a red line and change the path here ( Generally don't deal with this trouble

Once the configuration is complete , Open it later DevEco You don't need to enter the password of the remote connection every time
At this point, the environment construction is completed !!
版权声明
本文为[Know what you know and slowly understand what you don't know]所创,转载请带上原文链接,感谢
https://yzsam.com/2022/04/202204200609332437.html
边栏推荐
- Correction of date conversion format error after Oracle adds a row total
- Pycharm Chinese plug-in
- [leetcode refers to the substructure of offer 26. Tree (medium)]
- Error message: b04access.00f eve'. Read of address 000001B4
- MVC three-tier architecture (illustration)
- [leetcode refers to the maximum profit of offer 63. Stock (medium)]
- [leetcode sword finger offer 10 - II. Frog jumping steps (simple)]
- 从严从重从快 上海全面加强疫情期间食品安全监管
- Mixed use of Oracle column row conversion and comma truncated string
- 服务间通信和RestTemplate完成服务间通信
猜你喜欢
Oracle updates the data of different table structures and fields to another table, and then inserts it into the new table
Database Experiment 3 data update experiment
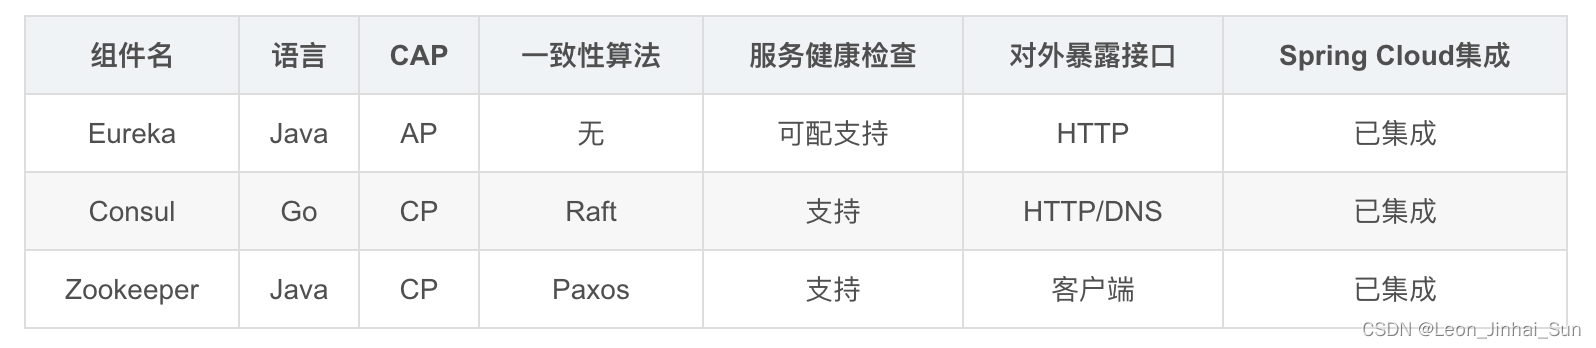
不同注册中心区别
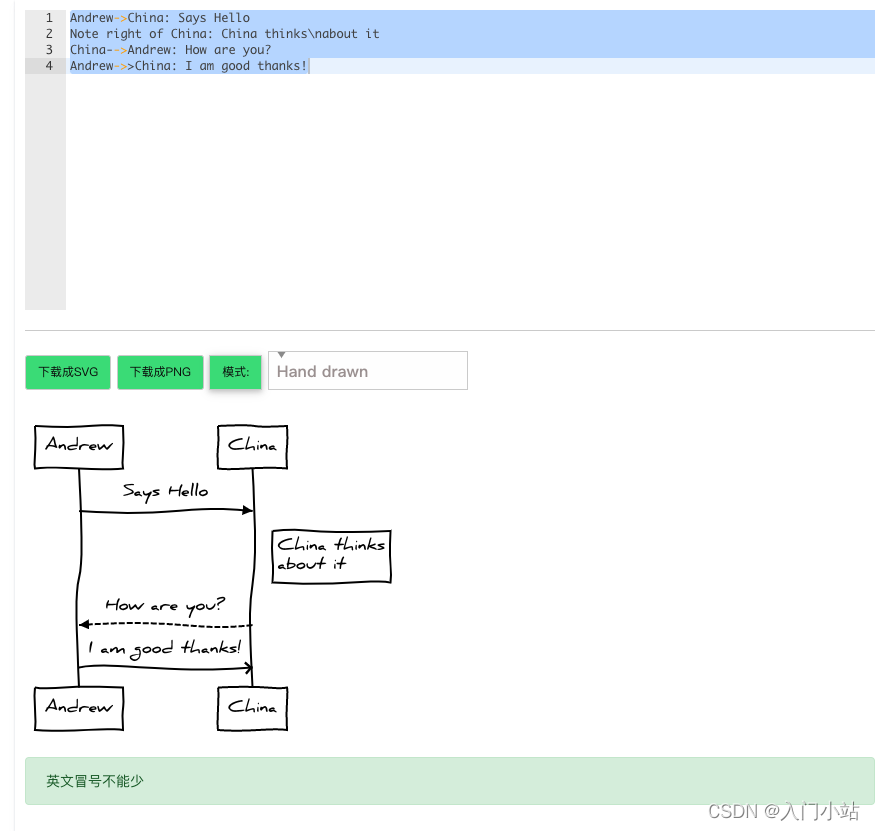
Online timing flow chart making tool
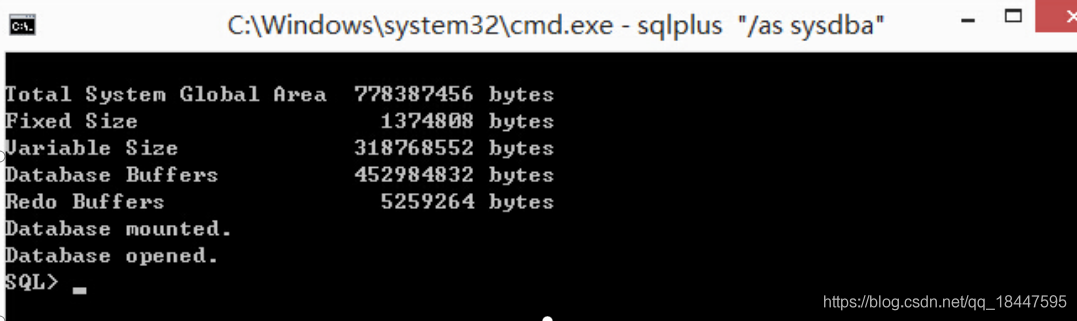
Oracle ora-01033: Oracle initialization or shutdown in progressprocess solution
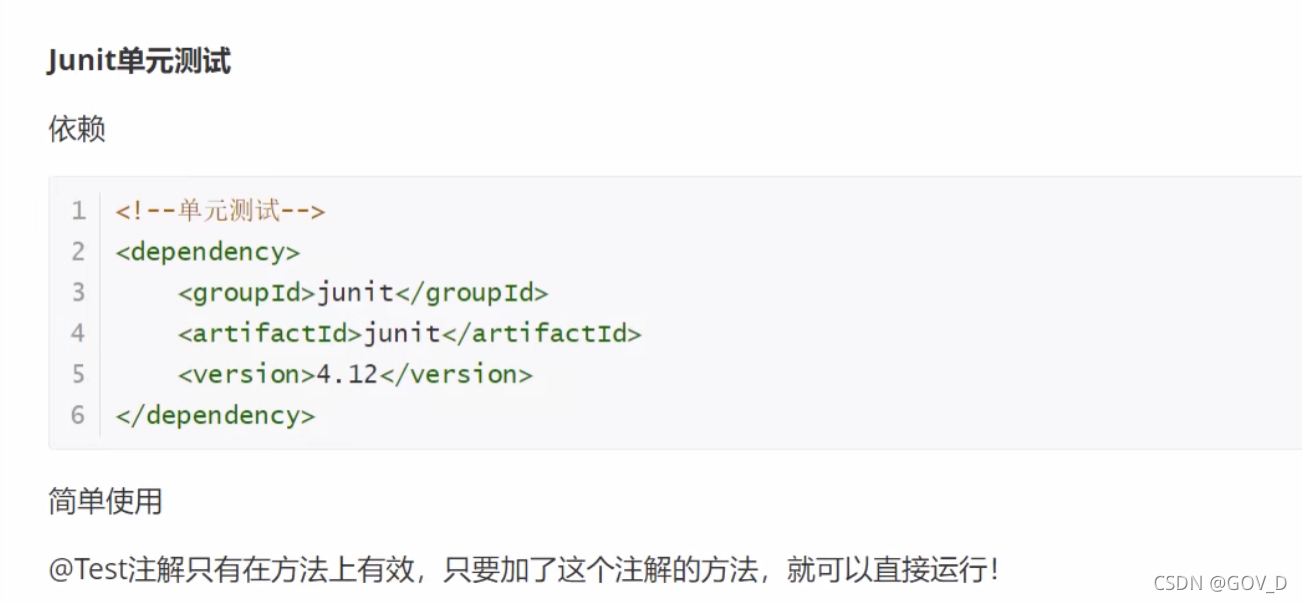
JUnit unit test ---- a good tool for testing a single method
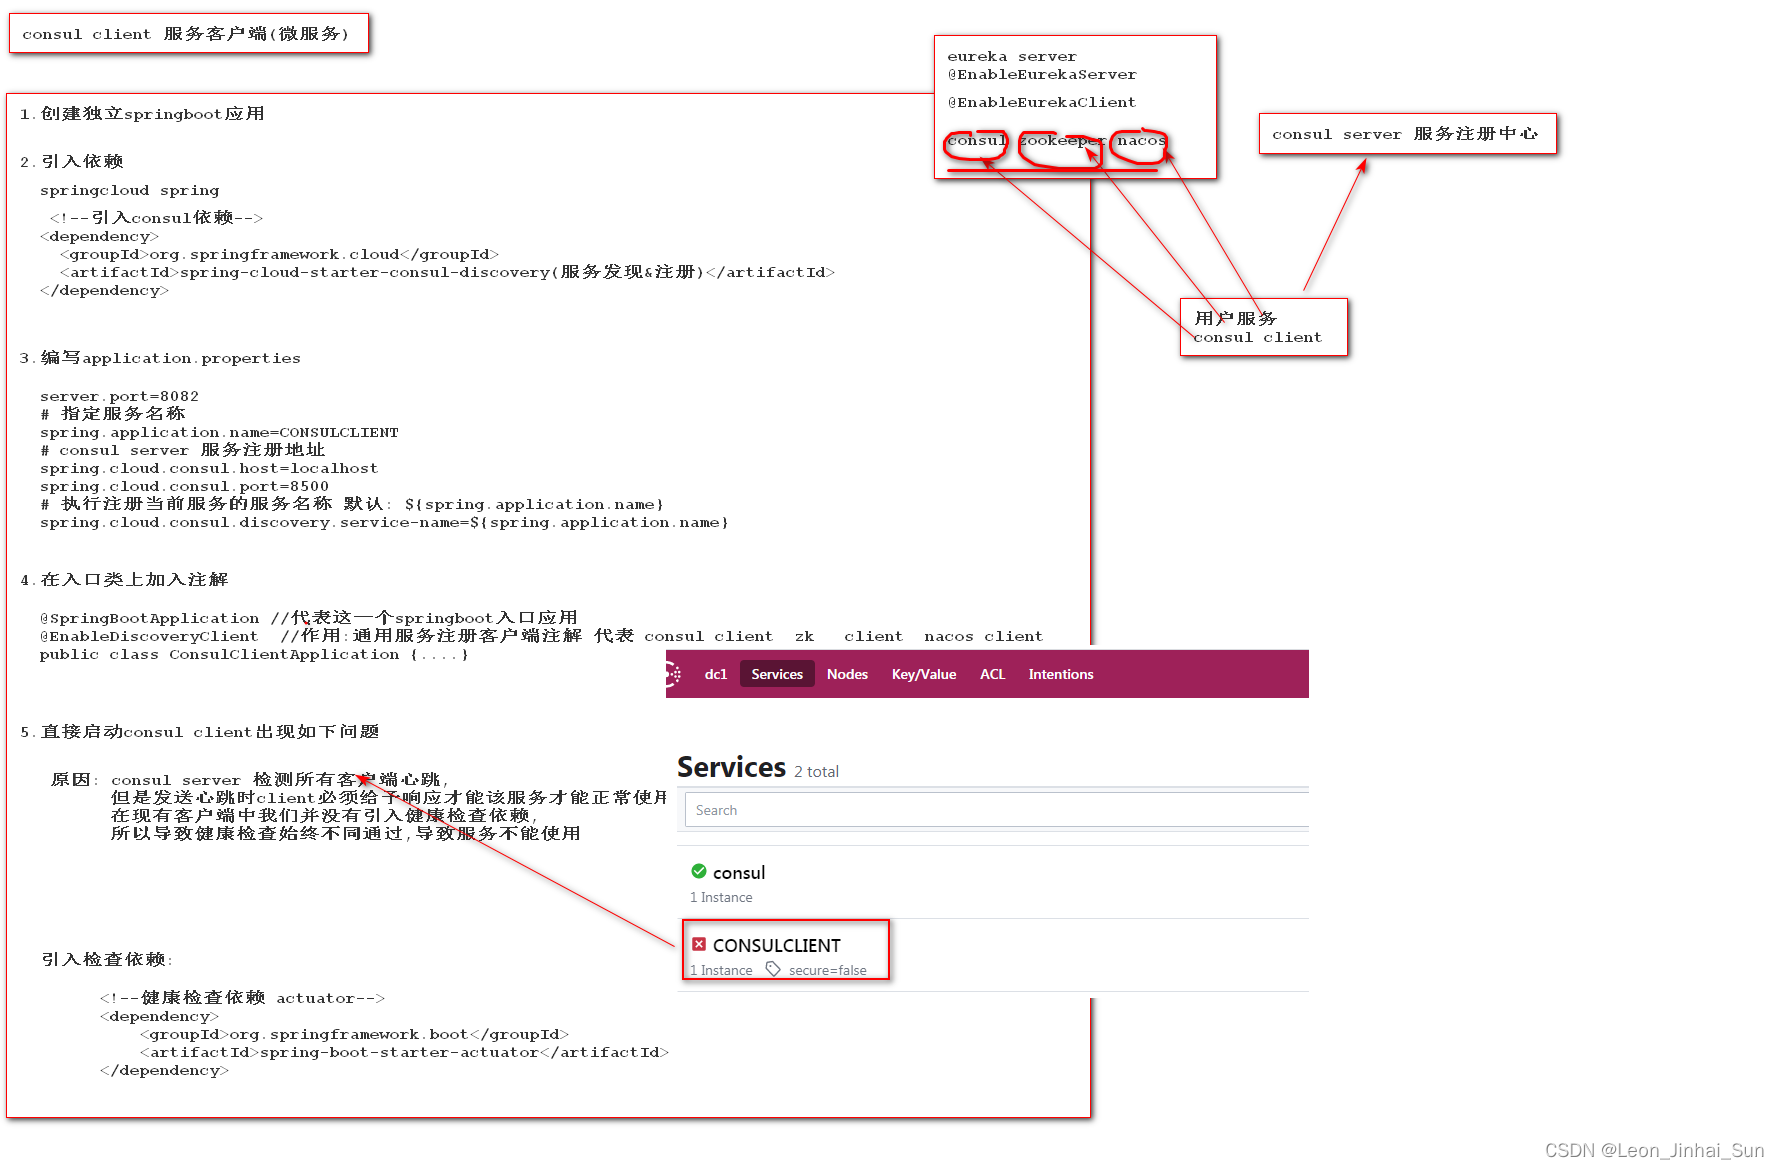
consul client客户端开发
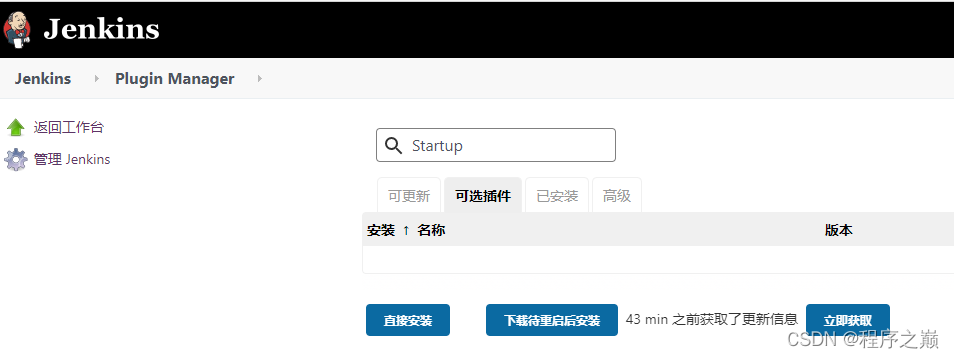
How to make Jenkins job run automatically after startup
![[leetcode refers to offer 42. Maximum sum of continuous subarrays (simple)]](/img/e9/497a31cd70b9b21e4cb7845b688d18.png)
[leetcode refers to offer 42. Maximum sum of continuous subarrays (simple)]
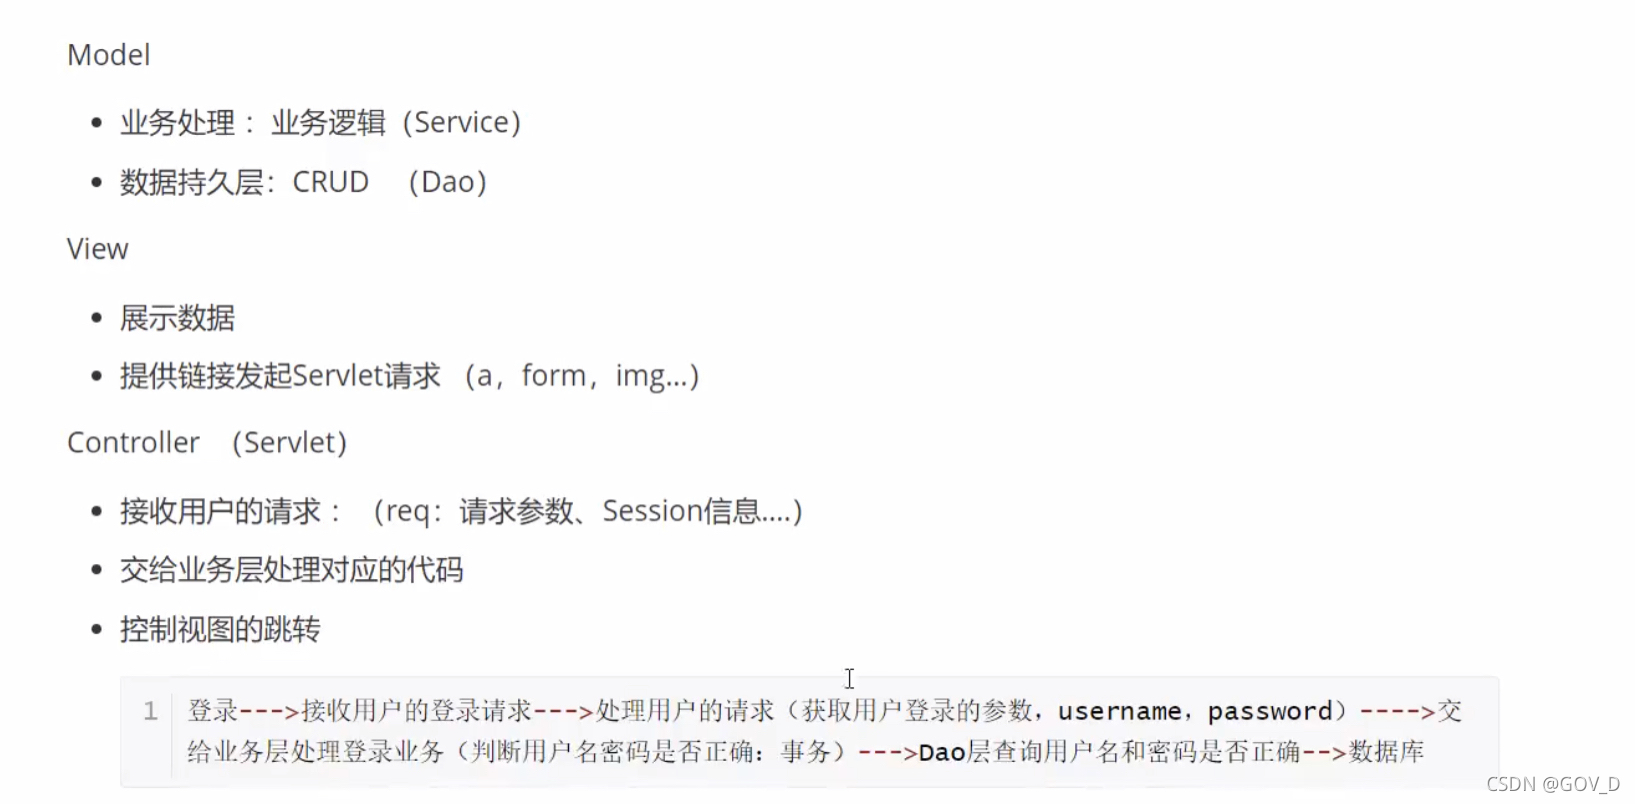
MVC three-tier architecture (illustration)
随机推荐
微服务系统中服务降级
Detectron2 using custom datasets
Yolov5 NMS source code understanding
[leetcode refers to offer 47. Maximum value of gift (medium)]
Correction of date conversion format error after Oracle adds a row total
Oracle intercepts special characters
服务雪崩效应
How to make Jenkins job run automatically after startup
Sklearn function: Train_ Test_ Split (split training set and test set)
2022-04-24日报:在生物科学领域应用深度学习的当前进展和开放挑战
Ribbon负载均衡策略
服务降级的实现
21. Basic usage of MariaDB
服务间通信方式
MySQL back to table
YOLOv5 Unable to find a valid cuDNN algorithm to run convolution
Devops and cloud computing
清华大学 | WebFace260M:百万级深度人脸识别的基准(TPAMI2022)
在线Excel转CSV工具
降级和熔断总结