当前位置:网站首页>Flume (四) --------- Flume 企业开发案例
Flume (四) --------- Flume 企业开发案例
2022-08-09 02:02:00 【在森林中麋了鹿】
一、复制和多路复用
案例需求
使用 Flume-1 监控文件变动,Flume-1 将变动内容传递给 Flume-2,Flume-2 负责存储到 HDFS。同时 Flume-1 将变动内容传递给 Flume-3,Flume-3 负责输出到 Local FileSystem。
需求分析
单数据源多出口案例 (选择器)

实现步骤:
A、准备工作
在 /opt/module/flume/job 目录下创建 group1 文件夹
[[email protected] job]$ cd group1/
在 /opt/module/datas/ 目录下创建 flume3 文件夹
[[email protected] datas]$ mkdir flume3
B、创建 flume-file-flume.conf
配置 1 个接收日志文件的 source 和两个 channel、两个 sink,分别输送给 flume-flume-hdfs 和 flume-flume-dir。
编辑配置文件
[[email protected] group1]$ vim flume-file-flume.conf
添加如下内容
# Name the components on this agent
a1.sources = r1
a1.sinks = k1 k2
a1.channels = c1 c2
# 将数据流复制给所有 channel
a1.sources.r1.selector.type = replicating
# Describe/configure the source
a1.sources.r1.type = exec
a1.sources.r1.command = tail -F /opt/module/hive/logs/hive.log
a1.sources.r1.shell = /bin/bash -c
# Describe the sink
# sink 端的 avro 是一个数据发送者
a1.sinks.k1.type = avro
a1.sinks.k1.hostname = hadoop102
a1.sinks.k1.port = 4141
a1.sinks.k2.type = avro
a1.sinks.k2.hostname = hadoop102
a1.sinks.k2.port = 4142
# Describe the channel
a1.channels.c1.type = memory
a1.channels.c1.capacity = 1000
a1.channels.c1.transactionCapacity = 100
a1.channels.c2.type = memory
a1.channels.c2.capacity = 1000
a1.channels.c2.transactionCapacity = 100
# Bind the source and sink to the channel
a1.sources.r1.channels = c1 c2
a1.sinks.k1.channel = c1
a1.sinks.k2.channel = c2
C、创建 flume-flume-hdfs.conf
配置上级 Flume 输出的 Source,输出是到 HDFS 的 Sink。
编辑配置文件
[fancyry@hadoop102 group1]$ vim flume-flume-hdfs.conf
添加如下内容
# Name the components on this agent
a2.sources = r1
a2.sinks = k1
a2.channels = c1
# Describe/configure the source
# source 端的 avro 是一个数据接收服务
a2.sources.r1.type = avro
a2.sources.r1.bind = hadoop102
a2.sources.r1.port = 4141
# Describe the sink
a2.sinks.k1.type = hdfs
a2.sinks.k1.hdfs.path = hdfs://hadoop102:9820/flume2/%Y%m%d/%H
#上传文件的前缀
a2.sinks.k1.hdfs.filePrefix = flume2-
#是否按照时间滚动文件夹
a2.sinks.k1.hdfs.round = true
#多少时间单位创建一个新的文件夹
a2.sinks.k1.hdfs.roundValue = 1
#重新定义时间单位
a2.sinks.k1.hdfs.roundUnit = hour
#是否使用本地时间戳
a2.sinks.k1.hdfs.useLocalTimeStamp = true
#积攒多少个 Event 才 flush 到 HDFS 一次
a2.sinks.k1.hdfs.batchSize = 100
#设置文件类型,可支持压缩
a2.sinks.k1.hdfs.fileType = DataStream
#多久生成一个新的文件
a2.sinks.k1.hdfs.rollInterval = 30
#设置每个文件的滚动大小大概是 128M
a2.sinks.k1.hdfs.rollSize = 134217700
#文件的滚动与 Event 数量无关
a2.sinks.k1.hdfs.rollCount = 0
# Describe the channel
a2.channels.c1.type = memory
a2.channels.c1.capacity = 1000
a2.channels.c1.transactionCapacity = 100
# Bind the source and sink to the channel
a2.sources.r1.channels = c1
a2.sinks.k1.channel = c1
D、创建 flume-flume-dir.conf
配置上级 Flume 输出的 Source,输出是到本地目录的 Sink。
编辑配置文件
[[email protected] group1]$ vim flume-flume-dir.conf
添加如下内容
# Name the components on this agent
a3.sources = r1
a3.sinks = k1
a3.channels = c2
# Describe/configure the source
a3.sources.r1.type = avro
a3.sources.r1.bind = hadoop102
a3.sources.r1.port = 4142
# Describe the sink
a3.sinks.k1.type = file_roll
a3.sinks.k1.sink.directory = /opt/module/data/flume3
# Describe the channel
a3.channels.c2.type = memory
a3.channels.c2.capacity = 1000
a3.channels.c2.transactionCapacity = 100
# Bind the source and sink to the channel
a3.sources.r1.channels = c2
a3.sinks.k1.channel = c2
提示:输出的本地目录必须是已经存在的目录,如果该目录不存在,并不会创建新的目录。
E、执行配置文件
分别启动对应的 flume 进程:flume-flume-dir,flume-flume-hdfs,flume-file-flume。
[[email protected] flume]$ bin/flume-ng agent --conf conf/ --name a3 --conf-file job/group1/flume-flume-dir.conf
[[email protected] flume]$ bin/flume-ng agent --conf conf/ --name a2 --conf-file job/group1/flume-flume-hdfs.conf
[[email protected] flume]$ bin/flume-ng agent --conf conf/ --name a1 --conf-file job/group1/flume-file-flume.conf
F、启动 Hadoop 和 Hive
[[email protected] hadoop-2.7.2]$ sbin/start-dfs.sh
[[email protected] hadoop-2.7.2]$ sbin/start-yarn.sh
[[email protected] hive]$ bin/hive
hive (default)>
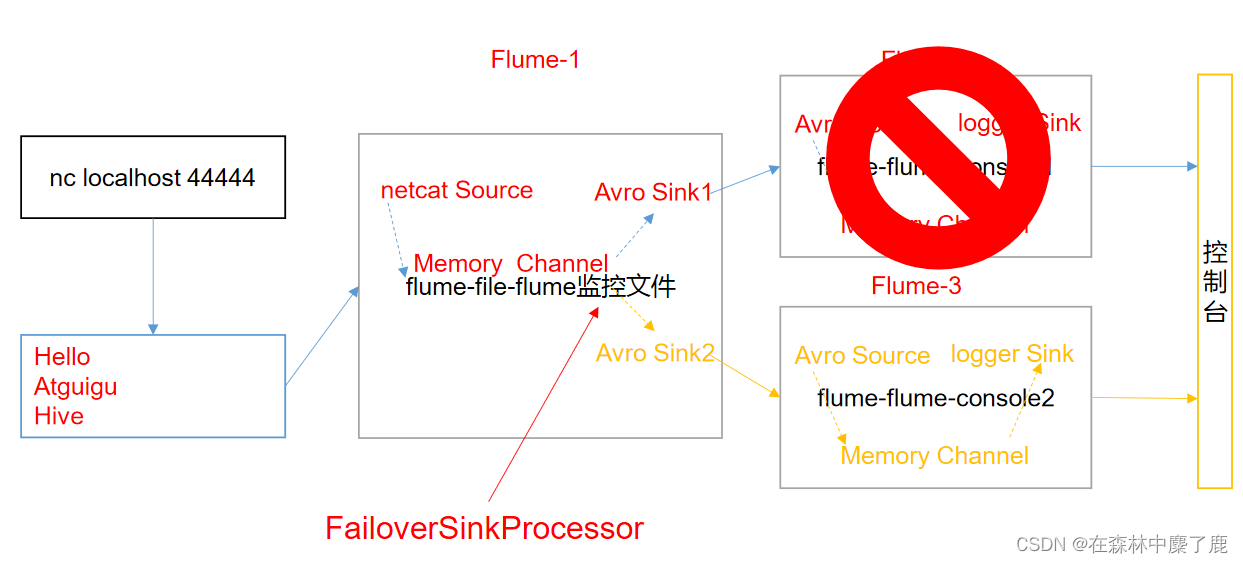
二、负载均衡和故障转移
案例需求
使用 Flume1 监控一个端口,其 sink 组中的 sink 分别对接 Flume2 和 Flume3,采用 FailoverSinkProcessor,实现故障转移的功能。
需求分析
实现步骤
A、准备工作
在 /opt/module/flume/job 目录下创建 group2 文件夹
[[email protected] job]$ cd group2/
B、创建 flume-netcat-flume.conf
配置 1 个 netcat source 和 1 个 channel、1 个 sink group (2 个 sink),分别输送给 flume-flume-console1 和 flume-flume-console2。
编辑配置文件
[[email protected] group2]$ vim flume-netcat-flume.conf
添加如下内容
# Name the components on this agent
a1.sources = r1
a1.channels = c1
a1.sinkgroups = g1
a1.sinks = k1 k2
# Describe/configure the source
a1.sources.r1.type = netcat
a1.sources.r1.bind = localhost
a1.sources.r1.port = 44444
a1.sinkgroups.g1.processor.type = failover
a1.sinkgroups.g1.processor.priority.k1 = 5
a1.sinkgroups.g1.processor.priority.k2 = 10
a1.sinkgroups.g1.processor.maxpenalty = 10000
# Describe the sink
a1.sinks.k1.type = avro
a1.sinks.k1.hostname = hadoop102
a1.sinks.k1.port = 4141
a1.sinks.k2.type = avro
a1.sinks.k2.hostname = hadoop102
a1.sinks.k2.port = 4142
# Describe the channel
a1.channels.c1.type = memory
a1.channels.c1.capacity = 1000
a1.channels.c1.transactionCapacity = 100
# Bind the source and sink to the channel
a1.sources.r1.channels = c1
a1.sinkgroups.g1.sinks = k1 k2
a1.sinks.k1.channel = c1
a1.sinks.k2.channel = c1
C、创建 flume-flume-console1.conf
配置上级 Flume 输出的 Source,输出是到本地控制台。
编辑配置文件
[[email protected] group2]$ vim flume-flume-console1.conf
添加如下内容
# Name the components on this agent
a2.sources = r1
a2.sinks = k1
a2.channels = c1
# Describe/configure the source
a2.sources.r1.type = avro
a2.sources.r1.bind = hadoop102
a2.sources.r1.port = 4141
# Describe the sink
a2.sinks.k1.type = logger
# Describe the channel
a2.channels.c1.type = memory
a2.channels.c1.capacity = 1000
a2.channels.c1.transactionCapacity = 100
# Bind the source and sink to the channel
a2.sources.r1.channels = c1
a2.sinks.k1.channel = c1
D、创建 flume-flume-console2.conf
配置上级 Flume 输出的 Source,输出是到本地控制台。
编辑配置文件
[fancyry@hadoop102 group2]$ vim flume-flume-console2.conf
添加如下内容
# Name the components on this agent
a3.sources = r1
a3.sinks = k1
a3.channels = c2
# Describe/configure the source
a3.sources.r1.type = avro
a3.sources.r1.bind = hadoop102
a3.sources.r1.port = 4142
# Describe the sink
a3.sinks.k1.type = logger
# Describe the channel
a3.channels.c2.type = memory
a3.channels.c2.capacity = 1000
a3.channels.c2.transactionCapacity = 100
# Bind the source and sink to the channel
a3.sources.r1.channels = c2
a3.sinks.k1.channel = c2
E、执行配置文件
分别开启对应配置文件:flume-flume-console2, flume-flume-console1, flume-netcat-flume。
[[email protected] flume]$ bin/flume-ng agent --conf conf/ --name a3 --conf-file job/group2/flume-flume-console2.conf - Dflume.root.logger=INFO,console
[[email protected] flume]$ bin/flume-ng agent --conf conf/ --name a2 --conf-file job/group2/flume-flume-console1.conf - Dflume.root.logger=INFO,console
[[email protected] flume]$ bin/flume-ng agent --conf conf/ --name a1 --conf-file job/group2/flume-netcat-flume.conf
F、使用 netcat 工具向本机的 44444 端口发送内容
$ nc localhost 44444
G、查看 Flume2 及 Flume3 的控制台打印日志
H、将 Flume2 kill,观察 Flume3 的控制台打印情况
注:使用 jps -ml 查看 Flume 进程。
三、聚合
案例需求:
hadoop102 上的 Flume-1 监控文件/opt/module/group.log,hadoop103 上的 Flume-2 监控某一个端口的数据流,Flume-1 与 Flume-2 将数据发送给 hadoop104 上的 Flume-3,Flume-3 将最终数据打印到控制台。
需求分析
多数据源汇总案例
实现步骤:
A、准备工作
分发 Flume
[[email protected] module]$ xsync flume
在 hadoop102、hadoop103 以及 hadoop104 的/opt/module/flume/job 目录下创建一个 group3 文件夹。
[[email protected] job]$ mkdir group3
[[email protected] job]$ mkdir group3
[[email protected] job]$ mkdir group3
B、创建 flume1-logger-flume.conf
配置 Source 用于监控 hive.log 文件,配置 Sink 输出数据到下一级 Flume。
在 hadoop102 上编辑配置文件
[[email protected] group3]$ vim flume1-logger-flume.conf
添加如下内容
# Name the components on this agent
a1.sources = r1
a1.sinks = k1
a1.channels = c1
# Describe/configure the source
a1.sources.r1.type = exec
a1.sources.r1.command = tail -F /opt/module/group.log
a1.sources.r1.shell = /bin/bash -c
# Describe the sink
a1.sinks.k1.type = avro
a1.sinks.k1.hostname = hadoop104
a1.sinks.k1.port = 4141
# Describe the channel
a1.channels.c1.type = memory
a1.channels.c1.capacity = 1000
a1.channels.c1.transactionCapacity = 100
# Bind the source and sink to the channel
a1.sources.r1.channels = c1
a1.sinks.k1.channel = c1
C、创建 flume2-netcat-flume.conf
配置 Source 监控端口 44444 数据流,配置 Sink 数据到下一级 Flume:
在 hadoop103 上编辑配置文件
[[email protected] group3]$ vim flume2-netcat-flume.conf
添加如下内容
# Name the components on this agent
a2.sources = r1
a2.sinks = k1
a2.channels = c1
# Describe/configure the source
a2.sources.r1.type = netcat
a2.sources.r1.bind = hadoop103
a2.sources.r1.port = 44444
# Describe the sink
a2.sinks.k1.type = avro
a2.sinks.k1.hostname = hadoop104
a2.sinks.k1.port = 4141
# Use a channel which buffers events in memory
a2.channels.c1.type = memory
a2.channels.c1.capacity = 1000
a2.channels.c1.transactionCapacity = 100
# Bind the source and sink to the channel
a2.sources.r1.channels = c1
a2.sinks.k1.channel = c1
D、创建 flume3-flume-logger.conf
配置 source 用于接收 flume1 与 flume2 发送过来的数据流,最终合并后 sink 到控制台。
在 hadoop104 上编辑配置文件
[[email protected] group3]$ touch flume3-flume-logger.conf
[[email protected] group3]$ vim flume3-flume-logger.conf
添加如下内容
# Name the components on this agent
a3.sources = r1
a3.sinks = k1
a3.channels = c1
# Describe/configure the source
a3.sources.r1.type = avro
a3.sources.r1.bind = hadoop104
a3.sources.r1.port = 4141
# Describe the sink
# Describe the sink
a3.sinks.k1.type = logger
# Describe the channel
a3.channels.c1.type = memory
a3.channels.c1.capacity = 1000
a3.channels.c1.transactionCapacity = 100
# Bind the source and sink to the channel
a3.sources.r1.channels = c1
a3.sinks.k1.channel = c1
E、执行配置文件
分别开启对应配置文件:flume3-flume-logger.conf,flume2-netcat-flume.conf,flume1-logger-flume.conf。
[[email protected] flume]$ bin/flume-ng agent --conf conf/ --name a3 --conf-file job/group3/flume3-flume-logger.conf - Dflume.root.logger=INFO,console
[[email protected] flume]$ bin/flume-ng agent --conf conf/ --name a2 --conf-file job/group3/flume1-logger-flume.conf
[[email protected] flume]$ bin/flume-ng agent --conf conf/ --name a1 --conf-file job/group3/flume2-netcat-flume.conf
F、在 hadoop103 上向/opt/module 目录下的 group.log 追加内容
[[email protected] module]$ echo 'hello' > group.log
G、在 hadoop102 上向 44444 端口发送数据
[[email protected] flume]$ telnet hadoop102 44444
H、检查 hadoop104 上数据

边栏推荐
- Latex example reference
- eladmin container deployment super detailed process
- New Swagger3.0 tutorial, OAS3 quick configuration guide, to automate API interface documentation!
- PMP有什么答题技巧?
- LeetCode每日两题02:第一个错误的版本 (均1200道)方法:二分查找
- 力扣刷题记录4.1-----209. 长度最小的子数组
- MT4/MQL4入门到精通EA课程第二课-常用的功能函数
- 2022 China Eye Expo, China Beijing International Children and Adolescent Eye Health Industry Exhibition
- Likou Brush Question Record 8.1-----206. Reverse linked list
- How SEMRush finds keywords for advertising
猜你喜欢

Group DETR:分组一对多匹配是加速DETR收敛的关键

The most fierce "employee" in history, madly complaining about the billionaire boss Xiao Zha: So rich, he always wears the same clothes!

力扣刷题记录9.1-----24. 两两交换链表中的节点

VOIP使用单端口替换动态端口池进行UDP通信

torchversion.transforms的使用
Use of torchversion.transforms

2.1-----27. Remove elements

HNUMSC-C语言第一课

如何在群晖系统中安装cpolar(群晖6.X版)

企业里Foxmail邮箱问题解决方法汇总
随机推荐
年金险的安全性怎么样啊?可靠吗?
企业里Foxmail邮箱问题解决方法汇总
js实现数组去重的方式(7种)
在树莓派上使用cpolar(番外篇2)
9.1-----24. Swap the nodes in the linked list in pairs
【HNUMSC】C语言第二讲
33. 分别谈谈联合索引生效和失效的条件
Go - 9 - data type - function
MT4/MQL4入门到精通EA教程第一课-MQL语言常用函数(一)OrderSend()函数
低代码开发创新企业应用构建模式
软件测试技术之如何编写测试用例(5)
2020.12.4日志
HNUMSC-C语言第一课
Likou Brush Question Record 8.1-----206. Reverse linked list
JDBC技术(一)——一个简单的JDBC测试
New Swagger3.0 tutorial, OAS3 quick configuration guide, to automate API interface documentation!
帮助安全红队取得成功的11条建议
mysql 5.7 入坑
Analysis of when AuthenticationSuccessHandler is called after UsernameAuthenticationFilter is authorized successfully
.reduce()的简单例子