当前位置:网站首页>C#100分秘籍 sduwh
C#100分秘籍 sduwh
2022-04-21 08:43:00 【琦子k】
关于我被sb C#折磨这件事
好吧 考完证明没有100 只有99
备份及引用
我的头像-> 内容管理,可以看到私密文件
C#如何引用别人写好的控件放到自己工程下使用?_CSDN社区云
引用WPFMessageBox
亟待复习:
文件操作; LINQ; 画图
一些概念
前面的http://到底是什么?
第二行第三行的"http://…"的地址其实并不是一个网站地址,它只是Xaml解析器的一个硬性编码(把他理解为C#的const常量即可),它代表了一系列的程序集,对应如下:
它主要是些绘制UI 的程序集,是表现层(Presentation)上的东西。
而对应Xaml语言解析处理相关的程序集。
属性:xmlns=“命名空间”,
xmlns是XML-Namespace,继承XML语法,表示引用了一个命名空间,类似WinForm的Using。
属性:xmlns:x=“命名空间”
语法xmlns[:可选的映射前缀]=“命名空间”,(个人觉得类似Winform引用命名空间为了解决下图问题而是用的using Excel = Microsoft.Office.Interop.Excel;同时因为使用了前缀,每次调用这个命名空间下的类,接口和属性等等都要Excel。同理,如果Xaml命名空间加了前缀,调用标签元素或者属性也要如此,如<n:Grid n:Class>等等。这也是第一行Class前加n:的原因
)
每一个Xaml中仅有一个不带前缀的,那就是默认的命名空间,所以一般把常用的与UI有关的Presentation设为默认命名空间,其余的包括自己引进的都要加前缀,使用时也都要加前缀。
Window x:Class="MyfirstWPF.Window1"是指要解析器把包含Class属性的Window标签编译成一个Window1类。同时我们发现后台也是一个Window1类,这说明他们都是不分类,类似Winform中的后台类与designer类。所以这个解耦与Winform原理是一致的。
(7条消息) WPF学习笔记1——xaml基础_liming10cm的专栏-CSDN博客
WPF自定义控件的制作 - 我家的小萌珊 - 博客园 (cnblogs.com)
(7条消息) XAML实例教程系列 - 命名空间(NameSpace)_fuerbosi-CSDN博客
WPF XAML命名空间和命名空间映射 - 简书 (jianshu.com)
自定义控件
NMD终于弄懂自定义控件了qwq 我是fw
<Window x:Class="PikachuTry.MainWindow"
        xmlns="http://schemas.microsoft.com/winfx/2006/xaml/presentation"
        xmlns:x="http://schemas.microsoft.com/winfx/2006/xaml"
        xmlns:d="http://schemas.microsoft.com/expression/blend/2008"
        xmlns:mc="http://schemas.openxmlformats.org/markup-compatibility/2006"
        xmlns:mycontrol="clr-namespace:Wpfz.ACM;assembly=Wpfz"
        mc:Ignorable="d"
        Title="MainWindow" Height="450" Width="800">
    <Grid>
        <mycontrol:Ch03UC Name="uc1" Title="【例3-1】常量和变量" />
    </Grid>
</Window>
要想使用自定义控件,必须在前面加上xmlns:一个不重复的随便取得名字(我这用的是mycontrol),然后加上clr-namespace:Wpfz.ACM;assembly=Wpfz
这里的Wpfz.ACM是我自己写的,WPFZ是一个用户自定义控件库,ACM是我起的文件夹名字
<UserControl x:Class="Wpfz.ACM.Ch03UC"
  xmlns="http://schemas.microsoft.com/winfx/2006/xaml/presentation"
  xmlns:x="http://schemas.microsoft.com/winfx/2006/xaml"
  xmlns:mc="http://schemas.openxmlformats.org/markup-compatibility/2006"
  xmlns:d="http://schemas.microsoft.com/expression/blend/2008"
  mc:Ignorable="d"
  d:DesignHeight="450" d:DesignWidth="800">
    <Border BorderBrush="DarkSalmon" BorderThickness="1" CornerRadius="15"
 VerticalAlignment="Top" Margin="10" Padding="10">
        <StackPanel>
 <TextBlock x:Name="tip" x:FieldModifier="private" Text="示例标题" LineHeight="20"/>
 <WrapPanel>
     <WrapPanel.Resources>
         <Style TargetType="Button">
  <Setter Property="Padding" Value="10 2"/>
  <Setter Property="Margin" Value="0 5 15 5"/>
         </Style>
     </WrapPanel.Resources>
     <Button x:Name="BtnConsole" x:FieldModifier="public" Content="用Console实现" />
     <Button x:Name="BtnWpf" x:FieldModifier="public" Content="[显示/隐藏]WPF实现" />
 </WrapPanel>
 <Border x:Name="Border1" Margin="0 5" Padding="5" BorderBrush="Black" BorderThickness="1">
     <TextBlock x:Name="Result" x:FieldModifier="public" Background="Bisque" LineHeight="20"/>
 </Border>
        </StackPanel>
    </Border>
</UserControl>
using System;
using System.Collections.Generic;
using System.Linq;
using System.Text;
using System.Threading.Tasks;
using System.Windows;
using System.Windows.Controls;
using System.Windows.Data;
using System.Windows.Documents;
using System.Windows.Input;
using System.Windows.Media;
using System.Windows.Media.Imaging;
using System.Windows.Navigation;
using System.Windows.Shapes;

namespace Wpfz.ACM
{
    /// <summary>
    /// MyNumericUpDown.xaml 的交互逻辑
    /// </summary>
    public partial class Ch03UC : UserControl
    {
        public string Title { get => tip.Text; set => tip.Text = value; }
        public Ch03UC()
        {
 InitializeComponent();
 Border1.Visibility = Visibility.Collapsed;
 BtnWpf.Click += delegate
 {
     if (Border1.Visibility == Visibility.Collapsed)
     {
         Border1.Visibility = Visibility.Visible;
     }
     else
     {
         Border1.Visibility = Visibility.Collapsed;
     }
 };
        }
    }
}
一言以蔽之:
自定义声明一个命名空间:xmlns:datagrid="clr-namespace:System.Windows.Controls;assembly=System.Windows.Controls.Data"这段代码中包含三部分的信息:

“xmlns:datagrid”命名空间前缀名,这个前缀名可以由开发人员自定义,但是必须由“xmlns:”作为起始,也就是说,datagrid可以被任何字符替换。根据开发命名标准,推荐开发人员使用简单的控件名表示,提高代码可读性;
“clr-namespace:System.Windows.Controls”表示该命名空间将映射到System.Windows.Controls 公共语言运行环境命名空间类;
“assembly=System.Windows.Controls.Data"”表示DataGrid隶属于System.Windows.Controls.Data.dll动态连接库中,在编译时,该DLL文件将被封装到XAP压缩文件包中。
完成声明后,调用方法如下:

<datagrid:DataGrid />
所以,
xmlns:mycontrol="clr-namespace:Wpfz.ACM;assembly=Wpfz"
这里的ns要写wpfz一个类名(namespace Wpfz.ACM),后面要写wpfz(动态链接库的名字)
(7条消息) WPF学习之X名称空间详解_星火燎猿-CSDN博客
C#中数组如果不使用new运算符简化,则只能用在声明语句中:
String a[] = {"123", "45"}
一般还是用new比较好:
int[] a = new int[30];
String a1[] = new String[]{"first", "second"}
String的split方法可以有多个参数,表示找到其中的任意一个符合就将其分开。
int等类型的数组自带average,max,min,sum等计算方法。
托管与非托管
以运行库为目标的代码称为托管代码,而不以运行库为目标的代码称为非托管代码。
NET Framework 有两个主要组件:公共语言运行库(CLR)和 .NET Framework 类库。
CLR 是 .NET Framework 的基础,可以将其看作一个在执行时管理代码的代理。
其实就是编译器把代码编译成中间语言(IL),在 CLR 运行的就是托管代码。
.NET 2002 发布之前所产生的代码都是非托管代码。非托管代码直接编译成目标计算机的机械码,是运行在 CLR 外部,由操作系统直接执行的代码。
.DLL文件
DLL文件即动态链接库文件,是一种可执行文件,它允许程序共享执行特殊任务所必需的代码和其他资源。
静态资源
看这个就懂了
	<Page.Resources>
        <ImageBrush x:Key="MyImageBrushKey" ImageSource="/Resources/Images/img1.jpg" />
    </Page.Resources>
    <StackPanel HorizontalAlignment="Center"
 VerticalAlignment="Center" TextBlock.FontSize="16"
 TextBlock.Foreground="Red">
        <StackPanel Orientation="Horizontal">
 <Ellipse Height="80" Width="150" Fill="{StaticResource MyImageBrushKey}" />
 <Ellipse Height="80" Width="150" StrokeThickness="20"
         Stroke="{StaticResource MyImageBrushKey}" />
 <Button Height="80" Width="150" Content="按钮1" FontSize="20pt"
         Foreground="White" Background="{StaticResource MyImageBrushKey}" />
        </StackPanel>
        <TextBlock FontWeight="Bold" FontSize="48pt" HorizontalAlignment="Center"
     Text="文本Text" Foreground="{StaticResource MyImageBrushKey}" />
    </StackPanel>
第三章
XAML 中特殊字符的表示
前缀**“&#x”表示16进制,后缀“;”表示是一个单个字符**。
例如:
<TextBlock …… text = “J” />
表示一个笑脸符号。
StringBuilder
需要初始化!
StringBuilder  sb =  new StringBuilder ( );
sb.Append( “s1” );
sb.AppendLine(“s2” );  //注意两者的区别
Console.WriteLine ( sb.ToString( ) );
// 输出结果为 s1s2
Join/Split/Substring
Join返回字符串, Split返回字符串数组
是String类.Join, String名字.Split
public static string Join( string separator,string[ ]  value )
public string[ ] Split ( params char[ ] separator)
    e.g.
string[] s1 = {"123", "456"};
string res1 = string.Join(',', s1);
string []res2 = res1.Split(',');
substring
两种用法:
stringname.substring(a) # 从a开始直到最后  注意下标是0开始的, 从6开始,实际前面是012345
stringname.substring(a, b) # 从a开始,取b个字符
第四章
C#的set get访问器
(7条消息) C# 属性 set与get方法_jl1134069094的博客-CSDN博客
(7条消息) C#函数中{get;set;}_KindSuper_liu的专栏-CSDN博客
public class MyClass  {
    private  int  gread  =  0;
    public  int  Gread  {
        get { return  gread ;  }
        set { if (value >= 0  &&  value <= 100) {
			gread  =  value ;   //value是关键字,其值由编译器自动生成。}
    }
}
value是关键字,其值由编译器自动生成。
其中定义了私有(private)属性 gread
由于是私有的,对其它类是不可见的,C#将这样的私有属性称为“字段”。
随后定义了公用属性过程 Gread (注意命名的差别),它们规定了对属性值的处理方式(get 及 set 访问器)。这样对外开放的访问接口称为“属性”或属性过程。
仅声明get的属性能且只能在构造函数中赋值。
我更习惯使用自动实现的属性: 这样就不再需要声明对应的私有字段(不用字段用name, 属性用Name了)。
属性要声明public的,有get; set两个访问器(虽然语法上允许只有其中一个),如果希望只读,那set访问器前面就加上private
不可以两个访问器都是private。
但是!如果有判断条件,不要使用简写:【这里非常重要! 如果有条件,必须写一个grade一个Grade,不可以一个grade然后在里面改,会报异常!!】
private int grade;
public int Grade
{
    get => grade; // 就是 {return grade;}
    set
    {
        if (value < 0 || value > 100) throw new Exception("??");
        else grade = value;
    }
}
如果有对象初始化,可以这么写:
class Student{
	string Name{get; set;}
	int Grade{get; set;}
}
Student s1 = new Student{ Name = 'STQ', Grade = 100};
可以这样初始化:
public char Gender { get; set; } = '男';
关于静态构造参数:
静态构造函数没有访问修饰符,也没有参数。
创建第一个实例或引用任何静态成员之前,会自动调用静态构造函数来初始化类。因此静态构造函数是在实例构造函数之前执行的。
static SimpleClass()
表示静态构造函数,没有访问修饰符,没有参数。
readonly变量两种赋值方式:初始化时赋值、构造函数中赋值。
构造函数一般用public 如果用private修饰构造函数,一般用于只包含静态成员的类,用于阻止该类被实例化。
方法中的参数传递:
四类参数:值参数、引用参数、输出参数和参数数组。
理解:与C++不同,这里变量地址不叫指针,而叫引用,引用有 ref 和 out 两个关键字,分别对应引用参数、输出参数。
有关ref 和 out:
无论 ref 还是 out 引用,都可以使方法返回多个参数的值,这是由引用的特性决定的。
两种引用的区别:分别为方法输入或输出参数。
ref:修改原变量的值,参数要求有初值
是函数的输入参数,在函数内部的任何改变,都将影响函数外部该参数的值。
out:修改原变量的值,参数可以无初值
目的在于获取函数的返回值,是输出参数,必须在函数内部对该参数赋值,这将冲掉函数外部的任何赋值,使得函数外部赋值毫无意义。
public static void MyMethod(out int a, out int b)  {a = 5;    b = 6;   }    //函数中赋值
MyMethod( out x,  out y );  //引用时无初值
这个程序很重要,Out是不可以省略的。并不是说有了函数声明时的out,调用时就可以省略out了。
Lambda表达式
C# 的 Lambda 表达式语法格式:
(输入参数列表)=> { 表达式或语句块 }
其中“=>”为 Lambda 运算符,读作 goes to
参数只有一个的时候可以省略括号
主要用在只有一条语句临时使用一次的函数
委托
可以把委托理解为一个类!!!
[访问修饰符] Delegate 返回类型 委托名([参 数列表]);//注意没有方法体的 { }
定义委托:
	public delegate double MyDelegate (double x );
符合委托结构(签名)的方法:
	public static double  Square (double x ) {
		return   x*x ;  }
其它方法中可以使用委托类型的变量或参数:
	public static double[ ]  Apply  (		double[ ] a, 	 MyDelegate  f )   {
	    double[ ] b = new double[ a.Length ] ;
 	    for( int  i = 0; ……)   b[i] = f ( a[i] );
	    return   a ;   }
实际调用: double[ ] a = { 1.0, 2.0 , 3.0 }
		    double[ ] s = Apply( a, Square ) ;
此处的 Square 也可为委托给其它符合委托签名的方法
委托可以理解为C++中指向函数的指针 只不过不仅可以委托静态方法,还可以通过委托调用实例方法,还可以通过Lambda表达式委托内联方法。
using System;
using System.Windows.Controls;
namespace ExampleWpfApp.Ch04
{
    public partial class E07Delegate : Page
    {
        public E07Delegate()
        {
 InitializeComponent();
 Loaded += delegate {
     var d1 = new DelegateDemo();
     uc.Result.Content = d1.R;
 };
        }
    }
    public class DelegateDemo
    {
        public string R { get; set; } = "";
        public DelegateDemo()
        {
 Demo1();  //基本用法
 Demo2();  //将委托作为参数传递给另一个方法(实际用途)
        }
        public void Demo1()
        {
 //用法1:调用类的静态方法
 MyDelegate m1 = MyClass.Method1;
 double r1 = m1(10);
 R += $"r1={r1:f2}";
 //用法2:调用类的实例方法
 var c = new MyClass();
 MyDelegate m2 = c.Method2;
 double r2 = m2(5);
 R += $",r2={r2:f2}\n";
        }
        public void Demo2()
        {
 MyClass c = new MyClass();
 double[] a = { 0.0, 0.5, 1.0 };

 //利用委托求数组a中每个元素的正弦值
 double[] r1 = c.Method3(a, Math.Sin);
 foreach (var v in r1)
 {

 }
 R += $"r1={string.Join(",", r1)}\n";

 //利用委托求数组a中每个元素的余弦值
 double[] r2 = c.Method3(a, Math.Cos);
 R += $"r2={string.Join(",", r2)}\n";
        }
    }
    public delegate double MyDelegate(double x);
    public class MyClass
    {
        public static double Method1(double x)
        {
 return x * 2;
        }
        public double Method2(double x)
        {
 return x * x;
        }
        public double[] Method3(double[] a, MyDelegate f)
        {
 double[] y = new double[a.Length];
 for (int i = 0; i < a.Length; i++)
 {
     y[i] = f(a[i]);
 }
 return y;
        }
    }
}
非常重要!!!注意本例中委托声明的位置,并不在某个类中,而是直接声明在名字空间下。!!!
多控件注册同一事件
如果具有相同类型的元素很多,而且这些元素都会引发某个相同的事件,此时可以在其父元素中声明附加事件,这种办法可以简化事件声明的次数(也可通过资源进行)。
< StackPanel Margin = “10” … … Button.Click=" Button_Click />
鼠标事件/键盘事件【例如显示鼠标的坐标以及光标】
P136开始。
Mouse 类的 OverrideCursor属性,利用该属性可动态改变光标的形状。
注意有s!
Mouse.OverrideCursor = Cursors.Arrow;
要使某个控件接受键盘事件,必须将该控件的 Focusable属性 设置为 true。
当发生按键操作时,如果键盘焦点正处在元素上,则会触发键盘事件。
显示鼠标坐标:
(7条消息) VS编程,WPF中,获取鼠标相对于当前屏幕坐标的一种方法_君一席-CSDN博客
获取鼠标在Windows中的坐标:
Point p = Mouse.GetPosition(this);
MessageBox.ShowInformation($"X:{p.X}, Y:{p.Y}", "这是相对于整个窗口的坐标");
获取鼠标在控件中的坐标:【控件的左上角坐标是(0,0)】
//需要注意的是参数为IInputElement类型,也就是说要是能输入的控件
Point point2 = Mouse.GetPosition(控件名称);
lbl2.Content = "(" + point2.X + ", " + point2.Y + ")";
其实就是Mouse.GetPosition()方法参数不一致罢了。如果是this就是相对于整个窗口, 是控件就是相对于那个控件。
Datatime类/TimeSpan类
DataTime类的toString方法可以给参数描述日期的描述方式
DateTime dt1 = new DateTime(2013, 1, 30);
R += $"dt1:{dt1.ToLongDateString()}\n";
//用法2:获取当前日期和时间
DateTime dt2 = DateTime.Now;
//用法3:格式化输出(注意大小写)
R += $"dt2:{dt2.ToString("yyyy-MM-dd")}\n" +
$"{dt2.Year}年{dt2.Month}月{dt2.Hour}点{dt2.Minute}分\n";
R += $"dt2:{dt2:yyyy-MM-dd HH:mm:ss)}";
//获取两个日期相隔的天数
TimeSpan ts = dt1 - dt2;
R += $"dt1和dt2相隔{ts.Days}天";
DispatcherTimer类
一个属性,三个方法: Interval Tick Start Stop
一个时钟,每秒更新一次:
DispatcherTimer timer = new DispatcherTimer
{
	Interval = TimeSpan.FromSeconds(1)
};
timer.Tick += (s, e) =>
{
	uc.Result.Content = $"{DateTime.Now:yyyy-MM-dd dddd tt HH:mm:ss}";
};
timer.Start();
第五章
覆盖和重写【new&override】
覆盖:在派生类用与基类相同的方法名和参数表写一个新方法 ,是多态性的体现。
通过在派生类中重写或隐藏基类的方法来呈现多态性 。
方法重写:基类的方法必需声明为 virtual,表示该方法(或属性)可以被覆盖。【声明为virtual的类并不强制覆盖】
覆盖时派生类的方法必需声明为 override
派生类的方法名和参数表必需与基类一致
派生类用关键字 base .方法名( ),可以调用基类被覆盖的方法。
如果基类中的方法没有用 virtual 进行声明,需要在派生类中重写该方法时,可以用 new 隐藏基类方法。
【new比override更加灵活】
派生类被实例化成对象时,先调用基类构造函数,再调用派生类构造函数。
override是编译时多态, 而new依然是看父类的。
 public partial class E02override : Page
    {
        public E02override()
        {
 InitializeComponent();
 Loaded += delegate
 {
     string s = "";
     E02B a1 = new E02B(); a1.M1(); a1.M2(); a1.M3(); s += $"{a1.R}\n";
     E02C a2 = new E02C(); a2.M1(); a2.M2(); a2.M3(); s += $"{a2.R}\n";
     uc.Result.Text = s;
 };
        }
    }
    public abstract class E02A
    {
        public string R { get; set; } = "";
        public void M1() { R += "A.M1\t"; }
        public abstract void M2();
        public virtual void M3() { R += "A.M3\t"; }
    }
    public class E02B : E02A
    {
        public new void M1() { R += "B.M1\t"; }
        public override void M2() { R += "B.M2\t"; }
        public override void M3() { R += "B.M3\t"; }
    }
    public class E02C : E02B
    {
        public new void M1() { R += "C.M1\t"; }
        public override void M2() { R += "C.M2\t"; }
        public new void M3() { R += "C.M3\t"; }
    }
结果: AM1 BM2 BM3
AM1 CM2 BM3
先调用基类构造函数,再调用派生类构造函数。
接口
接口的写法和类差不多,但它的成员只有属性和方法体,而没有具体执行方式。
接口没有构造方法,接口的成员总是 public 的,不用添加 public 修饰符。
接口可以多重继承(实现接口),只是 C# 仍然用“:”表示继承接口。
匿名类型
var s1 = new { id = "1234", age = 22 };
形式上看使用了 new ,像是声明了一个对象,使用时也像对象一样引用其属性: string s = s1.id + s1.age ;
注意,属性都是只读的,不能为其赋值
s1.age++; 错误!只读,不能修改。
对象初始化和集合初始化
创建一个对象时,可以用一条语句同时实现创建对象并对对象的一部分或者全部属性进行初始化,而无需显式调用类型的构造函数。
其实是一种简化了的声明方式。
集合对象也同样可以采用简化方式。
这种简化用法的前提是集合必须实现Ienumerable 接口,该接口是枚举器接口,几乎所有的集合都实现了该接口。
简化的声明方式:【几乎都实现了Ienumerable接口,所以可以直接new完之后直接用{}来赋值】
StudentInfo si = new StudentInfo { name = “zhangsan” , age = 22 }
列表/排序列表/字典/排序字典
列表: System.Collections.Generic.List< T >, 可通过 list[i] 访问元素
Add:向列表添加一个元素
Insert:列表中插入一个元素
Contains:判断列表中是否存在某元素
Remove:列表中移除指定元素
Clear:清空列表。
列表的初始化: 这个括号必不可少!
List<Student> students = new List<Student>()    {
  new Student{ Name="张三", Gender='男', Score=81 },
  new Student{ Name="李四", Gender='男', Score=83 },
  new Student{ Name="李五", Gender='女', Score=85 },
  new Student{ Name="王六", Gender='男', Score=83 }
};
排序列表:SortedList<Key, KeyValue>
区别仅是排序列表是通过键(Key)进行升序排序的结果,键值不能重复。
列表类似数组用索引(index)定位元素,而排序列表一般用键值(key)。
字典: Dictionary<TKey, TValue>
Add:将带有指定键和值的元素添加到字典中。
TryGetValue:获取与指定的键相关联的值。
ContainsKey:确定字典中是否包含指定的键。
Remove:从字典中移除带有指定键的元素。
排序字典: SortedDictionary<TKey, TValue>
用法与字典类似,区别是排序字典保存的是按照键值进行升序排序后的结果。
LINQ
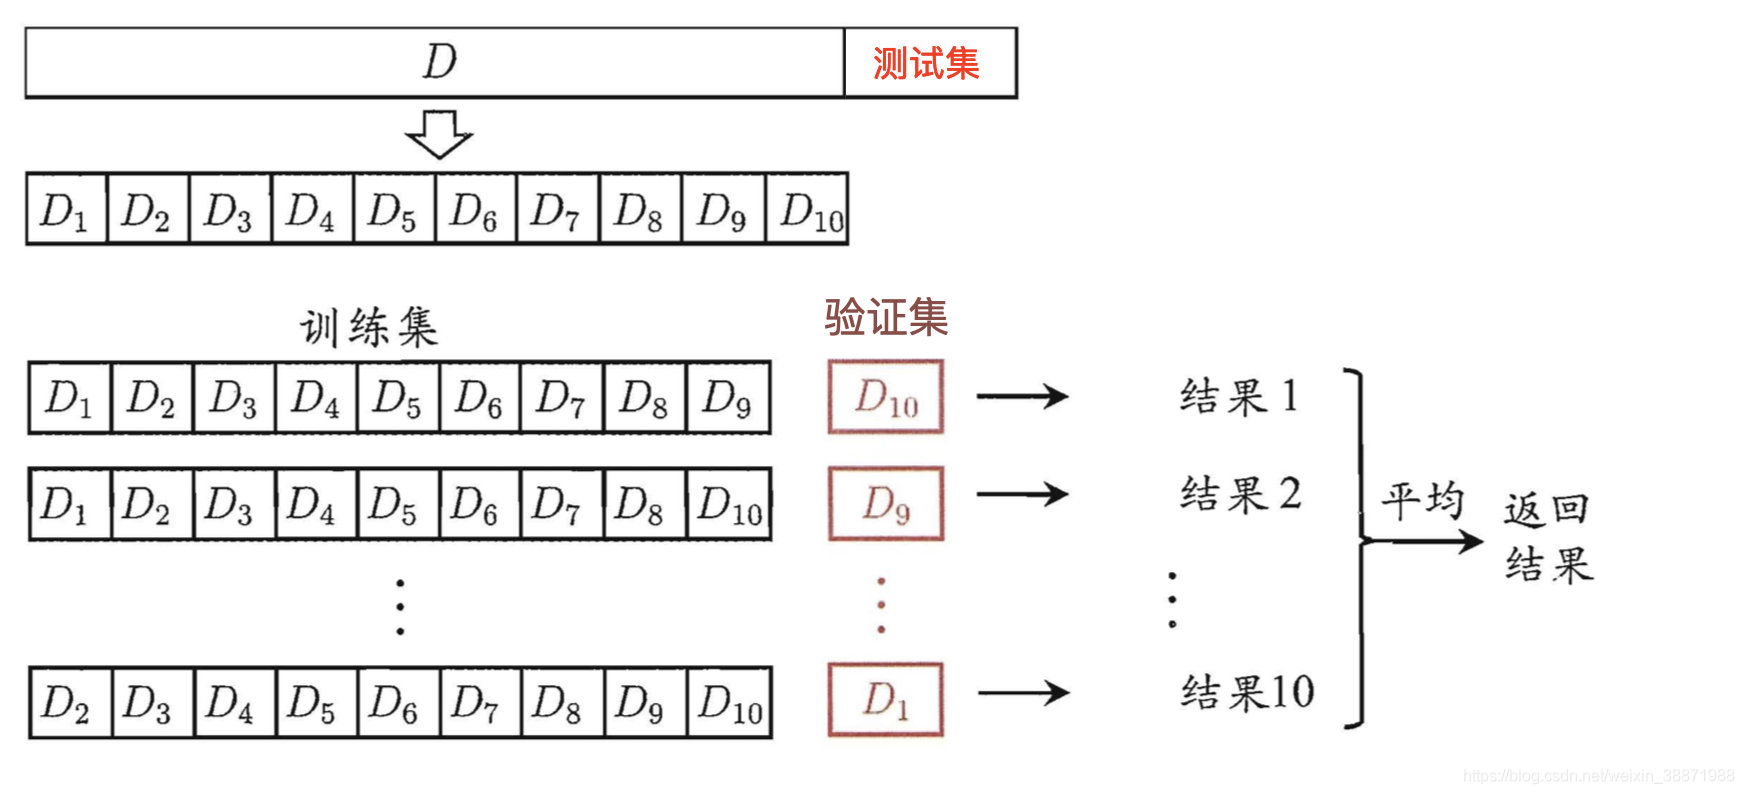
排序 对数据排序 (C#) | Microsoft Docs
多关键字排序,只需要用,分隔即可。
string[] words = { "the", "quick", "brown", "fox", "jumps" };

IEnumerable<string> query = from word in words
      orderby word.Length, word.Substring(0, 1) descending
      select word;

foreach (string str in query)
    Console.WriteLine(str);
var  q =  from  t  in  students  where  t.Score > 0    orderby  t. Score  desending  ,
  t. Name   asending
  select  t ;
数据源:
int[ ] numbers = { 1, 2, 3, 4, 5, 6, 7 } ;
声明查询变量及查询语句:
var q = from n in numbers where n % 2 == 0 select n ;
注意,此时只是声明还没有执行查询。
一般利用 foreach 进行遍历得到查询序列,这种方式称为**“延迟执行”**:
foreach ( var v in q ) { Console.Writeline ( “{0}”, v ) ; }
查询表达式必须以 from 子句开头
from 子句用于指定数据源和范围变量。
where子句: 用于指定筛选条件,只返回筛选表达式结果为true 的元素。
var q = from t in students where t.Name[0] == “李”&& t.Gender == “男” select t ;
orderby子句:于对返回的结果进行排序,ascending 关键字表示升序,descending 关键字表示降序
group 子句【注意是group XX by 属性, 和数据库不太一样,不是groupby】
用于按指定的键分组,group 后面可以用 by 指定分组的键。 group 子句必须在最后。
使用 foreach 生成分组序列查询时,必须使用双重嵌套循环,外层用于循环每个组,内层用于循环访问组成员。
【外层循环组, 内层循环每组内的元素】
例如:
查询
var q = from t in students orderby t.Score ascending, t.Name ascending where t.Score > 0 group t by t.Gender;
遍历
foreach (var v in q)    {		// 每组
    foreach (var  v1 in  v )   {		// 组内每个元素
    	sb.AppendLine( v1);
    }
}
如果没有 group 子句,必须用 select 结尾。
LINQ的结尾必须是group 或者 select.
select 除了可以选择变量本身, 还可以选择子集或者投影
子集: select t.Score
投影: select new { 姓名= t.Name,成绩= t.Score } 【除源元素副本以外的内容时】
查询多个对象:
这里用到了查询多个 和 投影
var q = from t1 in students from t2 in stuInfo where t1.ID == t2.StudentID select new { 姓名 = t1.Name, 父亲 = t2.FatherName, 母亲 = t2.MotherName };
查询符合条件的个数 : q.Count()方法。 【注意这是个方法,带着括号的,不是个属性】
第六章 文件操作
C#文件读入
用@去掉’\'的转义字符功能;
File是System.IO.File类
Writealllines可以写入字符串数组, WriteallText写入字符串;
对应的Readalllines\test
string.join(分隔符,字符串数组), 换行用environment.newline表示
string path1 = @"C:\Users\pc\Desktop\text1.txt";
string[] appendText = { "单位", "姓名", "成绩" };
if (File.Exists(path1))
{
    File.Delete(path1);
}
File.WriteAllLines(path1, appendText, Encoding.Default);
string[] readText = File.ReadAllLines(path1, Encoding.Default);
Console.WriteLine(string.Join(Environment.NewLine, readText));
Console.ReadLine();
var关键字可以定义只读的匿名类:
var v = new {ID = '01', name = 'pikachu'}
Directory 类:只提供了常用的静态方法。
DirectoryInfo 类:提供了更详细的功能,需要实例化才能使用。
最常用的是 Directory 类。
DirectoryInfo 类的构造函数形式如下:
public DirectoryInfo( string path); 参数 path 表示目录所在的路径。例如:
DirectoryInfo dirInfo = 	new DirectoryInfo(@"e:\temp");
常用方法
Directory是对文件夹进行管理,而File是对文件进行管理
1.创建目录
Directory 类的 CreateDirectory 方法用于创建指定路径中的所有目录。
public static Directory CreateDirectory (string path) 其中参数 path 为要创建的目录路径。
2.删除目录
Directory 类的 Delete 方法用于删除指定的目录
常用的方法原型为:
public static void Delete (string path, bool recursive)
3.移动目录
public static void Move (string sourceDirName, string destDirName)
其中:sourceDirName 为要移动的文件或目录的路径;destDirName 为新位置的目标路径。
4.文件常用方法
判断文件是否存在:调用 File 类的 Exist 方法可以判断是否存在指定的文件。
复制文件:File.Copy (sourceFileName, destFileName, bool overwrite)
删除文件:File.Delete (string path)
移动文件:
File.Move (sourceFileName, destFileName)
注意:Move方法不提供创建目录的功能,要确保存在目标文件目录。
文件属性:对 File 类:用 SetAttributes 方法,GetAttributes 方法设置、获取。
判断某个路径是目录还是文件:
if (( File.GetAttributes(path) & FileAttributes.Directory) 	== FileAttributes.Directory )
{
    Console.WriteLine("“{0}”是目录", path);
}
else {
    Console.WriteLine("“{0}”是文件", path);
}
5.读取文件
public static string ReadAllText( string path, Encoding encoding)
其中:path 为文件路径, encoding 为编码方式,无法自动检测出汉字的 UTF-8 编码,一般可以指定为 Encoding.Default 。
6.写文件-Text
WriteAllText 方法用于将指定的字符串写入到文件中(覆盖)。而AppendAllText 方法则为追加到文件中。
如果文件不存在则自动创建该文件。
常用原型为:
public static void AppendAllText (string path, string contents, Encoding encoding)
其中参数 contents 为追加到文件的字符串。
7.写文件-Line
ReadAllLines 方法打开一个文本文件,将文件的所有行都读入一个字符串数组,然后关闭该文件。
根据回车换行来确定一行,实际是一“段”
WriteAllLines 方法创建一个新文件,在其中写入指定的字符串数组,然后关闭文件。
如果目标文件已存在,则覆盖该文件。
8.关于两个对话框
btnOpen.Click += (s, e) =>
{
    var open = new OpenFileDialog
    {
        InitialDirectory = System.IO.Path.GetDirectoryName(fileName),
        Filter="文本文件(*.txt)|*.txt|所有文件(*.*)|*.*",
        FileName = fileName
    };
    if (open.ShowDialog() == true)
    {
        fileName = open.FileName;
        txtFileName.Text = fileName;
        txtResult.Text = File.ReadAllText(fileName, Encoding.Default);
        txtState.Text = "文件已打开,请添加或者删除一些内容,然后保存。";
    }
};
btnSave.Click += (s, e) =>
{
    var save = new SaveFileDialog
    {
        InitialDirectory = System.IO.Path.GetDirectoryName(fileName),
        FileName = fileName
    };
    if (save.ShowDialog() == true)
    {
        fileName = save.FileName;
        try
        {
 File.WriteAllText(fileName, txtResult.Text, Encoding.Default);
 txtResult.Text = "";
 txtState.Text = "保存成功。";
        }
        catch (Exception ex)
        {
 txtState.Text = $"保存失败:{ex.Message}";
        }
    }
};
FileStream P199
using (FileStream fs = File.Open(@"C:\Users\13234\Desktop\fstest.txt", FileMode.Create))
{
    byte[] b = Encoding.UTF8.GetBytes("你好!世界》");
    fs.Write(b, 0, b.Length);
}

using(FileStream fs = File.Open(@"C:\Users\13234\Desktop\fstest.txt", FileMode.Open))
{
    byte[] b = new byte[1024]; // 每次读取的缓存大小
    int len = 0;
    while((len = fs.Read(b, 0, b.Length)) > 0)
    {
        Console.WriteLine(Encoding.UTF8.GetString(b, 0, len) + "\n");
    }
}
注意事项
使用readallline writeallline等方法的时候,一定要用try-catch结构!!
同理对于Directory.CreateDirectory这种方法,也要用try-catch结构包裹。
学习一种写法:
如果读取的文件不存在,会自动创建该文件。
btnRead.Click += (s, e) =>
{
    try
    {
        string[] str = File.ReadAllLines(textBoxFilePath.Text, Encoding.Default);
        textBox1.Text = string.Join("\r\n", str);
    }
    catch (Exception err)
    {
        MessageBox.Show(err.Message + "\n\n系统将自动创建该文件。");
        textBox1.Text = "";
    }
};
string path = System.IO.Path.GetDirectoryName(filename.Text);
很常用,获取当前的路径的目录信息!【即:如果有一个文件,返回的是他所在文件夹的位置!】
第八章 wpf控件
WPF—>控件的隐藏与显示Visibility属性
| Visible | 元素在窗体中正常显示 |
|---|---|
| Collaspsed | 元素不显示,也不占用空间 |
| Hidden | 元素不显示,但是任然为它保留空间 |
在WPF中关联【启动】Console
在App.xaml.cs中添加以下代码:
public partial class App : Application
{
    public static void ExecConsoleApp(string arg)
    {
        string path = System.Reflection.Assembly.GetExecutingAssembly().Location;
        string path1 = path.Replace("当前WPF的名字", "需要调用的Console的名字");
        // string path1 = path.Replace("FuLuAWpfApp", "FuLuAConsoleApp");
        System.Diagnostics.Process.Start(path1, arg);
    }
}
注意这里利用反射+字符串替换来获得Console的路径,要求Console要和WPF在同一个解决方案下。
调用时,只需要:
Loaded += (s, e) =>
{
	App.ExecConsoleApp("FuLuAConsoleApp.A03.A0301");
};
参数是要调用的那个.cs文件的所在位置,但是不要写上.cs【如上就是启动在FuLuAConsoleApp的A03文件夹下的A0301.cs文件】
Stretch
HorizontalAlignment中的Stretch: 水平拉伸,默认值,拉伸子元素至父元素的已分配空间。
VerticalAlignment 同理
WrapPanel
WrapPanel默认为横向排列,子元素超出范围自动转到下一行(类似 Java 的行布局)
Boarder
CornerRadius:获取或设置边框的圆角半径。
BorderThickness:获取或设置边框的粗细。常用有两种表示形式:用一个值表示,BorderThickness=“5”;或按左、上、右、下的顺序表示BorderThickness=“15,5,15,5”。
Padding:获取或设置Border与其包含的子对象之间的距离。
Grid
GridSplitter 可以拖动的表格分界条
ScrollViewer.CanContentScroll
(3条消息) ScrollViewer.CanContentScroll_泡泡-CSDN博客
<GridSplitter Grid.Column="1" ResizeBehavior="PreviousAndNext" Width="6" Background="Red" Margin="5 0 0 0" />
注意! 这个条放在某个格子内部,要先把这个格子放好,再放这个条,否则这个条就不见了emm.
	<TextBlock Grid.Row="0" Grid.Column="0" Background="AliceBlue"/>
    <GridSplitter Grid.Row="0" Grid.Column="0"
    Grid.ColumnSpan="2"
    BorderBrush="Red" BorderThickness="2"
    HorizontalAlignment="Stretch" VerticalAlignment="Bottom"
    ResizeBehavior="BasedOnAlignment" />

    <TextBlock Grid.Row="1" Grid.Column="0" Background="Black"/>
    <GridSplitter Grid.Row="1"  Grid.Column="0" BorderBrush="Blue"
    BorderThickness="2" HorizontalAlignment="Right"
    VerticalAlignment="Stretch"
    ResizeBehavior="BasedOnAlignment" />
先在(0,0)放TextBlock,再放GridSplitter,是可以出现的; 反之就看不见条了。
为什么?
HorizontalAlignment=“Stretch” 表示的意思是“在水平方向上拉伸”,会占满横向, 而VerticalAlignment="Bottom"则表示这个条在格子的底部。【但是,在底部是拉伸这个格子和下一个格子;而在顶部是拉伸这个格子和上一个格子】【如果改成Top,就会出现在格子的顶部】。 所以后放可以看见,而先放的话,TextBlock会把这个条盖住。
VerticalAlignment="Stretch"表示在垂直方向上可以延伸。
想要用Grid.SetRow(item, pos), item首先要放在这个Grid中, pos是一个数。
并不是用【Gridname】.SetRow方法!
RadioButton
对于同一组RadioButton,一般要放在一个StackPanel中,然后在其父类(StackPanel)上设置
用**e.Source as RadioButton;**来判断剩下的。
<StackPanel RadioButton.Checked="Group_checked"> //xaml
private void Group1_Checked(object sender, RoutedEventArgs e)
{
    RadioButton r = e.Source as RadioButton;
    if (r.IsChecked == true) s1 = r.Content.ToString();
}
滚动条
把想在右侧设置滚动条的元素放在SV内部。
<ScrollViewer Grid.Column="1">
    <TextBlock x:Name="showfile" Background="Pink" Margin="20"/>
</ScrollViewer>
整个程序关闭
btnCancel.Click += delegate
{
    Application.Current.Shutdown();
};
Label字居中
<Label x:Name="label" Grid.Row="1" Width="400" HorizontalContentAlignment="Center" VerticalContentAlignment="Center" HorizontalAlignment="Left" Content="现在什么都没有yo" FontSize="45"/>
Style Setter Property
<StackPanel.Resources>
    <Style TargetType="Label">
        <Setter Property="Width" Value="90"/>
        <Setter Property="VerticalContentAlignment" Value="Center"/>
        <Setter Property="Margin" Value="0 10 0 0"/>
    </Style>
</StackPanel.Resources>
随机更换颜色/Color 结构
Color 结构同样位于 System.Windows.Media命名空间下。
可使用该结构在 C# 代码中通过 A、R、G、B 的组合来创建各种自定义的颜色。
该结构的静态方法 FromArgb:用指定的A、R、G、B值创建一个颜色,例如:
myBrush.Color = Color. FromArgb (255, 0, 255, 0 ); // sRGB 格式
【sRGB 格式:用4个字节(ARGB)表示一个像素的颜色 ,取值范围均为十六进制的00~FF,或者十进制的0到255,此为常用默认格式 。】
byte: 1 字节无符号
btn3.Click += delegate
{
    rgb[0] = (byte)r.Next(-1, 255);
    rgb[1] = (byte)r.Next(-1, 255);
    rgb[2] = (byte)r.Next(-1, 255);
    Color color = Color.FromArgb(255, rgb[0], rgb[1], rgb[2]);
    txt.Foreground = new SolidColorBrush(color);
};
Frame/Page/NavigationWindow
一个程序界面的顶层元素应该是 window,window 可以容纳 frame,frame可容纳page。因此一个 windows 可以容纳多个 page。
可以承载Page!
通常是在页面中通过设置 WindowWidth 和WindowHeight 以及 WindowTitle 来设置宿主的宽度、高度、标题属性。
可以在 NavigationWindow 中承载 Page
用 C# 代码将NavigationWindow窗口作为页的宿主窗,可将 Content 属性设置为页的实例。
Window w = new System.Windows.Navigation.NavigationWindow(); w.Content = new PageExamples.Page1(); w.Show();
Frame初始化方法: 其中的Sourse属性表示的是这个Frame承载了哪个Page!
<Frame Name="frame1"
    Grid.Column="2"
    Margin="100"
    Source="PageTry.xaml"
    BorderThickness="1"
    BorderBrush="Gray"
    ScrollViewer.CanContentScroll="True"
    NavigationUIVisibility="Visible"
/>
也可以用C#代码实现:
frame1. Source = new Uri("Page1.xaml", UriKind.Relative);
建议把Frame的高度、宽度改成Auto, 这样Frame的大小就是实际Page的大小了!
课本原码中点击按钮刷新Frame的操作
Uri uri = new Uri(btn.Tag.ToString(), UriKind.Relative);
object obj = null;
try
{
    obj = Application.LoadComponent(uri);
}
catch
{
    MessageBox.Show("未找到 " + uri.OriginalString, "出错了");
    return;
}
frame1.Source = uri;
【课本原码是用btn的标签来确定到底要打开哪个Frame的,所以是这样处理的; 如果那个标签可能是个Window, 可以这样处理:】
Uri uri = new Uri(btn.Tag.ToString(), UriKind.Relative);
object obj = null;
try
{
    obj = Application.LoadComponent(uri);
}
catch
{
    MessageBox.Show("未找到 " + uri.OriginalString, "出错了", MessageBoxButton.OK, MessageBoxImage.Error);
    return;
}
if (obj is Window)
{
    frame1.Source = null;
    var w = obj as Window;
    w.WindowStartupLocation = WindowStartupLocation.CenterScreen;
    w.ShowDialog();
}
else if (obj is Page)
{
    if (lastButton == btn) frame1.Refresh();
    else frame1.Source = uri;
}
else
{
    MessageBox.Show("不支持此类型,注意目标必须是Window或者Page。", "出错了", MessageBoxButton.OK, MessageBoxImage.Error);
}
WPFMessageBox【MessageBox美观】
使用方法:
- 添加项目-> 现有项目-> 在【好看的WPF模板】这个文件夹下
- 添加引用,让主窗口添加对WPFMessageBox的引用;
- 【在C#的代码中写】using MessageBox = WPFMessageBox.MessageBox;
- 以后所有使用MessageBox的地方,都只需要输入MessageBox.Showxxx即可,传入字符串。
Button 美观
非常美观的按钮代码!!
使用方法:
在App.xaml【这个主要是改StaticStyle的, 所以要放在App.xaml中!】
将Application.Resource改成如下:
这里我改了改。要想调整样式,只需要在**<ControlTemplate.Triggers>**里添加事件即可!
【这里我添加了按钮不可用时的样式】
<Trigger Property="IsEnabled" Value="False">
    <Setter Property="Background" TargetName="border" Value="Gray" />
</Trigger>
<Application.Resources>
        <!--自定义颜色-->
        <LinearGradientBrush x:Key="LinearGradientBlueBackground" EndPoint="0.5,1" StartPoint="0.5,0">
 <GradientStop Color="Yellow"  Offset="0" />
 <GradientStop Color="Aquamarine" Offset="1" />
        </LinearGradientBrush>
        <SolidColorBrush x:Key="MyBtnBorderColor" Color="Wheat"></SolidColorBrush>
        <SolidColorBrush x:Key="MyBtnHoverBackgroundColor" Color="Aquamarine"></SolidColorBrush>
        <!--END-->

        <Style x:Key="MyWpfButton" TargetType="{x:Type Button}" >
 <Setter Property="Background" Value="{StaticResource LinearGradientBlueBackground}"></Setter>
 <Setter Property="Foreground" Value="Blue"></Setter>
 <Setter Property="BorderBrush" Value="{StaticResource MyBtnBorderColor}"></Setter>
 <Setter Property="Template">
     <Setter.Value>
         <ControlTemplate TargetType="{x:Type Button}">
  <Border x:Name="border" BorderBrush="{TemplateBinding BorderBrush}" BorderThickness="{TemplateBinding BorderThickness}" Background="{TemplateBinding Background}"
          SnapsToDevicePixels="true" CornerRadius="5">
      <ContentPresenter x:Name="contentPresenter"
             Focusable="False"
             HorizontalAlignment="{TemplateBinding HorizontalContentAlignment}"
             Margin="{TemplateBinding Padding}"
             RecognizesAccessKey="True"
             SnapsToDevicePixels="{TemplateBinding SnapsToDevicePixels}"
             VerticalAlignment="{TemplateBinding VerticalContentAlignment}"  />
  </Border>
  <ControlTemplate.Triggers>
      <Trigger Property="IsMouseOver" Value="true">
          <Setter Property="Background" TargetName="border" Value="{StaticResource MyBtnHoverBackgroundColor}"/>
      </Trigger>
      <Trigger Property="IsEnabled" Value="False">
          <Setter Property="Background" TargetName="border" Value="Gray" />
      </Trigger>
  </ControlTemplate.Triggers>
         </ControlTemplate>
     </Setter.Value>
 </Setter>
        </Style>
    </Application.Resources>
然后,在使用Button时,只需要指定其**Style=“{StaticResource ResourceKey = MyWpfButton}”**即可。
<Button Content="Button" x:Name="btn" Style="{StaticResource ResourceKey = MyWpfButton}" />
TextBox 美观
使用方法:
1、右键-> 添加 -> 新建项 -> 用户控件 , 添加一个TipTextbox.xaml
2、 在这个文件中添加这个:这里的x:Class要改!
<TextBox x:Class="PikachuTry.TipTextbox"   // 这里的x:Class要改!
  xmlns="http://schemas.microsoft.com/winfx/2006/xaml/presentation"
  xmlns:x="http://schemas.microsoft.com/winfx/2006/xaml"
  xmlns:mc="http://schemas.openxmlformats.org/markup-compatibility/2006"
  xmlns:d="http://schemas.microsoft.com/expression/blend/2008"
  mc:Ignorable="d"
  d:DesignHeight="450" d:DesignWidth="800" Name="MyTextbox">
    <TextBox.Background>
        <VisualBrush Stretch="None" AlignmentX="Left">
 <VisualBrush.Visual>
     <Border DataContext="{Binding ElementName=MyTextbox}" Background="Aquamarine"  Width="{Binding ElementName=MyTextbox,Path=ActualWidth}"
  Height="{Binding Path=ActualHeight}" CornerRadius="10">
         <TextBlock Text="{Binding ElementName=MyTextbox,Path=TipText}"
         VerticalAlignment="{Binding ElementName=MyTextbox,Path=VerticalContentAlignment}">
  <TextBlock.Style>
      <Style TargetType="TextBlock">
          <Setter Property="Opacity" Value="0"/>
          <Style.Triggers>
   <DataTrigger Binding="{Binding ElementName=MyTextbox,Path=Text}" Value="">
       <Setter Property="Opacity" Value="0.2"/>
   </DataTrigger>
          </Style.Triggers>
      </Style>
  </TextBlock.Style>
         </TextBlock>
     </Border>
 </VisualBrush.Visual>
        </VisualBrush>
    </TextBox.Background>
</TextBox>
-
在对应的.cs文件中, 添加如下:
public partial class TipTextbox : TextBox
{
    public TipTextbox()
    {
        InitializeComponent();
    }

    public string TipText
    {
        get { return (string)GetValue(TipTextProperty); }
        set { SetValue(TipTextProperty, value); }
    }

    public static readonly DependencyProperty TipTextProperty =
        DependencyProperty.Register("TipText", typeof(string), typeof(TipTextbox), new PropertyMetadata(""));
}
4、 使用时, 首先添加命名空间的引用:
【注意!如果当前的解决方案就叫PikachuTry, 然后这个用户控件也放在PikachuTry中,那映射的命名空间就是自己】
xmlns:uc="clr-namespace:PikachuTry"5、使用时只需要调整TipText即可实现水印效果。
<uc:TipTextbox Margin="30" TipText="请输入密码"/>
要是希望只读,这样:
IsReadOnly="True"
TextBox 注意 : 该文本框需要设置以下属性 为了显示多行,TextWrapping=“Wrap”
滚动条在内部设置。
接受回车: AcceptsReturn = true
ListBox 美观
使用方法: 直接在代码中贴上即可。 可以修改对应字体的大小!
<ListBox>
    <ListBox.ItemContainerStyle>
    <Style TargetType="{x:Type ListBoxItem}">
    <Setter Property="OverridesDefaultStyle" Value="True" />
    <Setter Property="SnapsToDevicePixels" Value="True" />
    <Setter Property="Foreground" Value="Black" />
    <Setter Property="Height" Value="25" />
    <Setter Property="FontSize" Value="12" />
    <Setter Property="VerticalContentAlignment" Value="Center" />
    <Setter Property="Template">
    <Setter.Value>
    <ControlTemplate TargetType="{x:Type ListBoxItem}">
    <Border x:Name="border" CornerRadius="0" Margin="2" BorderBrush="Black"
        BorderThickness="0,0,0,0.2">
        <ContentPresenter HorizontalAlignment="{TemplateBinding HorizontalContentAlignment}"
        VerticalAlignment="{TemplateBinding VerticalContentAlignment}"
        Margin="10,0,0,0" />
        </Border>
        <ControlTemplate.Triggers>
        <Trigger Property="IsSelected" Value="True">
        <Setter Property="Foreground" Value="#FF46679A" />
        <Setter TargetName="border" Property="Background" Value="white" />
        <Setter TargetName="border" Property="BorderBrush" Value="#FF46679A" />
        <Setter TargetName="border" Property="BorderThickness" Value="4,0,0,0.5" />
        </Trigger>
        <MultiTrigger>
        <MultiTrigger.Conditions>
        <Condition Property="IsMouseOver" Value="True" />
        <Condition Property="IsSelected" Value="False" />
        </MultiTrigger.Conditions>
        <MultiTrigger.Setters>
        <Setter Property="Foreground" Value="#FF46679A" />
        <Setter TargetName="border" Property="Background" Value="white" />
        <Setter TargetName="border" Property="BorderBrush" Value="#FF46679A" />
        <Setter TargetName="border" Property="BorderThickness" Value="0,0,0,0.5" />
        </MultiTrigger.Setters>
        </MultiTrigger>
        </ControlTemplate.Triggers>
        </ControlTemplate>
        </Setter.Value>
        </Setter>
        </Style>
        </ListBox.ItemContainerStyle>
        <ListBoxItem>简单学习网</ListBoxItem>
        <ListBoxItem>腾讯游戏</ListBoxItem>
        <ListBoxItem>网易游戏</ListBoxItem>
        <ListBoxItem>哔哩哔哩</ListBoxItem>
        <ListBoxItem>敦刻尔克</ListBoxItem>
        <ListBoxItem>必应搜索</ListBoxItem>
        <ListBoxItem>京东商城</ListBoxItem>
</ListBox>
也可以采用封装成自定义控件的方法。【与上面的TextBox类似】。
1、右键-> 添加 -> 新建项 -> 用户控件 , 添加一个MyListBox.xaml
2、 在这个文件中添加这个:这里的x:Class要改!
<ListBox x:Class="PikachuTry.MyListBox"
  xmlns="http://schemas.microsoft.com/winfx/2006/xaml/presentation"
  xmlns:x="http://schemas.microsoft.com/winfx/2006/xaml"
  xmlns:mc="http://schemas.openxmlformats.org/markup-compatibility/2006"
  xmlns:d="http://schemas.microsoft.com/expression/blend/2008"
  mc:Ignorable="d"
  d:DesignHeight="450" d:DesignWidth="800">
    <ListBox.ItemContainerStyle>
        <Style TargetType="{x:Type ListBoxItem}">
 <Setter Property="OverridesDefaultStyle" Value="True" />
 <Setter Property="SnapsToDevicePixels" Value="True" />
 <Setter Property="Foreground" Value="Black" />
 <Setter Property="Height" Value="40" />
 <Setter Property="FontSize" Value="16" />
 <Setter Property="VerticalContentAlignment" Value="Center" />
 <Setter Property="Template">
     <Setter.Value>
         <ControlTemplate TargetType="{x:Type ListBoxItem}">
  <Border x:Name="border" CornerRadius="0" Margin="2" BorderBrush="Black"
       BorderThickness="0,0,0,0.2">
      <ContentPresenter HorizontalAlignment="{TemplateBinding HorizontalContentAlignment}"
           VerticalAlignment="{TemplateBinding VerticalContentAlignment}"
           Margin="10,0,0,0" />
  </Border>
  <ControlTemplate.Triggers>
      <Trigger Property="IsSelected" Value="True">
          <Setter Property="Foreground" Value="#FF46679A" />
          <Setter TargetName="border" Property="Background" Value="white" />
          <Setter TargetName="border" Property="BorderBrush" Value="#FF46679A" />
          <Setter TargetName="border" Property="BorderThickness" Value="4,0,0,0.5" />
      </Trigger>
      <MultiTrigger>
          <MultiTrigger.Conditions>
   <Condition Property="IsMouseOver" Value="True" />
   <Condition Property="IsSelected" Value="False" />
          </MultiTrigger.Conditions>
          <MultiTrigger.Setters>
   <Setter Property="Foreground" Value="#FF46679A" />
   <Setter TargetName="border" Property="Background" Value="white" />
   <Setter TargetName="border" Property="BorderBrush" Value="#FF46679A" />
   <Setter TargetName="border" Property="BorderThickness" Value="0,0,0,0.5" />
          </MultiTrigger.Setters>
      </MultiTrigger>
  </ControlTemplate.Triggers>
         </ControlTemplate>
     </Setter.Value>
 </Setter>
        </Style>
    </ListBox.ItemContainerStyle>
</ListBox>
3.对应的**.cs文件必须要改**!【为了体现继承】
public partial class MyListBox : ListBox
{
    public MyListBox()
    {
        InitializeComponent();
    }
}
-
正常使用即可。
<uc:MyListBox x:Name="List">
    <ListBoxItem>简单学习网</ListBoxItem>
    <ListBoxItem>腾讯游戏</ListBoxItem>
    <ListBoxItem>网易游戏</ListBoxItem>
</uc:MyListBox>
连续空格问题
XAML处理器默认将所有空白字符自动转换为空格。
连续的空格将被替换为一个空格。
如果希望保留文本字符串中的空格,可以在该元素的开始标记内添加
xml:space = "preserve"
窗口关联
P246
(7条消息) WPF中控制窗口显示位置的三种方式_Hyman的博客-CSDN博客
窗口关联可以使一个或多个窗口附属于某个主窗口,可看做主窗口的子窗口。
通过设置附属窗口的 Owner属性使一个窗口拥有另一个窗口 。例如:
Window ownedWindow = new Window(); ownedWindow.Owner = this; ownedWindow.Show();
窗口建立关联之后,附属窗口可以通过Owner 属性的值来引用它的所有者窗口,所有者窗口也可以通过 OwnedWindows 属性的值来发现它拥有的全部窗口。
WindowStartupLocation属性中可以设置 = CenterOwner
v.WindowStartupLocation = WindowStartupLocation.CenterOwner;
private void button1_Click(object sender, RoutedEventArgs e)
{
    TestWindow window = new TestWindow();
    window.WindowStartupLocation = WindowStartupLocation.CenterOwner;
    window.Owner = this;
    window.ShowDialog();
}
关闭应用程序P52 提示
quitbtn.Click += delegate
{
    var r = MessageBox.ShowQuestion("退出应用程序吗?", "提示");
    if (r == MessageBoxResult.Yes)
    	Application.Current.Shutdown();
};
注意! 书上是MessageBoxResult.OK, 我这里用的自定义控件, 所以上面这个才是我的退出代码。
TextBox换行
需要添加:
AcceptsReturn="True"
画图【尽量用Canvas画】P344
边框属性
以画椭圆为例:
<Ellipse Fill="Yellow" Height="100" Width="200" StrokeThickness="3" Stroke="Black"
StrokeDashArray="1,1" Canvas.Left="51" Canvas.Top="151" />
Fill是填充的颜色, Stroke是边框颜色,StrokeDashArray是边框的虚实。
注意Stroke和Fill属性不是String, 而是Brush, 所以在C#代码中设置时要:
SolidColorBrush和Brush是不一样的,要强制类型转换
SolidColorBrush rect_fill, rect_stroke, elli_fill, elli_stroke;
SolidColorBrush sd = new SolidColorBrush();

rect.MouseEnter += delegate
{
    rect_fill = (SolidColorBrush)rect.Fill;
    rect_stroke = (SolidColorBrush)rect.Stroke;
    rect.Stroke = new SolidColorBrush(Colors.Red);
    rect.Fill = new SolidColorBrush(Colors.Green);
    Mouse.OverrideCursor = Cursors.Hand;
};
但是在xml中可以直接设置。
<Rectangle x:Name="rect" Height="61" Canvas.Left="38" Canvas.Top="30" Fill="#FF8A8AF9" Stroke="Black" Width="108"/>
钢笔Pen和画笔Brush P363 360
Pen实现纯色图形的绘制,不多说。
System.Windows.Media.Brush类是各种画笔的基类
几种常见的画笔:
纯色画笔: 用Brush指定预先命名的画笔,或者用SolidColorBrush自定义纯色画笔。
渐变画笔: LinearGradientBrush 线性渐变画笔 RadialGradientBrush 径向渐变画笔【椭圆形渐变】
图像画笔: ImageBrush
SolidColorBrush 纯色画笔
可以用来设置控件的背景等
SolidColorBrush scb = new SolidColorBrush{
	Color = Color.FromArgb(0xff, 0xff, 0x0, 0x0),
    //或者直接用Colors类的预先定义好的颜色也行
};
btn1.Background = scb;
Brushes类
可以这样设置控件的边框色、前景背景色:
btn.Background = Brushes.AliceBlue;
LinearGradientBrush 线性渐变画笔
GrandientStop指定对象渐变的颜色以及在渐变轴上的位置;
用画笔的StartPoint和EndPoint更改直线的方向和大小。
不指定渐变方向,则默认对角线方向渐变。
		<Canvas x:Name="paint" Grid.Column="1">
 <Ellipse x:Name="elip" Width="235" Height="150" Canvas.Left="83" Canvas.Top="122" StrokeThickness="5">
     <Ellipse.Fill>
         <LinearGradientBrush StartPoint="0,0.5" EndPoint="1, 0.5">
          <GradientStop Color="Yellow" Offset="0.25"/>
          <GradientStop Color="Red" Offset="0.5"/>
          <GradientStop Color="Blue" Offset="0.75"/>
          <GradientStop Color="LimeGreen" Offset="1"/>
         </LinearGradientBrush>
     </Ellipse.Fill>
 </Ellipse>
        </Canvas>
具体看P364
ImageBrush类
将图像绘制到控件的背景或轮廓内
例如给Grid设置背景:
<Grid>
	<Grid.Background>
		<ImageBrush ImageSource = '...' />
	</Grid.Background>
</Grid>
默认情况下,ImgBrush会将图片拉伸, 以完全充满要绘制的区域
以下代码将ImgBrush设置成一个资源
	<Page.Resources>
        <ImageBrush x:Key="MyImageBrushKey" ImageSource="/Resources/Images/img1.jpg" />
    </Page.Resources>
    <StackPanel HorizontalAlignment="Center"
 VerticalAlignment="Center" TextBlock.FontSize="16"
 TextBlock.Foreground="Red">
        <StackPanel Orientation="Horizontal">
 <Ellipse Height="80" Width="150" Fill="{StaticResource MyImageBrushKey}" />
 <Ellipse Height="80" Width="150" StrokeThickness="20"
         Stroke="{StaticResource MyImageBrushKey}" />
 <Button Height="80" Width="150" Content="按钮1" FontSize="20pt"
         Foreground="White" Background="{StaticResource MyImageBrushKey}" />
        </StackPanel>
        <TextBlock FontWeight="Bold" FontSize="48pt" HorizontalAlignment="Center"
     Text="文本Text" Foreground="{StaticResource MyImageBrushKey}" />
    </StackPanel>
鼠标单击
注意! Canvas以及内部的rect ellipse等都是没有Click事件的, 要用MouseDown代替鼠标单击事件。
MouseDown是鼠标光标在元素上按下时引发。
WPF 在绘图控件(Shape)中添加文字
[WPF 在绘图控件(Shape)中添加文字 2018.7.15]_u010469446的专栏-CSDN博客
Q:使用Shape的子类Ellipse画一个圆,如何在圆中添加文字?
A:Shape类中不包含Text属性。可使用Shape类和TextBlock类组合,放到Grid中来实现。
纯xml:
<Grid Height="50" Width="50">
    <Ellipse Fill="Yellow" Stroke="Blue" Height="50" Width="50" HorizontalAlignment="Left"></Ellipse>
        <TextBlock Text="5" TextAlignment="Center" VerticalAlignment="Center" HorizontalAlignment="Center">			</TextBlock>
</Grid>
纯C#:
Grid nodeGrid = new Grid();

Ellipse nodeCircle = new Ellipse();
nodeCircle.Fill = Brushes.Red;
nodeCircle.Stroke = Brushes.Black;
nodeCircle.Width = 50;
nodeCircle.Height = 50;

TextBlock nodeText = new TextBlock();
nodeText.Text = "5";
nodeText.HorizontalAlignment = HorizontalAlignment.Center;
nodeText.VerticalAlignment = VerticalAlignment.Center;
nodeText.TextAlignment = TextAlignment.Center;

nodeGrid.Children.Add(nodeCircle);
nodeGrid.Children.Add(nodeText);
一些艺术家的事情
好看的颜色
Chocolate 棕橘色, 可以用来当做边框
Tomato 西红柿色
LightYellow 米黄色, 可以用做背景
背景
C:\Users\pc\Desktop\HTML_Code\Pikachu Online Compiler\img\背景5.jpg
窗口大小
Title="201800600051STQ" Height="350" Width="550" Background="Gold">
Window属性中 设置ResizeMode = NoResize, 不可以改变大小
艺术的渐变色
<LinearGradientBrush x:Name="gradientBrush">
    <GradientStop Offset="0.00" Color="Red" />
    <GradientStop Offset="0.14" Color="Orange" />
    <GradientStop Offset="0.28" Color="Yellow" />
    <GradientStop Offset="0.42" Color="Green" />
    <GradientStop Offset="0.56" Color="Blue" />
    <GradientStop Offset="0.70" Color="Indigo" />
    <GradientStop Offset="0.84" Color="Violet" />
    <GradientStop Offset="1.00" Color="Red" />
</LinearGradientBrush>
前几年的题目整理
19年
“点击该按钮弹出一个窗体(或使用页)” => 要用到窗口关联的知识
画图用Canvas比较好。 具体画图见上面文档。
考到了LINQ、文件操作。
XML树比较新颖。
18年
一个很重要的问题。 我设置了set; get访问器之后,如何初始化才能使用这个访问器呢?
答案是:
private String id;
public String ID
{
    get => id;
    set
    {
        if (!ulong.TryParse(value, out ulong tmp) || value.ToString().Length != 12)	//这里id还没赋值,不可以用length, 都要用value
        {
 throw new Exception("学号不合理!请检查");
        }
        else
        {
 MessageBox.ShowInformation(this.id);
 id = value;
        }
    }
}
public Registration(String s)
{
    string[] tmp = s.Split(',');
    this.ID = tmp[0];			//!!!!!!!!!
    this.Name = tmp[1];
    this.College = tmp[2];
    this.Gender = tmp[3];
    this.games[0] = tmp[4];
    this.games[1] = tmp[5];
    this.games[2] = tmp[6];
}
注意到是设置ID !!! 而不是id !! 如果设置id的话,不会出现任何问题,因为构造函数一定可以访问本类的对象,根本就不会经过ID这个过程。
调用的时候这样:
try
{
	var v = new Registration($"{id_str},{name_str},{collage_str},{gender_str},无,无,无");
	MessageBox.ShowInformation("成功!");
}
catch
{
	MessageBox.ShowError("出错了!学生信息不合理!添加失败!");
}
2021考试究极模板
注意文本文所应该放的位置!【右键->新建->文本文档】
string path = "../../.txt";
学生类 【保存自2018年试题】
	class Student       //学生类,封装了学号、姓名、性别、专业、成绩、年龄。
    {
        private String id;      //学号
        public String ID
        {
 get => id;
 set     //学号不是纯数字或者学号长度不是9位,抛出异常
 {
     if (!ulong.TryParse(value, out ulong tmp) || value.ToString().Length != 9)
     {
         throw new Exception("学号不合理!请检查");
     }
     else
     {
         id = value;
     }
 }
        }
        public string Name { get; set; } = "";      //姓名
        private string gender;          //性别
        public string Gender        //性别的取值范围只能是“男”或者“女”
        {
 get => gender;
 set
 {
     if (value == "女") this.gender = "女";
     else this.gender = "男";
 }
        }
        public string College { get; set; } = "";      //专业
        private int grade;      //成绩
        public int Grade
        {
 get => grade;
 set
 {
     if (value > 100 || value < 0)        //这里在输入的时候还需要进行是不是数字的检测
     {
         throw new Exception("成绩需要在0-100之间!请检查");
     }
     else grade = value;
 }
        }
        private int age;     //年龄
        public int Age
        {
 get => age;
 set
 {
     if (value > 100 || value < 0)        //这里在输入的时候还需要进行是不是数字的检测
     {
         throw new Exception("年龄需要在0-100之间!请检查");
     }
     else age = value;
 }
        }
        public Student()        //默认构造方法
        {

        }
        public Student(string id, string name, string gender, string college, int grade, int age)
        {            //全参数构造方法
 this.ID = id;
 this.Name = name;
 this.Gender = gender;
 this.College = college;
 this.Grade = grade;
 this.Age = age;
        }
        public Student(string info)         //给一个字符串信息的构造函数
        {
 string[] tmp = info.Split(',');
 this.ID = tmp[0];
 this.Name = tmp[1];
 this.Gender = tmp[2];
 this.College = tmp[3];
 if(!int.TryParse(tmp[4], out int tmp_grade))
     throw new Exception("成绩需为0-100间整数!请检查");
 this.Grade = tmp_grade;
 if (!int.TryParse(tmp[5], out int tmp_age))
     throw new Exception("年龄需为0-100间整数!请检查");
 this.Age = tmp_age;
        }
        public override string ToString()       //重载tostring, 转化为字符串
        {
 return $"{id},{Name},{gender},{College},{grade},{age}";
        }
        public List<Student> getStudent(String[] stu)       //将学生字符串数组转化为list
        {
 List<Student> list = new List<Student>();
 try
 {
     foreach (var s in stu)
     {
         var v = new Student(s);
         list.Add(v);
     }
     MessageBox.ShowInformation("转换成功!");
     return list;
 }
 catch
 {
     MessageBox.ShowError("出错了!学生信息不合理!",
         "返回一个空列表");
     return null;        //返回一个Null, 需要接受端判断返回是不是Null
 }
        }
        public override bool Equals(object obj)     //学号相同则相同,重载实现
        {
 return ((Student)obj).id == this.id;
        }
        public bool equalse(Student s)   //自己写的比较函数
        {
 return s.id == this.id;
        }
    }
追加保存文件【出自2018年试题】
 savebtn.Click += delegate
 {
     String res = resbox.Text;
     if (res == "") MessageBox.ShowError("尚未有信息在列!");
     else
     {
         File.AppendAllText(path, res, Encoding.UTF8);
         MessageBox.ShowInformation("保存成功!", res);
     }
     SetClearState();			//保存后将“清零”按钮状态设置
 };
弹窗/画图/渐变色【出自2019年试题】
弹窗
draw.Click += delegate
{
    var v = new Draw();
    v.Owner = this;
    v.WindowStartupLocation = WindowStartupLocation.CenterOwner;
    v.ShowDialog();
};
画图(xaml)
<Canvas x:Name="canvas">
        <Rectangle x:Name="rect" Height="61" Canvas.Left="38" Canvas.Top="30" Fill="#FF8A8AF9" Stroke="Black" Width="108"/>
        <Ellipse x:Name="elli" StrokeDashArray ="1, 1" Fill="#FF15F0F4" Stroke="Red" Width="115" StrokeThickness="4" Height="66" RenderTransformOrigin="2.096,1.354" Canvas.Left="193" Canvas.Top="70" />
    </Canvas>
鼠标进入颜色变化/鼠标点击显示坐标
	public partial class Draw : Window
    {
        SolidColorBrush rect_fill, rect_stroke, elli_fill, elli_stroke;
        SolidColorBrush sd = new SolidColorBrush();
        Point p;
        public Draw()
        {
            InitializeComponent();
            rect.MouseEnter += delegate
            {
                rect_fill = (SolidColorBrush)rect.Fill;
                rect_stroke = (SolidColorBrush)rect.Stroke;
                rect.Stroke = new SolidColorBrush(Colors.Red);
                rect.Fill = new SolidColorBrush(Colors.Green);
                Mouse.OverrideCursor = Cursors.Hand;
            };
            elli.MouseEnter += delegate
            {
                elli_fill = (SolidColorBrush)elli.Fill;
                elli_stroke = (SolidColorBrush)elli.Stroke;
                elli.Stroke = new SolidColorBrush(Colors.Blue);
                elli.Fill = new SolidColorBrush(Colors.Aquamarine);
                Mouse.OverrideCursor = Cursors.Hand;
            };
            rect.MouseLeave += delegate
            {
                rect.Stroke = rect_stroke;
                rect.Fill = rect_fill;
                Mouse.OverrideCursor = Cursors.Arrow;
            };
            elli.MouseLeave += delegate
            {
                elli.Stroke = elli_stroke;
                elli.Fill = elli_fill;
                Mouse.OverrideCursor = Cursors.Arrow;
            };
            rect.MouseDown += delegate
            {
                p = Mouse.GetPosition(rect);
                MessageBox.ShowInformation($"X: {p.X}, Y: {p.Y}");
            };
            elli.MouseDown += delegate
            {
                p = Mouse.GetPosition(elli);
                MessageBox.ShowInformation($"X: {p.X}, Y: {p.Y}");
            };
        }
    }
对于结果显示方式的选择【选自2017/2018年试题】
都写过之后,个人推荐第二种方式,美观。
可以用listbox,也可以用只读的textbox
2018版: 使用只读的textbox【比较简单】
<local:TipTextbox x:Name="resbox" TipText="这里显示学生信息yo "
                              Height="250" Width="280" IsReadOnly="true"
                              FontSize="15px" Margin="0,20,0,0" AcceptsReturn="True" 					 								  VerticalScrollBarVisi  bility="Visible"
                              TextWrapping="Wrap"/
2017版: 使用Listbox
listbox中的元素都是string。
Tips
其实不需要像一下代码中一样,使用toString()来添加。调用Items.Add方法时,完全可以传一个类(如student),会自动调用这个类的ToString()方法,将该类的实例转化为字符串加入listbox.
<local:MyListBox x:Name="Display" Width="300" Height="200" HorizontalAlignment="Center" VerticalAlignment="Center" Margin="0,10" Background="Snow"/>
			addbtn.Click += delegate
            {
                idstr = idbox.Text;
                namestr = namebox.Text;
                gradestr = gradebox.Text;
                coursestr = combo.SelectedItem.ToString();
                if (idstr == "" || namestr == "" || gradestr == "") MessageBox.ShowError("学生信息不全, 添加失败!");
                else
                {
                    if (!Double.TryParse(gradestr, out double gradedb))
                        MessageBox.ShowError("成绩需为0-100的数字!");
                    else
                    {
                        if(gradedb > 100 || gradedb < 0)
                            MessageBox.ShowError("成绩需为0-100的数字!");
                        else
                        {
                            Student s = new Student(idstr, namestr, coursestr, gradedb);
                            Display.Items.Add(s.ToString());
                            list.Add(s);
                        }
                    }
                }
            };
            savebtn.Click += delegate
            {
                if (Display.Items.Count == 0)
                    MessageBox.ShowError("尚未有信息在列!");
                else
                {
                    foreach(var v in Display.Items)
                    {
                        File.AppendAllText(path, $"{v}\n", Encoding.UTF8);
                    }
                    MessageBox.ShowInformation("保存成功!");
                }
            };
            loadbtn.Click += delegate
            {
                Display.Items.Clear();
                String[] tmp = File.ReadAllLines(path, Encoding.UTF8);
                foreach (string s in tmp)
                    Display.Items.Add(s);
                MessageBox.ShowInformation("读取成功!");
            };
退出应用程序提示【出自2017年试题】
点击按钮退出
quitbtn.Click += delegate
{
    var r = MessageBox.ShowQuestion("退出应用程序吗?", "提示");
    if (r == MessageBoxResult.Yes)
    	Application.Current.Shutdown();
};
点击X退出
方法: f4打开Window的属性,点击那个闪电符号(设置事件), 将Closing改成Closing_Comfirm
		private void Closing_Comfirm(object sender, System.ComponentModel.CancelEventArgs e)
        {
            var r = MessageBox.ShowQuestion("退出应用程序吗?", "提示");
            if (r == MessageBoxResult.No)
                e.Cancel = true;
        }
性别单选按钮
<WrapPanel Margin="0,10,0,0" x:Name="gender_panel">
     <Label Content="性别: " Margin="10,0,0,0"/>
     <RadioButton Content="男" IsChecked="True" VerticalAlignment="Center" Margin="20,0,0,0"/>
     <RadioButton Content="女" VerticalAlignment="Center" Margin="20,0,0,0"/>
</WrapPanel>
标签 + 文本框【例如学号】
<WrapPanel Margin="0,0,0,5">
	<Label Content="学号: " Margin="10,0"/>
	<local:TipTextbox x:Name="IDbox" TipText="请输入学号(12位)" HorizontalAlignment="Center" 	  			         VerticalAlignment="Center" Width="100"/>
</WrapPanel>
显示结果的ListBox合适的大小【放在界面的右侧】
<local:MyListBox x:Name="Display" Width="280" Height="250" HorizontalAlignment="Center" VerticalAlignment="Center" Margin="0,20,0,0" Background="LightYellow"/>
ComBox组合【只需要修改里面的字符串即可】
<WrapPanel>
    <Label Content="学院: " Margin="10,0,0,0"/>
    <ComboBox x:Name="combo" SelectedIndex="0" HorizontalAlignment="Center" VerticalAlignment="Center" Margin="20,0,0,0" Width="90">
    	<System:String>机信学院</System:String>
    	<System:String>东北亚学院</System:String>
    	<System:String>商学院</System:String>
    	<System:String>法学院</System:String>
    </ComboBox>
</WrapPanel>
Frame切换界面
Uri uri = new Uri(r.Tag.ToString(), UriKind.Relative);
frame.Source = uri;
文件操作集合【出自2016年题】
xaml:
<StackPanel>
        <local:TipTextbox x:Name="textbox" TextWrapping="Wrap" AcceptsReturn="True"
                 VerticalScrollBarVisibility="Visible" TipText="在这里输入要保存入文件的内容yo"
                 FontSize="20px" Height="230"/>
        <WrapPanel>
            <Button Content="覆盖写入" x:Name="writefile" Style="{StaticResource ResourceKey = MyWpfButton}" Margin="40,10,50,0" Height="25" Width="60" />
            <Button Content="追加写入" x:Name="appendfile" Style="{StaticResource ResourceKey = MyWpfButton}" Height="25" Margin="0,10,0,0" Width="60" />
            <Button Content="读取文件" x:Name="readfile" Style="{StaticResource ResourceKey = MyWpfButton}" Margin="50,10,0,0" Height="25" Width="60" />
        </WrapPanel>
</StackPanel>
C#:
	public partial class FileOp : Page
    {
        string FileContent;
        string path = "../../MyFile/TextFile1.txt";
        public FileOp()
        {
            InitializeComponent();
            writefile.Click += delegate
            {
                FileContent = textbox.Text;
                if (FileContent == "") MessageBox.ShowError("尚未输入内容!", "保存失败");
                else
                {
                    File.WriteAllText(path, $"{FileContent}\n", Encoding.UTF8);
                    MessageBox.ShowInformation("覆盖写入文件成功!",$"写入内容:{FileContent}");
                    textbox.Text = "";
                }
            };
            appendfile.Click += delegate
            {
                FileContent = textbox.Text;
                if (FileContent == "") MessageBox.ShowError("尚未输入内容!", "保存失败");
                else
                {
                    File.AppendAllText(path, $"{FileContent}\n", Encoding.UTF8);
                    MessageBox.ShowInformation("追加写入文件成功!", $"写入内容:{FileContent}");
                    textbox.Text = "";
                }
            };
            readfile.Click += delegate
            {
                FileContent = File.ReadAllText(path, Encoding.UTF8);
                if (FileContent == "") MessageBox.ShowWarning("文件中什么也没有呢!");
                else
                {
                    MessageBox.ShowInformation("读取文件成功!");
                    textbox.Text = FileContent;
                }
            };
        }
    }
作业里的随机数产生器+定时器
xaml
	<Grid Width="560" Height="280" Background="Beige" Margin="20">
        <Grid.RowDefinitions>
            <RowDefinition Height="5*"/>
            <RowDefinition Height="Auto"/>
            <RowDefinition Height="3*"/>
        </Grid.RowDefinitions>
        <GroupBox Name="groupBox1" Header="参数" BorderBrush="Blue" BorderThickness="2">
            <Canvas>
                <Label Content="最小:" Canvas.Left="28" Canvas.Top="26"/>
                <TextBox Name="textBoxMin" Width="60" Text="0"
                         HorizontalContentAlignment="Center"
                         Canvas.Left="79" Canvas.Top="30"/>
                <Label Content="最大:" Canvas.Left="178" Canvas.Top="26"/>
                <TextBox Name="textBoxMax" Width="60" Text="100"
                         HorizontalContentAlignment="Center"
                         Canvas.Left="229" Canvas.Top="30"/>
                <Label Content="定时器间隔(秒):" Canvas.Left="28" Canvas.Top="77"/>
                <TextBox Name="textBoxInterval" Width="60" Text="100"
                         HorizontalContentAlignment="Center"
                         Canvas.Left="164" Canvas.Top="81"/>
                <RadioButton Name="r1" IsChecked="True" Content="随机生成整数"
                             Canvas.Left="390" Canvas.Top="36"/>
                <RadioButton Name="r2" Content="随机生成实数"
                             Canvas.Left="390" Canvas.Top="77"/>
            </Canvas>
        </GroupBox>
        <StackPanel Grid.Row="1" Margin="0 20" Orientation="Horizontal" HorizontalAlignment="Center">
            <Button Name="btnStart" Content="开始" Padding="20 0"/>
            <Button Name="btnStop" Content="停止" Margin="20 0" Padding="20 0"/>
        </StackPanel>
        <GroupBox Name="groupBox2" Grid.Row="2" Header="结果" BorderBrush="Blue" BorderThickness="2">
            <Label Name="labelResult" Content="产生的随机数" FontSize="20" Foreground="Red"
                   VerticalContentAlignment="Center" HorizontalContentAlignment="Center"/>
        </GroupBox>
    </Grid>
C#
	public partial class PageA0403 : Page
    {
        public PageA0403()
        {
            InitializeComponent();
            labelResult.Content = "";
            oldFontSize = labelResult.FontSize;
            newFontSize = oldFontSize * 2;
            timer1.Tick += delegate
            {
                if (isIntRandom)
                {
                    int r = RandomHelp.GetIntRandomNumber(min, max);
                    labelResult.Content = r.ToString();
                }
                else
                {
                    double r = RandomHelp.GetDoubleRandomNumber(min, max);
                    labelResult.Content = r.ToString();
                }
            };
            btnStart.Click += delegate
            {
                InitParameters();
                SetState(true);
                timer1.Start();
            };
            btnStop.Click += delegate
            {
                timer1.Stop();
                SetState(false);
            };
            InitParameters();
            SetState(false);
        }

        private DispatcherTimer timer1 = new DispatcherTimer();
        private int min, max;
        private double oldFontSize;
        private double newFontSize;
        private bool isIntRandom = true;

        private void InitParameters()
        {
            if (int.TryParse(textBoxInterval.Text, out int inteval) == false)
            {
                textBoxInterval.Text = "100";
                timer1.Interval = TimeSpan.FromMilliseconds(100);
            }
            else
            {
                timer1.Interval = TimeSpan.FromMilliseconds(inteval);
            }
            if (int.TryParse(textBoxMin.Text, out min) == false)
            {
                textBoxMin.Text = "0";
                min = 0;
            }
            if (int.TryParse(textBoxMax.Text, out max) == false)
            {
                textBoxMax.Text = "100";
                max = 100;
            }
            if (r1.IsChecked == true)
            {
                isIntRandom = true;
            }
            else
            {
                isIntRandom = false;
            }
        }

        private void SetState(bool isStarted)
        {
            btnStop.IsEnabled = isStarted;
            groupBox1.IsEnabled = !isStarted;
            btnStart.IsEnabled = !isStarted;
            if (isStarted)
            {
                labelResult.FontSize = oldFontSize;
            }
            else
            {
                labelResult.FontSize = newFontSize;
            }
        }
    }

    class RandomHelp
    {
        private static Random r = new Random();
        /// <summary>
        /// 获取指定范围的随机整数
        /// </summary>
        /// <param name="min">最小值</param>
        /// <param name="max">最大值</param>
        /// <returns>随机产生的整数</returns>
        public static int GetIntRandomNumber(int min, int max)
        {
            return r.Next(min, max + 1);
        }

        /// <summary>
        /// 获取指定范围的随机浮点数
        /// </summary>
        /// <param name="min">最小值</param>
        /// <param name="max">最大值</param>
        /// <returns>随机产生
        /// 的浮点数</returns>
        public static double GetDoubleRandomNumber(int min, int max)
        {
            double d = max * r.NextDouble();
            if (d < min)
            {
                d += min;
            }
            return Math.Min(d, max);
        }
    }
版权声明
本文为[琦子k]所创,转载请带上原文链接,感谢
https://blog.csdn.net/QIzikk/article/details/118095780
边栏推荐
- 基于Ansible实现Apache Doris快速部署运维指南
- 淘宝小程序体验优化:数据分析和优化实践
- Map Object WeakMap
- 输入四个整数按照从小到大的顺序排列
- Eight sorts (Part 1)
- knn预测最小案例总结
- Actual combat analysis of PC wechat robot personal number interface API wechat agrees with friend call
- Oozie常用命令
- 2022化工自动化控制仪表考试练习题及模拟考试
- Compile pyx file into PYD file (many pits have been solved)
猜你喜欢

Flink's API introduction case

互动多媒体应用所表现的特点

User authentication center of micro service
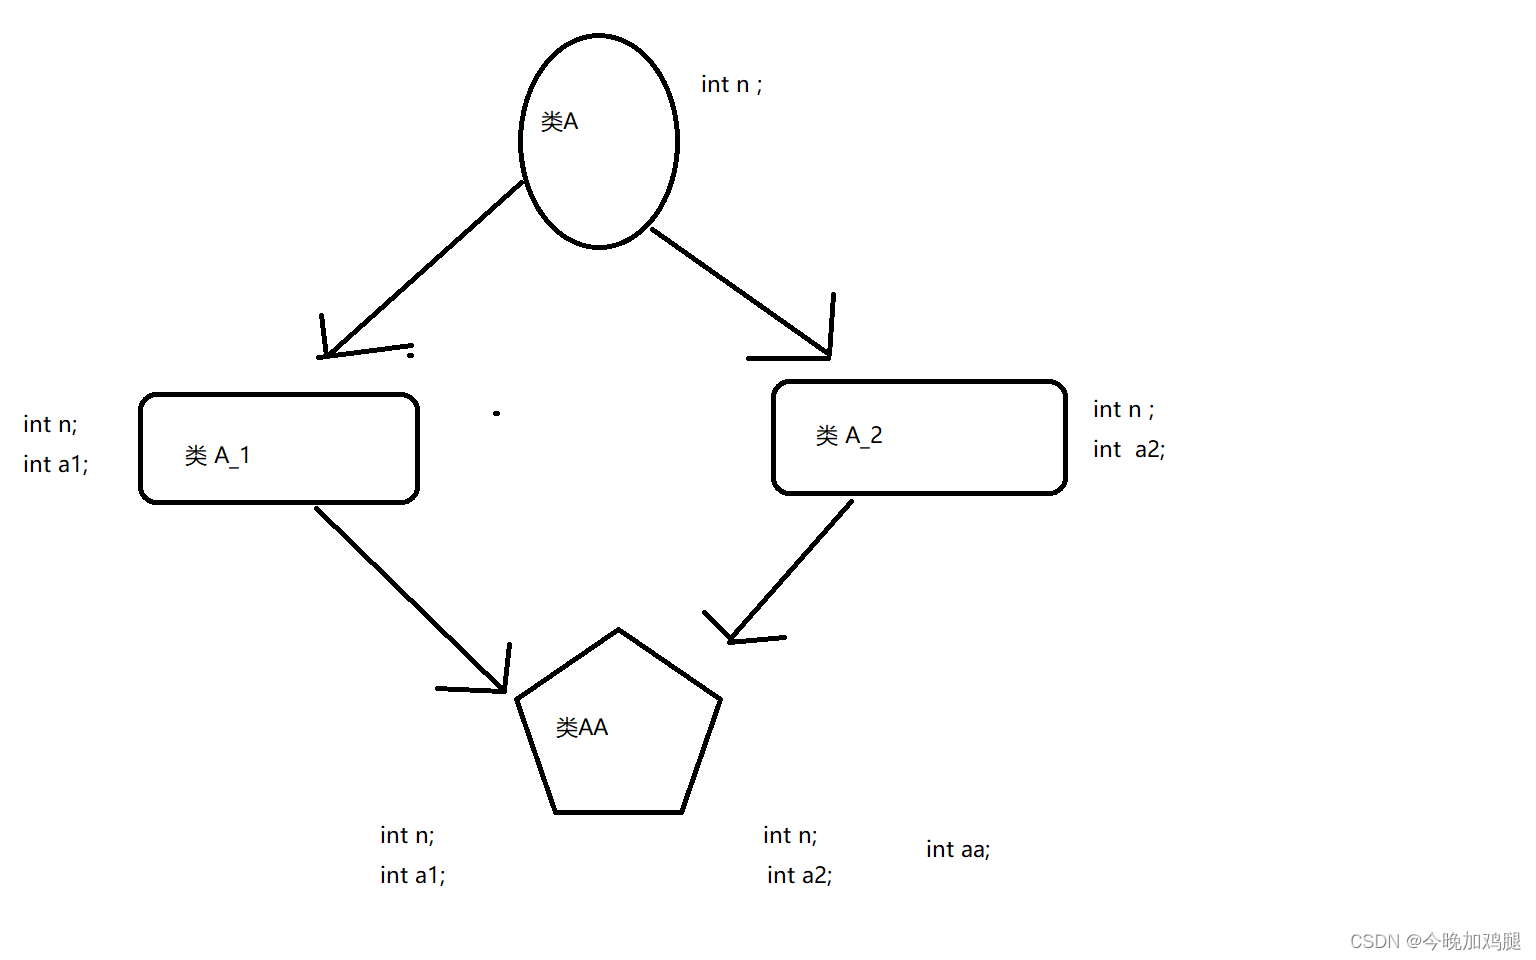
What is paternity and diamond inheritance

机器学习笔记 - SVD奇异值分解(2)
苹果计划将儿童信息通信安全功能扩展到英国和加拿大
knn之交叉验证,网格搜索

Don't be greedy for cheap. The free MES system is not necessarily good

渗透实战-无回显Rce-thinkphp5-Getshell

Ghost blank node properties
随机推荐
What is paternity and diamond inheritance
Overview of VoIP technology development and its relationship with outbound call system
[Nodejs]Nodejs基础学习(二)-模块机制
2022年上海市安全员C证考试模拟100题及模拟考试
加入log4j日志功能
电网企标B接口接入记录(二):资源上报
【Appium】使用模拟器实现有道云App的业务功能-新增、搜索、修改、删除
苹果计划将儿童信息通信安全功能扩展到英国和加拿大
Map Object WeakMap
Flink's API introduction case
受控组件与非受控组件
2022年流动式起重机司机考试练习题模拟考试平台操作
Enter four integers in descending order
PC微信機器人個人號接口api之實戰分析微信同意好友call
signalr 控制台做服务端
Be sure to watch the nine steps of MES selection, which is worth collecting and watching repeatedly (Part 2)
Machine learning notes - SVD singular value decomposition (2)
You can remove cached packages by executing ‘yum clean packages‘. Error: GPG check FAILED
JVM——》CMS
电网企标B接口接入记录(一):注册