当前位置:网站首页>Model location setting in GIS data processing -cesium
Model location setting in GIS data processing -cesium
2022-04-23 14:35:00 【Sun batian】
GIS Data processing -cesium Model location settings in
Introduce
Recently, I have received many private letters asking me , stay cesium Load in 3dtiles How to adjust the position of the model after the model , Here I'll give you a unified introduction , How do I handle it for your reference .
Common model classification :
- Tilt the camera model : Due to the geographical location of the model belt , There is basically no need to adjust the model position .
- Artificial model : The model has no coordinate information , At this time, we need to adjust the position of the model .
There are also some cloud and other data , I won't introduce it here .
I recommend two methods here , One is to use cesiumlab To operate ( Visual operation ), The other is to use code to operate
Code principle
cesium Load in 3dtiles The model code is as follows :
viewer.scene.primitives.add(new Cesium.Cesium3DTileset({

        url: 'http://localhost:8080/data/testModel/tileset.json',
        modelMatrix: Cesium.Matrix4.fromArray(
            [0.9972458032561666, 0.04372029028528979, 0.05991113506964879, 0,
              -0.03623787897545647, 0.9920229449104262, -0.12073646051879428, 0,
              -0.06471185374661931, 0.11823287609043515, 0.9908750491338749, 0,
              -663.0794944260269, 1211.490494620055, 2974.1003134818748, 1]),
      }));
new Cesium.Cesium3DTileset(options)
It is used for streaming massive heterogeneous data 3D Geospatial dataset
options Options
| name | type | Default | describe |
|---|---|---|---|
| url | Network resources , character string | Tile set JSON Of documents url | |
| modelMatrix | matrix 4(Matrix4) | Matrix4.IDENTITY | Convert the root tile of the tile set 4x4 Transformation matrix |
Here we will talk about the use of matrix in detail ,cesium All coordinates in the will eventually be converted to Space Cartesian coordinates That is what we often call the three-dimensional space coordinate system . Coordinate system transformation of the model in Cartesian coordinate system , Here's the matrix conversion .
tileset.modelMatrix, Using this property, you can perform coordinate transformation based on the data
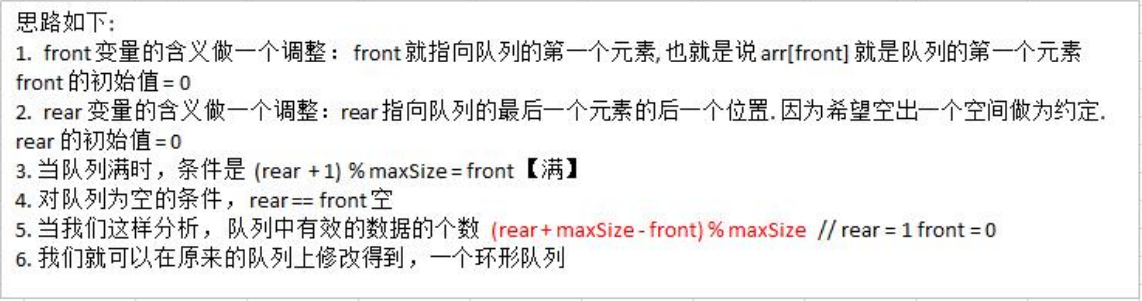
Translation thinking
- Get the package range of the current tile dataset (boundingSphere) center ( At this time, the reference system is the three-dimensional Cartesian coordinate system )
- Calculate when the reference system is local coordinates ( The origin of the local coordinate system is the center of the surrounding range of the model ) when , This position is the local coordinate system of the origin , Transformation matrix to world coordinates (eastNorthUpToFixedFrame)
- Use the transformation matrix in the previous step , Multiply left by a local translation vector , Get the translation target position of this translation vector in the world coordinate system ( matrix × vector , The result is a vector )
- Vector subtraction : In the world coordinate system , The target vector pointing to the translation target point - Vector pointing to the center of the dataset , Get the translation vector in the world coordinate system .
- Convert the translation vector in the world coordinate system into a translation matrix , give
tileset.modelMatrix
Code implementation
tileset
  .readyPromise
  .then(tileset => {

    // Cartesian3  The center point of the tile in the three-dimensional Cartesian coordinate system
    const tileset_center = tileset.boundingSphere.center;
    // Matrix4( Fourth order matrix ) Transformation matrix from local reference system to world reference system
    const frompoint_to_world_matrix = Cesium.Transforms.eastNorthUpToFixedFrame(tileset_center);
    //  Take the center of the model as the origin , True north is y, Due east is x, The center of the earth is upward z Translate... Separately  310、-140、10 rice
    const local_translation = new Cesium.Cartesian3(310, -140, 10);
    const result = new Cesium.Cartesian3(0,0,0);
    //  The transformation matrix is left multiplied by the local translation vector , The results are stored in  result  in , The result is the translation end vector in world coordinates
    Cesium.Matrix4.multiplyByPoint(frompoint_to_world_matrix, local_translation, result);
    const targetpoint_to_world_matrix = Cesium.Transforms.eastNorthUpToFixedFrame(result);
    //  In the world coordinate system , The target vector pointing to the translation target point  -  Vector pointing to the center of the dataset , Get the translation vector in the world coordinate system
    const world_translation = new Cesium.Cartesian3(
      targetpoint_to_world_matrix[12] - frompoint_to_world_matrix[12],
      targetpoint_to_world_matrix[13] - frompoint_to_world_matrix[13],
      targetpoint_to_world_matrix[14] - frompoint_to_world_matrix[14],
    );
    //  Construct a translation matrix and assign a value
    tileset.modelMatrix = Cesium.Matrix4.fromTranslation(world_translation);
    //  Move the camera angle to the model position
    viewer.zoomTo(tileset);
});
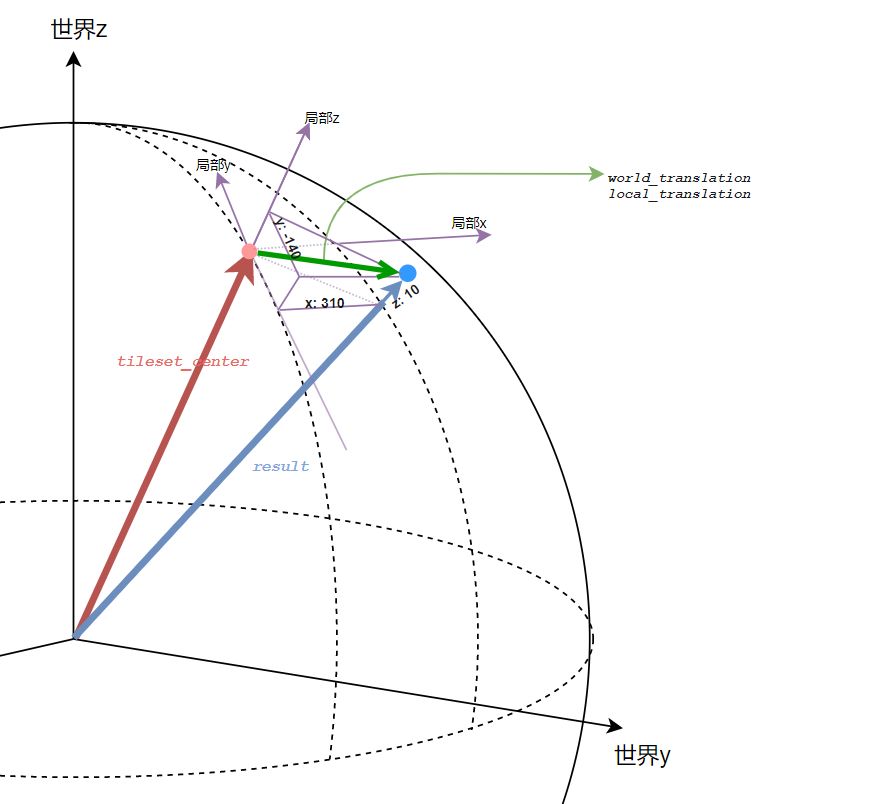
- Red dot :frompoint( The center point of the surrounding area of the model , It is also the origin of the local coordinate system )
- Blue dot :targetpoint(frompoint The local coordinates are offset from east to North and upward 310、-140、10 rice The target point obtained after )
- Red vector : The center point of the surrounding range of the model in the world coordinate system ( The origin of the local coordinate system 、 The starting point ) vector
- Blue vector : Target point vector in world coordinate system
- Green vector : Translation vector . If it's local coordinates , So that is (310, -140, 10), If it's in world coordinates , That's it Blue vector - Red vector
cesium The scene data is ultimately world coordinates , So what is required is the world coordinate expression of the green vector , Then construct the translation matrix .
Now it's the green vector with the red vector and the local coordinates , We need to find the blue vector first , To get the green vector in the world coordinate system .
Spin your mind
Local rotation , First move the model to the world coordinate center , After rotation , Then move to the original place , namely
tileset.modelMatrix

among ,

Is a translation matrix , Just use the center vector of the model to take a negative value

Then it moves from the world coordinate center to the origin of the model
Be careful , Here is the left multiply priority , Multiply from right to left .
Code implementation
tileset
  .readyPromise
  .then(tileset => {

    const tileset_center = tileset.boundingSphere.center; // Cartesian3  The center point of the tile in the three-dimensional Cartesian coordinate system
    // Matrix4( Fourth order matrix ) Transformation matrix from local reference system to world reference system
    const backto_matrix = Cesium.Matrix4.fromTranslation(tileset_center);
    //  The model vector takes a negative value
    const moveto_vec = Cesium.Cartesian3.multiplyByScalar(tileset_center, -1, new Cesium.Cartesian3());
    // Matrix moving to the origin of the world coordinate system
    const moveto_matrix = Cesium.Matrix4.fromTranslation(moveto_vec);

    /*  Around the x( The eastern axis ) turn 90 degree  */
    const cos_rotateX = Math.cos(Math.PI/2);
    const sin_rotateX = Math.sin(Math.PI/2);
    const arr = [1,0,0,0,  0, cos_rotateX, sin_rotateX,0,   0,-sin_rotateX,cos_rotateX,0, 0,0,0,1];
    // Rotation matrix
    const rotateX_matrix = Cesium.Matrix4.fromArray(arr);

    /*  Calculate the final matrix  */
    //  Get the matrix after rotating at the world origin
    const temp = Cesium.Matrix4.multiply(rotateX_matrix, moveto_matrix, new Cesium.Matrix4());
    //  Get the matrix that moves back to its original position after rotation
    const r = Cesium.Matrix4.multiply(backto_matrix, temp, new Cesium.Matrix4());

    tileset.modelMatrix = r; //  Construct a translation matrix and assign a value
    //  Move the camera angle to the model position
    viewer.zoomTo(tileset);
});
Zoom ideas
Scaling is similar to rotation , First move to the center of the world coordinate system , The zoom , Then move to the original place
tileset.modelMatrix

Code implementation
To be realized
Refer to the original text of the boss
Tool use
The above describes the implementation steps of the code , Now let's introduce how to use tools directly
cesiumlab
I have to recommend again , Chinese conscience tool cesiumlab, Download and install
step
Generate 3dtiles I have already written the tutorial of slicing , The default here is that everyone is ready
What I use here is a manual modeling model , No geographic coordinate information , It's convenient to show you
Load data
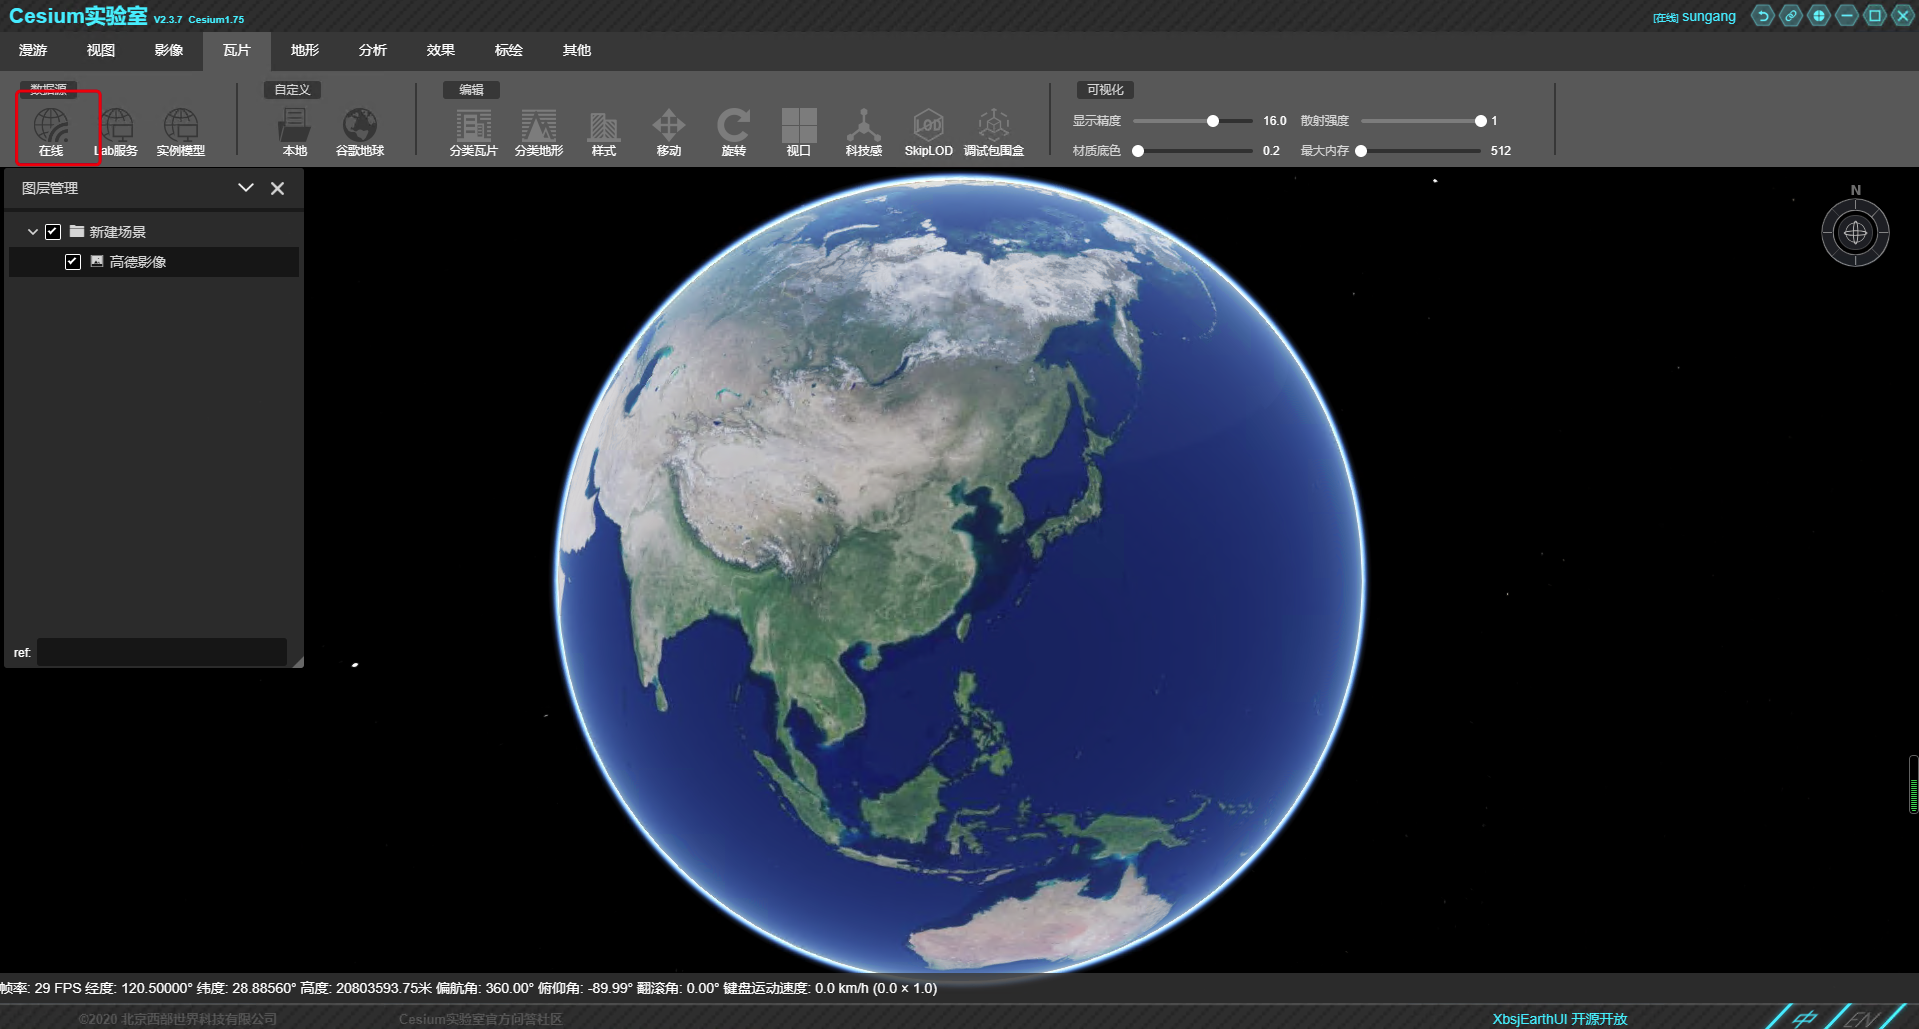
open cesiumlab, Select 3D visualization
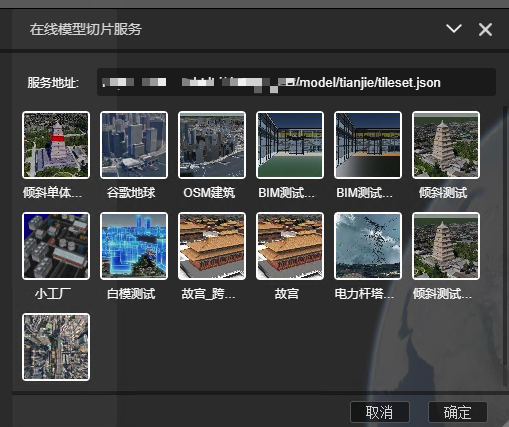
Choose tiles -》 On-line
Fill in your online 3dtiles Address
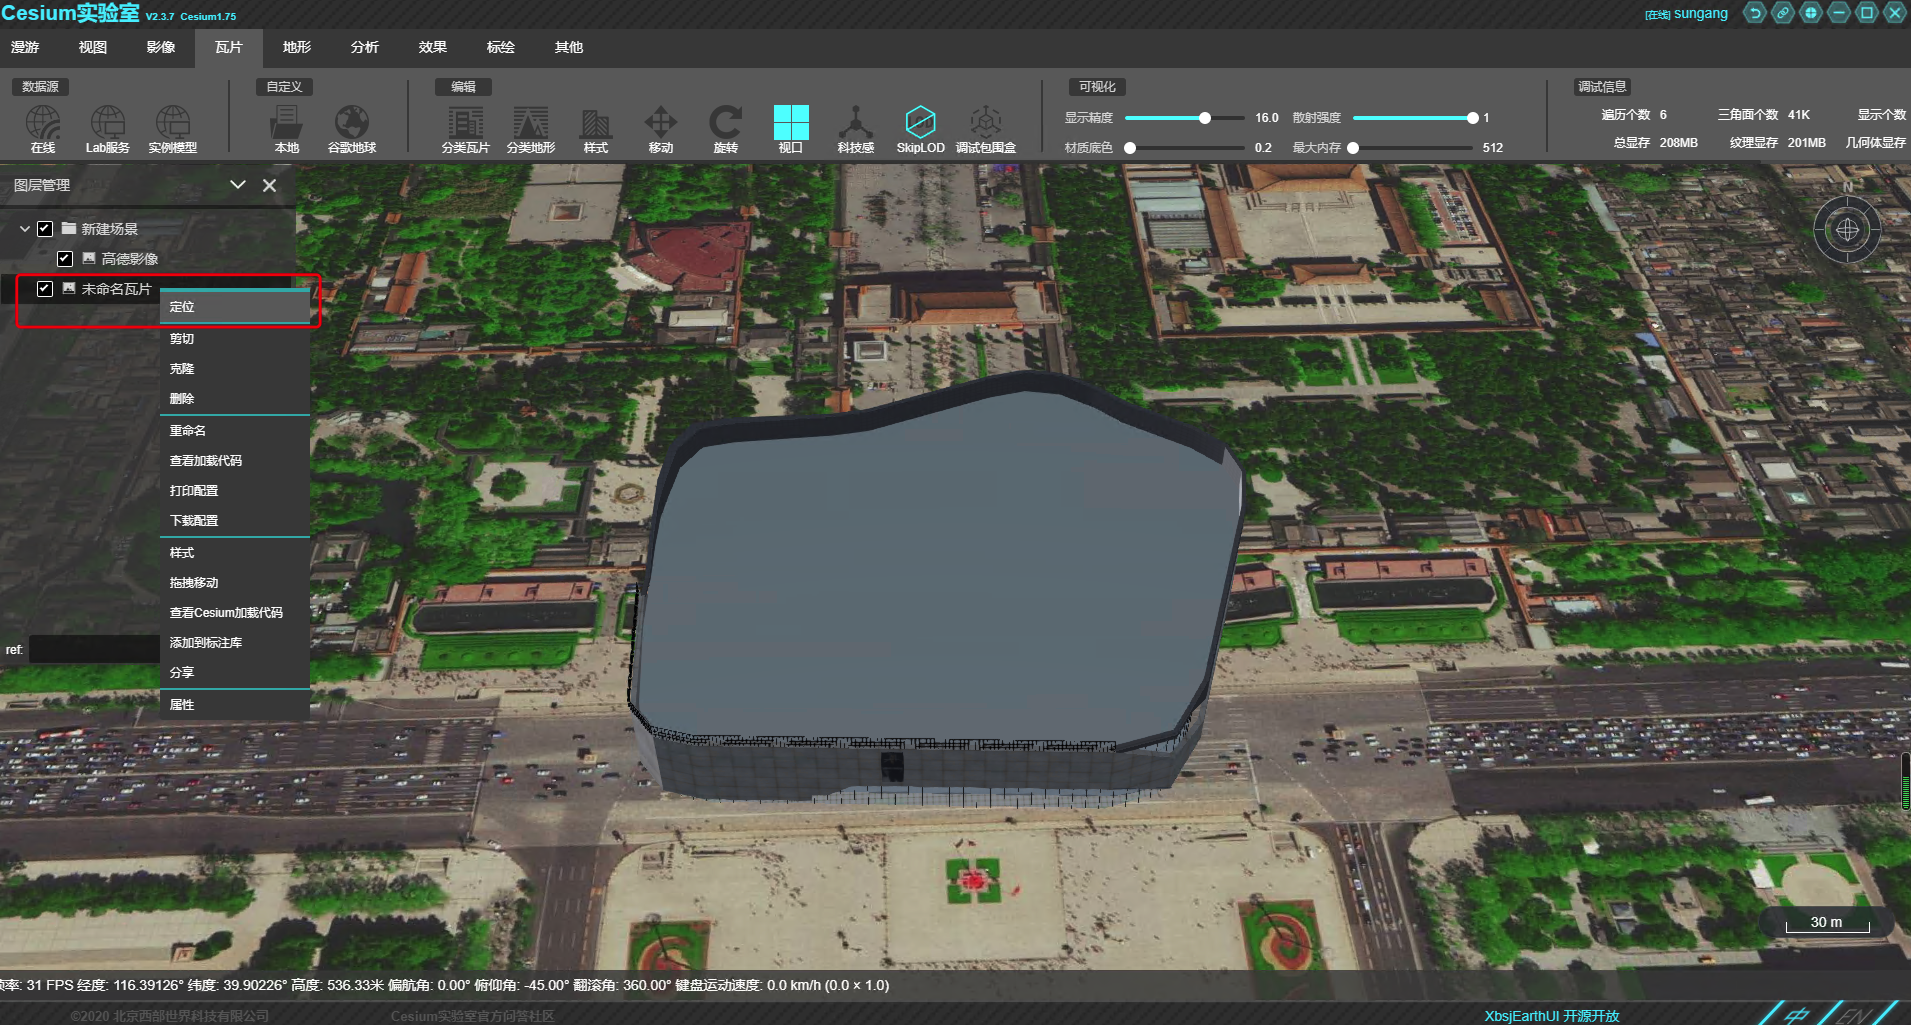
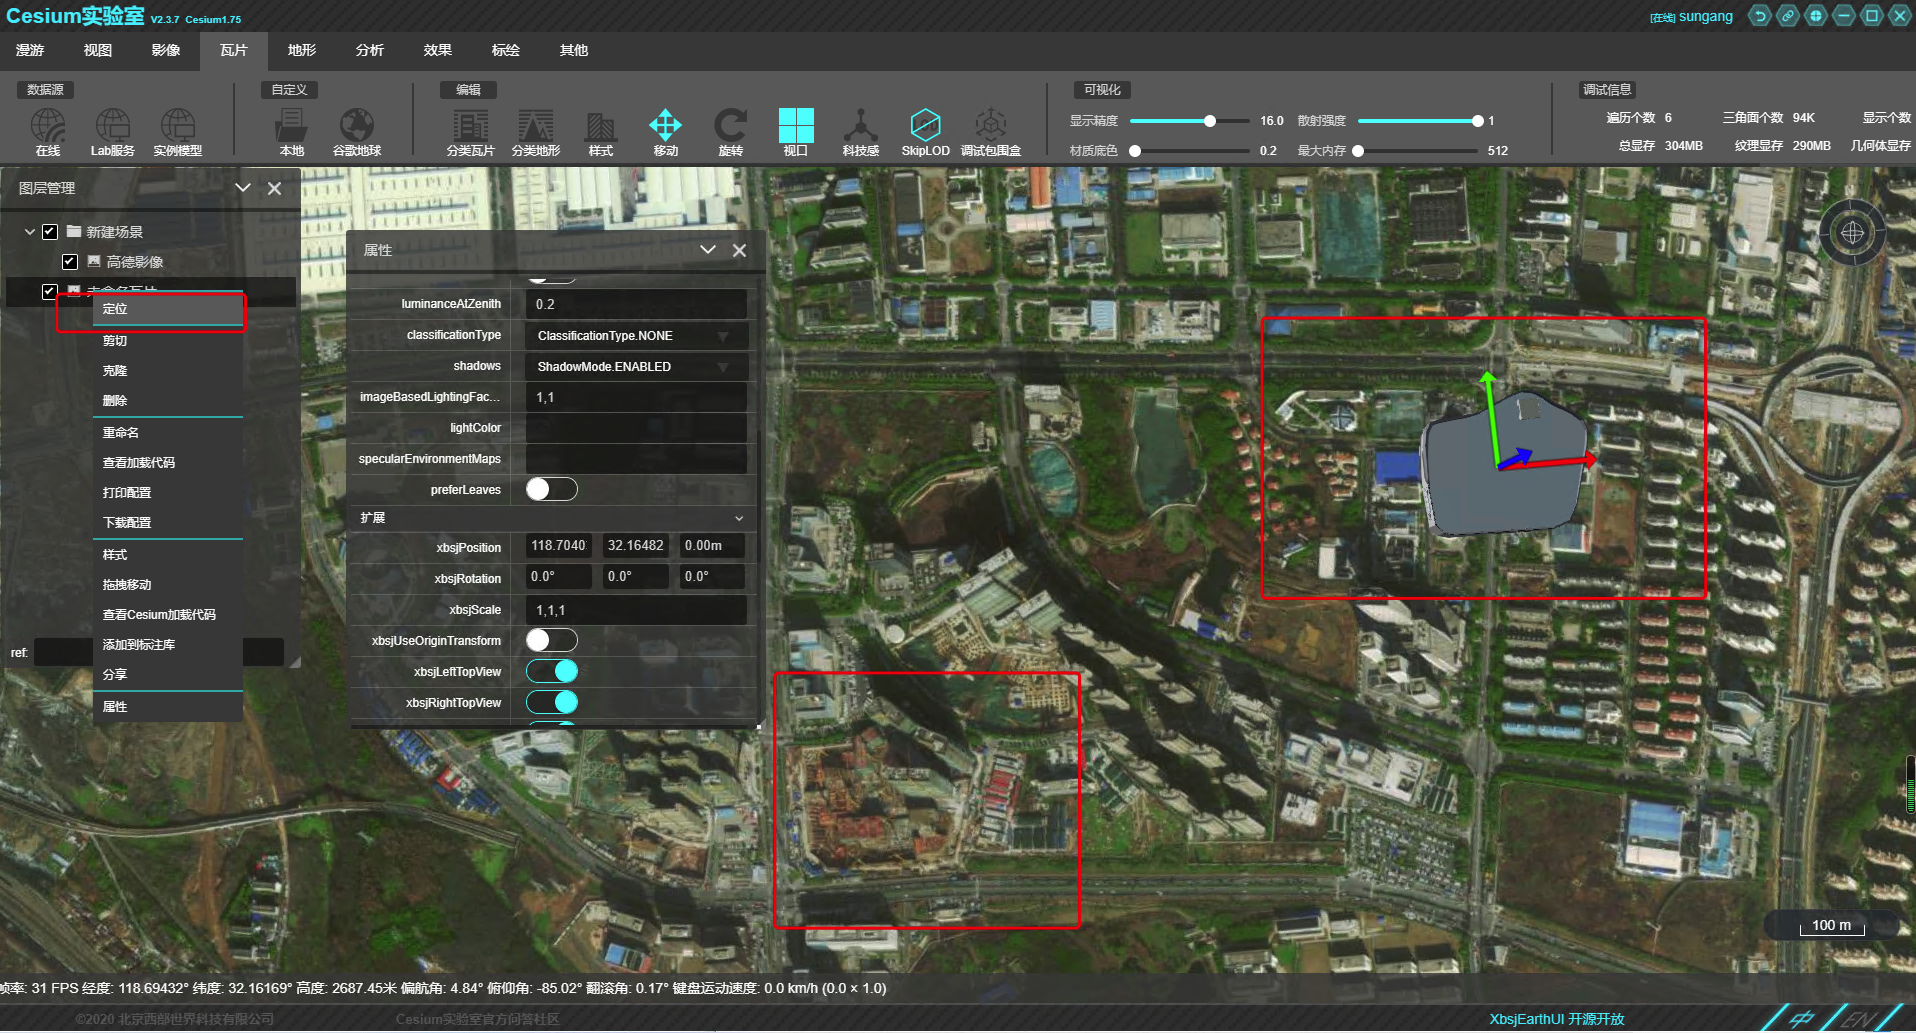
Right click on the layer , Select location , Because the artificial model has no coordinate information ,cesiumlab Will load the model to Tiananmen Square, Beijing
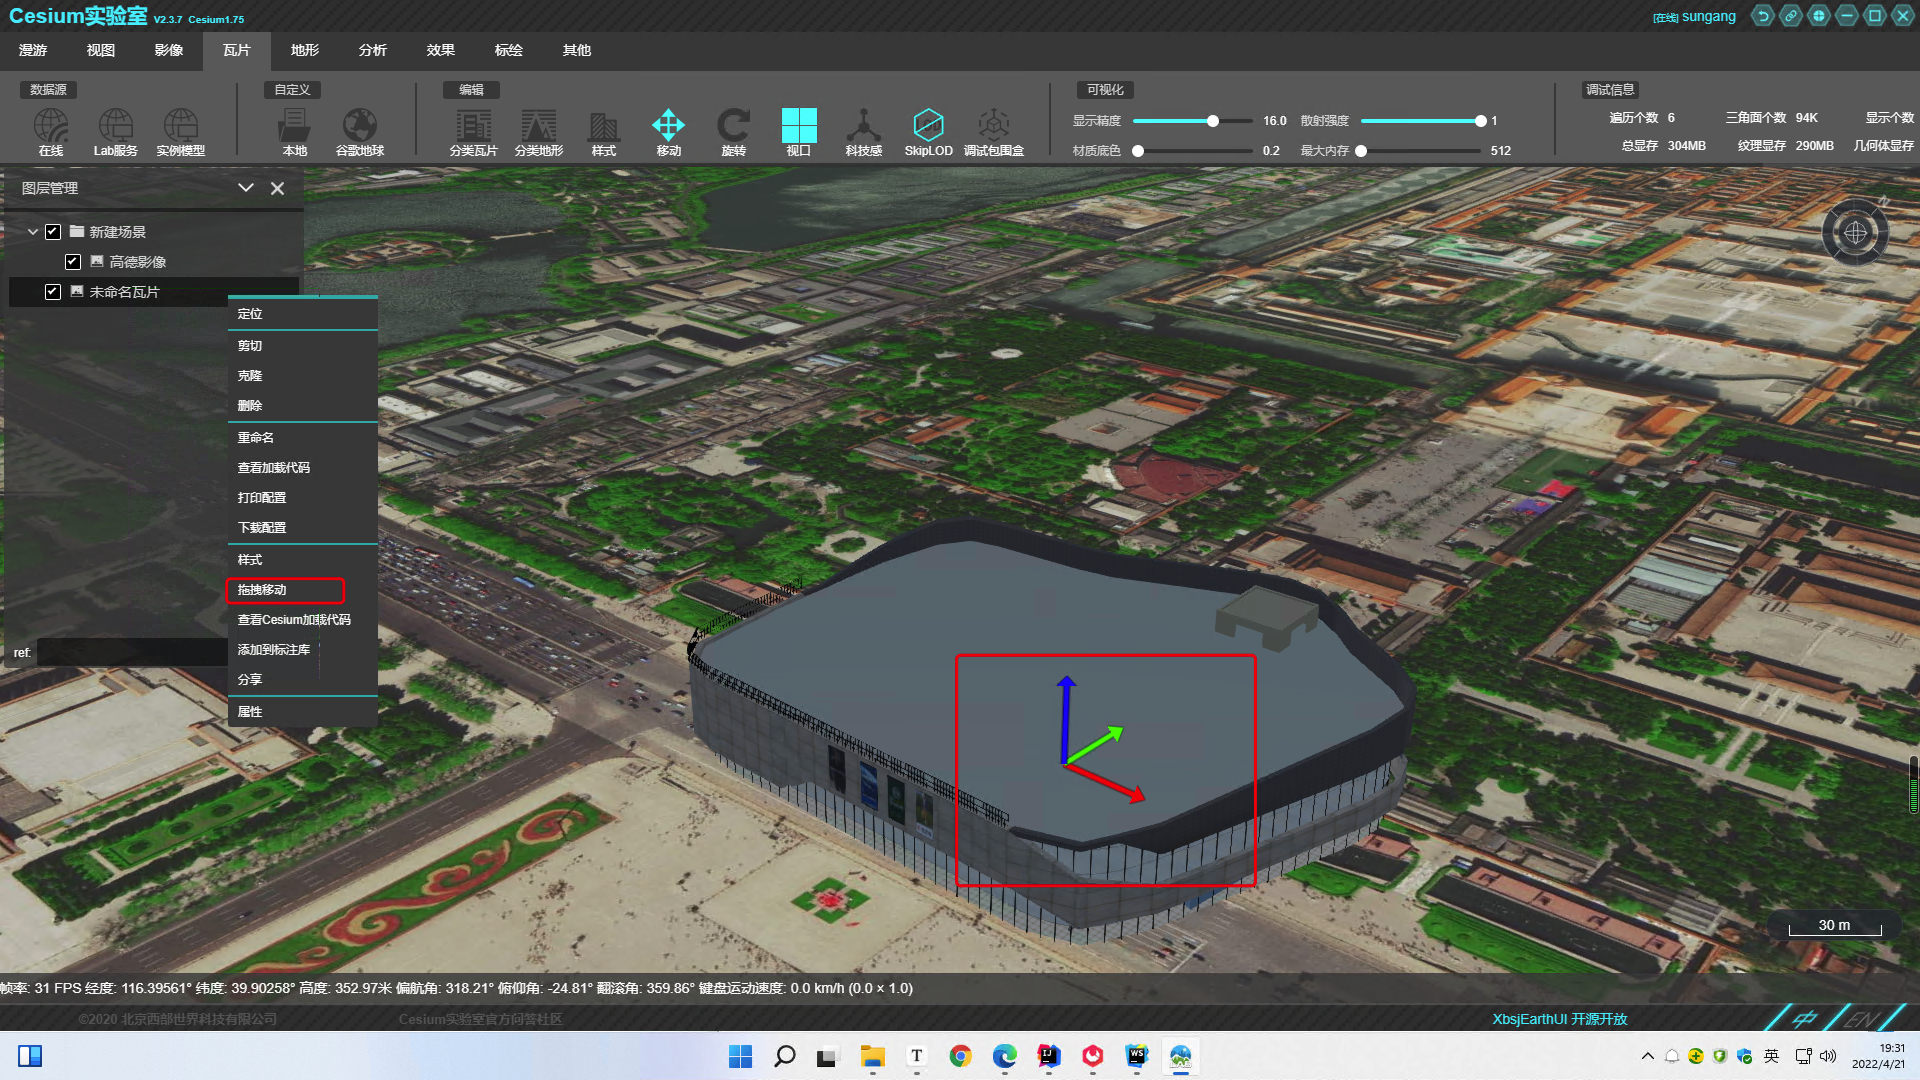
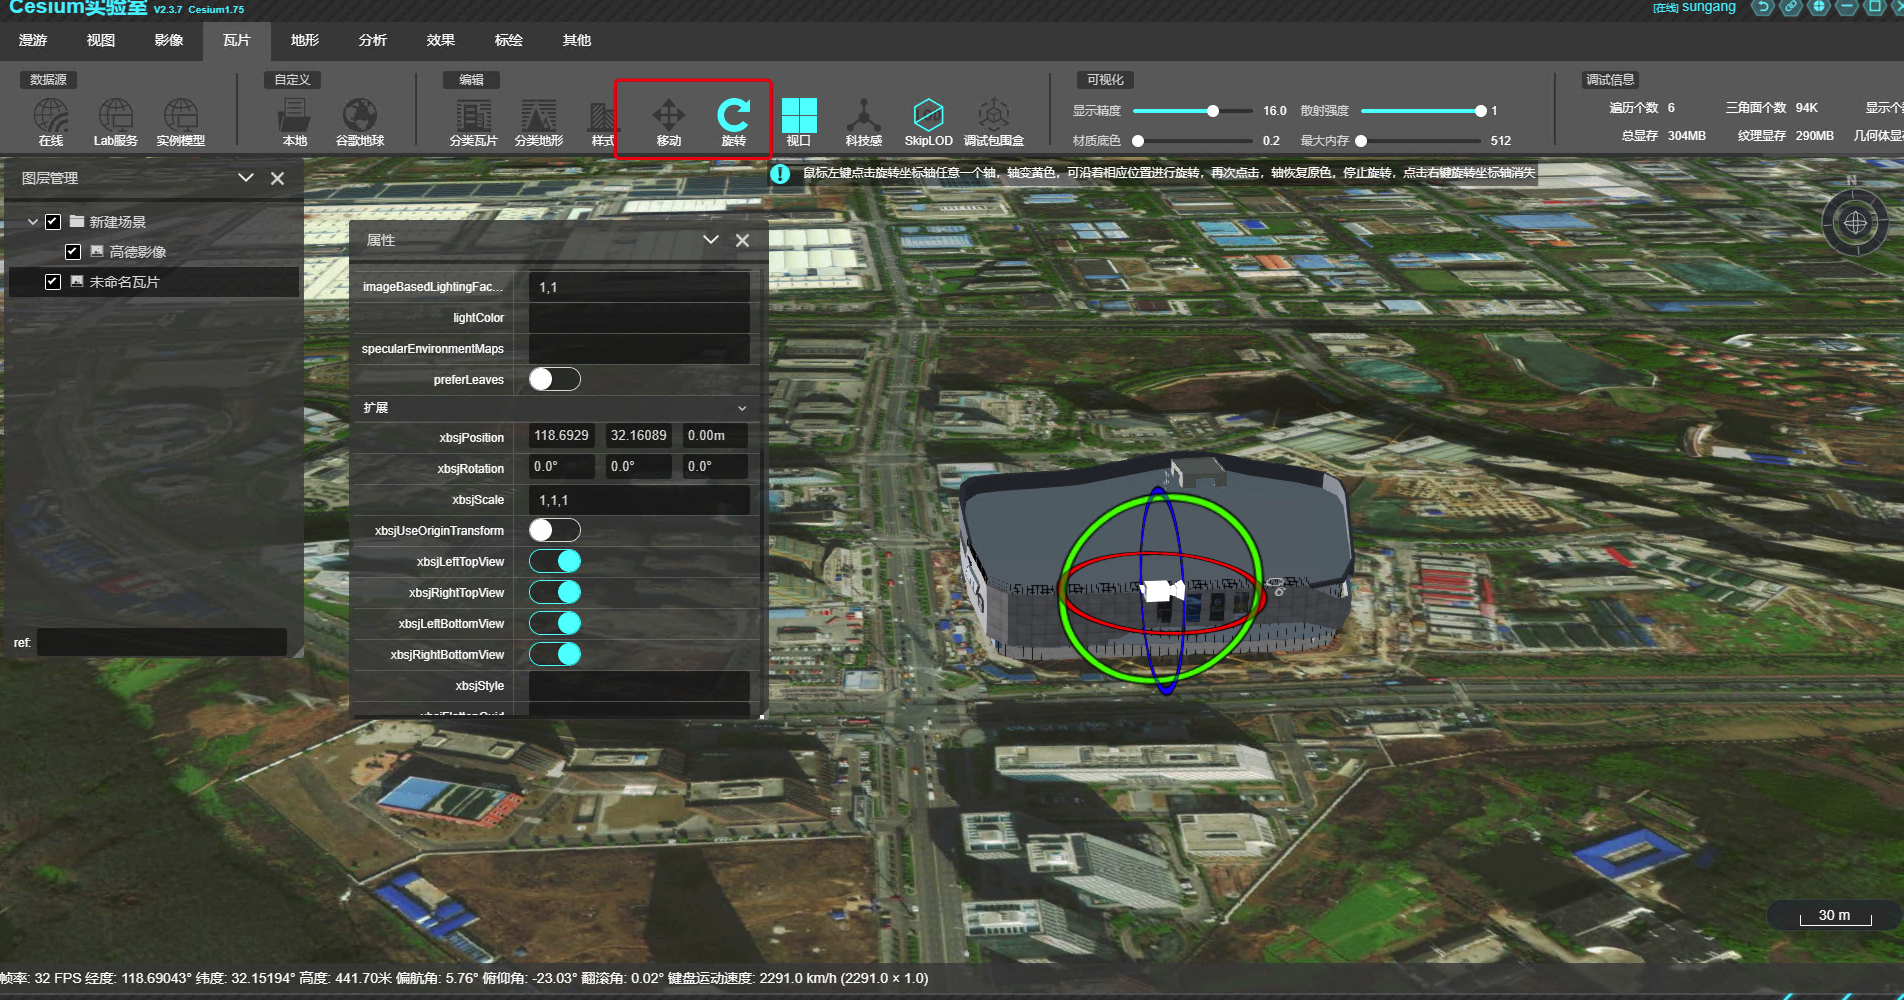
Operational data
Right click to start drag and move , The local coordinate system will appear in the center of the surrounding range of the model
Let's first determine the real geographical location of the model , Here you can go through Baidu longitude and latitude query system Let's check the real location of the model ( Be careful : Baidu's coordinate system is encrypted twice on the Mars coordinate system , So... Not too accurate , But it doesn't matter. We're just referring to )
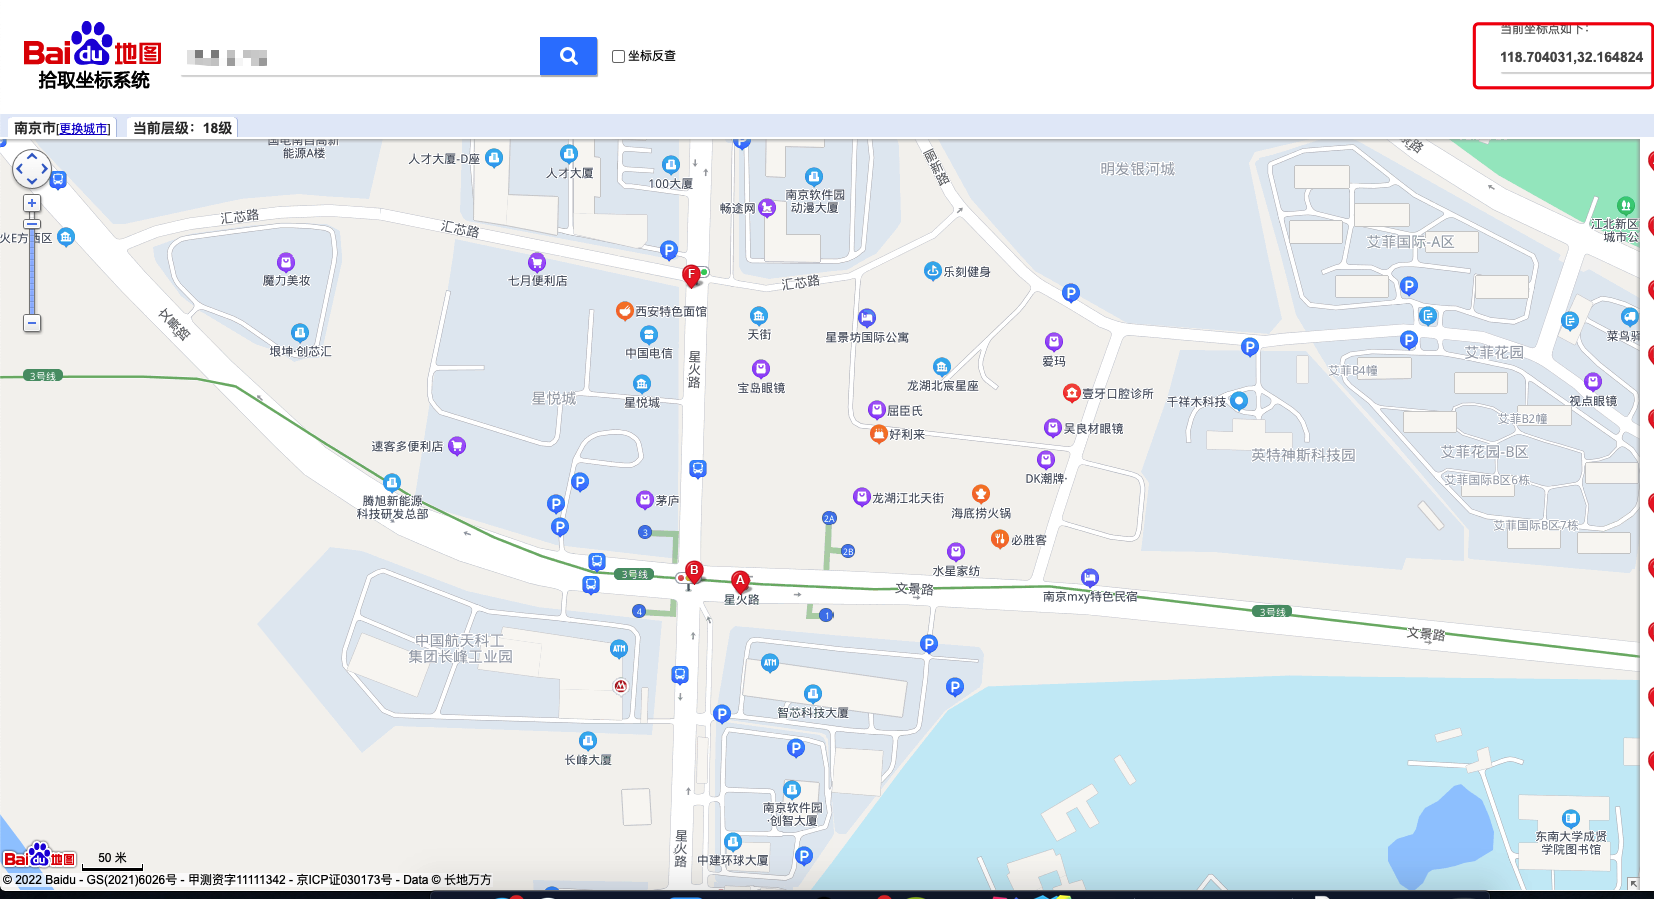
118.704031,32.164824
Right click to open properties -》 See the extension (xbsjPosition), Assign coordinates to
[ Failed to transfer the external chain picture , The origin station may have anti-theft chain mechanism , It is suggested to save the pictures and upload them directly (img-dnIk9cYZ-1650542433989)(http://qiliu.sunbt.ltd/qiliu_PicGo/image-20220421193827289.png)]
After filling in, the model will disappear , Don't worry about , It just went where it should go
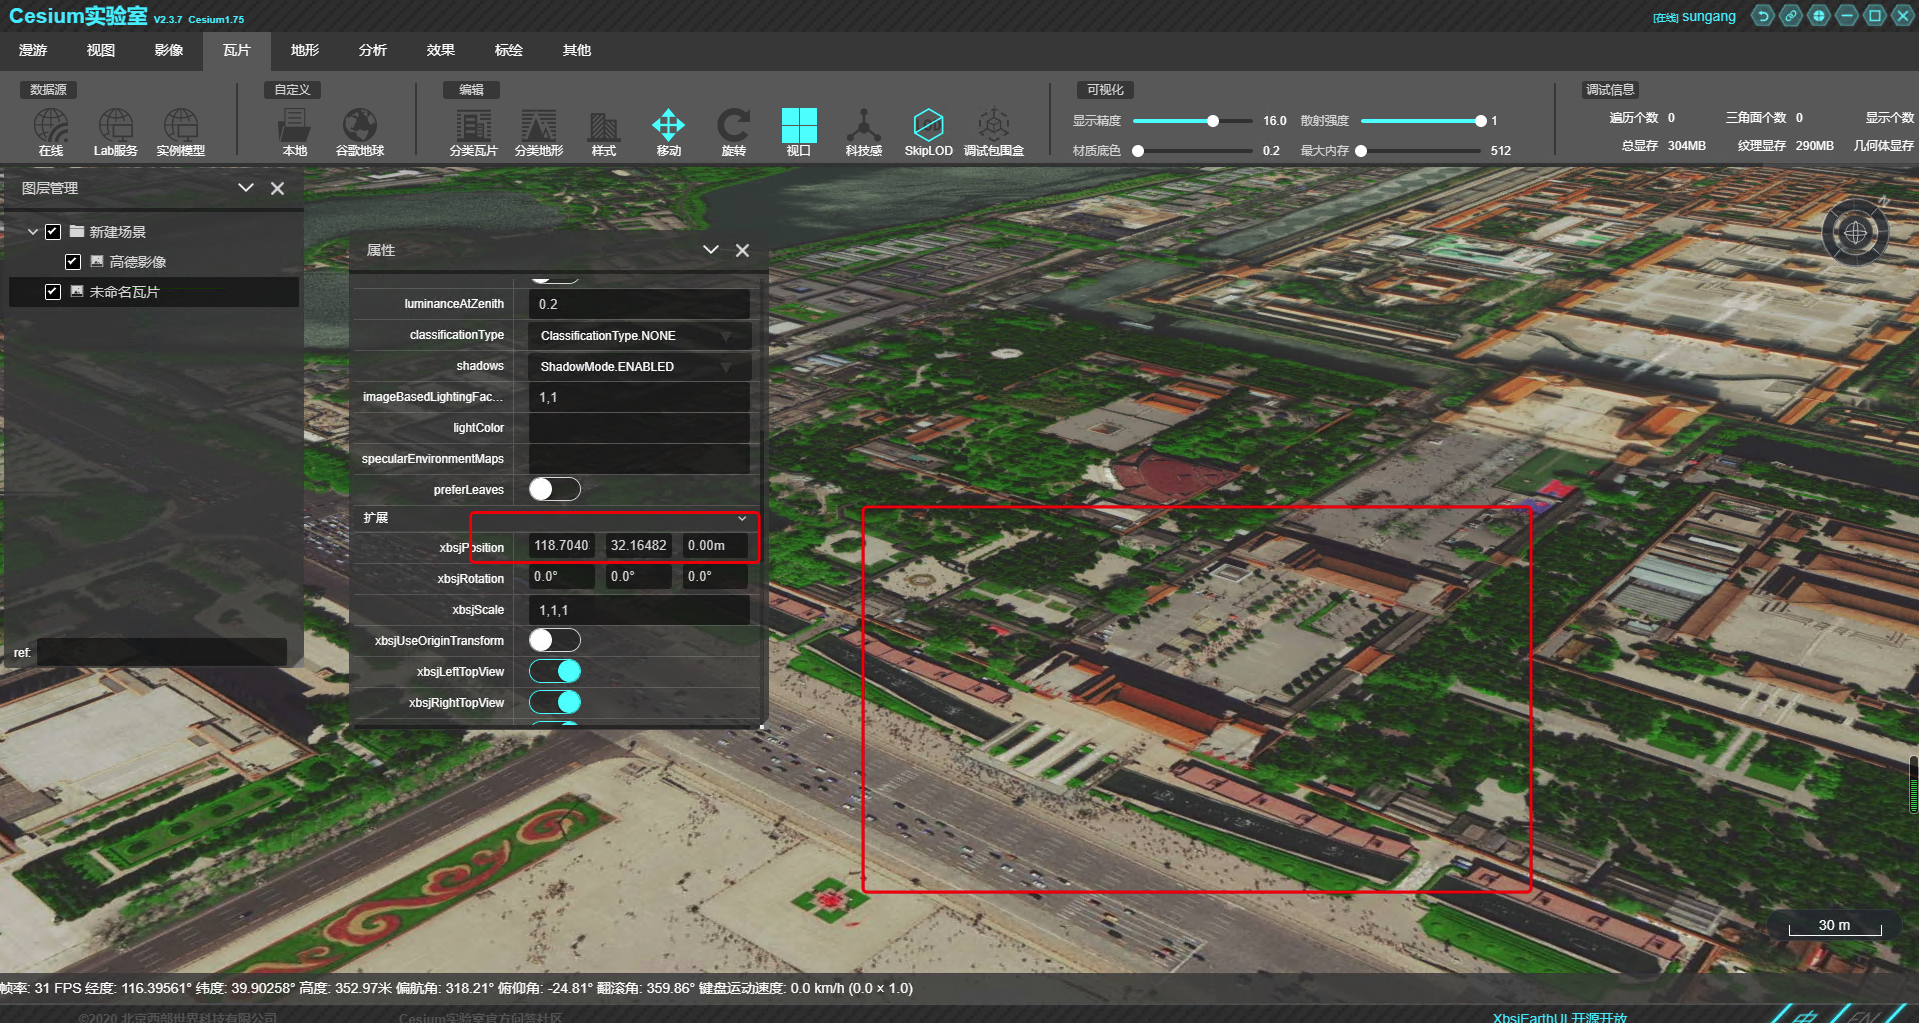
Right click to locate , We can see it , As shown in the picture, it is still a little short of the real geographical location
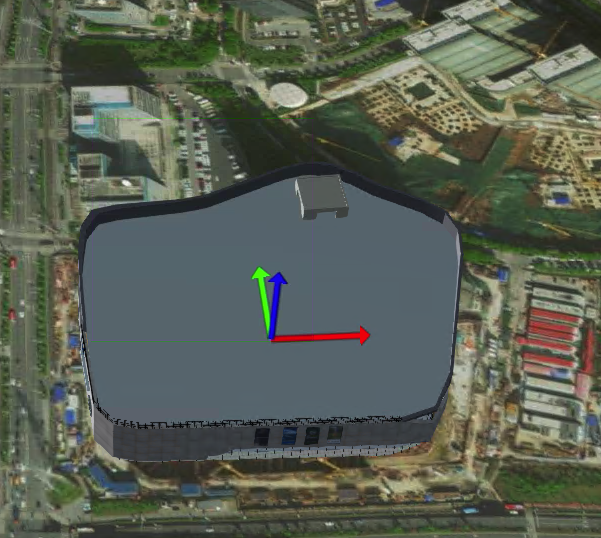
Here we need to adjust it manually , We need to drag red 、 green 、 Blue three directions ( Hong Wei x Axis 、 Green for y Axis 、 Lan Wei y Axis )
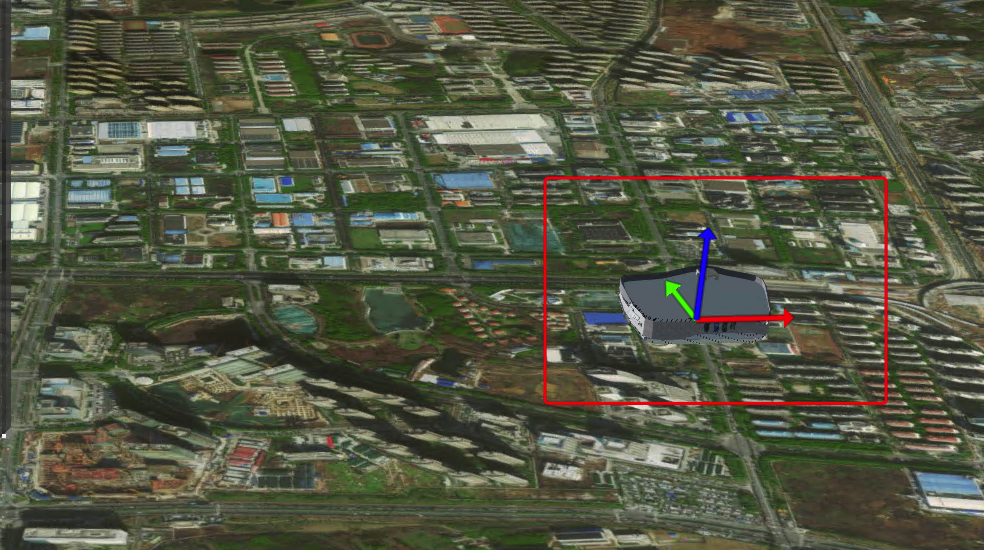
By dragging and dropping, the model has reached the correct position , We have succeeded here 90% 了
obtain cesium Load code
Up to the top , If the size and orientation of the model are not a problem , We can get it cesium Loading code for
cesiumlab Two loading codes are provided : A kind of cesium Native load code , One is earthSDK( Also from their family , One is based on cesium Source code secondary development package , It's very easy to use and helps us realize many functions , You should also give a good introduction when you have a chance later )
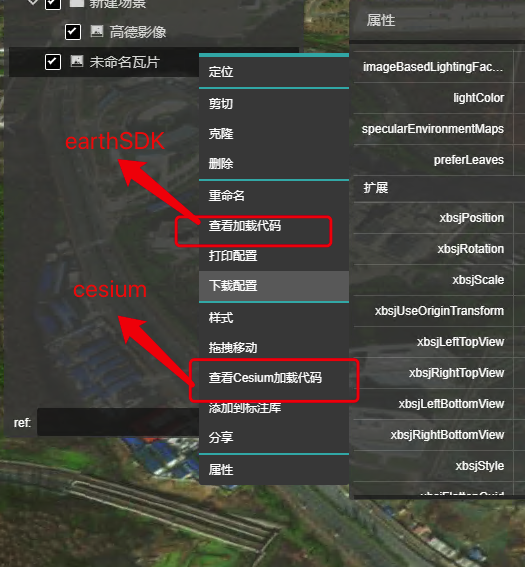
Click to see cesium Load code
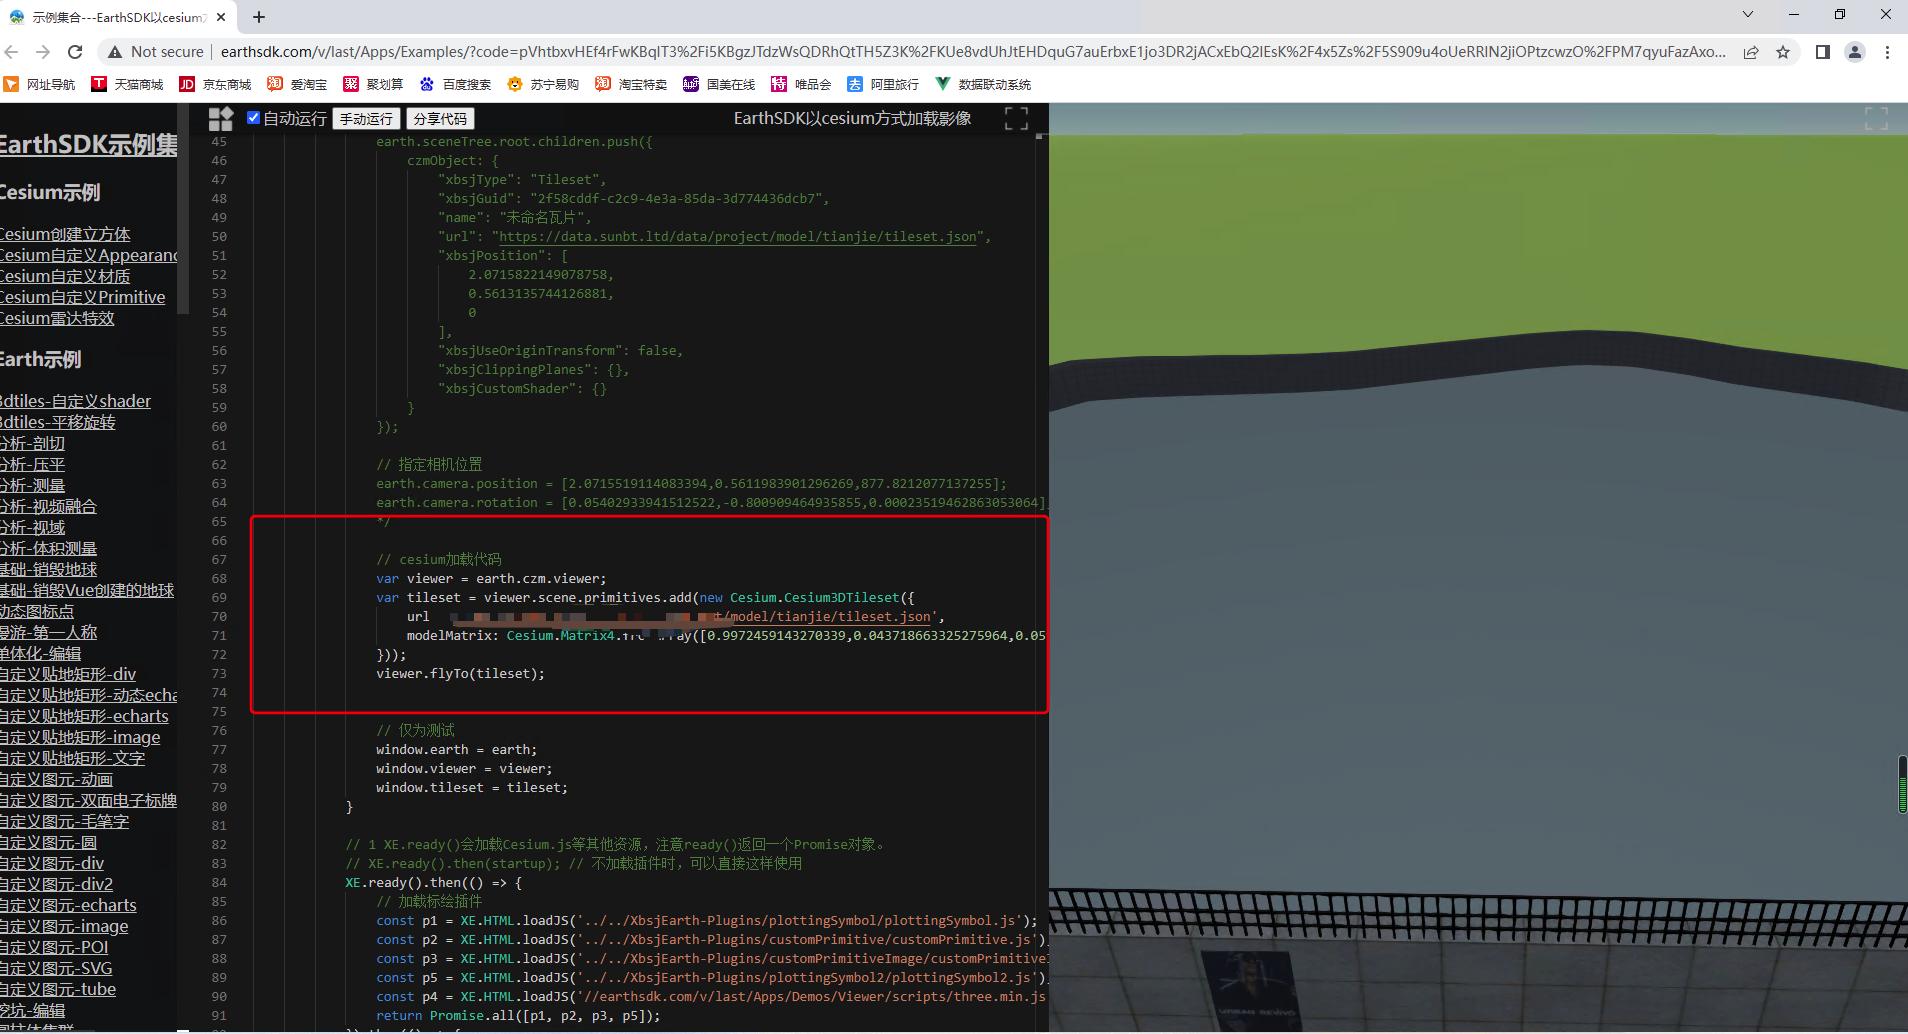
// cesium Load code
var viewer = earth.czm.viewer;
var tileset = viewer.scene.primitives.add(new Cesium.Cesium3DTileset({

    url: '../model/tianjie/tileset.json',
    modelMatrix: Cesium.Matrix4.fromArray([0.9972459143270339,0.043718663325275964,0.05991047350079684,0,-0.03623642613173875,0.9920231602439527,-0.12073512728614089,0,-0.06471095563532905,0.11823167095432924,0.990875251585238,0,-663.0708428965881,1211.4791529159993,2974.063367189374,1]),
}));
viewer.flyTo(tileset);
among modelMatrix( Transformation matrix ) It has been calculated for us ( Study cesium It's that simple )
We can use it in our own code
Parameter Introduction
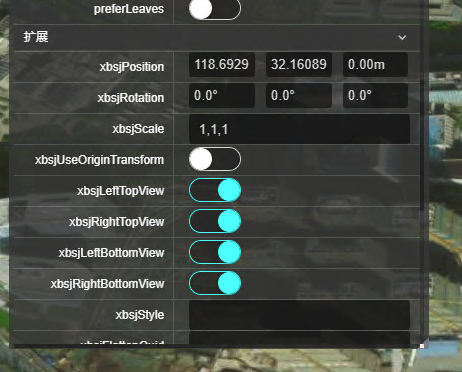
The extension has many parameters , Here are some common parameters
xbsjPosition: Including latitude and longitude and model elevation
xbsjRotation: Set the model here in x、y、z The degree of rotation on the axis
xbsjScale: The default here is 1, Indicates that the model does not scale , Modify these three parameters , Can be in x、y、z Scale on axis
It's best for everyone to use , You know how to do it , It's so convenient
These modified parameters will be calculated in the transformation matrix , Finally, we just need the matrix parameters
cesiumlab There are many functions in , You can use it
版权声明
本文为[Sun batian]所创,转载请带上原文链接,感谢
https://yzsam.com/2022/04/202204231432364604.html
边栏推荐
- 【Servlet】Servlet 详解(使用+原理)
- C语言知识点精细详解——数据类型和变量【1】——进位计数制
- 全连接层的作用是什么?
- Design of single chip microcomputer Proteus for temperature and humidity monitoring and alarm system of SHT11 sensor (with simulation + paper + program, etc.)
- 8.4 循环神经网络从零实现
- 直流可调稳压电源的Proteus仿真设计(附仿真+论文等资料)
- 【Proteus仿真】自动量程(范围<10V)切换数字电压表
- 分分钟掌握---三目运算符(三元运算符)
- Notes on Visio drawing topology
- 51 Single Chip Microcomputer Design of traffic light system (with Proteus simulation, C program, schematic diagram, PCB, thesis and other complete data)
猜你喜欢
DS1302的电子万年历_51单片机,年月日、星期、时分秒、农历和温度,带闹钟,全套资料
555定时器+74系列芯片搭建八路抢答器,30s倒计时,附Proteus仿真等
单片机的函数信号发生器,输出4种波形,频率可调,原理图,仿真和C程序

51 MCU flowers, farmland automatic irrigation system development, proteus simulation, schematic diagram and C code

8.3 语言模型与数据集

ArrayList collection basic usage
QT actual combat: Yunxi chat room
AT89C51 MCU digital voltmeter development, measuring range 0 ~ 5V, proteus simulation, schematic diagram, PCB and C program, etc
数组模拟队列进阶版本——环形队列(真正意义上的排队)
QT actual combat: Yunxi calendar
随机推荐
机器学习之逻辑回归(Logistic Regression)原理讲解和实例应用,果断收藏
LotusDB 设计与实现—1 基本概念
TLS/SSL 协议详解 (30) SSL中的RSA、DHE、ECDHE、ECDH流程与区别
Swift - Literal,字面量协议,基本数据类型、dictionary/array之间的转换
51单片机的直流电机PWM调速控制系统(附Proteus仿真+C程序等全套资料)
ASEMI超快恢复二极管与肖特基二极管可以互换吗
Want to be an architect? Tamping the foundation is the most important
kprobe 的 3 种使用
Redis源码分析之PSYNC同步
TLS/SSL 协议详解 (28) TLS 1.0、TLS 1.1、TLS 1.2之间的区别
Redis cluster 原理
一个月把字节,腾讯,阿里都面了,写点面经总结……
Notes on Visio drawing topology
AT89C51 MCU digital voltmeter development, measuring range 0 ~ 5V, proteus simulation, schematic diagram, PCB and C program, etc
循环队列的基本操作,你学会了吗?
Qt实战:云曦聊天室篇
redis 模块编程中 key value的生命周期
SVN详细使用教程
Eight way responder system 51 Single Chip Microcomputer Design [with Proteus simulation, C program, schematic diagram, PCB files, component list and papers, etc.]
【JZ46 把数字翻译成字符串】