当前位置:网站首页>Cloud computing learning 1 - openstack cloud computing installation and deployment steps with pictures and texts (Xiandian 2.2)
Cloud computing learning 1 - openstack cloud computing installation and deployment steps with pictures and texts (Xiandian 2.2)
2022-04-23 02:54:00 【kcyuan】
Statement : Original works , Strictly prohibited for commercial purposes . If there are any technical problems , Welcome to talk to me :408797506( Wechat same number ).
List of articles
1. Configure virtual machines


2. Create virtual machines for control and compute nodes
Create two virtual machines ( Control node and calculation node )
2.1 Create node virtual machine
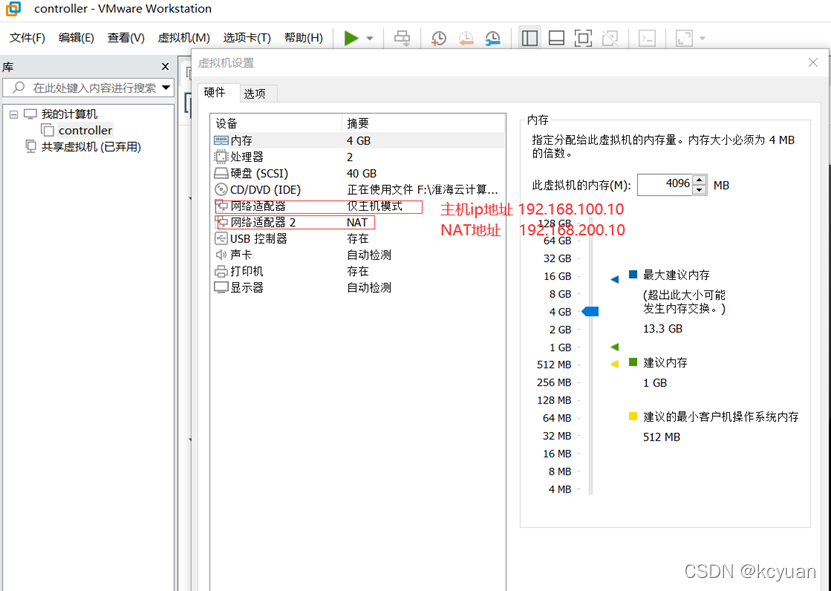
(1) Create a new system for the virtual machine , Set parameters

(2) After the node system is installed , Use root Account login system , Configure static ip Address
>ip a   //  Command to check that there is no network card at this time ip Address , Modify the interface of the corresponding network card ip Address
> vi /etc/sysconfig/network-scripts/ifcfg-xxxxx  //  Use vi Command configuration network ip Address
> systemctl restart network     //  Use systemctl Command to restart the network


Be careful : gateway Set to 192.168.200.2 What's the reason for that ?
Because the gateway has been set in the virtual machine network configuration ip and ip Address range , as follows :

If you want the virtual machine to be able to access the Internet , Just add dns The configuration can be :

(3) View configuration results

(4) > And then through secureCRT You can connect to the system shell Terminal interface :

notes : About secureCRT and SecureFX Software installation reference blog :
https://blog.csdn.net/qq_38695182/article/details/79843649?utm_medium=distribute.pc_relevant.none-task-blog-baidujs_title-5&spm=1001.2101.3001.4242
(5) To configure Host name of control node controller and Compute node hostname compute
Sign in controller Node terminal , Enter the following command :
>hostnamectl set-hostname controller
> logout
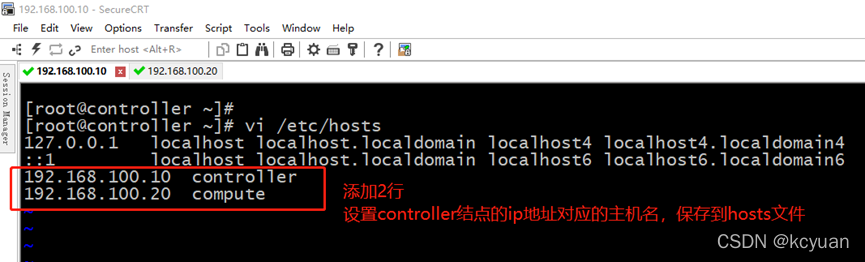
> vi /etc/hosts // Add the following 2 That's ok
> ping compute         //  Test whether the host name is set successfully
	 Sign in compute Node terminal , Enter the following command :
>hostnamectl set-hostname compute
> logout
> vi /etc/hosts           //  Add the following 2 That's ok

ping controller // Test whether the host name is set successfully
(6) Each node ( Control node and computing node at the same time ) Set up Turn off firewall , Start up does not start ; selinux by permissive
Enter the following command :
systemctl stop firewalld // Stop firewall
systemctl disable firewalld // Set to enable or disable the firewall
firewall-cmd --state // Test and check the firewall status
setenforce 0 // Temporarily Closed Selinux
vi /etc/selinux/config // Use vi command , Enter the configuration file and change it to disable
getenforce // getenforce Command to view test results
(7) Set the synchronization time
yum install -y chrony // Both the control node and the computing node execute the installation command


- Configure the control node as shown in the figure : Comment out your own server Group . Add the following two lines :

- Configure the calculation node as shown in the figure :

- Finally, start the service and start chronyd:( Both the computing node and the control node should execute )
> systemctl start chronyd
> systemctl enable chronyd
- test
Execute on the compute node chronyc sources -v Command synchronization time
>  chronyc sources
 For example, modify the server controller Time for , Check whether the calculation node is synchronized successfully :
> timedatectl set-time  "2021-07-31 20:40:38"            //  stay controller Node execution
>  chronyc sources -v          //  stay compute Node execution
3. Import centos\XianDian Image package
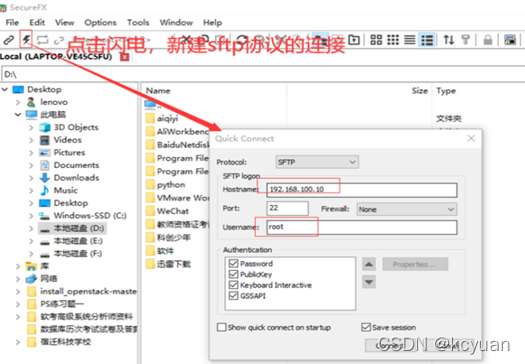
(1) Use SecureFX Software creates a new connection 192.168.100.10
(2) Use... On the control node SecureFX Software upload image file CentOS-7-x86_64-DVD-1511.iso and
XianDian-IaaS-v2.1.iso To /opt Under the path

(3) Configure the control node , Create two directories /opt/centos、/opt/iaas, Will be more than iso The image files are mounted in two directories respectively :
> cd /opt
> mkdir iaas
> mkdir centos
> mount -o loop /opt/CentOS-7-x86_64-DVD-1511.iso /opt/centos/     // mount Centos
> mount -o loop /opt/XianDian-IaaS-v2.2.iso /opt/iaas/                   // mount iaas

Be careful : If the next installation process , Restart the computer , Then you need to download download Resource Pack , Need to re mount mount !
4. To configure yum Source
4.1 Configure control node local yum Source file local.repo ( Reference resources /etc/yum.repos.d/ In the catalog yum Source configuration )
(1) First clear the source configuration file or move repo File to media Catalog
mv /etc/yum.repos.d/* /media/ perhaps rm –rf /etc/yum.repos.d/*
(2) establish local.repo file , Configure source content
vi /etc/yum.repos.d/local.repo // Use vi Command edit control node yum Source
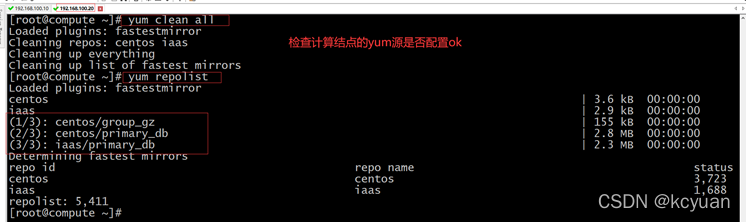
(3) Test configuration success
yum clean all
yum repolist // Use yum repolist Command to check whether the configuration is successful
(4) install vsftpd:

>yum -y install vsftpd
>vi /etc/vsftpd/vsftpd.conf         //  Edit profile , Add a row
anon_root=/opt    //  Specify anonymous users to access the home directory


systemctl restart vsftpd && systemctl enable vsftpd // Enter the restart command
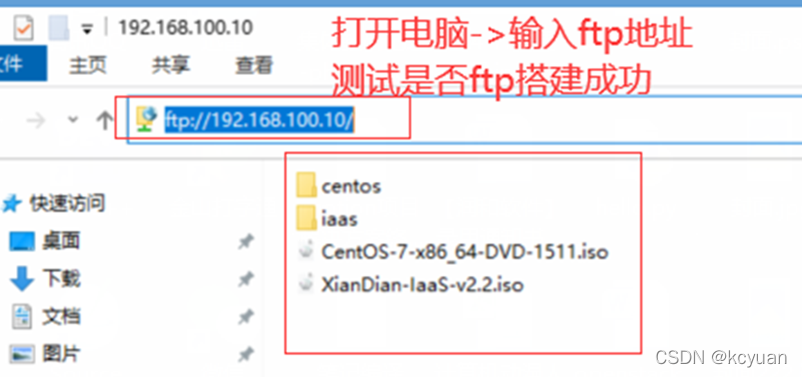
adopt windows Computer Explorer , visit ftp website , Verify if ok?
(5) restart vsftpd service , see vsftp state :
4.2 Configure the local configuration of the compute node yum Source file ftp.repo
(1) First clear the source configuration file or move repo File to media Catalog
mv /etc/yum.repos.d/* /media/ perhaps rm –rf /etc/yum.repos.d/*
(2) establish ftp.repo file , build ftp The server points to store yum The source path , Configure compute nodes yum Source file ftp.repo Use the previously configured control nodes ftp As yum Source ( The addresses of two nodes are represented by host names )

> vi /etc/yum.repos.d/ftp.repo // Edit source file ftp.repo Point to ftp The server , Add the following :

> yum clean all
> yum repolist             //  Use yum repolist Command to check whether the configuration is successful
5. Modify the configuration file
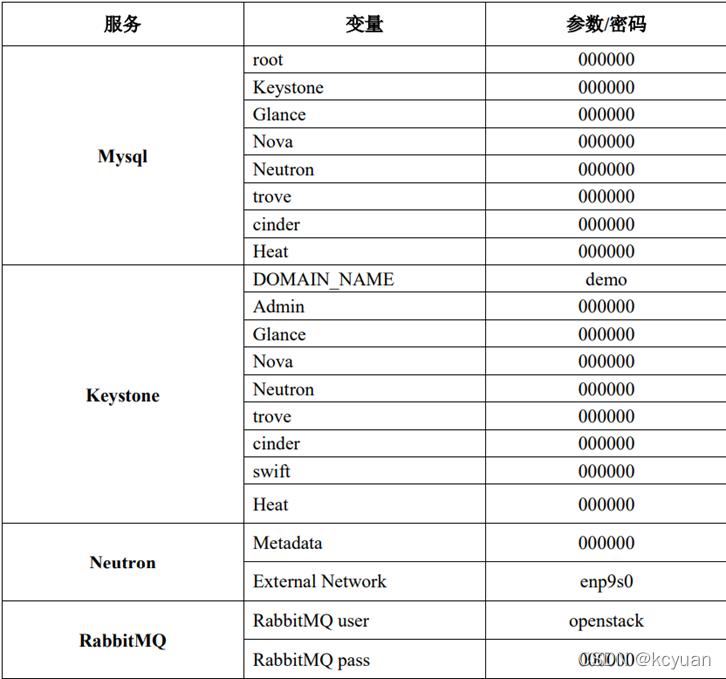
Install the control node and the calculation node respectively iaas-xiandian package , Complete the configuration of basic variables in the configuration file . According to the following table 2 Complete the configuration of the specified variable :
(1) For configuration cinder Storage service , The virtual machine that needs to be in the computing node , New disk sdb, And partition it
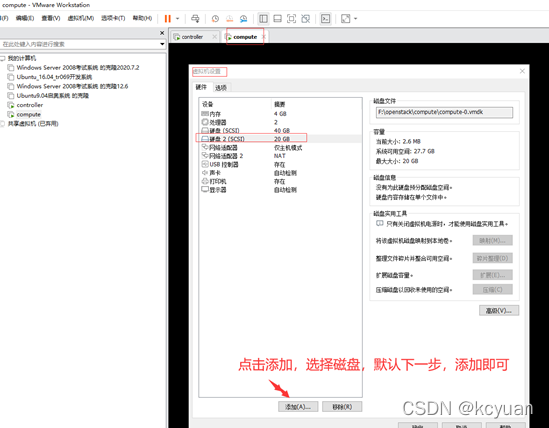
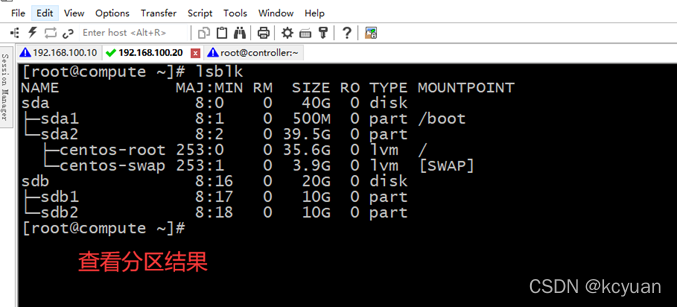
After rebooting the system , Get into shell terminal , Use the command to partition
> fdisk /dev/sdb                    //  Partition sdb surface
> n   Express  add a new partition
> w  Express write table to disk and exit

(2) At the control node and calculation node , At the same time, use the command to install iaas Of rpm package
yum -y install iaas-xiandian // Install at the control node and the calculation node respectively iaas
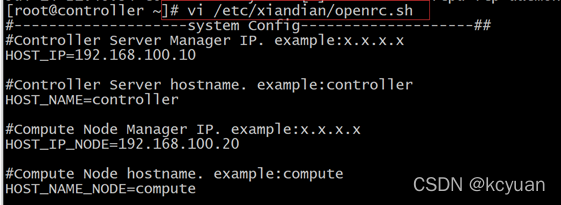
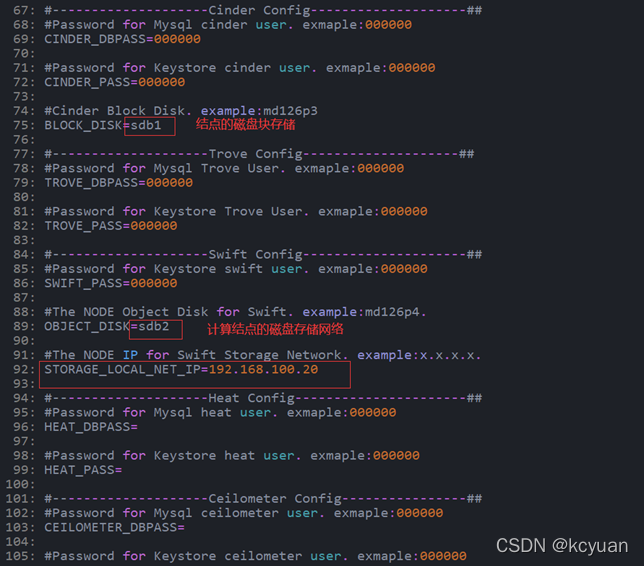
(3) According to the above table 2 Complete the configuration of specified control node and calculation node variables :( Refer to... In the attachment folder openrc.sh)
vi /etc/xiandian/openrc.sh // Edit environment variables
Specific document contents , Refer to the below :
skill 1: In the step of editing environment variables , How to quickly remove the first in each line #?
vi /etc/xiandian/openrc.sh // Edit the environment variable and enter the following :
:%s/^#//g
skill 2: have access to scp The command directly copies the configured file of the control node to the computing node .
scp /etc/xiandian/openrc.sh compute:/etc/xiandian/


6. install openstack package
The basic configuration operation command has been written as shell Script , One click installation through script .
If during the installation process , appear download Failure or failed to load perhaps no such file…. Here's the picture :
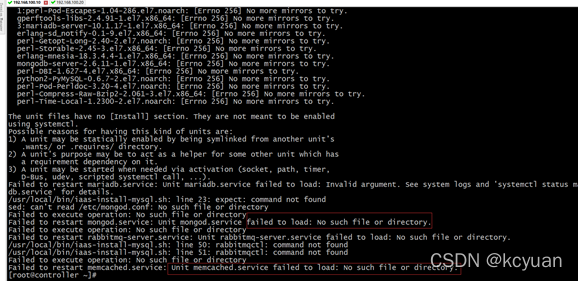
Check the mount Two directories mounted /opt/centos and /opt/iaas Whether there is a file . If the directory is empty , You need to mount it again : Execute the following two lines of commands :
> mount -o loop /opt/CentOS-7-x86_64-DVD-1511.iso /opt/centos/     // mount Centos
> mount -o loop /opt/XianDian-IaaS-v2.2.iso /opt/iaas/                   // mount iaas
(1) Install services through scripts
Controller Nodes and Compute The node performs the following installation services :
The content includes : install Openstack package , Configure domain name resolution , Configure firewall and Selinux, install ntp service
>iaas-pre-host.sh // Execute the command to install the service
(2) Restart the computer , Prepare for the installation of each component

7. install Controller and compute Node openstack Various components
(1) mysql install : The content includes : install Mysql Database services , install Mongo Database services , install RabbitMQ service , install memcahce
iaas-install-mysql.sh // install mysql database
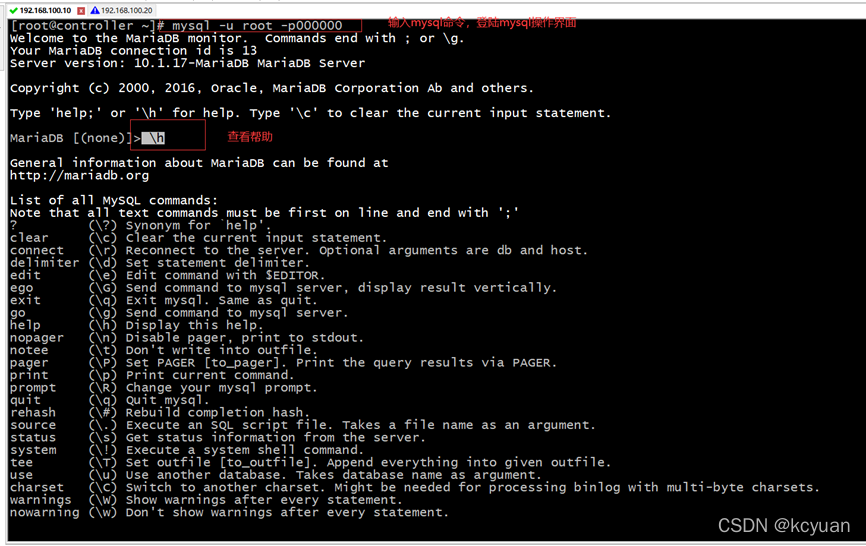
Check to see if mysql Installation successful .
mysql -u root -p000000 // User is root , The default password is 000000, Get into mysql Command operation of
To quit mysql The interface of , Input \q that will do . About mysql For more information, please refer to relevant books .

(2) keystone install : The content includes : install keystone Service package , establish Keystone database , Configure database connections , by keystone Service to create database tables , Create token , Create signing keys and certificates , Define users 、 Tenants and roles
iaas-install-keystone.sh // install keystone Components
(3) glance install : The content includes : install Glance Image service package , establish Glance database , Create a database connection from a configuration file , Create database tables for the mirroring service , Create user , Configure the mirror service , establish Endpoint and API Endpoint , Start the service , Upload the image
iaas-install-glance.sh
(4) nova install : The content includes : install Nova Computing service package , establish Nova database , Create a computing service table , Create user , Configure computing services , establish Endpoint and API Endpoint , Start the service , verification Nova, install Nova Computing service package , To configure Nova service , Check whether the system processor supports the hardware acceleration of the virtual machine , start-up , Clear the firewall
iaas-install-nova-controller.sh // install controller Nodal nova service
iaas-install-nova-compute.sh // install compute Nodal nova service
(5) neutron install : The content includes : establish Neutron database , Create user , establish Endpoint and API Endpoint , install neutron Network service package , To configure Neutron service , Edit kernel , Create database , Start the service and create the bridge , Install package , To configure Neutron service , Edit kernel , Start the service and create the bridge
iaas-install-neutron-controller.sh // install controller Nodal neutron service
iaas-install-neutron-compute.sh // install compute Nodal neutron service
(6) neutron Configure the network mode to gre
iaas-install-neutron-controller-gre.sh // choice controller Nodal neutron The network mode is gre
iaas-install-neutron-compute-gre.sh // choice compute Nodal neutron The network mode is gre
(7) dashboard install : The content includes : install Dashboard Service package , To configure , Start the service
iaas-install-dashboard.sh
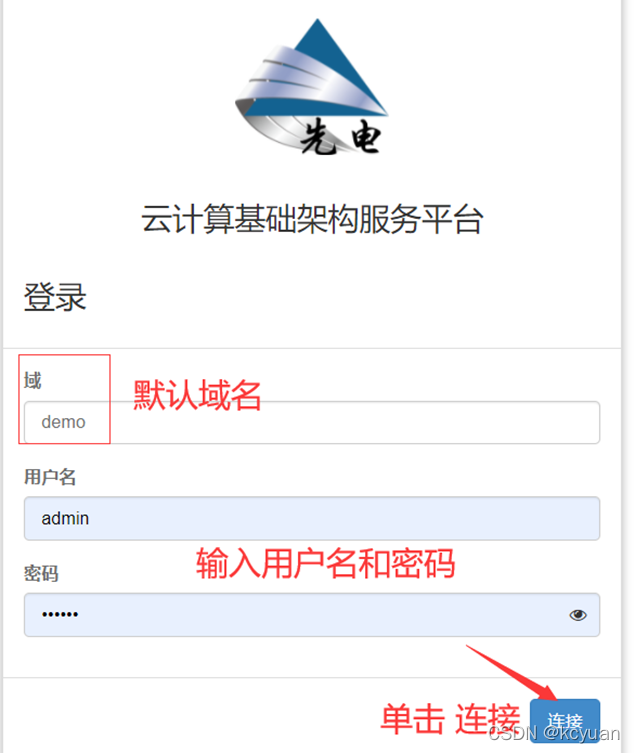
At this time, you can enter... Through the web address bar of the browser http://192.168.100.10/dashboard Enter the first power cloud computing platform
Domain :demo
user name :admin
password :000000
(8) cinder install : The content includes : install Cinder Block storage service package , Create database , Create user , establish Endpoint and API Endpoint , To configure Cinder service , Create database , Start the service , Install block storage software , establish LVM Physical and logical volumes , modify Cinder The configuration file , Restart the service , verification
iaas-install-cinder-controller.sh // install controller Node cinder service
iaas-install-cinder-compute.sh // install compute Node cinder service
Be careful : Install again compute Node cinder Before service , Add it first sdb disk , And partition sdb1 and sdb2, Otherwise, you will be prompted that... Cannot be found during installation sdb1 error . Follow up sessions on storage management
(9) swift install : The content includes : Create user , establish Endpoint and API Endpoint , edit /etc/swift/proxy-server.conf, Create account 、 Containers 、 object , edit /etc/swift/swift.conf, Start the service and grant permissions
iaas-install-swift-controller.sh // install controller Node cinder service
iaas-install-swift-compute.sh // install compute Node cinder service
Be careful : Install again compute Node swift Before service , Add it first sdb disk , And partition sdb1 and sdb2, Otherwise, you will be prompted that... Cannot be found during installation sdb2 error .
8. test
Sign in dashboard Test the success of the deployment :
Open the browser and enter the URL : http://192.168.100.10/dashboard/
版权声明
本文为[kcyuan]所创,转载请带上原文链接,感谢
https://yzsam.com/2022/04/202204220658444441.html
边栏推荐
猜你喜欢
LeetCode 1450 - 1453

L2-006 树的遍历(中后序确定二叉树&层序遍历)

Shell script learning notes - regular expressions

How big the program development of single chip microcomputer project can be, it represents your level of knocking code

Looking for a job, writing a resume to an interview, this set of information is enough!

How can enterprises with major hazard installations ensure the completion of the digital construction task of double prevention mechanism by the end of the year

php+mysql对下拉框搜索的内容修改

Machine learning (Zhou Zhihua) Chapter 14 probability graph model

解决win7 中powershell挖矿占用CPU100%

国产轻量级看板式Scrum敏捷项目管理工具
随机推荐
VirtualBox virtual machine (Oracle VM)
Android high-level interview must ask: overall business and project architecture design and reconstruction
Devil cold rice 𞓜 078 devil answers the market in Shanghai and Nanjing; Communication and guidance; Winning the country and killing and screening; The purpose of making money; Change other people's op
Kubernetes study notes
Reverse a linked list < difficulty coefficient >
OCR recognition PDF file
期中汇总(概论+应用层+运输层)
TypeScript(1)
Flink learning (XI) watermark
[unity3d] rolling barrage effect in live broadcasting room
Close the computer port
《信息系统项目管理师总结》第六章 项目人力资源管理
Shell script learning notes -- shell operation on files sed
[if you want to do a good job, you must first use its tools] Guide for downloading and using paper editing and document management (endnote, latex, jabref, overflow) resources
Linux redis - redis ha sentinel cluster construction details & redis master-slave deployment
JZ35 replication of complex linked list
[wechat applet] set the bottom menu (tabbar) for the applet
Chapter V project quality management of information system project manager summary
Codeforces round 784 (Div. 4) (a - H)
[learn junit5 from official documents] [II] [writingtests] [learning notes]