当前位置:网站首页>基于BottomNavigationView实现底部导航栏
基于BottomNavigationView实现底部导航栏
2022-04-23 06:07:00 【小叶很笨呐!】
预览

- 新建三个对应于fragment的layout文件
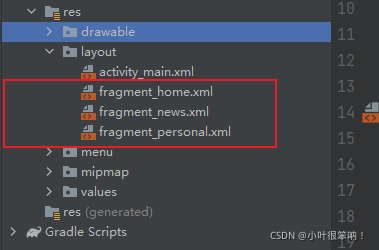
代码如下(三个都一样,就不一一列出了)
<?xml version="1.0" encoding="utf-8"?>
<androidx.constraintlayout.widget.ConstraintLayout xmlns:android="http://schemas.android.com/apk/res/android" xmlns:app="http://schemas.android.com/apk/res-auto" xmlns:tools="http://schemas.android.com/tools" android:layout_width="match_parent" android:layout_height="match_parent">
    <TextView android:layout_width="wrap_content" android:layout_height="wrap_content" android:text="HomeFragment" android:textSize="18sp" android:textColor="@color/black" app:layout_constraintBottom_toBottomOf="parent" app:layout_constraintEnd_toEndOf="parent" app:layout_constraintStart_toStartOf="parent" app:layout_constraintTop_toTopOf="parent" />
</androidx.constraintlayout.widget.ConstraintLayout>
- 新建三个类继承与androidx.fragment.app包下的Fragment;(需要几个界面就新建几个这里只是演示)
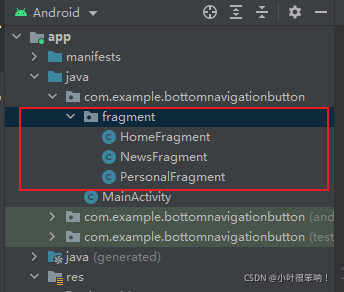
- 在新建的三个Fragment中重写父类的onCreateView()方法,并绑定布局
三个类的代码也都相同,需要注意的是—>布局别绑定错了!
public class HomeFragment extends Fragment {

    private View mRootView;
    @Nullable
    @Override
    public View onCreateView(@NonNull LayoutInflater inflater, @Nullable ViewGroup container, @Nullable Bundle savedInstanceState) {

        mRootView = inflater.inflate(R.layout.fragment_home,container,false);
        return mRootView;
    }
}
- 新建menu布局文件,用于BottomNavigationView
- 新建menu包

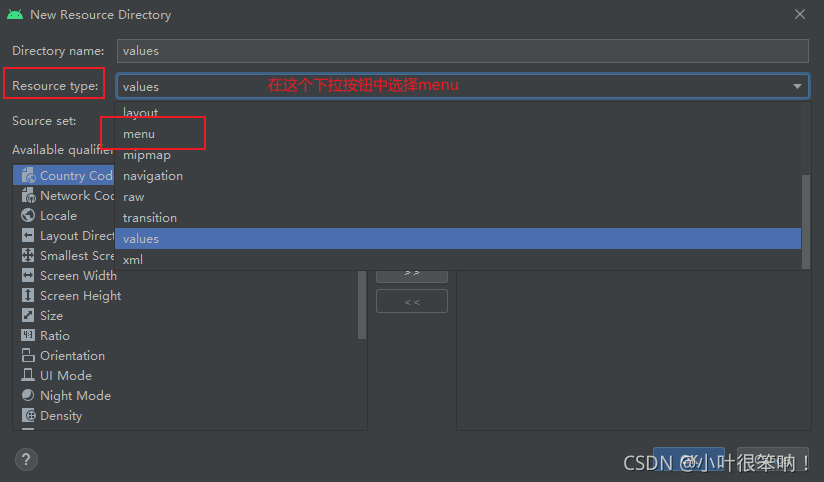
- 在menu包下新建布局文件
<?xml version="1.0" encoding="utf-8"?>
<menu xmlns:android="http://schemas.android.com/apk/res/android">
    <item android:id="@+id/nav_home" android:title="首页" android:icon="@drawable/ic_baseline_home_24"/>
        <!--icon就是对应要显示的图标-->
    <item android:id="@+id/nav_news" android:title="新闻" android:icon="@drawable/ic_baseline_fiber_new_24"/>
    <item android:id="@+id/nav_personal" android:title="我的" android:icon="@drawable/ic_baseline_person_24"/>

</menu>
- 在宿主Activity的布局中添加
通过menu属性来完成绑定menu资源
<?xml version="1.0" encoding="utf-8"?>
<androidx.constraintlayout.widget.ConstraintLayout xmlns:android="http://schemas.android.com/apk/res/android" xmlns:app="http://schemas.android.com/apk/res-auto" xmlns:tools="http://schemas.android.com/tools" android:layout_width="match_parent" android:layout_height="match_parent" tools:context=".MainActivity">

    <com.google.android.material.bottomnavigation.BottomNavigationView android:id="@+id/bottom_navigation" android:layout_width="match_parent" android:layout_height="wrap_content" app:menu="@menu/bottom_navigation_menu" app:layout_constraintBottom_toBottomOf="parent" app:layout_constraintEnd_toEndOf="parent" app:layout_constraintStart_toStartOf="parent" />

    <FrameLayout android:id="@+id/fragment_container" android:layout_width="match_parent" android:layout_height="match_parent" app:layout_constraintBottom_toTopOf="@+id/bottom_navigation" app:layout_constraintEnd_toEndOf="parent" app:layout_constraintStart_toStartOf="parent" app:layout_constraintTop_toTopOf="parent" />

</androidx.constraintlayout.widget.ConstraintLayout>
- 宿主类MainActivity
/** * 宿主Activity */
public class MainActivity extends AppCompatActivity {

    private BottomNavigationView bottomNavigation;

    // 持有对应Fragment的对象
    private HomeFragment mHomeFragment;
    private NewsFragment mNewsFragment;
    private PersonalFragment mPersonalFragment;
    // 用于存放fragment的数组
    private Fragment[] mFragmentContainer;
    // 用于标记最后一个fragment的标签
    public int mLastFragmentTag;

    @Override
    protected void onCreate(Bundle savedInstanceState) {

        super.onCreate(savedInstanceState);
        setContentView(R.layout.activity_main);
        initView();
        loadData();
        registerListener();
    }

	/** * 注册监听 */
    private void registerListener() {

        // 给BottomNavigation设置监听以切换fragment
        bottomNavigation.setOnNavigationItemSelectedListener(new BottomNavigationView.OnNavigationItemSelectedListener() {

            @SuppressLint("NonConstantResourceId")
            @Override
            public boolean onNavigationItemSelected(@NonNull MenuItem item) {

                switch (item.getItemId()) {

                    case R.id.nav_home:
                        if (mLastFragmentTag !=0) {

                            choseFragment(mLastFragmentTag,0);
                            mLastFragmentTag = 0;
                        }
                        // 监听事件中“return true”
                        // 表示这个按钮的监听事件在这个方法中已经处理完成了,不需要别人再去处理了
                        return true;
                    case R.id.nav_news:
                        if (mLastFragmentTag !=1) {

                            choseFragment(mLastFragmentTag,1);
                            mLastFragmentTag = 1;
                        }
                        return true;
                    case R.id.nav_personal:
                        if (mLastFragmentTag !=2) {

                            choseFragment(mLastFragmentTag,2);
                            mLastFragmentTag = 2;
                        }
                        return true;
                }
                return false;
            }
        });
    }

	/** * 用于切换到需要的显示Fragment * @param lastFragmentTag lastFragmentTag * @param index 需要显示的Fragment的index * HomeFragment ---> 0 * NewsFragment ---> 1 * PersonalFragment ---> 2 */
    private void choseFragment(int lastFragmentTag, int index) {

        FragmentTransaction transaction = getSupportFragmentManager().beginTransaction();
        // 隐藏上一个Fragment
        transaction.hide(mFragmentContainer[lastFragmentTag]);
        // 如果新的Fragment的对象还在容器中,就不需要去new对象了,直接显示就好
        if (!mFragmentContainer[index].isAdded()) {

            transaction.add(R.id.fragment_container,mFragmentContainer[index]);
        }
        // commitNowAllowingStateLoss()允许在保存活动状态后执行提交
        transaction.show(mFragmentContainer[index]).commitNowAllowingStateLoss();
    }

	/** * 加载数据 */
    private void loadData() {

        mHomeFragment = new HomeFragment();
        mNewsFragment = new NewsFragment();
        mPersonalFragment = new PersonalFragment();
        // 将初始化后的Fragment添加到容器中
        mFragmentContainer = new Fragment[]{
    mHomeFragment,mNewsFragment,mPersonalFragment};

        // 将进入应用默认显示的Fragment对应的tag值设置为0
        mLastFragmentTag = 0;
        // 默认显示为HomeFragment
        // 获取Fragment管理器并开始操作
        // 替换(第一个参数为容器【remove】,第二个参数为要放在容器中新的Fragment【add】)
        getSupportFragmentManager().beginTransaction()
                .replace(R.id.fragment_container,mHomeFragment)
                .show(mHomeFragment)
                .commit();
    }

    private void initView() {

        bottomNavigation = findViewById(R.id.bottom_navigation);
    }
}
版权声明
本文为[小叶很笨呐!]所创,转载请带上原文链接,感谢
https://blog.csdn.net/weixin_50957373/article/details/120924315
边栏推荐
- 一个DG环境的ORA-16047: DGID mismatch between destination setting and target database问题排查及监听VNCR特性
- oracle中生成32位uuid
- Comparison between Prometheus thanos and cortex components
- oracle计算两日期相差多少秒,分钟,小时,天
- iTOP4412内核反复重启
- Apache Atlas 编译及安装记录
- Exception record-7
- Winter combat camp hands-on combat - MySQL database rapid deployment practice lead mouse cloud Xiaobao
- iTOP4412无法显示开机动画(4.0.3_r1)
- Abnormal record-13
猜你喜欢

从0开始封装一套项目的网络请求框架

Try catch cannot catch asynchronous errors

Dolphinscheduler源码包src.tar.gz解压问题
Chaos带你快速上手混沌工程

oracle通过触发器和序列来定义自增主键,并且设置定时任务每秒钟插入一条数据到目标表
基於ECS搭建雲上博客(雲小寶碼上送祝福,免費抽iphone13任務詳解)

Apache SeaTunnel 2.1.0部署及踩坑

组件化学习(2)Arouter原理学习

Winter combat camp hands-on combat - MySQL database rapid deployment practice lead mouse cloud Xiaobao

Dolphinscheduler调度sql任务建表时The query did not generate a result set异常解决
随机推荐
B站用户视频观看记录的存储方案
微服务架构核心概念
Prometheus thanos Quick Guide
从0开始封装一套项目的网络请求框架
[sm8150] [pixel4] LCD driver
Exception record-14
Abnormal record-22
Apache SeaTunnel 2.1.0部署及踩坑
Build a cloud blog based on ECS (polite experience)
Try catch cannot catch asynchronous errors
【机器学习】笔记 4、KNN+交叉验证
Oracle RAC数据库实例启动异常问题分析IPC Send timeout
oracle 修改默认临时表空间
js时间获取本周一、周日,判断时间是今天,今天前、后
qs. In the stringify interface, the input parameter is converted into a & connected string (with the application / x-www-form-urlencoded request header)
记录webView显示空白的又一坑
Component learning
oracle生成毫秒级时间戳
Dolphinscheduler调度spark任务踩坑记录
組件化學習