当前位置:网站首页>Practice using polardb and ECs to build portal websites
Practice using polardb and ECs to build portal websites
2022-04-23 07:02:00 【Alibaba cloud cloud Lab】

Yunqi Laboratory Winter training camp (1.17-3.8)
Refillable card !!!
Phase V actual combat in winter , From entry to advanced , Help developers with best practices , Fast cloud practice , Learning on the cloud .
It's polite to experience , Click to go to :https://developer.aliyun.com/adc/series/wintercamp
The first phase of winter combat camp : Play with ECs from zero to one

Single task reward : Practical battalion skill certificate + Custom mouse
Phase III task reward : The first winter Olympics limited edition cloud Xiaobao on the whole network
Five task rewards : Winter combat camp medal + Custom schoolbag + Shadowless trial
Introduction to the experience
This scenario will provide a basic environment for CentOS Of ECS( Cloud server ) Instance and created PolarDB Database instance . We will install... On this server WordPress, Help you quickly build your own cloud blog .
Background knowledge
PolarDB Database introduction
PolarDB The database is the next generation of relational cloud database developed by Alibaba cloud , There are three separate engines , Respectively 100% compatible MySQL、100% compatible PostgreSQL、 Highly compatible Oracle grammar , Storage capacity up to 100TB, A single library can be extended up to 16 Nodes , It is suitable for Enterprise Diversified database application scenarios .
PolarDB Adopt the architecture of separating storage and Computing , All computing nodes share one piece of data , Provide minute level configuration upgrade level 、 Second level fault recovery 、 Global data consistency and free data backup and disaster recovery service .PolarDB It not only integrates the commercial database, but also is stable and reliable 、 High performance 、 Extensible features , It also has open source cloud database, simple and open 、 The advantage of self iteration , for example PolarDB MySQL Performance can be up to MySQL Of 6 times , And the cost is only for commercial databases 1/10. Cluster architecture , Separation of computing and storage .
Cluster architecture , Separation of computing and storage .
PolarDB Adopt the architecture of multi node cluster , There is one in the cluster Writer node ( Master node ) And multiple Reader node ( Read node ), Each node through the distributed file system (PolarFileSystem) Share the underlying storage (PolarStore).
Read / write separation .
When the application uses the cluster address ,PolarDB MySQL/PostgreSQL Through the internal agent layer (Proxy) External services , The application's requests go through the agent first , Then access to the database node . Proxy layer can not only do security authentication and protection , It can also be parsed SQL, Write operations ( Such as transaction 、UPDATE、INSERT、DELETE、DDL etc. ) Send to master , Put the read operation ( for example SELECT) Evenly distributed to multiple read-only nodes , Achieve automatic read-write separation . For applications , It's like using a single point MySQL It's as simple as a database . The internal agent layer (Proxy) Will support PolarDB compatible Oracle Syntax engine .
Product advantage
You can use MySQL、PostgreSQL、Oracle The use of PolarDB, Besides ,PolarDB There are also advantages that traditional databases do not have :
Large capacity .
The highest 100TB, You don't need to buy multiple instances to partition because of the ceiling of single capacity , This simplifies application development , Reduce the burden of operation and maintenance .
High cost performance .
PolarDB Separation of computation and storage , Each additional read-only node only charges for computing resources , Traditional read-only nodes contain both computing and storage resources , Each additional read-only node needs to pay the corresponding storage cost .
PolarDB There is no need to manually configure the storage space , Automatically scale according to the amount of data , You only need to pay by the hour for the amount of data actually used .
To better help you reduce your storage costs ,PolarDB Launched a prepaid storage package . When you have a large amount of data , Recommended PolarDB Storage bag , Compared to paying by the hour , There is a discount for prepaid storage bags , The more capacity you buy , The greater the discount .
Minute elasticity .
Architecture of separating storage and Computing , With shared storage , Make fast upgrades a reality .
Read consistency .
Cluster address utilization LSN(Log Sequence Number) Ensure global consistency when reading data , Avoid the inconsistency caused by the delay between master and standby .
Millisecond delay ( Physical replication ).
Utilization based on Redo Instead of physical replication based on Binlog Logical replication of , Improve the efficiency and stability of primary and standby replication . Even if you quote a large table 、 Add fields, etc DDL operation , And it won't cause database latency .
Lockless backup .
Take a snapshot of the storage tier , Can be in 60 In seconds 2TB Data size of the database backup , And the backup process does not lock the database , Almost no impact on the application , all day 24 It can be backed up in 24 hours .
Activate Alibaba cloud resources
establish PolarDB Database account
-
Double click to open the desktop FireFox ESR browser , stay RAM Click... In the user login box next step , Copy Cloud product resources In the list Subuser password Paste (lx shell Paste shortcut ctrl+shift+v, Paste in other places is ctrl+v) Go to browser RAM User login interface , You can log in to the current sub account .

-
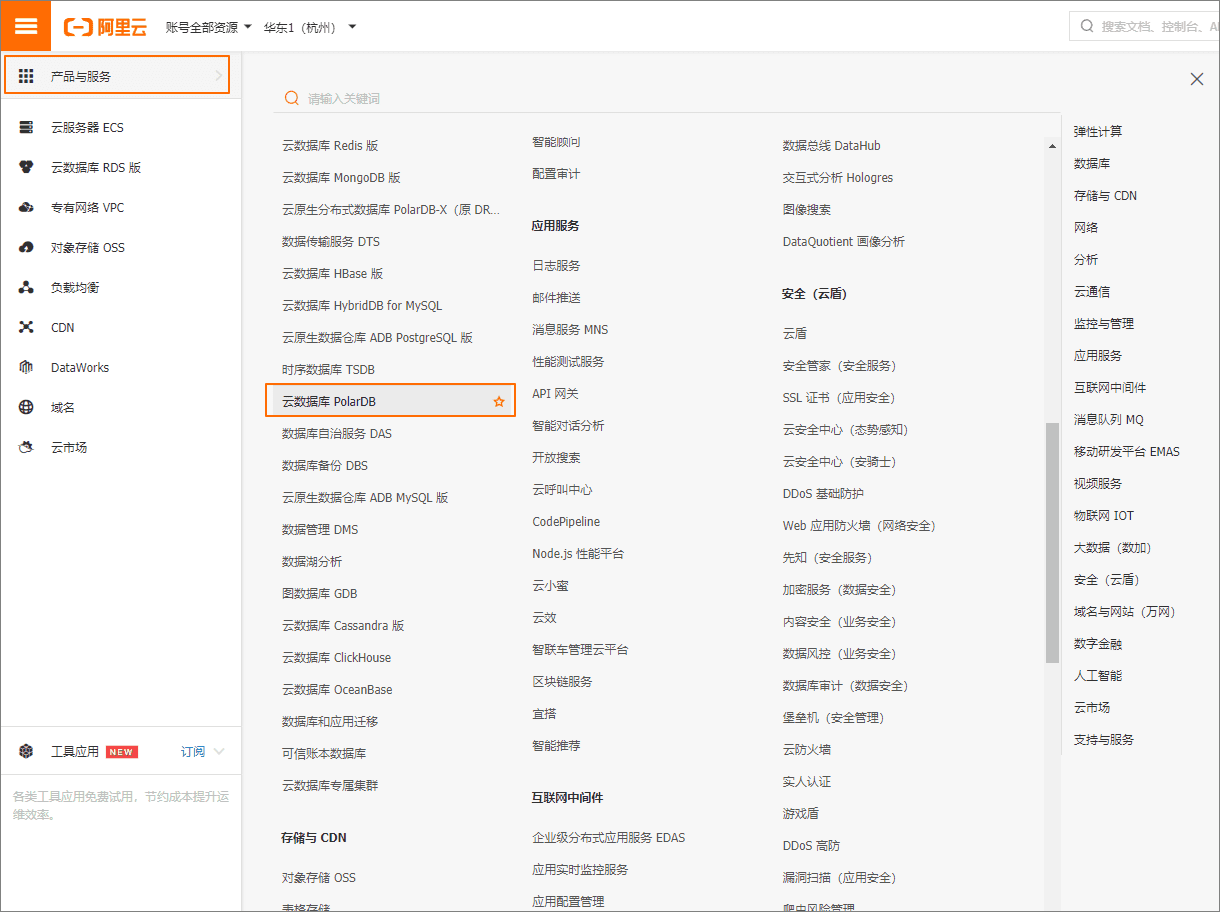
stay Home page of alicloud console Left navigation bar , In turn, click Products and services > Cloud database PolarDB , Get into Cloud database PolarDB Administrative console .
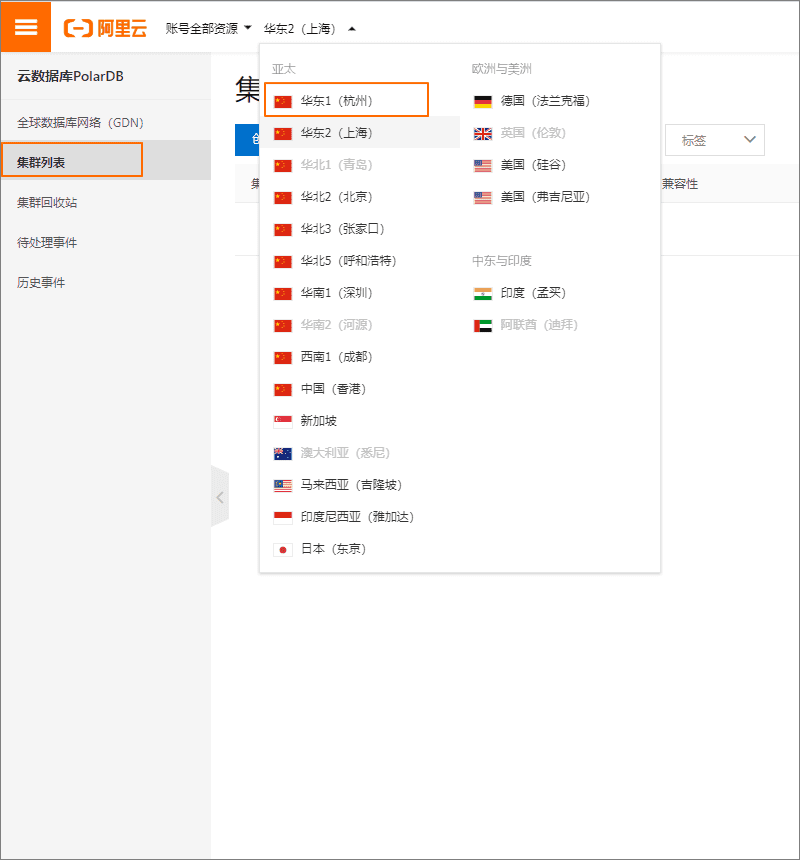
- Click on the left Cluster list , Then select the region where cloud product resources are provided . for example : East China 2( Shanghai ).
- Create a database account .
a. stay Cluster list page , single click colony ID , Get into Cluster details screen .

b. Click on the left navigation bar Configuration and management > Account management .
c. Click on the top left Create account .

d. Refer to the instructions to configure account information , And then click determine .

Database account : Enter the database account name , for example :test_user .
Account type : Select normal account here .
password : Set account password , for example :Password1213.
Confirm the password : Enter the password again .
5. Create database .
a. On the instance details page , Click... On the left navigation bar Database management , And then click Create database .
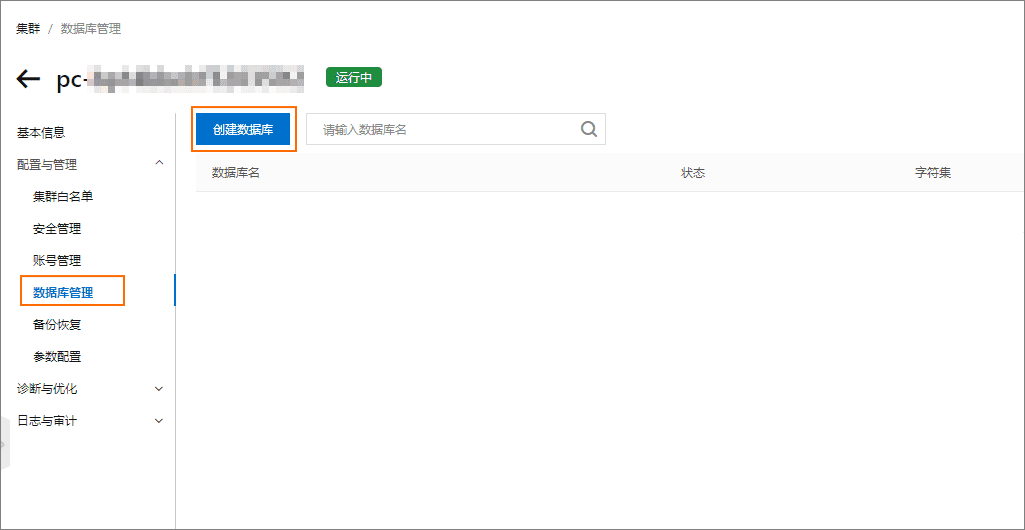
b. Refer to the instructions for configuring database information , And then click establish .

database (DB) name : Enter the database name , for example :pbootcms .
Character set support : Default to utf8mb4.
Authorized account number : Select the database account created in the previous step test_user.
Account type : The default setting is read-write .
Remarks : Not required . It is used to note the information about the database , Convenient for subsequent database management , Most support 256 Characters .
6. Set database white list .
To connect to a database, you need to set the database white list , Click on [ Cluster whitelist ], And then click [ Set up ] Set database cluster white list .
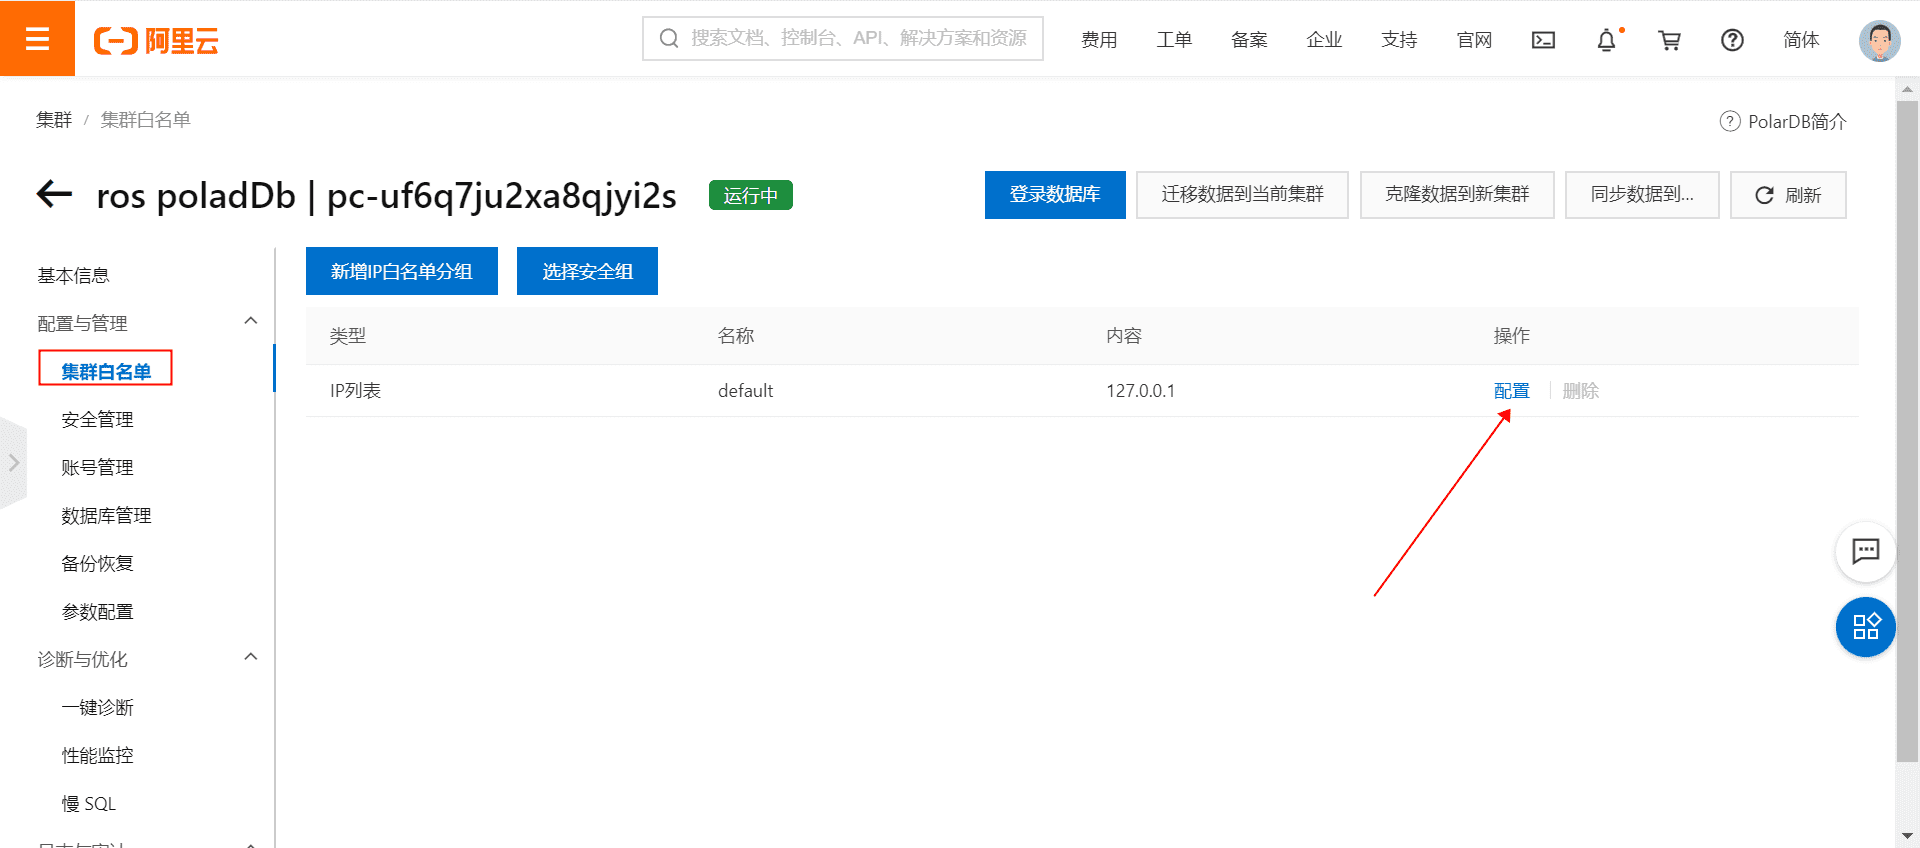
In the whitelist interface, the default whitelist address will be displayed 127.0.0.1 Change to 0.0.0.0/0, And then click [ determine ] Make white list address effective .( If you can't find it [ determine ] Button , Please press F11, Turn on full screen mode and you can see . Press again F11 You can exit full screen mode )

Connect ECS The server
Alicloud resources
https://developer.aliyun.com/adc/scenario/exp/a7161434e6cd499e9e26f2e62d0242fb
install LAMP Environmental Science
LAMP Refers to the operation in Linux Under the Apache、MySQL and PHP Environment . Refer to the following operation to install the development environment on the cloud server .
- stay ECS Server , Perform the following installation Apache Services and their extensions .
yum -y install httpd httpd-manual mod_ssl mod_perl mod_auth_mysql
If the result similar to the figure below is returned, the installation is successful .

- PbootCMS It's using PHP Language development CMS System . Refer to the following operation for installation PHP Environmental Science .
Execute the following command , install PHP.
yum -y install php php-mysql gd php-gd gd-devel php-xml php-common php-mbstring php-ldap php-pear php-xmlrpc php-imap
- Execute the following command to download and install MySQL.
wget http://dev.mysql.com/get/mysql57-community-release-el7-10.noarch.rpm
yum -y install mysql57-community-release-el7-10.noarch.rpm
yum -y install * --nogpgcheck mysql-community-server
- Execute the following command to start MySQL database .
systemctl start mysqld
Building a portal
After the environment is deployed , Refer to the following operations to build a portal .
- stay ECS Server , Execute the following command , install Git.
yum -y install git
- stay ECS Server , Execute the following command to download PbootCMS The source code file .
cd ~ && git clone https://gitee.com/hnaoyun/PbootCMS.git
- Execute the following command to copy the installation package to Apache Of wwwroot Under the table of contents .
cp -r PbootCMS/* /var/www/html/
- Execute the following command to modify the site root file permissions .
chmod -R a+w /var/www/html
- Import... Into the database CMS The initial data .
Execute the following command to initialize the database pbootcms The table structure and data of .
explain : Before executing the order , Please modify the three parameters .
See the link address section at the bottom of the cluster details page for the database connection address .
test_user For the database account created in step 2 .
Password1213 The database password created in step 2 .
sql_file="/var/www/html/static/backup/sql/"$(ls /var/www/html/static/backup/sql/) &&
mysql -h Database connection address  -utest_user -pPassword1213 -Dpbootcms < $sql_file
- Execute the following command , modify CMS System database configuration .
explain : Before executing the order , Please replace your database configuration according to the parameter description .
cat > /var/www/html/config/database.php << EOF
<?php
return array(
    'database' => array(
        'type' => 'mysqli', //  Database connection driver type : mysqli,sqlite,pdo_mysql,pdo_sqlite
        'host' => ' Database connection address ', // PolarDB Database link address
        'user' => 'test_user', // PolarDB The user name of the database
        'passwd' => 'Password1213', // PolarDB Database password
        'port' => '3306', //  Database port
        'dbname' => 'pbootcms' // Database name
    )
);
EOF
-
return ECS Console , stay ECS Instance list page , Click the created ECS example ID Link to ECS Details page .
-
On the left navigation bar , single click This example security group , Then click... For the security group ID Link to view security group configuration .
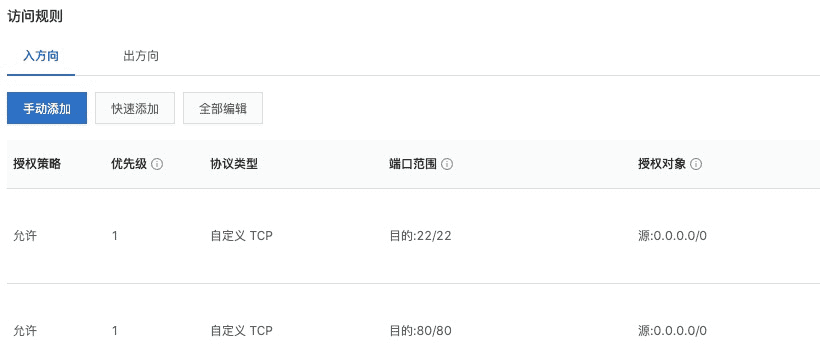
Make sure the security team is open 80 Port access , Otherwise, you can't access the established portal . A security group is a kind of virtual firewall , State detection and packet filtering capabilities , Used to divide security domains in the cloud . By configuring security group rules , You can control one or more in the security group ECS The inflow and outflow of the instance .
- Access program .
Execute the following command to restart Apache service .
systemctl restart httpd
Enter the public network of the cloud server in the browser address bar IP Address , Go to the home page of the portal .
The default access path of the system background is http://<ECS Public network IP Address >/admin.php. The default account number is admin, The password for 123456.
So far, you have completed the construction of the portal website , You can customize the content of the portal website according to the needs of the company .

版权声明
本文为[Alibaba cloud cloud Lab]所创,转载请带上原文链接,感谢
https://yzsam.com/2022/04/202204230601371817.html
边栏推荐
猜你喜欢
阿里矢量库的图标使用教程(在线,下载)
Passerelle haute performance pour l'interconnexion entre VPC et IDC basée sur dpdk

【Lombok快速入门】

DDOS攻击/防御介绍

ebfp编程常用API介绍

MySQL【sql性能分析+sql调优】

rdma 编程详解
基于DPDK实现VPC和IDC间互联互通的高性能网关

qs.stringify 接口里把入参转为&连接的字符串(配合application/x-www-form-urlencoded请求头)
Introduction to common APIs for EBFP programming
随机推荐
异常记录-17
The arithmetic square root of X in leetcode
Prometheus Cortex使用Block存储时的相关问题
Working principle and practice of browser
异常记录-7
【MySQL基础篇】启动选项、系统变量、状态变量
How to use DBA_ hist_ active_ sess_ History analysis database history performance problems
Prometheus Cortex架构概述(水平可扩展、高可用、多租户、长期存储)
基于DPDK实现VPC和IDC间互联互通的高性能网关
volatile 关键字的三大特点【数据可见性、指令禁止重排性、不保证操作原子性】
Detailed explanation of RDMA programming
【漏网之鱼】Ansible AWX调用playbook传参问题
异常记录-16
阿里矢量库的图标使用教程(在线,下载)
How to use tiup to deploy a tidb V5 0 cluster
MySQL Server单机部署手册
VirtualBox如何修改“网络地址转换(NAT)”网络模式下分配给虚拟机的IP网段
【代码解析(6)】Communication-Efficient Learning of Deep Networks from Decentralized Data
BCC installation and basic tool instructions
异常记录-11