当前位置:网站首页>Flutter Getting Started and Advanced Tour (4) Text Input Widget TextField
Flutter Getting Started and Advanced Tour (4) Text Input Widget TextField
2022-08-09 13:19:00 【Xie Dong_】
What we learned together in the previous articleTextwith how to giveTextset the font style andText Widget的一些常用属性Flutter入门进阶之旅(三) Text Widgets,通过对TextWe learn to learnTextis used to display text,If there are some special requirements for the displayed text,比如字体样式,Text color we can passTextStyle去给Text指定styleto do personalization,This is the originalAndroid的TextView非常类似,With text display, there will definitely be text input,今天我们就一起来学习一下FlutterThe text in the inputWidget TextField.
先来看下TextField的构造方法
const TextField({
    Key key,
    this.controller,           控制器,控制TextField文字
    this.focusNode,
    this.decoration = const InputDecoration(),    //输入器装饰
    TextInputType keyboardType,   输入的类型
    this.textInputAction,
    this.textCapitalization = TextCapitalization.none,
    this.style,
    this.textAlign = TextAlign.start,   //文字显示位置
    this.autofocus = false,
    this.obscureText = false,
    this.autocorrect = true,
    this.maxLines = 1,
    this.maxLength,
    this.maxLengthEnforced = true,
    this.onChanged,                //文字改变触发
    this.onEditingComplete,   //当用户提交可编辑内容时调用
    this.onSubmitted,   文字提交触发(键盘按键)
    this.inputFormatters,
    this.enabled,
    this.cursorWidth = 2.0,
    this.cursorRadius,
    this.cursorColor,
    this.keyboardAppearance,
    this.scrollPadding = const EdgeInsets.all(20.0),
  })

Through the above construction method and preview renderings,熟悉androidDo the developers who are developing feel a sense of deja vu?,Flutter的TextField跟原生Android中的EditTextUsage, including some attribute names, are almost the same,比如我们可以通过keyboardTypeTo specify the input mode of arouse the software disk,For example, the two input box property settings in the above figure:
import 'package:flutter/material.dart';
import 'package:flutter/services.dart';

void main() {
  runApp(new MaterialApp(home: new PullToRefreshDemo()));
}

class PullToRefreshDemo extends StatelessWidget {
  @override
  Widget build(BuildContext context) {
    return Scaffold(
      appBar: new AppBar(
        title: new Text("文本输入"),
      ),
      body: new Center(
          child: new Column(
        children: <Widget>[
          new Text("Simple text input box",style: new TextStyle(fontSize: 20.0)),
          new TextField(keyboardType: TextInputType.text,),  //Specify the input method as text input
          new TextField(keyboardType: TextInputType.number,),//Specifies to display the numeric keyboard by default when the soft keyboard is invoked

        ],
      )),
    );
  }
}
Through the above construction method, we notice thatTextField给我提供了onChanged、onSubmitted、OnEditingCompleteThe callback method helps us monitor the content change of the input box、编辑提交、Editing completion and other events,Let's test the binding of the above monitoring method to the input box:
   new TextField(
            onSubmitted: (value){
              print("------------文字提交触发(键盘按键)--");
            },
            onEditingComplete: (){
              print("----------------编辑完成---");
            },
            onChanged: (value){
              print("----------------The content of the input box is:$value--");
            },
            keyboardType: TextInputType.text,
          ),
Type in the input box after evoking the soft keyboard123456,log控制台打印出:

At this point, you have completely used the basic use of the input boxget到了,But the reality in the development process,Maybe we will need to specify some auxiliary description content for the input box,For example, when the input box has no input content, addhint提示,Or add next to the input boxIcon指示,Or internal text input box to display、背景色等等,These auxiliary settings areFlutterThere is a unifiedInputDecorationdecorator to complete the operation,我们先来看下InputDecoration的构造方法,Then let's simply try a few operations commonly used in daily development.
const InputDecoration({
    this.icon, //输入框左侧添加个图标
    this.labelText,//输入框获取焦点/有内容 会移动到左上角,否则在输入框内labelTex的位置
    this.labelStyle,
    this.helperText,
    this.helperStyle,
    this.hintText, //未输入文字时,输入框中的提示文字
    this.hintStyle,
    this.errorText,
    this.errorStyle,
    this.errorMaxLines,
    this.isDense,
    this.contentPadding,
    this.prefixIcon, //输入框内侧左面的控件
    this.prefix,
    this.prefixText,
    this.prefixStyle,
    this.suffixIcon,//输入框内侧右面的图标
    this.suffix,
    this.suffixText,
    this.suffixStyle,
    this.counterText,
    this.counterStyle,
    this.filled,
    this.fillColor,
    this.errorBorder,
    this.focusedBorder,
    this.focusedErrorBorder,
    this.disabledBorder,
    this.enabledBorder,
    this.border,  //增加一个边框
    this.enabled = true,
    this.semanticCounterText,
  })
Add input auxiliary input description to input box:
 body: new Center(
          child: new TextField(
            decoration: new InputDecoration(
                labelText: "请输入内容",//输入框内无文字时提示内容,有内容时会自动浮在内容上方
                helperText: "随便输入文字或数字", //输入框底部辅助性说明文字
                prefixIcon: new Icon(Icons.print), //input box left icon
                suffixIcon: new Icon(Icons.picture_as_pdf), //Picture on the right side of the input box
                contentPadding: const EdgeInsets.only(bottom:15.0)),
            keyboardType: TextInputType.number,
          ),
        ));
通过给InputDecoration设置borderAdd border to input box:
  body: new Center(
          child: new TextField(
            decoration: new InputDecoration(
                border: new OutlineInputBorder(  //添加边框
                  gapPadding: 10.0,
                  borderRadius: BorderRadius.circular(20.0),
                ),
                prefixIcon: new Icon(Icons.print),
                contentPadding: const EdgeInsets.all(15.0)),
            keyboardType: TextInputType.number,
          ),
        ));
Other styles and attributes readers can run the experience by themselves,I won't list them one by one.,In short, use the reference documents combined with the experience of native developmentTextField还是比较简单的.I share a complete login belowUI的例子供大家参考:
完整代码:
import 'package:flutter/material.dart';

void main() {
  runApp(new MaterialApp(home: new MyApp()));
}

class MyApp extends StatefulWidget {
  @override
  State<StatefulWidget> createState() {
    return new MyAppState();
  }
}

class MyAppState extends State<MyApp> {
  @override
  Widget build(BuildContext context) {
    TextEditingController _userPhoneController = new TextEditingController();
    TextEditingController _userPasswordController = new TextEditingController();

    /**
     * 清空输入框内容
     */
    void onTextClear() {
      setState(() {
        _userPhoneController.text = "";
        _userPasswordController.text = "";
      });
    }

    return new Scaffold(
        appBar: new AppBar(
          title: new Text("登录"),
        ),
        body: new Column(
          children: <Widget>[
            new TextField(
              controller: _userPhoneController,
              keyboardType: TextInputType.number,
              decoration: new InputDecoration(
                  contentPadding: const EdgeInsets.all(10.0),
                  icon: new Icon(Icons.phone),
                  labelText: "请输入手机号",
                  helperText: "The mobile phone number entered during registration"),
              onChanged: (String str) {
                //onChanged是每次输入框内每次文字变更触发的回调
                print('手机号为:$str----------');
              },
              onSubmitted: (String str) {
                //onSubmitted是用户提交而触发的回调{当用户点击提交按钮(Input the enter key)}
                print('最终手机号为:$str---------------');
              },
            ),
            new TextField(
              controller: _userPasswordController,
              keyboardType: TextInputType.text,
              decoration: new InputDecoration(
                  contentPadding: const EdgeInsets.all(10.0),
                  icon: new Icon(Icons.nature_people),
                  labelText: "请输入名字",
//                  hintText: "fdsfdss",
                  helperText: "注册名字"),
            ),
            new Builder(builder: (BuildContext context) {
              return new RaisedButton(
                onPressed: () {
                  if (_userPasswordController.text.toString() == "10086" &&
                      _userPhoneController.text.toString() == "10086") {
                    Scaffold.of(context)
                        .showSnackBar(new SnackBar(content: new Text("校验通过")));
                  } else {
                    Scaffold.of(context)
                        .showSnackBar(new SnackBar(content: new Text("校验有问题,请重新输入")));
                    onTextClear(); //Is the input,让用户重新输入
                  }
                },
                color: Colors.blue,
                highlightColor: Colors.deepPurple,
                disabledColor: Colors.cyan,
                child: new Text(
                  "登录",
                  style: new TextStyle(color: Colors.white),
                ),
              );
            })
          ],
        ));
  }
}边栏推荐
- 数字化转型之支撑保障单元
- 8、IDEA提交代码出现: Fetch failed fatal: Could not read from remote repository
- 手写大根堆
- 非科班AI小哥火了:他没有ML学位,却拿到DeepMind的offer
- AI basketball referee, walking is special, ask harden care don't care
- 曲鸟全栈UI自动化教学(八):框架代码讲解和进一步优化
- 罗振宇折戟创业板/ B站回应HR称用户是Loser/ 腾讯罗技年内合推云游戏掌机...今日更多新鲜事在此...
- 用 API Factory 产品生成 API 文档
- 用皮肤“听”音乐,网友戴上这款装备听音乐会:仿佛住在钢琴里
- 随机快排时间复杂度是N平方?
猜你喜欢
ABAP 面试题:如何使用 ABAP 编程语言的 System CALL 接口,直接执行 ABAP 服务器所在操作系统的 shell 命令?

用皮肤“听”音乐,网友戴上这款装备听音乐会:仿佛住在钢琴里
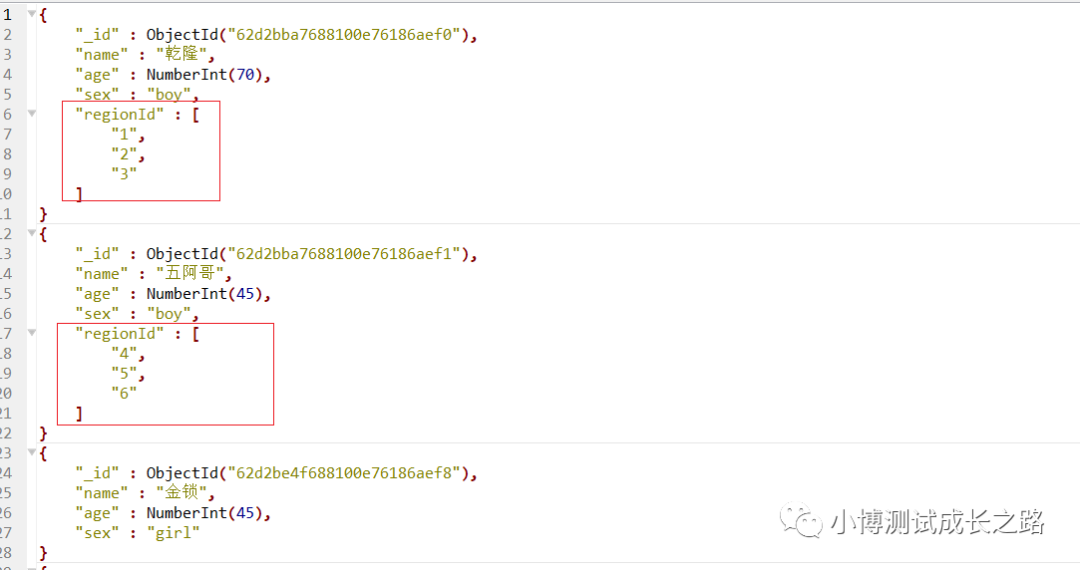
MongoDB-查询中$all的用法介绍
00后写个暑假作业,被监控成这笔样
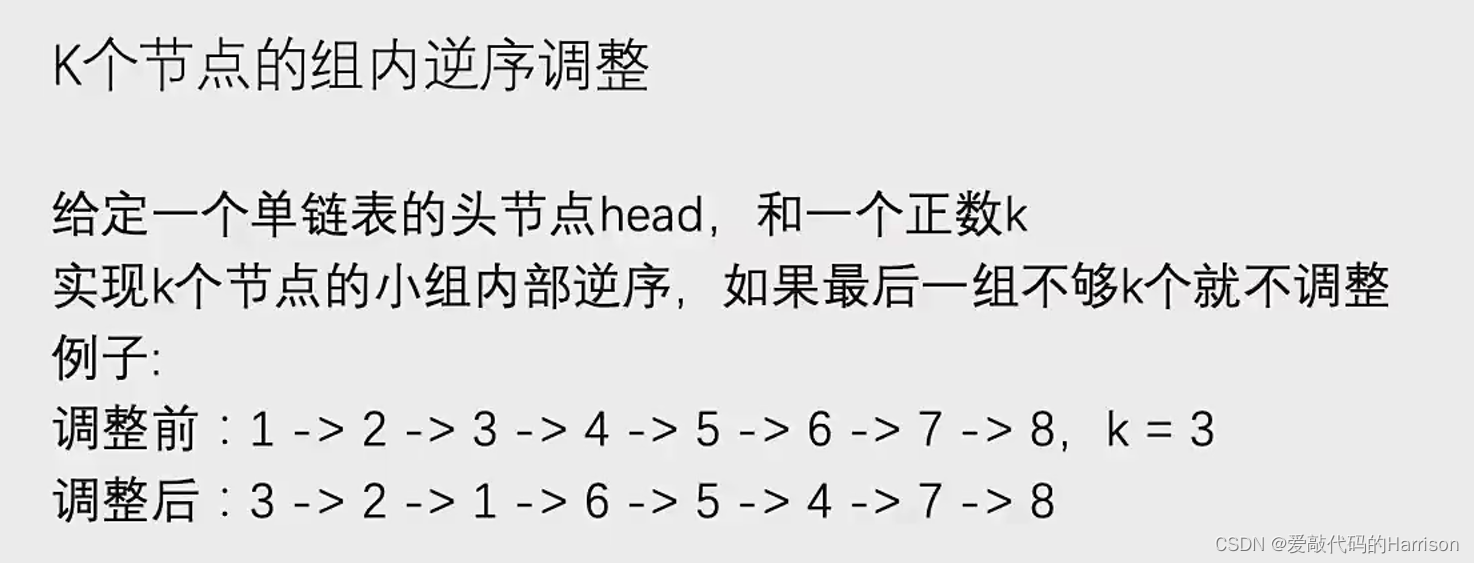
Intra-group reverse order adjustment of K nodes

中科院打脸谷歌:普通电脑追上量子优越性,几小时搞定原本要一万年的计算...

JD.com architects tidy up: what are the core technical knowledge points of jvm and performance tuning
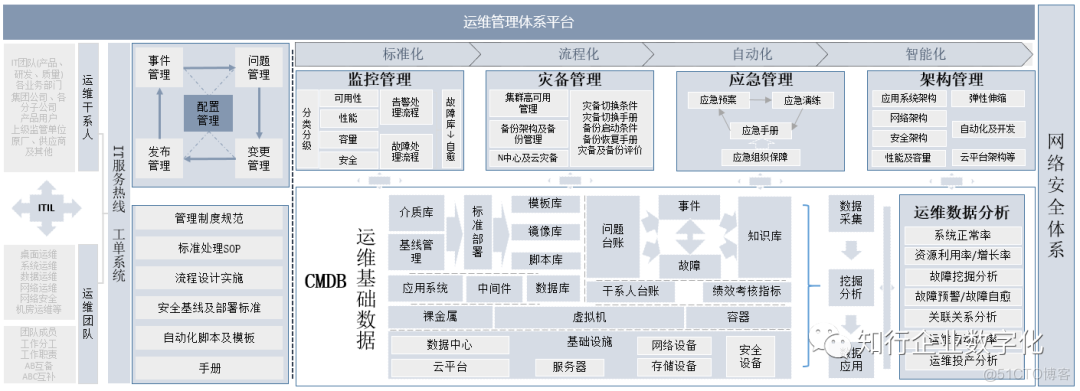
数字化转型之支撑保障单元
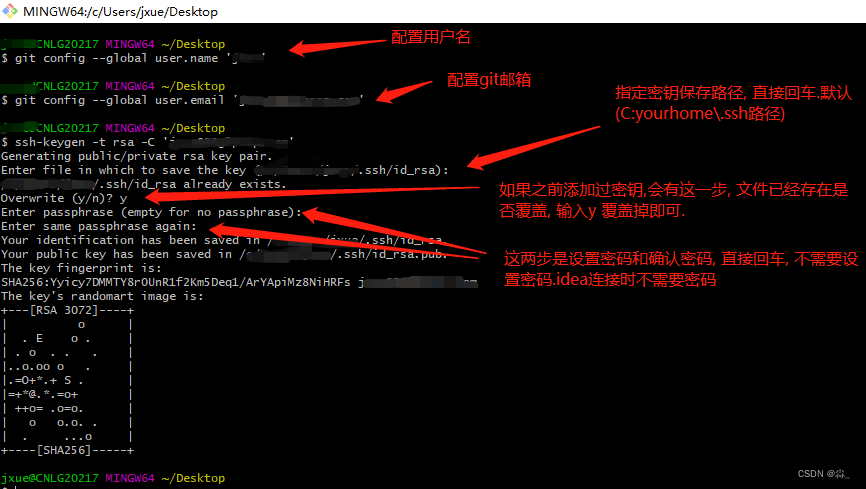
8、IDEA提交代码出现: Fetch failed fatal: Could not read from remote repository

国产抗新冠口服药每瓶不超300元/ 我国IPv6网络全面建成/ 谷歌入局折叠屏手机...今日更多新鲜事在此...
随机推荐
Flutter入门进阶之旅(五)Image Widget
8、IDEA提交代码出现: Fetch failed fatal: Could not read from remote repository
腾讯欲成育碧最大股东/ 米哈游招NLP内容生成研究员/ AI发现四千余物种濒临灭绝...今日更多新鲜事在此...
WebView injects Js code to realize large image adaptive screen click image preview details
Compensation transaction and idempotency guarantee based on CAP components
h264 protocol
脱光衣服待着就能减肥,当真有这好事?
告别手摇织布机的AI时代
Flutter入门进阶之旅(八)Button Widget
Intranet penetration tool ngrok usage tutorial
Report: The number of students who want to learn AI has increased by 200%, and there are not enough teachers
罗振宇折戟创业板/ B站回应HR称用户是Loser/ 腾讯罗技年内合推云游戏掌机...今日更多新鲜事在此...
微服务架构的核心关键点
AQS Synchronization Component - FutureTask Analysis and Use Cases
Byte Qiu Zhao confused me on both sides, and asked me under what circumstances would the SYN message be discarded?
二叉树的序列化和反序列化
我们真的需要DApp吗?App真的不能满足我们的幻想吗?
AI篮球裁判火了,走步算得特别准,就问哈登慌不慌
WeChat payment development process
1-hour live broadcast recruitment order: industry big names share dry goods, and enterprise registration opens丨qubit·viewpoint