当前位置:网站首页>sprintboot验证码kaptcha 自定义图片样式
sprintboot验证码kaptcha 自定义图片样式
2022-08-10 16:10:00 【if...else...】
前言
本文教大家如何自定义kaptcha的图片样式,效果如下:
一、kaptcha默认的图片样式的问题
这里我以鱼眼效果为例,大家看下默认的效果:
从上图大家可以看到,文字变形很严重,不是很好辨认。
下面是xml配置文件:
<?xml version="1.0" encoding="UTF-8"?>
<beans xmlns="http://www.springframework.org/schema/beans" xmlns:xsi="http://www.w3.org/2001/XMLSchema-instance" xsi:schemaLocation="http://www.springframework.org/schema/beans http://www.springframework.org/schema/beans/spring-beans.xsd">
    <!-- 生成kaptcha的bean-->
    <bean id="captchaProducer" class="com.google.code.kaptcha.impl.DefaultKaptcha">
        <property name="config">
            <bean class="com.google.code.kaptcha.util.Config">
                <constructor-arg type="java.util.Properties">
                    <!--设置kaptcha属性 -->
                    <props>
                        <prop key="kaptcha.border ">yes</prop>
                        <prop key="kaptcha.border.color">105,179,90</prop>
                        <prop key="kaptcha.textproducer.font.color">black</prop>
                        <prop key="kaptcha.image.width">100</prop>
                        <prop key="kaptcha.image.height">44</prop>
                        <prop key="kaptcha.textproducer.font.size">27</prop>
                        <prop key="kaptcha.session.key">code</prop>
                        <prop key="kaptcha.textproducer.char.length">4</prop>
                        <prop key="kaptcha.textproducer.font.names">Arial, Courier</prop>
                        <prop key="kaptcha.textproducer.char.string">0123456789</prop>
                        <prop key="kaptcha.obscurificator.impl">com.google.code.kaptcha.impl.FishEyeGimpy</prop>
                        <!-- <prop key="kaptcha.noise.color">black</prop>-->
                        <prop key="kaptcha.noise.impl">com.google.code.kaptcha.impl.NoNoise</prop>
                        <prop key="kaptcha.textproducer.char.space">3</prop>
                        <prop key="kaptcha.textproducer.impl">com.google.code.kaptcha.text.impl.DefaultTextCreator</prop>         </props>
                </constructor-arg>
            </bean>
        </property>
    </bean>
</beans>
其中图片效果用的是com.google.code.kaptcha.impl.FishEyeGimpy
二、自定义图片效果的步骤
这里我还是以鱼纹效果为例
1.创建自定义鱼纹效果类
代码如下(示例):
package com.zjyc.qzaft.entity.customs;

import com.google.code.kaptcha.impl.FishEyeGimpy;

import java.awt.*;
import java.awt.image.BufferedImage;

/** * Author: mek * Date: 2022\5\14 0014 * Time: 10:37 * Description: 自定义鱼眼纹效果 */
public class AftFishEyeGimpy extends FishEyeGimpy {

    @Override
    public BufferedImage getDistortedImage(BufferedImage baseImage) {

        Graphics2D graph = (Graphics2D)baseImage.getGraphics();
        int imageHeight = baseImage.getHeight();
        int imageWidth = baseImage.getWidth();
        int horizontalLines = imageHeight / 7;
        int verticalLines = imageWidth / 7;
        int horizontalGaps = imageHeight / (horizontalLines + 1);
        int verticalGaps = imageWidth / (verticalLines + 1);

        int i;
        for(i = horizontalGaps; i < imageHeight; i += horizontalGaps) {

            graph.setColor(Color.blue);
            graph.drawLine(0, i, imageWidth, i);
        }

        for(i = verticalGaps; i < imageWidth; i += verticalGaps) {

            graph.setColor(Color.red);
            graph.drawLine(i, 0, i, imageHeight);
        }

        int[] pix = new int[imageHeight * imageWidth];
        int j = 0;

        for(int j1 = 0; j1 < imageWidth; ++j1) {

            for(int k1 = 0; k1 < imageHeight; ++k1) {

                pix[j] = baseImage.getRGB(j1, k1);
                ++j;
            }
        }

		/*这里删除了默认鱼纹效果类的渲染代码*/

        return baseImage;
    }
}
2.修改kaptcha.xml配置
将图片效果类设置成自己的AftFishEyeGimpy类
代码如下(示例):
<prop key="kaptcha.obscurificator.impl">com.zjyc.qzaft.entity.customs.AftFishEyeGimpy</prop>
总结
自定义图片效果的方法,就是新建类继承默认的效果类,然后重写getDistortedImage函数。
边栏推荐
猜你喜欢


随机推荐
观测云入选 CNCF 云原生全景图
Gif动图制作怎么在线操作?一招教你快速完成gif在线制作
ExceptionInInitializerError
MySQL-创建、修改和删除表
安克创新每一个“五星好评”背后,有怎样的流程管理?
如何修改gif图片尺寸?教你一键裁剪gif尺寸
北海 Kraken:基于 Flutter 构建的高性能 Web 渲染引擎
cmake记录
怎么截取视频做gif动图?手把手教你视频在线转gif制作
cube-studio配置镜像仓库并允许
如何将jpg静图做成gif动图?教你1分钟快速合成gif
如何将jpg图片变成gif?教你一分钟图片合成gif的方法
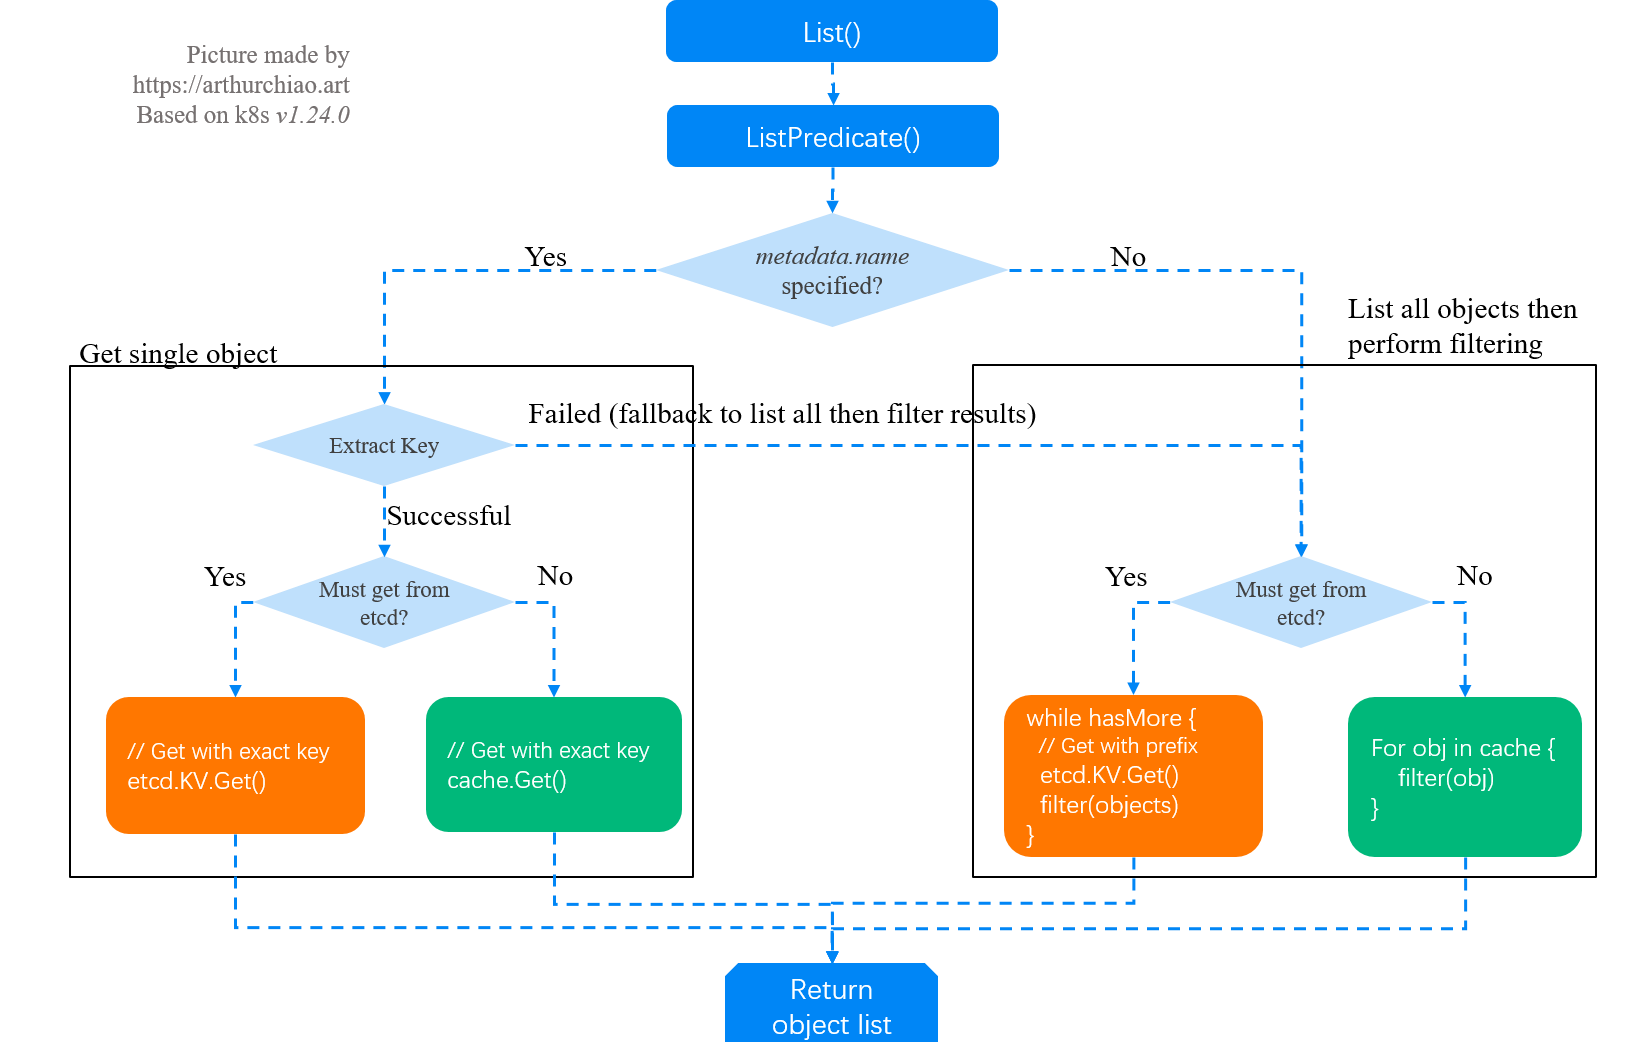
Etcd Kubernetes 集群稳定性:LIST 请求源码分析、性能评估与大规模基础服务部署调优
C专家编程 第10章 再论指针 10.7 使用指针创建和使用动态数组
FTXUI基础笔记(botton按钮组件进阶)
虚拟电厂可视化大屏,深挖痛点精准减碳
uniapp使用scroll-view,设置横向,内容重叠的问题解决
智为链接,慧享生活,荣耀智慧服务,只为 “懂” 你
Mastodon:可创建类似推特的开源社交网络服务器
视频转gif怎样操作?1分钟在线视频转gif制作