当前位置:网站首页>Simple construction of rebbitmq
Simple construction of rebbitmq
2022-04-23 11:23:00 【Fields after dusk】
install rebbitMQ Simple use :
First step docker install rebbitMQ
One 、 Get mirror image
Use docker search rabbitMq Command to get the list of images

2. Use docker pull docker.io/rabbitmq:3.8-management Pull the mirror image

We chose STARS Most official images , Notice here , Default rabbitmq The image is without web End management plug-in , So the image is specified tag by 3.8-management, Indicates that the download contains web Manage plug-in version images , Other Tag Version can be accessed DockerHub Inquire about
Two 、 establish rabbitMq Containers
1. Use docker images Get to see rabbitMQ Mirror image ID, My is d5458fa6a2bf

2. perform docker run --name rabbitmq -d -p 15672:15672 -p 5672:5672 d5458fa6a2bf Command to create rabbitMq Containers , The meanings of the parameters are as follows :
–name Container name specified
-d Specifies that the container runs as a background daemon
-p Specifies the mapping between the container's internal port number and the host ,rabbitMq The default is to use 15672 For its web Port when accessing the end interface ,5672 Is the data communication port
After the command is executed ,docker Will use ID by d5458fa6a2bf Image creation container of , After creation, return to the container ID by ed77b4a651e84377bcf9a0a46564472eed39f85ca…
( Too long to omit )
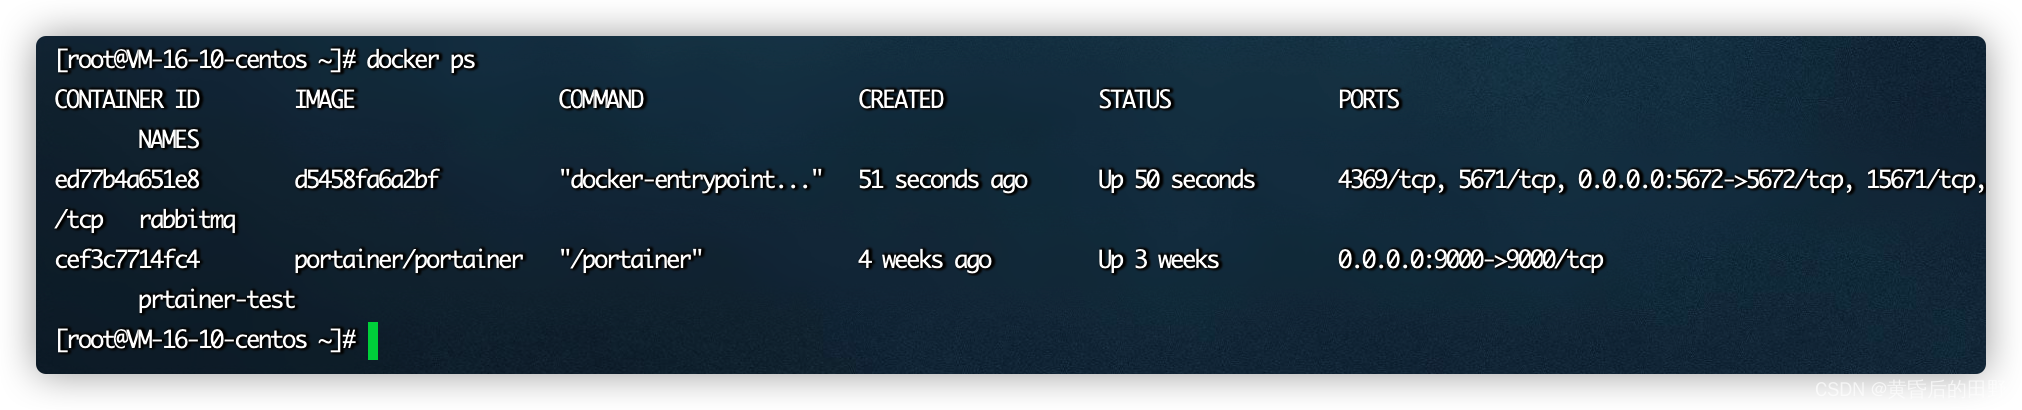
perform docker ps You can view the running containers , We can see that rabbitMq Already run
3. View container log Use docker logs -f Containers ID Command to view the container log , We execute docker logs -f ed7 Command view rabbitMq Log during startup ,ed7 It's a container ID Abbreviation —— Containers ID Too long , When in use, it can be written in the first few digits

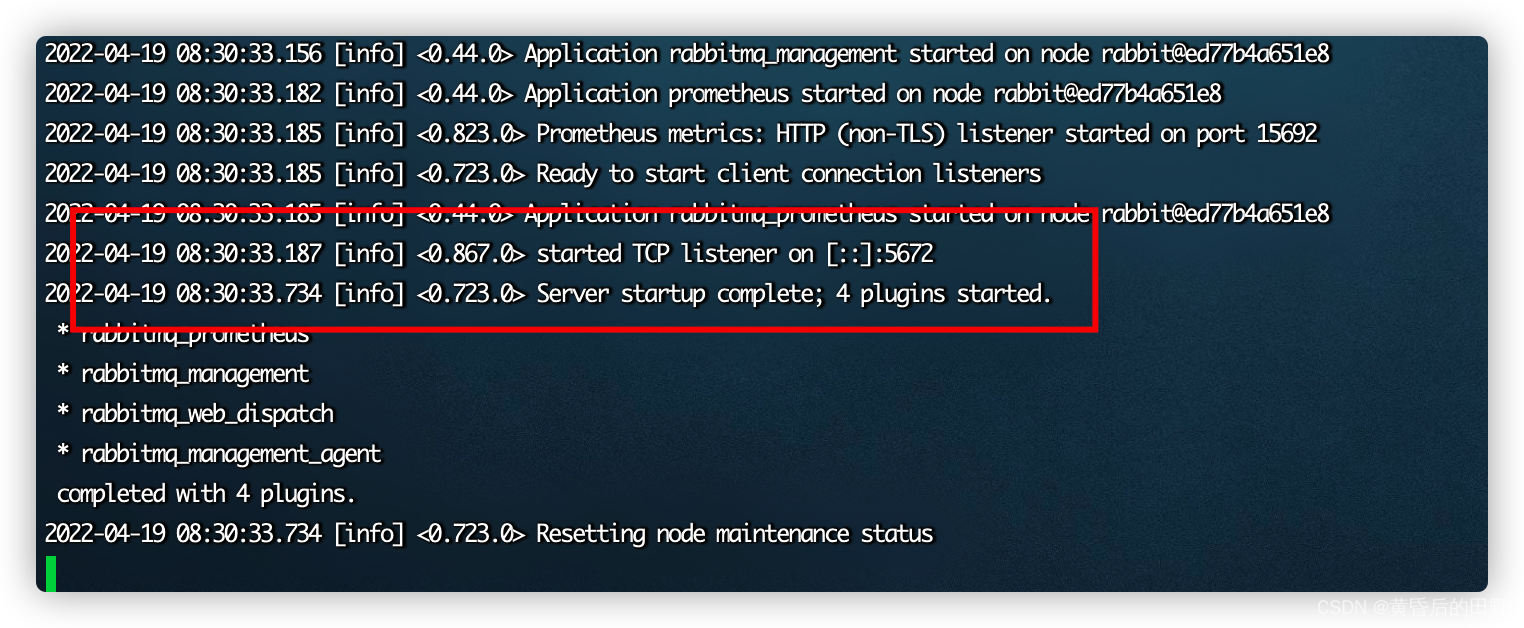
As can be seen from the log ,rabbitMq By default guest user , And give administr
ator Role permissions , Simultaneous service monitoring 5672 port TCP The connection and 15672 Port of HTTP Connect , So far, the installation is successful .
3、 ... and 、 visit rabbitMq
1. visit web Interface
In the browser. Enter your host Ip:15672 Press enter to access rabbitMq Of Web End management interface , The default username and password are guest, The following interface appears as shown in the figure, which means that it has been successful .

2. Add a new account
default guest The account has access restrictions , By default, only through local network ( Such as localhost) visit , Remote network access is limited , So we usually add additional users when using , For example, we add a root user :
① perform docker exec -i -t ed7 bin/bash Enter into rabbitMq Inside of container
[root@localhost docker]# docker exec -i -t ed7 bin/bash
root@3ae75edc48e2:/#
perform rabbitmqctl add_user root 123456 Add users , The user is called root, The password for 123456
root@3ae75edc48e2:/# rabbitmqctl add_user root 123456
Adding user "root" ...
③ perform abbitmqctl set_permissions -p / root ".*" ".*" ".*" give root All rights of the user
root@3ae75edc48e2:/# rabbitmqctl set_permissions -p / root ".*" ".*" ".*"
Setting permissions for user "root" in vhost "/" ...
④ perform rabbitmqctl set_user_tags root administrator give root user
administrator role
root@3ae75edc48e2:/# rabbitmqctl set_user_tags root administrator
Setting tags for user "root" to [adminstrator] ...
⑤ perform rabbitmqctl list_users View all users to see root The user has been added successfully
root@3ae75edc48e2:/# rabbitmqctl list_users
Listing users ...
user	tags
guest	[administrator]
root	[administrator]
Copy code execution exit command , Exit from the inside of the container . Now we use root The account login web The interface is also OK . Here we are ,rabbitMq The installation of is over , The next step is the actual code development .

author : Sky mending Captain
link :https://juejin.cn/post/6844903970545090574
source : Rare earth digs gold
版权声明
本文为[Fields after dusk]所创,转载请带上原文链接,感谢
https://yzsam.com/2022/04/202204231119486186.html
边栏推荐
- mysql中整数数据类型tinyint详解
- MySQL数据库事务transaction示例讲解教程
- rebbitMQ的简单搭建
- Summary of the relationship among GPU, CUDA and cudnn
- Canvas详解
- Study notes of C [8] SQL [1]
- Usage Summary of datetime and timestamp in MySQL
- AcWing 1874. 哞加密(枚举,哈希)
- MQ在laravel中简单使用
- Get things technology network optimization - CDN resource request Optimization Practice
猜你喜欢

After the MySQL router is reinstalled, it reconnects to the cluster for boot - a problem that has been configured in this host before

年度最尴尬的社死瞬间,是Siri给的

解析社交性机器人对基础科学的作用

CUMCM 2021-B:乙醇偶合制备C4烯烃(2)

MQ在laravel中简单使用

Upgrade the functions available for cpolar intranet penetration

Redis optimization series (II) redis master-slave principle and master-slave common configuration

R-Drop:更强大的Dropout正则方法

nacos基础(8):登录管理

nacos基础(5):nacos配置入门
随机推荐
防止web项目中的SQL注入
用curl库压缩成发送字符串为utf8并用curl库发送
laravel-admin表单验证
进程间通信 -- 消息队列
Detailed explanation of how to smoothly go online after MySQL table splitting
GPU, CUDA,cuDNN三者的关系总结
Excel · VBA array bubble sorting function
qt 64位静态版本显示gif
qt5.8 64 位静态库中想使用sqlite但静态库没有编译支持库的方法
MySQL failed to insert the datetime type field without single quotation marks
Excel·VBA自定义函数获取单元格多数值
Write console script by laravel
谁说抠图要会 PS?这个开源神器还能批量抠,效果拔群!
Analysis on the characteristics of the official game economic model launched by platoffarm
QT 64 bit static version display gif
Summary of QT semaphore unresolved errors
Constraintlayout layout
系统编程之高级文件IO(十三)——IO多路复用-select
@Valid, @ validated learning notes
Oracle连通性测试小工具