当前位置:网站首页>ASP.NET和ASP.NETCore多环境配置对比
ASP.NET和ASP.NETCore多环境配置对比
2022-04-23 03:02:00 【dotNET跨平台】
前言
多环境配置应该都很熟悉了,最为常见的便是Debug和Release,例如下图是新建的一个asp.net项目,配置文件展开共有三个文件组成
据我所知,大多公司从来没编辑过Web.Debug.config和Web.Release.config,一个Web.config文件改来改去来切换不同的配置,十分麻烦。
asp.net下的多环境配置
哪怕你随手双击打开Web.Debug.config和Web.Release.config任何一个,看看里面的注释。
Web.Debug.config<?xml version="1.0" encoding="utf-8"?>
<!-- 有关使用 Web.config 转换的详细信息,请访问 https://go.microsoft.com/fwlink/?LinkId=301874 -->
<configuration xmlns:xdt="http://schemas.microsoft.com/XML-Document-Transform">
<!--
在下例中,“SetAttributes”转换将更改
“connectionString”的值,仅在“Match”定位器找到值为“MyDB”的
特性“name”时使用“ReleaseSQLServer”。
<connectionStrings>
<add name="MyDB"
connectionString="Data Source=ReleaseSQLServer;Initial Catalog=MyReleaseDB;Integrated Security=True"
xdt:Transform="SetAttributes" xdt:Locator="Match(name)"/>
</connectionStrings>
-->
<system.web>
<!--
在以下示例中,"Replace" 转换将替换 Web.config 文件的
整个 <customErrors> 节。
请注意,由于在 <system.web> 节点下只有一个
customErrors 节,因此无需使用 "xdt:Locator" 属性。
<customErrors defaultRedirect="GenericError.htm"
mode="RemoteOnly" xdt:Transform="Replace">
<error statusCode="500" redirect="InternalError.htm"/>
</customErrors>
-->
</system.web>
</configuration>微软为了让你使用它,把不仅给出实例,还配上详细的注释。
下面再展示下最为常用的appSettings如何配置
Web.config // 开发环境<appSettings>
<add key="webpages:Version" value="3.0.0.0" />
<add key="webpages:Enabled" value="false" />
<add key="ClientValidationEnabled" value="true" />
<add key="UnobtrusiveJavaScriptEnabled" value="true" />
<add key="MyKey" value="Myvalue" />
</appSettings>Web.Release.config // Release环境<appSettings>
<add key="webpages:Version" value="3.0.0.0" />
<add key="webpages:Enabled" value="false" />
<add key="ClientValidationEnabled" value="true" />
<add key="UnobtrusiveJavaScriptEnabled" value="true" />
<add key="MyKey" value="Releasvalue" xdt:Transform="Replace" xdt:Locator="Match(key)" />
</appSettings>经过这样的配置后,本机开发时读取到MyKey的值为Myvalue,发布生产环境时值为Releasvalue。
按照上面的配置,本地发布一下试试。
发布成功后,打开发布后的Web.config文件,我们发现开发环境下Web.config中对应的值被替换了。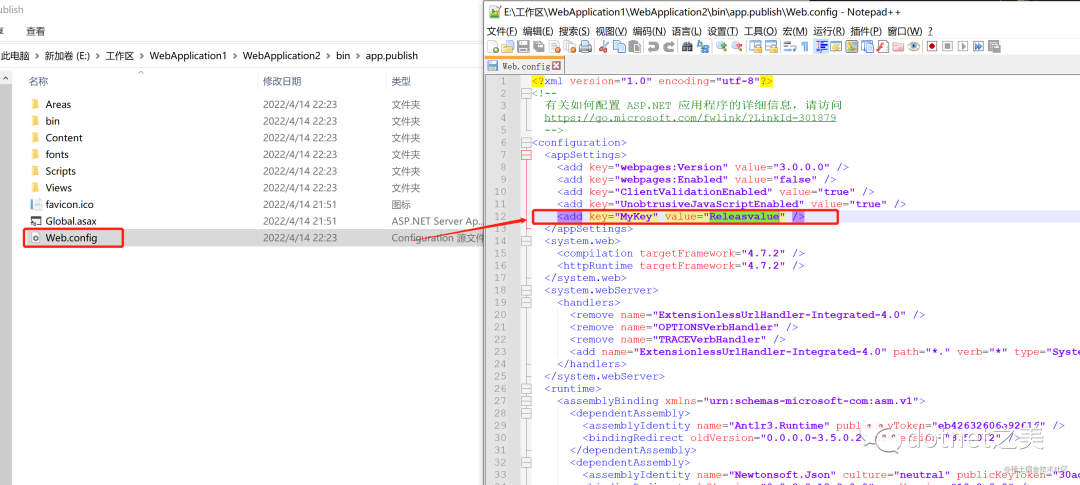
如何增加额外的环境配置
有时候Debug和Release两个环境还不能满足我们的需要,需要增加更多的环境配置。
打开菜单生成-->配置管理器,新建一个TEST1环境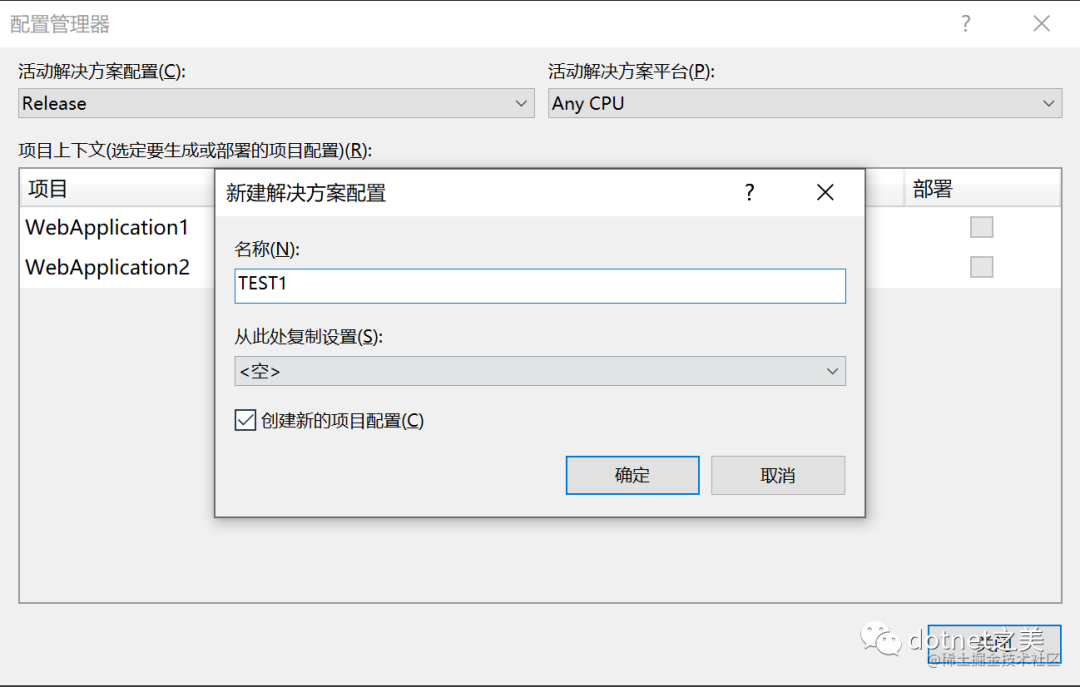
然后右键Web.config选择添加配置转换(第四个)
会自动生成一个Web.TEST1.config文件,添加一个该环境下的配置用来覆盖开发配置
更改发布的配置
打开发布成功后的Web.config文件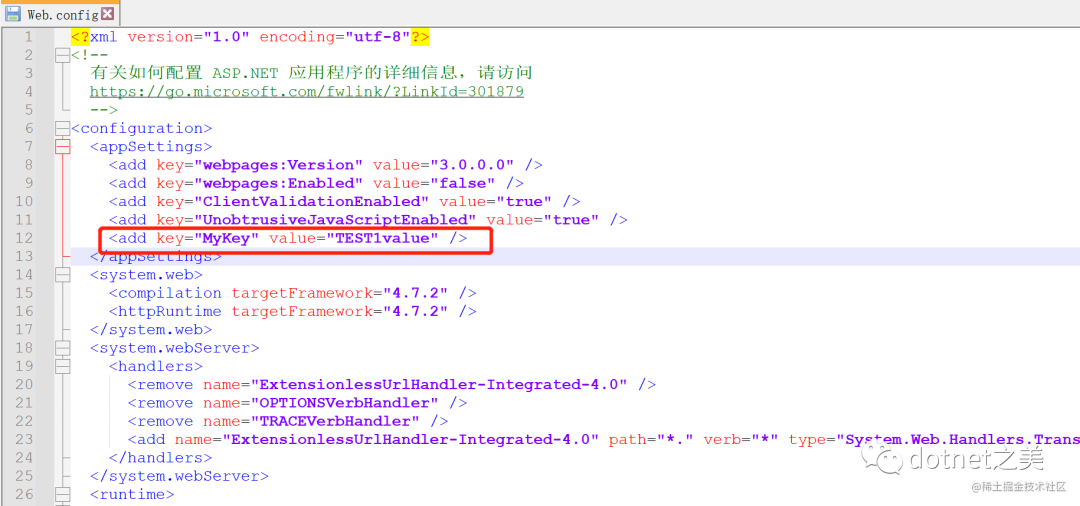
效果与预期一致。
aspnetcore下的多环境配置
aspnetcore中的配置文件被appsettings.json所取代,.NET Core中的配置是使用一个或多个配置提供程序执行的。配置提供程序使用各种配置源从键值对读取配置数据:
什么是配置提供程序
下表显示了 .NET Core 应用可用的配置提供程序。
| 提供程序 | 通过以下对象提供配置 |
|---|---|
| Azure 应用配置提供程序 | Azure 应用程序配置 |
| Azure Key Vault 配置提供程序 | Azure Key Vault |
| 命令行配置提供程序 | 命令行参数 |
| 自定义配置提供程序 | 自定义源 |
| 环境变量配置提供程序 | 环境变量 |
| 文件配置提供程序 | JSON、XML 和 INI 文件 |
| Key-per-file 配置提供程序 | 目录文件 |
| 内存配置提供程序 | 内存中集合 |
| 应用机密(机密管理器) | 用户配置文件目录中的文件 |
详细内容参考 .NET 中的配置
https://docs.microsoft.com/zh-cn/dotnet/core/extensions/configuration
其中以下部分比较值得注意
划重点:后来添加的配置提供程序会替代之前的密钥设置appsettings.Development.json比appsettings.json后加载,则后加载的会覆盖先加载配置的值,没毛病!
多环境配置文件时如何加载
为了彻底弄清楚底层加载逻辑,下载源码一探究竟。
builder.ConfigureAppConfiguration((hostingContext, config) =>
        {
            var env = hostingContext.HostingEnvironment;

            config.AddJsonFile("appsettings.json", optional: true, reloadOnChange: true)
                  .AddJsonFile($"appsettings.{env.EnvironmentName}.json", optional: true, reloadOnChange: true);

            if (env.IsDevelopment())
            {
                if (!string.IsNullOrEmpty(env.ApplicationName))
                {
                    var appAssembly = Assembly.Load(new AssemblyName(env.ApplicationName));
                    if (appAssembly != null)
                    {
                        config.AddUserSecrets(appAssembly, optional: true);
                    }
                }
            }

            config.AddEnvironmentVariables();

            if (args != null)
            {
                config.AddCommandLine(args);
            }
})默认的WebHostBuilder,用环境变量env.EnvironmentName拼接的文件就是默认加载的Json配置文件。
也就解释了为什么开发阶段会加载appsettings.Development.json配置文件了。
VS本地开发时如何切换环境
如何修改环境变量EnvironmentName值是问题的关键,若能修改想要的值,然后创建对应名称的配置文件即可。
在web根目录存在一个文件:Properties/launchSettings.json
其中有一个配置环境变量的配置
"environmentVariables": {
    "ASPNETCORE_ENVIRONMENT": "Development"
},本地开发时只需要创建多个启动配置,分别设置不同的ASPNETCORE_ENVIRONMENT即可进行切换了,修改后的launchSettings.json
// launchSettings.json
{
  "iisSettings": {
    "windowsAuthentication": false,
    "anonymousAuthentication": true,
    "iisExpress": {
      "applicationUrl": "http://localhost:2364",
      "sslPort": 44302
    }
  },
  "profiles": {
    "Web1": {
      "commandName": "Project",
      "launchBrowser": true,
      "environmentVariables": {
        "ASPNETCORE_ENVIRONMENT": "Development"
      },
      "applicationUrl": "https://localhost:7006;http://localhost:5006",
      "dotnetRunMessages": true
    },
    "Web1:Test": {
      "commandName": "Project",
      "launchBrowser": true,
      "environmentVariables": {
        "ASPNETCORE_ENVIRONMENT": "TEST"
      },
      "applicationUrl": "https://localhost:7006;http://localhost:5006",
      "dotnetRunMessages": true
    }
  }
}Web1和Web1:Test启动选项便会同步显示在VS启动选项中,切换为Web1:Test再运行程序,就会加载appsettings.TEST.json,效果和appsettings.Development.json没区别。
如何在发布时应用不同的配置文件
在上文中我们学会了在本地配置多个不同环境配置进行开发,那如果需要发布的生产环境也有很多种配置,那如何让程序自动加载不同的配置文件呢,毕竟launchSettings.json文件只是在开发时搭配VS用的,既然launchSettings.json可以配置环境变量,没了它我们手动创建环境变量应该也可以。在操作系统添加环境变量如:

也可以在程序启动时通过命令行传参设置环境值。
但是这两种我都感觉不方便,我们希望程序根据不同的环境发布好以后,只需要直接执行就好,而不是需要进行额外的配置或传参。
EnvironmentName 属性
在项目的工程文件中有EnvironmentName属性,可以指定当前EnvironmentName值,添加如下代码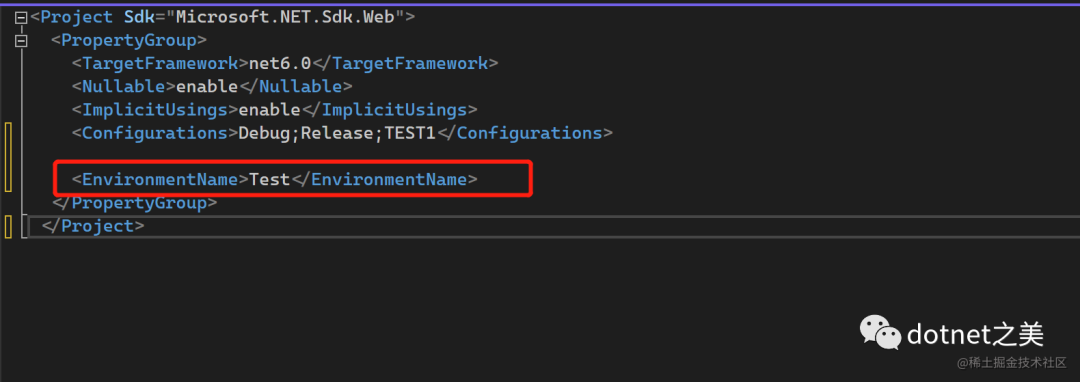
然后编译后的,直接运行,就能够读取到appsettings.TEST.json配置文件。
这配置不会覆盖launchSettings.json中指定的环境值,但影响发布后的EnvironmentName值,从而可以改变实现发布后默认的EnvironmentName值。
那这样设置后,岂不是发布后的EnvironmentName值只能是Test,如果要发布其他环境还要每次发布前修改这个值,那不是很麻烦吗?
没错如果没有点其他手段,那这真是多此一举啊,请看下图。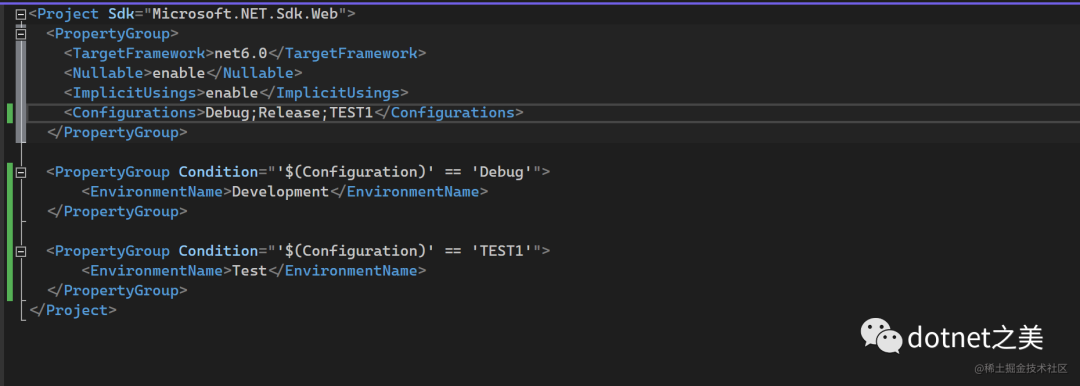
懂了吧,我们只需要多配置一个PublishProfile发布文件,指定不同的配置项,然后结合Condition条件来控制EnvironmentName。
至此,完美实现根据不同环境选择不同的发布文件,进行发布项目,目标机器不需要做任何配置,直接运行就是我们想要的效果。
总结虽然ASP.NET和ASP.NETCore实现多环境的方式不同,但是最后发布时我们可以做到一样的效果,所有的配置都是一次性的,发布时指定对应的PublishProfile即可。

版权声明
本文为[dotNET跨平台]所创,转载请带上原文链接,感谢
https://blog.csdn.net/sd7o95o/article/details/124262945
边栏推荐
- Binary tree
- Introduction to ACM [TSP problem]
- [if you want to do a good job, you must first use its tools] Guide for downloading and using paper editing and document management (endnote, latex, jabref, overflow) resources
- Sonic cloud real machine tutorial
- Q-Learning & Sarsa
- Kubernetes - detailed explanation of pod
- tf. keras. layers. Embedding function
- BLDC double closed loop (speed PI + current PI) Simulink simulation model
- Depth deterministic strategy gradient (ddpg)
- Introduction and use of openfeign component
猜你喜欢

Onenet connection process

Notes sur le développement de la tarte aux framboises (XII): commencer à étudier la suite UNO - 220 de la tarte aux framboises de contrôle industriel advantech (i): Introduction et fonctionnement du s
Encapsulation of ele table
![Niuke white moon race 6 [solution]](/img/c5/6c59378c3bb12efa60ab3a8cd2c943.png)
Niuke white moon race 6 [solution]
Leangoo brain map - shared multi person collaborative mind mapping tool

The interface request takes too long. Jstack observes the lock holding
Linux Redis ——Redis HA Sentinel 集群搭建详解 & Redis主从部署
Plug in for vscode
![Niuke white moon race 5 [problem solving mathematics field]](/img/be/ca059bd1c84eaaaefa3266f9119a6b.png)
Niuke white moon race 5 [problem solving mathematics field]

Q-Learning & Sarsa
随机推荐
Passing object type parameters through openfeign
tf. keras. layers. Embedding function
樹莓派開發筆記(十二):入手研華ADVANTECH工控樹莓派UNO-220套件(一):介紹和運行系統
【工欲善其事必先利其器】论文编辑及文献管理(Endnote,Latex,JabRef ,overleaf)资源下载及使用指南
Face longitude:
Traversée de l'arbre L2 - 006
Codeforces round 784 (Div. 4) (a - H)
对.NET未来的一点感悟
Notes sur le développement de la tarte aux framboises (XII): commencer à étudier la suite UNO - 220 de la tarte aux framboises de contrôle industriel advantech (i): Introduction et fonctionnement du s
Redis Cluster集群,主节点故障,主从切换后ip变化,客户端需要处理不
Summary of software test interview questions
Golden nine silver ten interview season, you are welcome to take away the interview questions (with detailed answer analysis)
VirtualBox virtual machine (Oracle VM)
Encapsulation of ele table
Publish to NPM?
Introduction to ACM [inclusion exclusion theorem]
《信息系统项目管理师总结》第五章 项目质量管理
JS relearning
Navicat premium import SQL file
[ncnn] - the meaning of - 23300 in param