当前位置:网站首页>Raspberry pie 3B logs into the wired end of Ruijie campus network through mentohust, creates WiFi (open hotspot) for other devices, and realizes self startup at the same time
Raspberry pie 3B logs into the wired end of Ruijie campus network through mentohust, creates WiFi (open hotspot) for other devices, and realizes self startup at the same time
2022-04-23 03:36:00 【Yi Lanjun】
Implementation process :
- 0、 Write it at the front ( This content has nothing to do with the task , Only when I write code, I find that I need to use it many times sudo, So I wrote to use sudo You don't have to enter a password every time. Solution ):
- 1、 Brief introduction to the task :
- 2、 adopt mentohust Log in to the wired end of Ruijie campus network , And implement mentohust Boot from boot
- 3、 Raspberry pie install hotspot sharing program create_ap, And realize automatic startup
0、 Write it at the front ( This content has nothing to do with the task , Only when I write code, I find that I need to use it many times sudo, So I wrote to use sudo You don't have to enter a password every time. Solution ):
	1. Open file
			sudo vim /etc/sudoers
	2. modify /etc/sudoers The last line of the document
			 take
			%sudo   ALL=(ALL:ALL) ALL
			 It is amended as follows
			%sudo   ALL=(ALL:ALL) NOPASSWD:ALL
1、 Brief introduction to the task :
Raspberry Pi( Chinese name “ Raspberry pie ”), It's a microcomputer the size of a credit card , Its system is based on Linux. In order to improve the Internet environment of the school dormitory ( The campus network login system leads to the inability to use the router multi device general network ), Visit the campus network through raspberry pie, log in to the system, and 24 Hour boot sharing hotspot to achieve 24 More than hours of device Internet access .
2、 adopt mentohust Log in to the wired end of Ruijie campus network , And implement mentohust Boot from boot
stay linux Using campus network under the environment of , Like Ruijie's classmates , It's still a headache for surfing the Internet . Ruijie's own linux It seems that the client has not been updated for a long time , It doesn't work very well . We recommend you to use the... Developed by Huazhong University of science and technology mentohust, Good online reputation , Bloggers can use it after testing and configuring it , Here is a brief introduction mentohust Installation and use .
- download mentohust file , Here is the use of git clone Command download ;
sudo git clone https://github.com/hyrathb/mentohust - After downloading, enter mentohust Folder , And install ;
1. Get into mentohust Folder cd mentohust 2. The following libraries are necessary to run , It is recommended to install one by one sudo apt-get install build-essential sudo apt-get install autopoint sudo apt-get install automake sudo apt-get install autoconf sudo apt-get install gettext-base gettext liblocale-gettext-perl 3. next sh autogen.sh 4. Then configure ./configure --prefix=/usr sudo make sudo make install Compilation and installation sudo chmod u+s /usr/bin/mentohust 5. Then install and run mentohust Required libraries sudo apt-get install libpcap-dev libnotify-dev sudo mentohust 6. Set the corresponding parameters : 1. Select the corresponding network card user name password 2. Multicast address (multicast address) choice 1 Agility 3.dhcp The way (dhcp type) choice 3 Before certification 7. Not surprisingly, you can see the authentication options , Fill in the account number and password , Should be able to connect to the campus network - Set power on self start , So you don't have to run every time you start up sudo mentohust The command , I used it here apt-get install sysv-rc-conf To manage startup items ;
PS: This method can be applied to the startup items set by many users1.# Installation method : sudo apt-get install sysv-rc-conf 2.cd To /etc/init.d Under the table of contents , Use root Permission to write scripts :login.sh cd /etc/init.d sudo vim login.sh #( If not installed vim Students can search and install vim And learn vim How to use ) 3. Write the following script : #!/bin/bash sudo mentohust<<" Here is your root Account password " 4. Change the permissions of the script file to daemon : chmod +x login.sh 5. use sysv-rc-conf Command to set the running level of the daemon sysv-rc-conf login.sh on 4. preservation login.sh File and exit , After restarting, you can find that you can automatically log in to the campus network . sudo reboot
3、 Raspberry pie install hotspot sharing program create_ap, And realize automatic startup
- create_ap Install and open the raspberry pie hotspot
1. Put the code clone To local sudo git clone https://github.com/oblique/create_ap cd create_ap sudo make install 2. Install dependent Libraries sudo apt-get install util-linux procps hostapd iproute2 iw haveged dnsmasq 3. Turn on the hotspots sudo create_ap --no-virt wlan0 eth0 Hotspot name Hot code - take create_ap Start as a service , The raspberry pie hot spot can be started automatically
1. Modify service configuration , add to --no-virt Parameters
		sudo vim /usr/lib/systemd/system/create_ap.service
		#  take create_ap.service Medium
		ExecStart=/usr/bin/create_ap --config /etc/create_ap.conf
		#  It is amended as follows
		ExecStart=/usr/bin/create_ap --no-virt --config /etc/create_ap.conf

2. Default profile /etc/create_ap.conf, Change the following two horizontal lines to your own ssid And password , Modify your own dhcp gateway
		sudo vi /etc/create_ap.conf
		# take create_ap.conf In the document
		GATEWAY=10.0.0.1
		SSID=MyAccessPoint
		PASSPHRASE=12345678
		#  It is amended as follows
		GATEWAY=192.168.123.1
		SSID= The hotspot name you want to set
		PASSPHRASE= The hotspot password you want to set
3. About the service startup code ( Only the last three lines need to be used to set the boot auto start ):
		#  Start a service :
		systemctl start create_ap.service
		#  Shut down a service :
		systemctl stop create_ap.service
		#  Restart a service :
		systemctl restart create_ap.service
		#  Show the status of a service :
		systemctl status create_ap.service
		#  Enable a service at boot time :
		systemctl enable create_ap.service
		#  Disable a service at boot time :
		systemctl disable create_ap.service
		#  Check whether the service is started :
		systemctl is-enabled create_ap.service
版权声明
本文为[Yi Lanjun]所创,转载请带上原文链接,感谢
https://yzsam.com/2022/04/202204220602232044.html
边栏推荐
- Query stored procedures in PostgreSQL
- AWS from entry to actual combat: creating accounts
- C-10 program error correction (recursive function): number to character
- QT learning summary
- Create virtual machine
- List interface of collection
- Super easy to use [general excel import function]
- Application and definition of interface
- 变量、常量、运算符
- Several common methods of multithreading
猜你喜欢

QT learning summary

51 single chip microcomputer: D / a digital to analog conversion experiment

C set
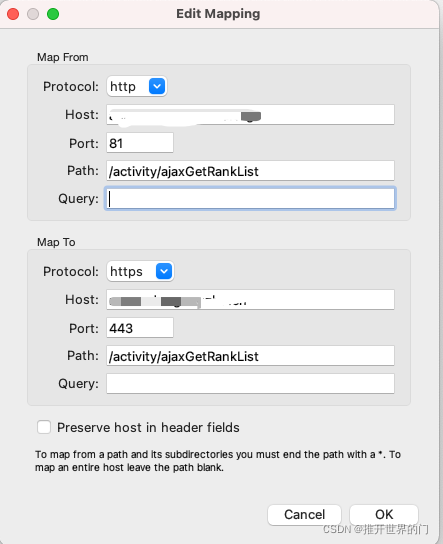
Basic use of Charles

PyMOL usage

"Visual programming" test paper
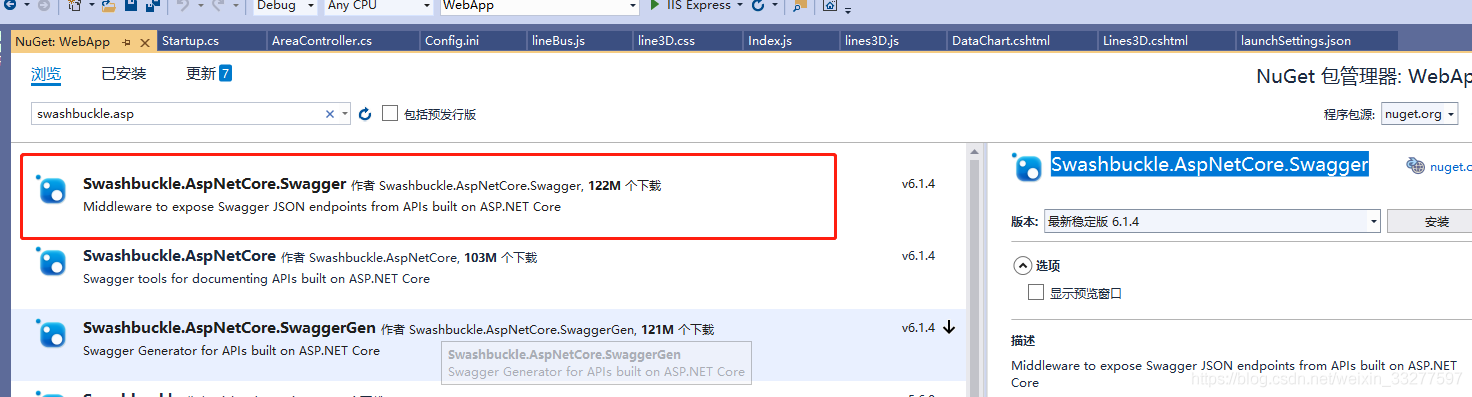
Using swagger in. Net5
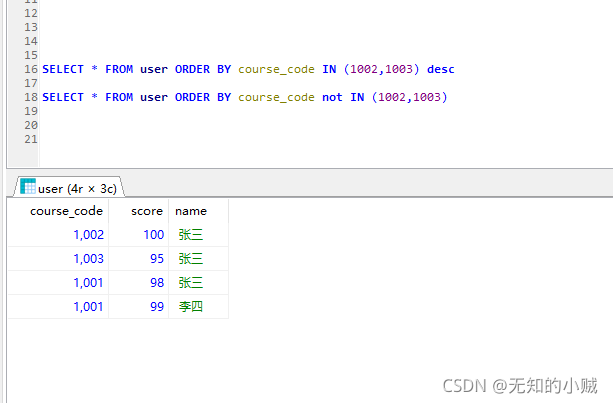
MySQL query specifies that a row is sorted to the first row

Wechat applet canvas draws a simple asymptotic color of the dashboard

Un aperçu des flux d'E / s et des opérations de fichiers de classe de fichiers
随机推荐
Identifier, keyword, data type
Unity knowledge points (ugui 2)
Activity supports multi window display
Docker pulls MySQL and connects
ThreadLocal test multithreaded variable instance
Websites frequented by old programmers (continuously updated)
A hundred dollars for a hundred chickens
C-11 problem h: treasure chest 2
Un aperçu des flux d'E / s et des opérations de fichiers de classe de fichiers
Common auxiliary classes
Basic use of Charles
If statement format flow
7-3 poly width
Supersocket is Use in net5 - startup
The art of concurrent programming (5): the use of reentrantlock
L3-011 直捣黄龙 (30 分)
C abstract class
PyMOL usage
打卡:4.23 C语言篇 -(1)初识C语言 - (12)结构体
Romantic silhouette of L2-3 of 2022 group programming ladder Simulation Competition (25 points)