Raspberry Pi Pico as a Rubber Ducky

Overview

Raspberry-Pi-Pico-as-a-Rubber-Ducky

2022-02-09-16-58-32_Trim

Kurulum

  1. Raspberry Pi Pico cihazınız için CircuitPython'u indirin.
  2. Boot düğmesine basılı tutarken cihazı bir USB bağlantı noktasına takın ve cihazı taktıktan sonra boot tuşundan elinizi çekin. Bunun sonucunda "RPI-RP2" adlı çıkarılabilir bir medya aygıtı karşınıza çıkacaktır.
  3. İndirdiğiniz .uf2 dosyasını Pico'nun (RPI-RP2) ana dizinine kopyalayın. Bir süre sonra cihaz yeniden başlayacak ve 1-2 saniye sonra CIRCUITPY adında çıkarılabilir bir medya aygıtı olarak karşınıza çıkacaktır.
  4. Ardından adafruit-circuitpython-bundle-7.x-mpy-YYYYMMDD.zip dosyasını indirin ve cihazın dışına çıkarın.
  5. adafruit-circuitpython-bundle-7.x-mpy-YYYYMMDD klasörü altındaki "lib" klasörüne gidin ve "adafruit_hid'i" Raspberry Pi Pico'nuzdaki lib klasörüne kopyalayın.
  6. Buradaki sayfaya giderek CTRL + S tuşlarına basın ve dosyayı Pico'nun içerisinde bulunan code.py dosyasının üzerine yazarak Raspberry Pi Pico'nun ana dizinine "code.py" olarak kaydedin.
  7. Buradaki linkten bir script bulun veya kendi Rubber Ducky scriptinizi oluşturun ve "payload.dd" olarak kaydedin.
  8. Dikkat edin, son işlemden sonra cihaz yeniden başlatılacak ve yarım saniye sonra komut dosyası (payload.dd) çalışacaktır.

USB Etkinleştirme/Devre Dışı Bırakma

Pico'nun gizlilik amacıyla bir USB depolama aygıtı gibi görünmemesine istiyorsanız;

  1. Cihazı USB bağlantı noktasına takın.
  2. "boot.py" dosyasını Pico'nun (RPI-RP2) ana dizinine kopyalayın.
  3. payload.dd dosyanızı da Pico'ya (RPI-RP2) kopyalayın.
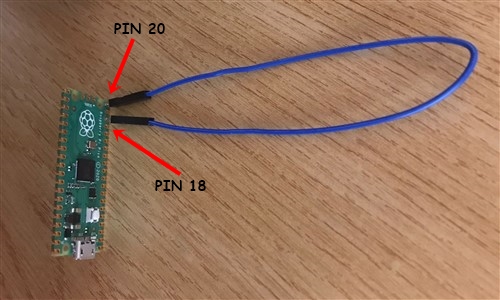
  4. Pico'yu bilgisayarınızdan çıkarın. Pin 18 ve pin 20 arasına bir jumper kablosu bağlayın. Bu durum Pico üzerinde bir kısa devre yaratacaktır ve hedef bilgisayara takıldığında Pico'nun bir USB sürücüsü olarak görünmesini engelleyecek.
  5. Tekrar programlamak için (Payload'ınızı güncellemek için) jumper kabloyu çıkarın ve PC'nize yeniden bağlayın. Varsayılan modda, USB depolama aygıtı aktif durumda olacaktır.

1

Klavye Düzenlerini Değiştirme

Varsayılan modda klavye düzeni İngilizce'dir. Bunu değiştirmek isterseniz;

  1. https://kbdlayout.info/ sayfasından istediğiniz klavye düzenini bularak üzerine tıklayın ve linki kopyalayıp https://www.neradoc.me/layouts/ sayfasındaki kutucuğa yapıştırın. Ardından "Make Zip Bundle Links" butonuna tıklayın.
  2. Ardından "Download the zip file (.py)" butonuna tıklayın.
  3. İndirilen dosyanın içerisinden kendize uygun olan klavye düzeninin dosyalarını Pico'nuzun içerisindeki lib klasörü altına kopyalayın (ben Türkçe Q klavye düzenini tercih ediyorum);
  • keyboard_layout.mpy
  • keyboard_layout_win_tuq.mpy
  • keycode_win_tuq.mpy

2

Dil Dosyanızı Kullanmak için Pico Kodunuzu Değiştirin

Pico içerisindeki "code.py" dosyasını açın ve içerisindeki şu kodu;

from adafruit_hid.keyboard_layout_us import KeyboardLayoutUS as KeyboardLayout
from adafruit_hid.keycode import Keycode

aşağıdaki kod ile değiştirin;

from keyboard_layout_win_tuq import KeyboardLayout
from keycode_win_tuq import Keycode
Owner
Furkan Enes POLATOĞLU
Cyber Security Researcher, SOC Analyst, CENG, YnVsbGV0cHJvb2Y=
Furkan Enes POLATOĞLU
A Python program that makes it easy to manage modules on a CircuitPython device!

CircuitPython-Bundle-Manager-v2 A Python program that makes it easy to manage modules on a CircuitPython device! The CircuitPython Bundle Manager v2 i

Ckyiu 1 Dec 18, 2021
A refreshed Python toolbox for building complex digital hardware

A refreshed Python toolbox for building complex digital hardware

nMigen 1k Jan 05, 2023
The goal of this project is for anyone with an old printer to be able to double-sided printing.

Welcome to PDF-double-side! Hi! I'm 15. I have a old printer so I can't print double-sided outs. The goal of this project is for anyone with an old pr

DejaVu 4 Dec 28, 2021
A simple non-official manager interface I'm using for my Raspberry Pis.

My Raspberry Pi Manager Overview I have two Raspberry Pi 4 Model B devices that I hooked up to my two TVs (one in my bedroom and the other in my new g

Christian Deacon 21 Jan 04, 2023
CircuitPython Driver for Adafruit 24LC32 I2C EEPROM Breakout 32Kbit / 4 KB

Introduction CircuitPython driver for Adafruit 24LC32 I2C EEPROM Breakout Dependencies This driver depends on: Adafruit CircuitPython Bus Device Regis

foamyguy 0 Dec 20, 2021
An open source two key macro-pad modeled to look like a cartoony melting popsicle

macropopsicle An open source two key macro-pad modeled to look like a cartoony melting popsicle. Build instructions Parts List -1x Top case half (3D p

17 Aug 18, 2022
Raspberry Pi Pico development platform for PlatformIO

Raspberry Pi Pico development platform for PlatformIO A few words in the beginning Before experimental please Reinstall the platform Version: 1.0.0 Th

Georgi Angelov 160 Dec 23, 2022
a library for using WS2812b leds (aka neopixels) with Raspberry Pi Pico

pico_ws2812b a library for using WS2812b leds (aka neopixels) with Raspberry Pi Pico You'll first need to save the ws2812b.py file to your device (for

76 Nov 25, 2022
Home Assistant custom component to help ev-chargers stay below peak hourly energy levels.

Peaqev ev-charging Peaqev ev-charging is an attempt of charging an ev without breaching a preset monthly max-peak energy level. In order for this inte

Magnus Eldén 35 Dec 24, 2022
Parametric open source reconstructions of Voron printed parts

The Parametric Voron This repository contains Fusion 360 reconstructions of various printed parts from the Voron printers

Matthew Lloyd 26 Dec 19, 2022
KIRI - Keyboard Interception, Remapping, and Injection using Raspberry Pi as an HID Proxy.

KIRI - Keyboard Interception, Remapping and Injection using Raspberry Pi as a HID Proxy. Near limitless abilities for a keyboard warrior. Features Sim

Viggo Falster 10 Dec 23, 2022
This repository hosts the code for Stanford Pupper and Stanford Woofer, Raspberry Pi-based quadruped robots that can trot, walk, and jump.

This repository hosts the code for Stanford Pupper and Stanford Woofer, Raspberry Pi-based quadruped robots that can trot, walk, and jump.

Stanford Student Robotics 1.2k Dec 25, 2022
Using a raspberry pi, we listen to the coffee machine and count the number of coffee consumption

A typical datarootsian consumes high-quality fresh coffee in their office environment. The board of dataroots had a very critical decision by the end of 2021-Q2 regarding coffee consumption.

dataroots 51 Nov 21, 2022
🐱 Petkit feeder components for HomeAssistant

Petkit for HomeAssistant Installing Download and copy custom_components/xiaomi_miot folder to custom_components folder in your HomeAssistant config fo

62 Dec 29, 2022
LedFx is a network based LED effect controller with support for advanced real-time audio effects

Welcome to LedFx ✨ -Making music come alive! LedFx website: https://ledfx.app/ What is LedFx? What LedFx offers is the ability to take audio input, an

786 Jan 02, 2023
Home Assistant custom components MPK-Lodz

MPK Łódź sensor This sensor uses unofficial API provided by MPK Łódź. Configuration options Key Type Required Default Description name string False MP

Piotr Machowski 3 Nov 01, 2022
Ansible tools for operating and managing fleets of Blinksticks in harmony using the Blinkstick Python library.

Ansible tools for operating and managing fleets of Blinksticks in harmony using the Blinkstick Python library.

Greg Robinson 3 Aug 10, 2022
[unmaintained] WiFi tools for linux

Note: This project is unmaintained. While I would love to keep up the development on this project, it is difficult for me for several reasons: I don't

Rocky Meza 288 Dec 13, 2022
Quasi-static control of the centroid of quadruped robot

Quasi-static control of quadruped robot   This is a demo of the quasi-static controller for the centroid of the quadruped robot. The Quadratic Program

Junwen Cui 21 Dec 12, 2022
A dashboard for Raspberry Pi to display environmental weather data, rain radar, weather forecast, etc. written in Python

Weather Clock for Raspberry PI This project is a dashboard for Raspberry Pi to display environmental weather data, rain radar, weather forecast, etc.

Markus Geiger 1 May 01, 2022