当前位置:网站首页>opencv实现数据增强(图片+标签)平移,翻转,缩放,旋转
opencv实现数据增强(图片+标签)平移,翻转,缩放,旋转
2022-08-11 05:41:00 【gy-77】
面试问到了,让手撕数据增强,图片+标签。这里整理一下,直接上代码。
import math
import cv2
import numpy as np
def pan(img, anns, size=(50, 100)):
''' :param img: np.ndarray[h,w,c] :param anns: np.ndarray[n,4] :param size: list[shift_x, shift_y] '''
shift_x, shift_y = size
h, w, _ = img.shape
M = np.array([[1, 0, shift_x], [0, 1, shift_y]], dtype=np.float32) # 平移矩阵
img_change = cv2.warpAffine(img, M, (w, h))
anns_change = anns + np.array([shift_x, shift_y, shift_x, shift_y])
return img_change, anns_change
def flip(img, anns, flip_code=0):
# flip_code: 1:水平翻转, 0:垂直翻转, -1:水平垂直翻转
h, w, _ = img.shape
img_change = cv2.flip(img, flipCode=flip_code)
anns_change = anns.copy()
if flip_code == 1:
anns_change[:, 0], anns_change[:, 2] = w - anns_change[:, 2], w - anns_change[:, 0]
elif flip_code == 0:
anns_change[:, 1], anns_change[:, 3] = h - anns_change[:, 3], h - anns_change[:, 1]
else:
anns_change[:, 0], anns_change[:, 2] = w - anns_change[:, 2], w - anns_change[:, 0]
anns_change[:, 1], anns_change[:, 3] = h - anns_change[:, 3], h - anns_change[:, 1]
anns_change = np.int32(anns_change)
return img_change, anns_change
def resize(img, anns, scale=(2, 1)):
h, w, _ = img.shape
scale_x, scale_y = scale
anns_change = anns.copy()
M = np.array([[scale_x, 0, 0], [0, scale_y, 0]], dtype=np.float32) # 缩放矩阵
img_change = cv2.warpAffine(img, M, (int(w * scale_x), int(h * scale_y)))
anns_change[:, 0], anns_change[:, 2] = anns_change[:, 0] * scale_x, anns_change[:, 2] * scale_x
anns_change[:, 1], anns_change[:, 3] = anns_change[:, 1] * scale_y, anns_change[:, 3] * scale_y
anns_change = np.int32(anns_change)
return img_change, anns_change
def rotate(img, anns, center=(0, 0), angle=-45, scale=1):
# scale为缩放比例,默认为1,也就是不缩放。 图像旋转+缩放,bboxes对不上,暂时不知道怎么解决。有人知道的话,请评论区告诉我,感谢。
angle_pi = -angle * math.pi / 180.0 # 弧度
h, w, _ = img.shape
M = cv2.getRotationMatrix2D(center, angle, scale)
img_change = cv2.warpAffine(img, M, (w, h))
anns_change = anns.copy() * scale
x1, y1, x2, y2 = anns_change[:, 0], anns_change[:, 1], anns_change[:, 2], anns_change[:, 3]
x3, y3, x4, y4 = x1, y2, x2, y1
x1_ = (x1 - center[0]) * math.cos(angle_pi) - (y1 - center[1]) * math.sin(angle_pi) + center[0]
y1_ = (x1 - center[0]) * math.sin(angle_pi) + (y1 - center[1]) * math.cos(angle_pi) + center[1]
x2_ = (x2 - center[0]) * math.cos(angle_pi) - (y2 - center[1]) * math.sin(angle_pi) + center[0]
y2_ = (x2 - center[0]) * math.sin(angle_pi) + (y2 - center[1]) * math.cos(angle_pi) + center[1]
x3_ = (x3 - center[0]) * math.cos(angle_pi) - (y3 - center[1]) * math.sin(angle_pi) + center[0]
y3_ = (x3 - center[0]) * math.sin(angle_pi) + (y3 - center[1]) * math.cos(angle_pi) + center[1]
x4_ = (x4 - center[0]) * math.cos(angle_pi) - (y4 - center[1]) * math.sin(angle_pi) + center[0]
y4_ = (x4 - center[0]) * math.sin(angle_pi) + (y4 - center[1]) * math.cos(angle_pi) + center[1]
xs, ys = np.array([x1_, x2_, x3_, x4_]), np.array([y1_, y2_, y3_, y4_])
xmin, xmax = np.amin(xs, axis=0), np.amax(xs, axis=0)
ymin, ymax = np.amin(ys, axis=0), np.amax(ys, axis=0)
anns_change = np.array(list(zip(xmin, ymin, xmax, ymax))) # 4个[2] ---》 [2, 4]
anns_change = np.int32(anns_change)
return img_change, anns_change
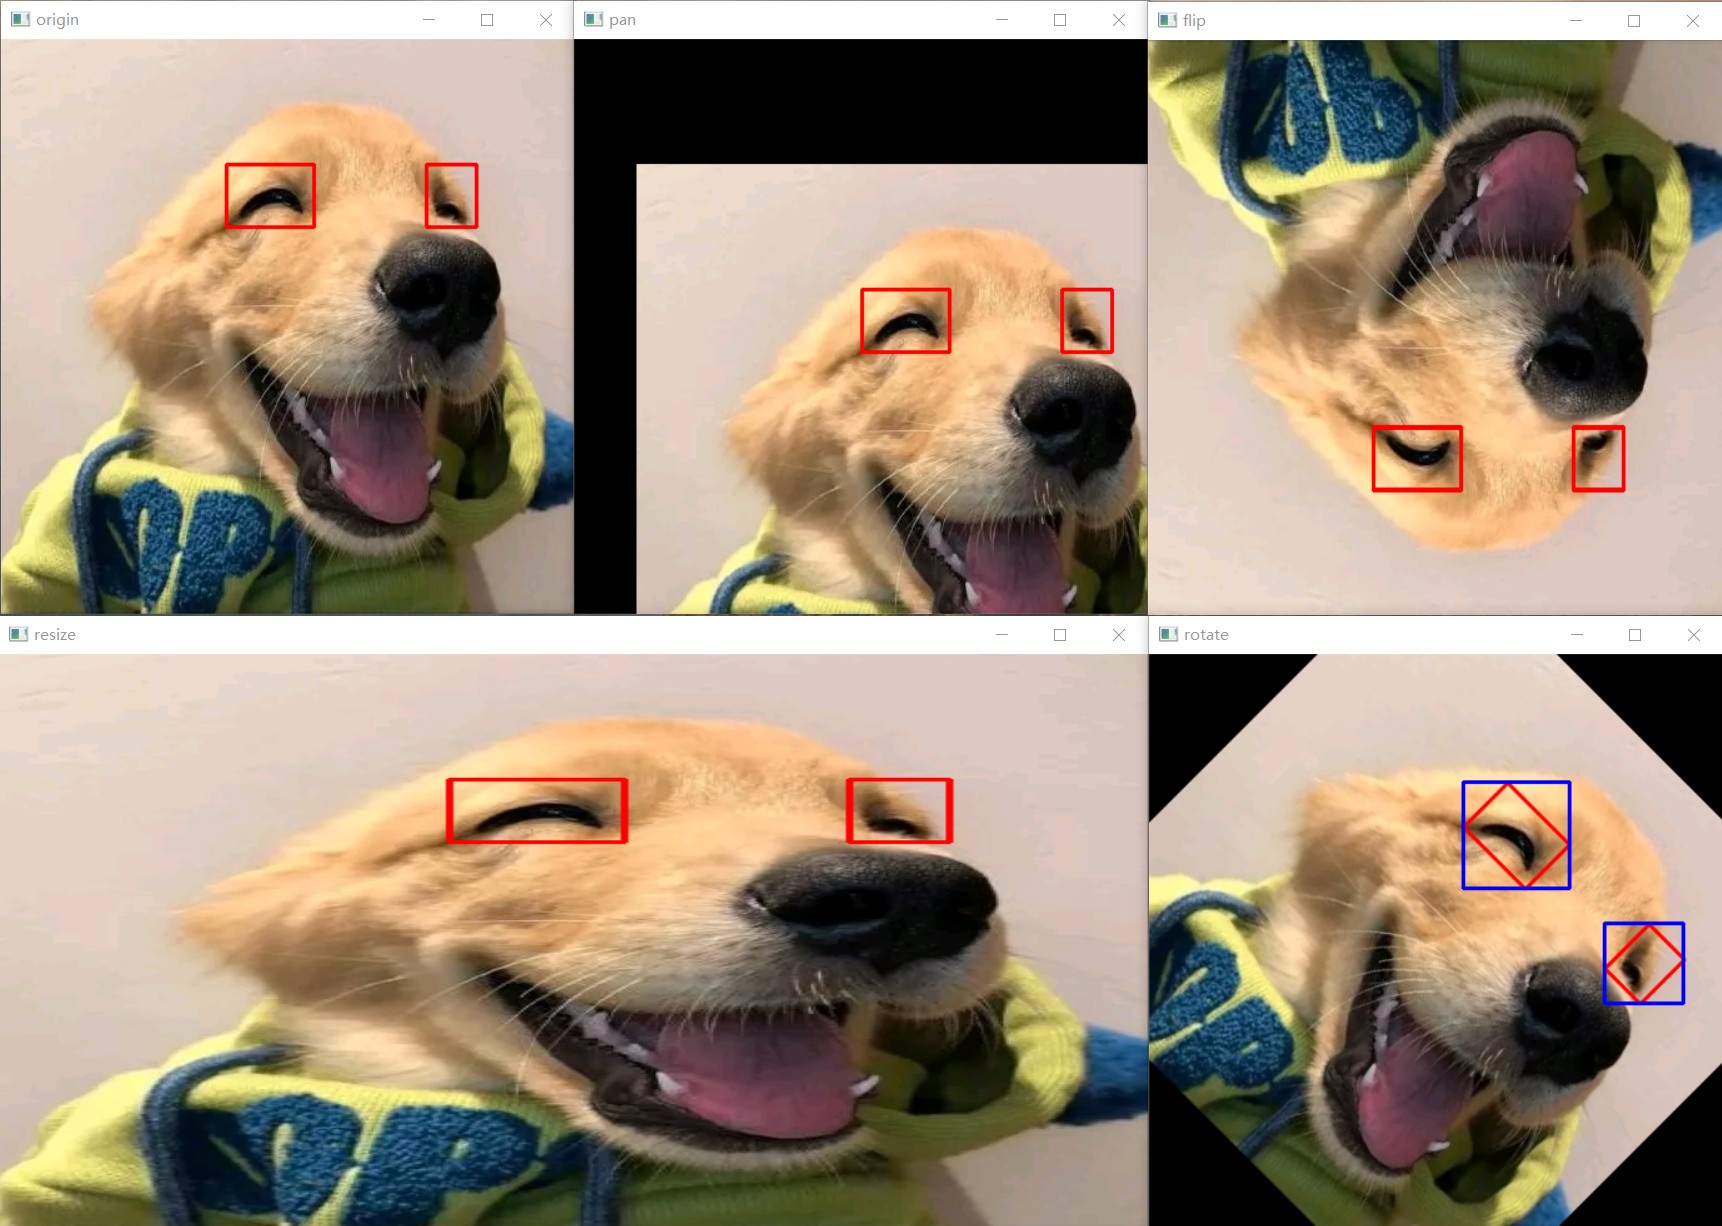
if __name__ == '__main__':
img = cv2.imread("head.jpg") # 测试图片
anns = np.array([[180, 100, 250, 150], [340, 100, 380, 150]]) # 测试bbox
for i in anns:
cv2.rectangle(img, (i[0], i[1]), (i[2], i[3]), (0, 0, 255), 2)
cv2.imshow("origin", img)
# 移动
img1, anns1 = pan(img, anns)
for i in anns1:
cv2.rectangle(img1, (i[0], i[1]), (i[2], i[3]), (0, 0, 255), 2)
cv2.imshow("pan", img1)
# 翻转
img2, anns2 = flip(img, anns)
for i in anns2:
cv2.rectangle(img2, (i[0], i[1]), (i[2], i[3]), (0, 0, 255), 2)
cv2.imshow("flip", img2)
# 缩放
img3, anns3 = resize(img, anns)
for i in anns3:
cv2.rectangle(img3, (i[0], i[1]), (i[2], i[3]), (0, 0, 255), 2)
cv2.imshow("resize", img3)
# 旋转,anns4是下面可视化中蓝色框
img4, anns4 = rotate(img, anns, center=(img.shape[1] // 2, img.shape[0] // 2)) # 中心旋转
# img4, anns4 = rotate(img, anns) # 左上角旋转
for i in anns4:
cv2.rectangle(img4, (i[0], i[1]), (i[2], i[3]), (255, 0, 0), 2)
cv2.imshow("rotate", img4)
cv2.waitKey(0)
结果展示:
边栏推荐
- 空间金字塔池化 -Spatial Pyramid Pooling(含源码)
- 每日sql--统计员工近三个月的总薪水(不包括最新一个月)
- 八股文之并发编程
- My approval of OA project (inquiry & meeting signature)
- 《Show, Attend and Tell: Neural Image Caption Generation with Visual Attention》论文阅读(详细)
- 每日sql-找到每个学校gpa最低的同学(开窗)
- MySQL之CRUD
- 每日sql-统计各个专业人数(包括专业人数为0的)
- 矩阵分析——微分、积分、极限
- 一个小时快速熟悉MySQL基本用法
猜你喜欢


随机推荐
技能在赛题解析:交换机防环路设置
《Show, Attend and Tell: Neural Image Caption Generation with Visual Attention》论文阅读(详细)
拼多多API接口大全
HCIP实验(pap、chap、HDLC、MGRE、RIP)
Daily sql-statistics of the number of professionals (including the number of professionals is 0)
Do not add the is prefix to the variables of the boolean type in the POJO class of the Alibaba specification
八股文之jvm
每日sql--统计员工近三个月的总薪水(不包括最新一个月)
HCIP OSPF/MGRE综合实验
抖音关键词搜索商品-API工具
Daily SQL - find each of the students school gpa minimum (window)
每日sql-统计各个专业人数(包括专业人数为0的)
HCIP BGP建邻、联邦、汇总实验
从 dpdk-20.11 移植 intel E810 百 G 网卡 pmd 驱动到 dpdk-16.04 中
Amazon Get AMAZON Product Details API Return Value Description
拼多多API接口(附上我的可用API)
radix-4 FFT 原理和C语言代码实现
My meeting of the OA project (meeting seating & review)
LabelEncoder和LabelBinarizer的区别
Taobao sku API interface (PHP example)