当前位置:网站首页>Opencv + clion face recognition + face model training
Opencv + clion face recognition + face model training
2022-04-23 04:45:00 【Vivid_ Mm】
OpenCV windows Version compilation +CLion Project import reference :
CLion+OpenCV Identification ID number --- Identification card number _xxwbwm The blog of -CSDN Blog
Code :
#include <iostream>
#include <opencv2/opencv.hpp>

using namespace cv;
using namespace std;

class CascadeDetectorAdapter : public DetectionBasedTracker::IDetector {
public:
    CascadeDetectorAdapter(cv::Ptr<cv::CascadeClassifier> detector) :
            IDetector(),
            Detector(detector) {
        CV_Assert(detector);
    }

    void detect(const cv::Mat &Image, std::vector<cv::Rect> &objects) {
        Detector->detectMultiScale(Image, objects, scaleFactor, minNeighbours, 0, minObjSize, maxObjSize);
    }

    ~CascadeDetectorAdapter() {

    }

private:
    CascadeDetectorAdapter();

    cv::Ptr<cv::CascadeClassifier> Detector;
};

DetectionBasedTracker *getTracker() {
    // OpenCV Built in model location F:\opencvWin\opencv\build\etc\lbpcascades
    String path = "F:\\opencvWin\\opencv\\build\\etc\\lbpcascades\\lbpcascade_frontalface.xml";
//    String path = "F:\\opencvWin\\facetrain\\samples\\data\\cascade.xml";// Can't recognize

    Ptr<CascadeClassifier> classifier = makePtr<CascadeClassifier>(path);
    // Adapter
    Ptr<CascadeDetectorAdapter> mainDetector = makePtr<CascadeDetectorAdapter>(classifier);

    Ptr<CascadeClassifier> classifier1 = makePtr<CascadeClassifier>(path);
    // Adapter
    Ptr<CascadeDetectorAdapter> trackingDetector = makePtr<CascadeDetectorAdapter>(classifier1);
    // tracker
    DetectionBasedTracker::Parameters DetectorParams;
    DetectionBasedTracker *tracker = new DetectionBasedTracker(mainDetector, trackingDetector, DetectorParams);
    return tracker;
}

int main() {
    DetectionBasedTracker *tracker = getTracker();

    // Turn on the tracker
    tracker->run();
    // Get camera data
    VideoCapture capture(0);

    Mat Sourceimg;
    Mat gray;
    Mat test;
    while (1) {
        capture >> Sourceimg;
        // Gray image processing
        cvtColor(Sourceimg, gray, COLOR_BGR2GRAY);
        // Enhance contrast  ( Histogram equalization )
        equalizeHist(gray, gray);
        // Create and save a vector set of detected faces
        std::vector<Rect> faces;
        // Gray image recognition processing
        tracker->process(gray);
        // To get the results
        tracker->getObjects(faces);

        for (Rect face : faces) {
            // Assign separately  bgra
            if (face.x < 0 || face.width < 0 || face.x + face.width > Sourceimg.cols ||
                face.y < 0 || face.height < 0 || face.y + face.height > Sourceimg.rows) {
                continue;
            }
            // Draw the frame in the original picture
            rectangle(Sourceimg, face, Scalar(255, 0, 255));
#if 0
            int i = 0;
            while (true){
                // Make positive samples
                Mat m;
                // hold img Copy the face part in to m in
                Sourceimg(face).copyTo(m);
                // Put the face   Reset to  24x24 Size picture
                resize(m, m, Size(24, 24));
                // Converted to grayscale
                cvtColor(m, m, COLOR_BGR2GRAY);
                char p[200];
                sprintf(p, "F:/opencvWin/facetrain/samples/vivid/%d.jpg", i++);
                // hold mat Write as jpg file
                imwrite(p, m);
                m.release();
                if(i == 100){
                    break;
                }
            }
#endif
        }
        imshow("camera", Sourceimg);
        //27 == ESC   wait for 30 MS exit
        if (waitKey(30) == 27) {
            break;
        }
    }
    if (!Sourceimg.empty()) Sourceimg.release();
    if (!gray.empty()) gray.release();
    capture.release();
    tracker->stop();
    delete tracker;
    return 0;
}
Loaded above lbpcascade_frontalface.xml The face model is opencv The source code comes with , We can use this model to train our own face model , Next, I will introduce training my own face model , Open this code , When we recognize the human face, we save the face information into a size of 24*24( Pixels ) Pictures of the , keep in storage 100 Zhang , reason : I only 300 Negative sample picture ( Do not include face )
#if 0
            int i = 0;
            while (true){
                // Make positive samples
                Mat m;
                // hold img Copy the face part in to m in
                Sourceimg(face).copyTo(m);
                // Put the face   Reset to  24x24 Size picture
                resize(m, m, Size(24, 24));
                // Converted to grayscale
                cvtColor(m, m, COLOR_BGR2GRAY);
                char p[200];
                sprintf(p, "F:/opencvWin/facetrain/samples/vivid/%d.jpg", i++);
                // hold mat Write as jpg file
                imwrite(p, m);
                m.release();
                if(i == 100){
                    break;
                }
            }
#endif
Positive sample :
Sort the positive sample information into xxx.xxx( Any file name , Any file suffix ) I saved it here to vivid.data file
vivid.data The contents of the document :
vivid/0.jpg 1 0 0 24 24
vivid/1.jpg 1 0 0 24 24
vivid/2.jpg 1 0 0 24 24
vivid/3.jpg 1 0 0 24 24
vivid/4.jpg 1 0 0 24 24
vivid/5.jpg 1 0 0 24 24
vivid/6.jpg 1 0 0 24 24
vivid/7.jpg 1 0 0 24 24
vivid/8.jpg 1 0 0 24 24
vivid/9.jpg 1 0 0 24 24
Parameter meaning :
vivid/x.jpg Sample location ( The full path is :F:\opencvWin\facetrain\samples\vivid\x.jpg)
1 It means there is only one face
0 0 Indicates the starting position of the face
24 24 Represents the size of the face , That is, the end position
If one picture has more than one face ,eg:2 Zhang Renren
vivid/0.jpg 2 0 0 50 50 80 80 130 130
0 0 50 50 The starting and ending point of the first face ,80 80 130 130 The starting and ending point of the second face
Writing of document contents , Can be done in code :
import java.io.*;
public class GeneateFile{
		public static void main(String[] args) throws Exception{//FileOutputStream
			FileOutputStream fos = new FileOutputStream("F:/opencvWin/facetrain/samples/vivid/vivid.data");
			for(int i =0 ;i<100;i++){
				String content = String.format("vivid/%d.jpg 1 0 0 24 24\n",i);
				fos.write(content.getBytes());
			}
			fos.close();
	}
}
take vivid.data File conversion to vec Sample file
opencv_createsamples -info vivid.data -vec vivid.vec -num 100 -w 24 -h 24
-info:  Positive sample description
-vec :  Output positive sample file
-num :  Number of positive samples
-w -h:  The size of the output sample
opencv_createsamples -info vivid.data -vec vivid.vec -num 100 -w 24 -h 24
result :
F:\opencvWin\facetrain\samples>opencv_createsamples -info vivid.data -vec vivid.vec -num 100 -w 24 -h 24
Info file name: vivid.data
Img file name: (NULL)
Vec file name: vivid.vec
BG file name: (NULL)
Num: 100
BG color: 0
BG threshold: 80
Invert: FALSE
Max intensity deviation: 40
Max x angle: 1.1
Max y angle: 1.1
Max z angle: 0.5
Show samples: FALSE
Width: 24
Height: 24
Max Scale: -1
Create training samples from images collection...
Done. Created 100 samples
F:\opencvWin\facetrain\samples>The above display indicates success .
Modify generation vivid.data Of java Code , Generating negative samples bg.data file
import java.io.*;
public class GeneateFileOpp{
		public static void main(String[] args) throws Exception{//FileOutputStream
			FileOutputStream fos = new FileOutputStream("F:/opencvWin/facetrain/samples/bg/bg.data");
			for(int i =0 ;i<300;i++){
				String content = String.format("bg/%d.jpg\n",i);
				fos.write(content.getBytes());
			}
			fos.close();
	}
}
bg.data The contents of the document ( Omit the part ): Note that there is no face information
bg/0.jpg
bg/1.jpg
bg/2.jpg
bg/3.jpg
bg/4.jpg
bg/5.jpg
bg/6.jpg
bg/7.jpg
bg/8.jpg
bg/9.jpg
bg/10.jpg
Training :
opencv_traincascade -data data -vec vivid.vec -bg bg.data -numPos 100 -numNeg 300 -numStages
15 -featureType LBP -w 24 -h 24
-data : The target directory needs to be created manually , Used to store the generated model , The name can be customized
-vec : Positive sample
-bg : Negative sample
-numPos : The number of positive samples used in the training of each classifier
-numNeg : The number of negative samples used in the training of each classifier , Can be greater than -bg number
-numStages: Train the number of classifiers , If there are many layers , The error of classifier is smaller , But the detection speed is slow .(15-20)
-featureType: LBP
-w -h
Execution success results :
Training until now has taken 0 days 0 hours 0 minutes 18 seconds.

===== TRAINING 7-stage =====
<BEGIN
POS count : consumed   100 : 100
NEG count : acceptanceRatio    0 : 0
Required leaf false alarm rate achieved. Branch training terminated.
At this time in data The directory will have the following files :

Modify the above model loading path , You can check whether the model is valid , The operation is as follows :

版权声明
本文为[Vivid_ Mm]所创,转载请带上原文链接,感谢
https://yzsam.com/2022/04/202204220558084086.html
边栏推荐
- Mysql50 basic exercises
- C language: spoof games
- What is the thirty-six plan
- 2019 is coming to an end, the longest day.
- 520. Detect capital letters
- MySQL queries users logged in for at least N consecutive days
- win10, mysql-8.0.26-winx64.zip 安装
- Case of using stream load to write data to Doris
- Recommended scheme for national production of electronic components of wireless keyboard
- Kotlin. The binary version of its metadata is 1.6.0, expected version is 1.1.15.
猜你喜欢

Experience summary and sharing of the first prize of 2021 National Mathematical Modeling Competition
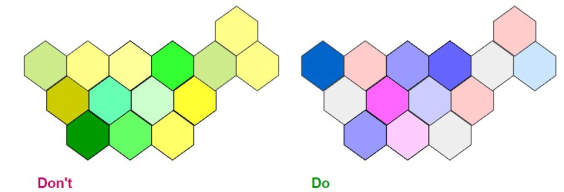
Eight misunderstandings that should be avoided in data visualization

Supplement 14: cmake practice project notes (to be continued 4 / 22)
![[paper reading] [3D object detection] voxel transformer for 3D object detection](/img/a2/9f66789cc12fad99491309717cf418.png)
[paper reading] [3D object detection] voxel transformer for 3D object detection
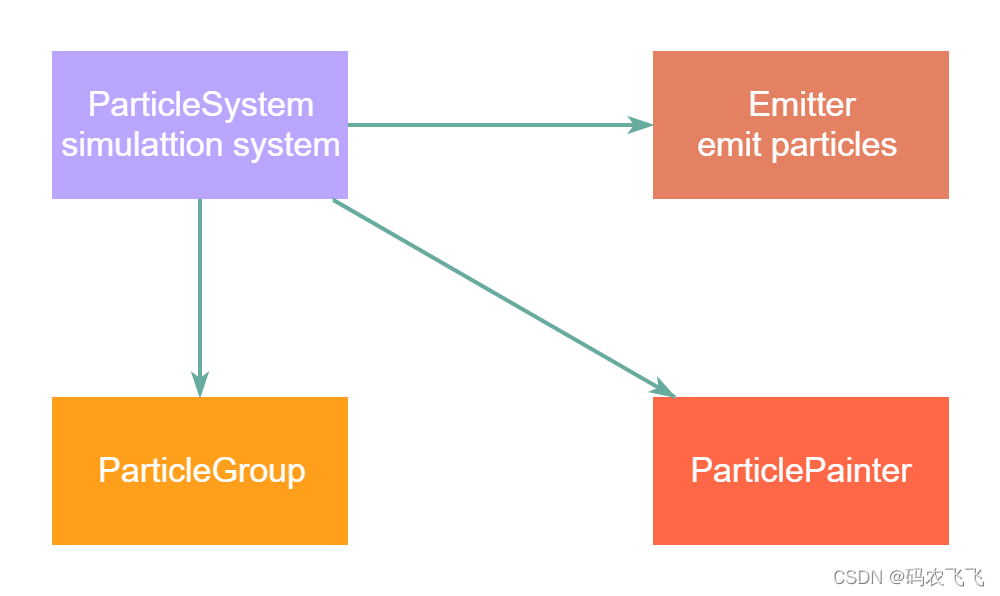
QML advanced (V) - realize all kinds of cool special effects through particle simulation system

程序员抱怨:1万2的工资我真的活不下去了,网友:我3千咋说
![[timing] empirical evaluation of general convolution and cyclic networks for sequence modeling based on TCN](/img/c5/3b3f9cf9a39bf14a68ac100294ca6c.png)
[timing] empirical evaluation of general convolution and cyclic networks for sequence modeling based on TCN

/etc/bash_ completion. D directory function (the user logs in and executes the script under the directory immediately)

IDE Idea 自动编译 与 On Upate Action 、 On Frame Deactivation 的配置

Fusobacterium -- symbiotic bacteria, opportunistic bacteria, oncobacterium
随机推荐
Huawei machine test -- high precision integer addition
Flink case - Kafka, MySQL source
Innovative practice of short video content understanding and generation technology in meituan
Unity3d practical skills - theoretical knowledge base (I)
重剑无锋,大巧不工
Mysql, binlog log query
程序员抱怨:1万2的工资我真的活不下去了,网友:我3千咋说
New terminal play method: script guidance independent of technology stack
针对NFT的网络钓鱼
Recommended scheme of national manufactured electronic components
MySQL queries users logged in for at least N consecutive days
IDE idea automatic compilation and configuration of on update action and on frame deactivation
Record the ThreadPoolExecutor main thread waiting for sub threads
No such file or directory problem while executing shell
Special topic of data intensive application system design
Practice and exploration of knowledge map visualization technology in meituan
383. Ransom letter
[paper reading] [3D object detection] voxel transformer for 3D object detection
C language: Advanced pointer
Eksctl deploying AWS eks