当前位置:网站首页>Serverless + domain name can also build a personal blog? Really, and soon
Serverless + domain name can also build a personal blog? Really, and soon
2022-08-11 07:47:00 【Time standing still is not a brief history】
基于Gitee快速搭建个人博客
一. 背景
作为技术人, I believe most people have the habit of taking notes.
I won't say much about the benefits of taking notes, And if you think you remember your notes pretty well, Maybe choose to post your notes to a blogging platform.
We usually work for professional reasons, Will be exposed to a lot of platform blogs: 列如: CSDN, 博客园, 简书, 知乎, 掘金等等.
Their advantages are many, 比如说: 功能强大, Comes with image server, 社交属性强, potential fans/By many and so on.
But platform-based blogging will be somewhat less personal/The core competitiveness of the team. Therefore, many bigwigs choose to use personal blogs or public accounts to promote their personal brands
There is also a cost to setting up a personal blog
We usually set up a blog, There are many steps to prepare. 大致流程为: 购买服务器->申请域名->Domain name audit and website audit->Choose a blog system->Manually modify and deploy the blog system.
Each of these steps will take a lot of time, energy and even money to do something. I believe that many people are reluctant to engage in these things.
And recently discovered a super convenient and simple personal blog system——— jekyll
关于 jekyll
jekyll 是一个简单的免费的Blog生成工具,类似 WordPress. 官方网站
但是和 WordPress 不同的是,jekyll Is a tool for generating static web pages,不需要数据库支持.
And can cooperate with third-party services, 例如 Disqus. 最关键的是 jekyll 可以免费部署在 Gitee/Github上,And supports one piece builds. And there is no need for us to manually apply for a domain name
Without further ado, let's start using it~~~
二. 部署
基于 jekyll The built personal blog can be deployed in Gitee/GitHub 上, We deploy here mainly to Gitee 为例
The reason I think everyone is very clear: Gitee(码云) 他快啊. 说到这里, Suddenly remembered a line: 天下武功, 唯快不破.
如果之前没有申请Gitee的童鞋, 可以点击 这里 进行注册. 注册成功后, You can start the road to build our personal blog
The construction steps can be divided into: 拉取代码->Modify and upload configuration->Build and access. Below I will follow the steps to introduce how to quickly build a base Gitee+ jekyll 的个人博客
拉取代码
Copy this repository to your own repository
in the upper right corner of the warehouse, 点击fork You can copy the code to your own repository; Another idea is to download the code directly, After editing, upload it to your new repository, Here I take the first way as an example
Download the code from your own repository
This can be done directly on the command line, 利用git clone 自己仓库地址进行下载, 也可以通过idea/pycharm/vscode 等IDE工具来下载.
这里以IDEAway to download the repository code as an example: 鼠标点击 File->Close Project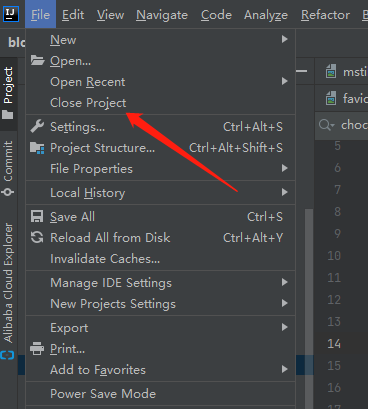
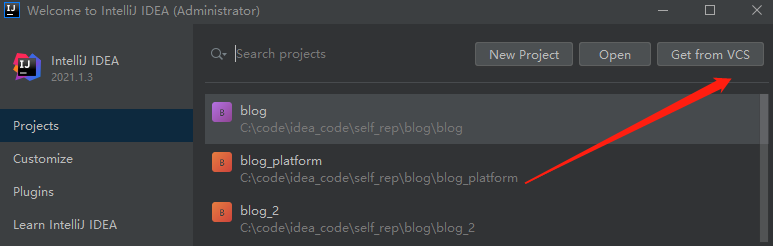
Select after exiting the current project Get from VCS
Copy your warehouse address to the above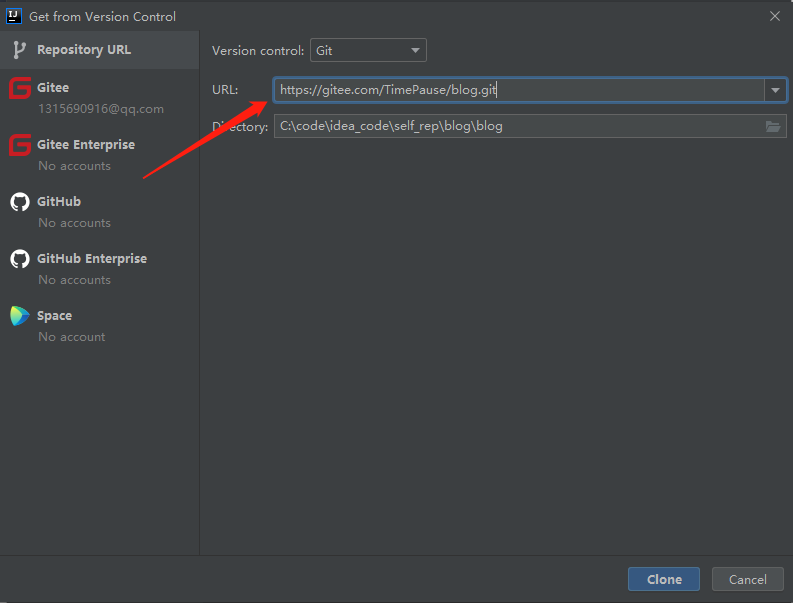
Modify and upload configuration
_config.yml
通过 _config.yml to modify the basic configuration
进入根目录下的 _config.yml
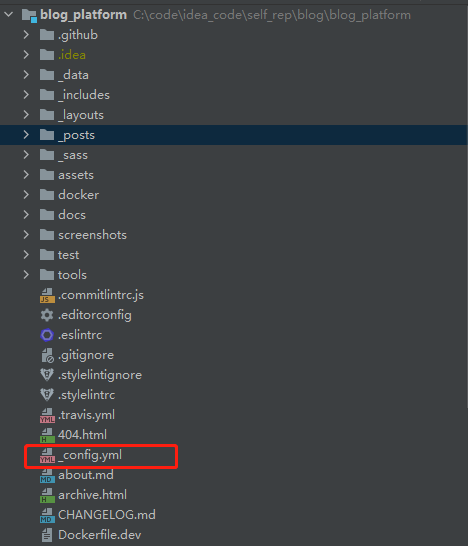
这里主要The following information has been modified, 如下图所示:
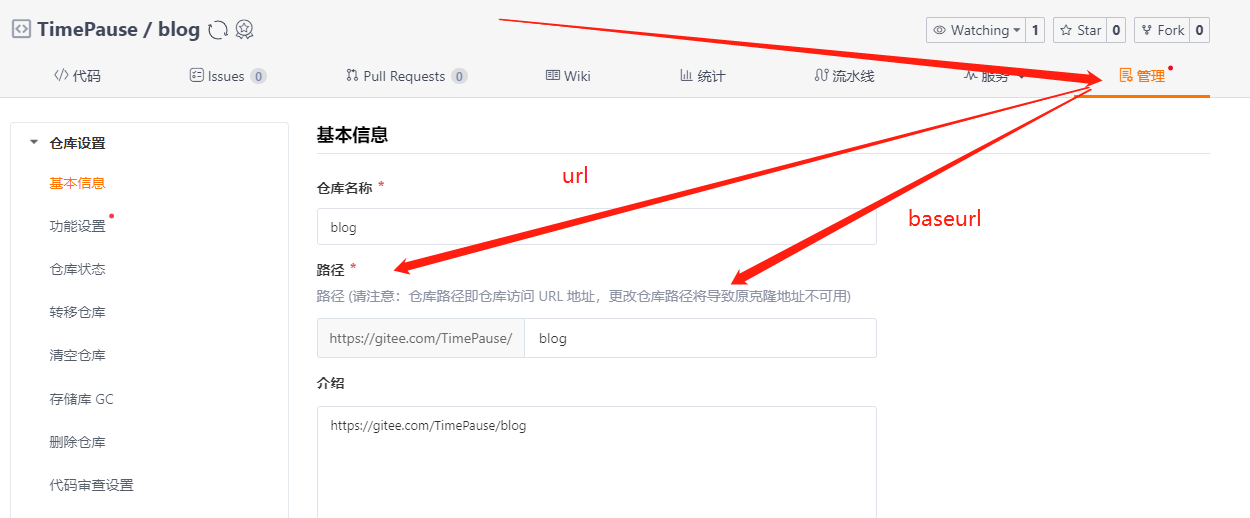
- url : Gitee主页地址
- baseurl: The relative address of the repository where the blog is located
- description: 博客简介
- text_skin: 主题颜色
- highlight_theme: Font highlighting theme

ps:
url 和 baseurl 这两个参数可以通过 gitee View the admin page
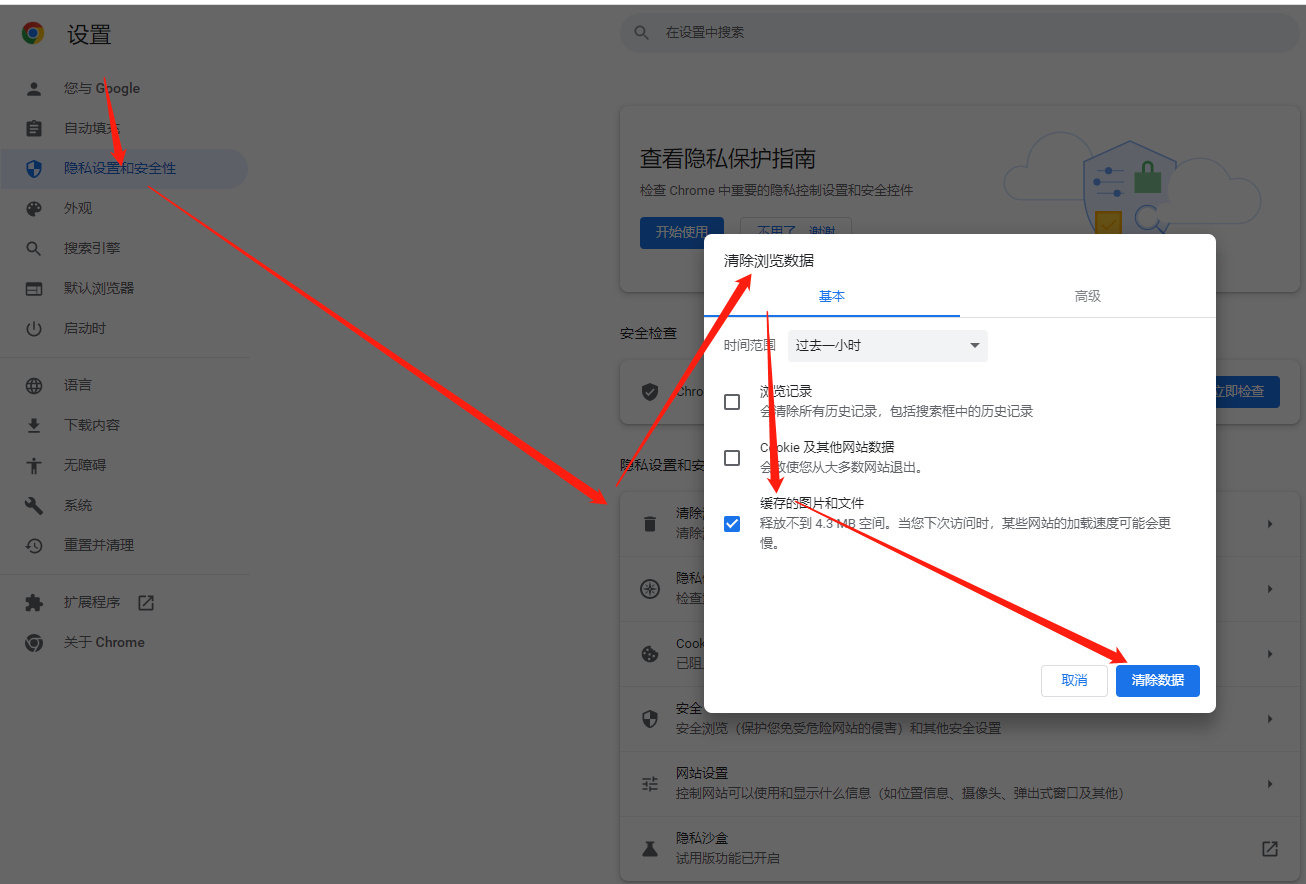
第一次修改后, Modify again later text_skin和 highlight_theme时, Web page needs to be closed, 然后清理缓存, Then refresh to access.
locale.yml
Modify copyright time information (Here if the pull is my code, 就不用改了, Because I have changed it~~~)
There are many languages for the localization configuration here for us to choose from, But if we need to display Simplified Chinese, Then just pay attention to the following configuration
顺便说一句: The localization configuration modified here can be found here _config.yml 来指定
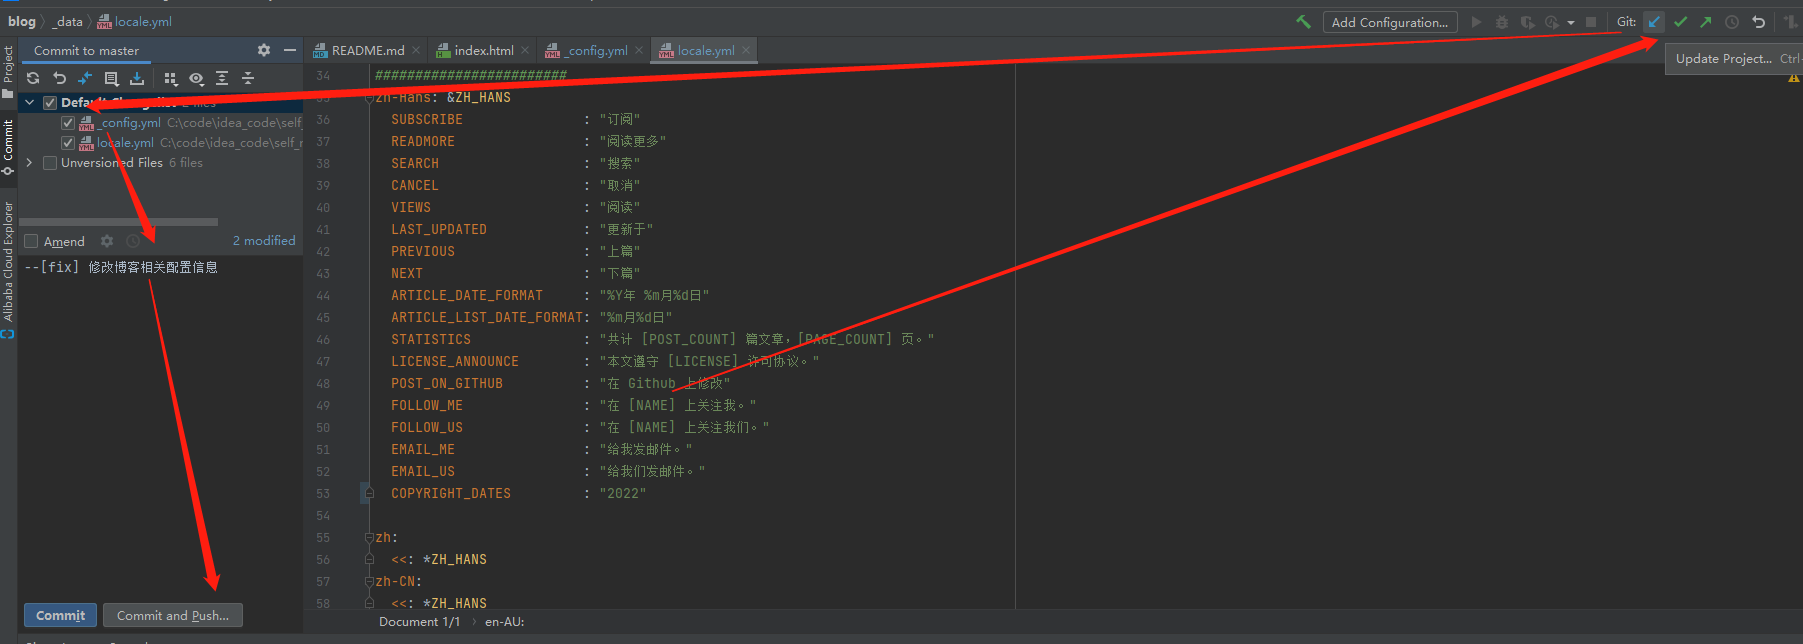
Submit and push the code to the specified repository
Build and access(gitee部署项目)
点击Gitee Pages

身份认证
经过第1步操作之后, We will find out if there is no real-name authentication before, authentication is required(This is the most time-consuming part)
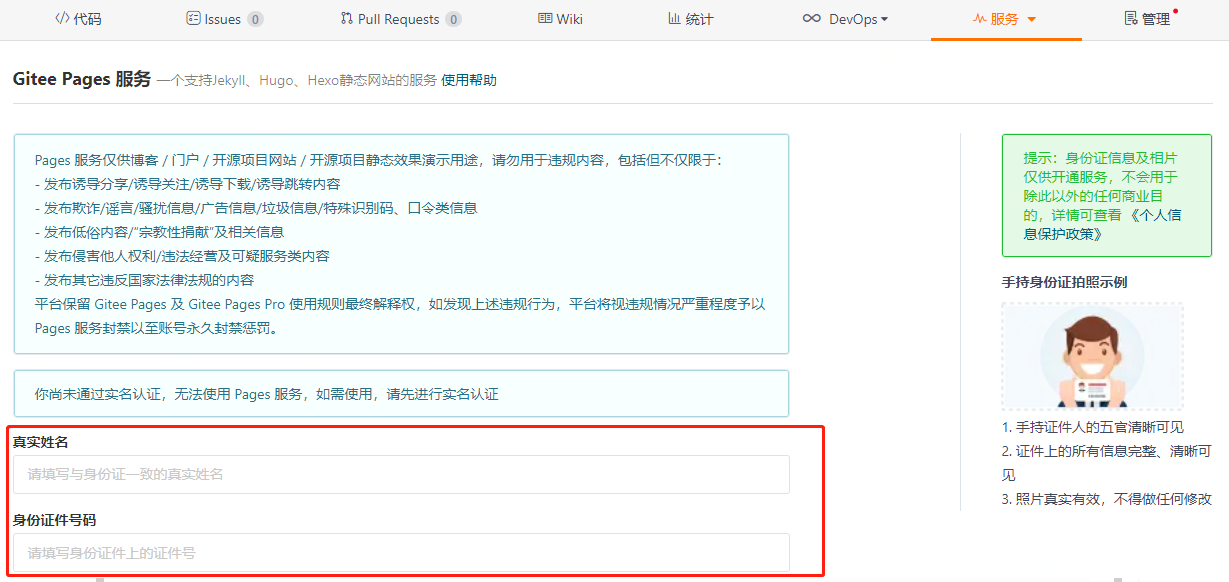
填写后, You will also need to upload relevant information such as ID photos

构建和部署
Usually during working days, The review time is about a day(Not sure about the weekend, Might be later)
审核成功之后, 再次点击 Gitee Pages, 会出现下面窗口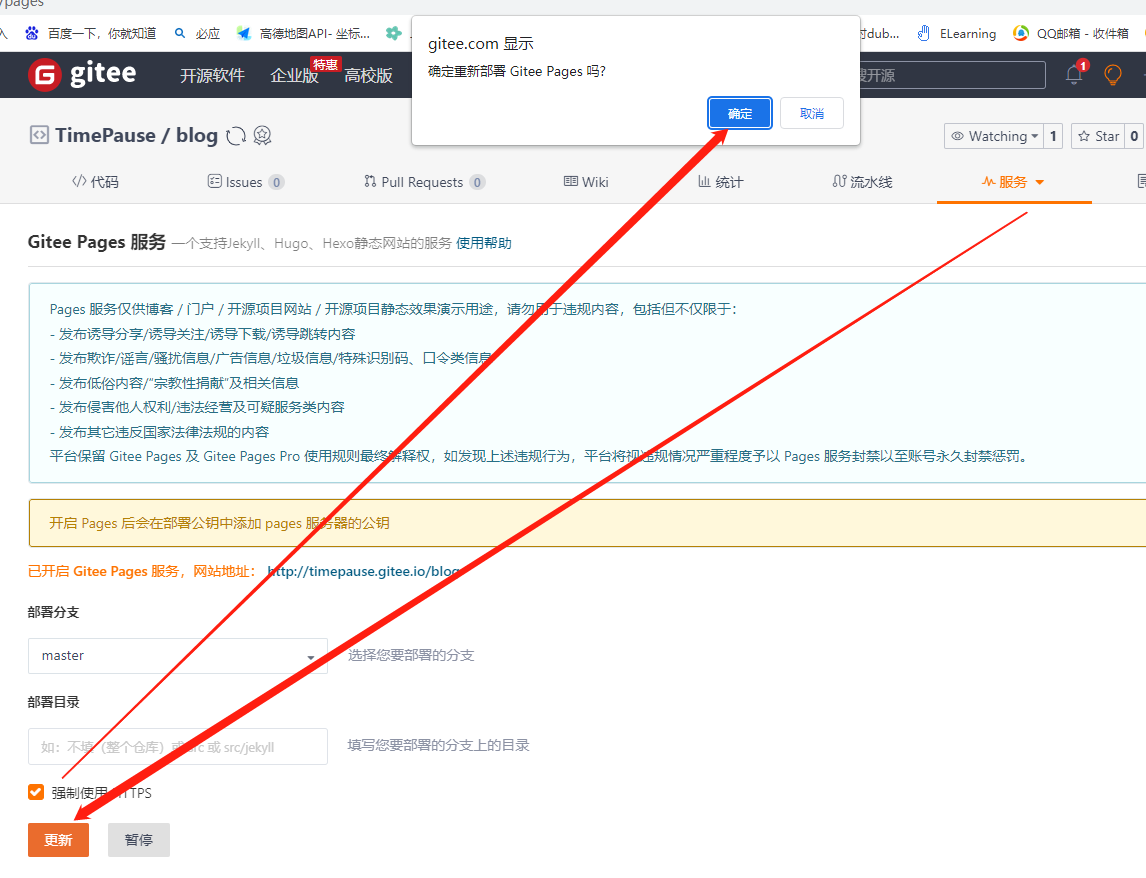
部署成功后, Just click on the address
Click the hyperlink above to access
三. 使用
上传博客
将 .md (markdown) Format files are uploaded to 项目根目录下 的 _post 目录下

上传图片
- We usually upload pictures on our blog, Therefore, we need to manually place the image resources, 根目录/asserts/imgs/ 下.
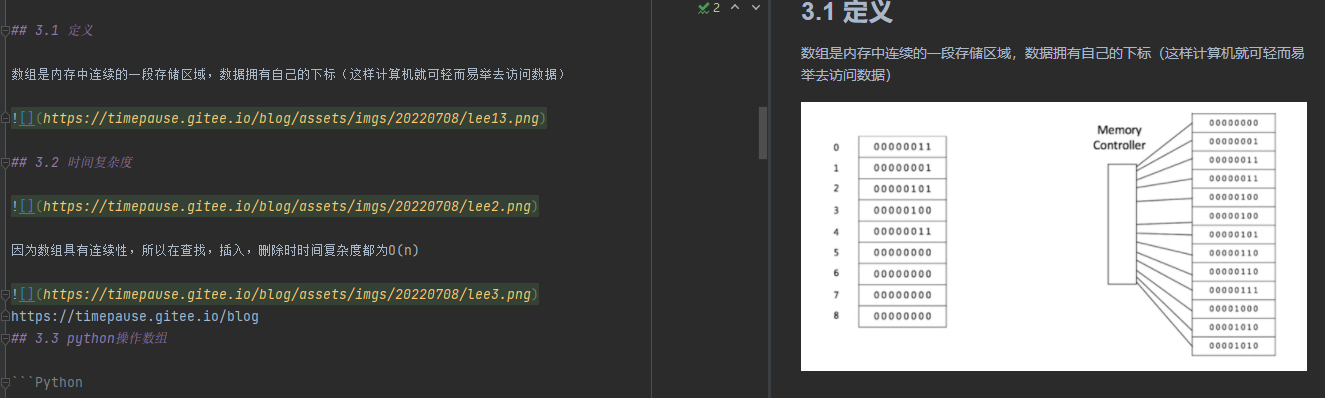
The access path of the image is: Personal blog website address/Image relative directory. 例如:https://timepause.gitee.io/blog/assets/imgs/chy/20220709/image-20220709134159346.png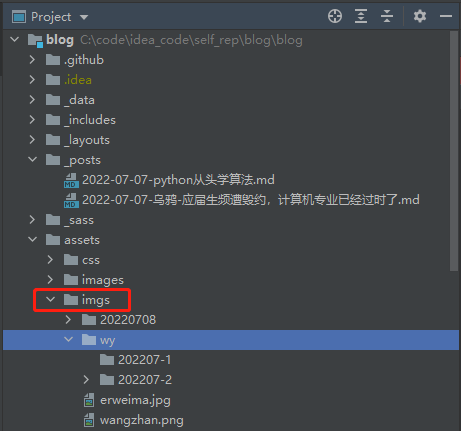
ps : There are two things to say about the storage of images
We can take the date as a directory, Then store by date. And this method is because the directory hierarchy is small, 图片可以直接显示
If it's a team blog, You can use your own name+Time to store pictures for the directory

四. 总结
This article mainly introduces how to base Gitee+jekyll 来快速搭建个人博客. And briefly introduced its configuration, How to use and deploy.
You are welcome to introduce other functions through the official website, 自己尝试哦. 如果觉得不错, Please also support us !
边栏推荐
- CIKM 2022 AnalytiCup Competition: 联邦异质任务学习
- JD.com product details API call example explanation
- 博途PLC 1200/1500PLC ModbusTcp通信梯形图优化汇总(多服务器多从站轮询)
- Douyin share password url API tool
- 伦敦银规则有哪些?
- Daily sql--statistics the total salary of employees in the past three months (excluding the latest month)
- 【软件测试】(北京)字节跳动科技有限公司终面HR面试题
- Strongly recommend an easy-to-use API interface
- 【LeetCode每日一题】——844.比较含退格的字符串
- 2022-08-09 Group 4 Self-cultivation class study notes (every day)
猜你喜欢


随机推荐
ROS 话题通信理论模型
详述MIMIC 的ICU患者检测时间信息表(十六)
Douyin API interface
TF中的One-hot
Edge provides label grouping functionality
恒源云-Pycharm远程训练避坑指南
docker安装mysql5.7(仅供测试使用)
opencv实现数据增强(图片+标签)平移,翻转,缩放,旋转
关于Android Service服务的面试题
radix-4 FFT principle and C language code implementation
测试用例很难?有手就行
【sdx62】XBL设置共享内存变量,然后内核层获取变量实现
6月各手机银行活跃用户较快增长,创半年新高
线程交替输出(你能想出几种方法)
3GPP LTE/NR信道模型
1091 N-自守数 (15 分)
How to choose professional, safe and high-performance remote control software
国密规范 SM2 SM3 SM4
Daily sql-statistics of the number of professionals (including the number of professionals is 0)
Discourse's Close Topic and Reopen Topic