当前位置:网站首页>机器人控制器编程实践指导书旧版-实践二 传感器(模拟量)
机器人控制器编程实践指导书旧版-实践二 传感器(模拟量)
2022-08-10 06:57:00 【zhangrelay】
适用于UNO/2560/DUE/ESP8266/ESP32,2021年之前使用版本。

实践二 传感器(模拟量)
2.1 实践目的
- 掌握Arduino[ESP32]与红外避障传感器、温湿度传感器、烟雾传感器、火焰传感器、人体红外感应传感器、超声波传感器模块的测试。
2.2 实践设备
- PC机一台
- Arduino[ESP32]开发板及配件等
- 万用表和示波器等
2.3 实践原理
由于模拟传感器种类繁多,但是代码和原理基本相似,只给出一些典型案例介绍。
- 初级:
压力传感器:
示意图
参考代码:
int sensorPin = 2; // select the input pin for the potentiometer
int ledPin = 13; // select the pin for the LED
int sensorValue = 0; // variable to store the value coming from the sensor
void setup() {
// declare the ledPin as an OUTPUT:
pinMode(ledPin, OUTPUT);
}
void loop() {
// read the value from the sensor:
sensorValue = analogRead(sensorPin);
// turn the ledPin on
digitalWrite(ledPin, HIGH);
// stop the program for <sensorValue> milliseconds:
delay(sensorValue);
// turn the ledPin off:
digitalWrite(ledPin, LOW);
// stop the program for for <sensorValue> milliseconds:
delay(sensorValue);
}
- 中级:
温度传感器LM35:
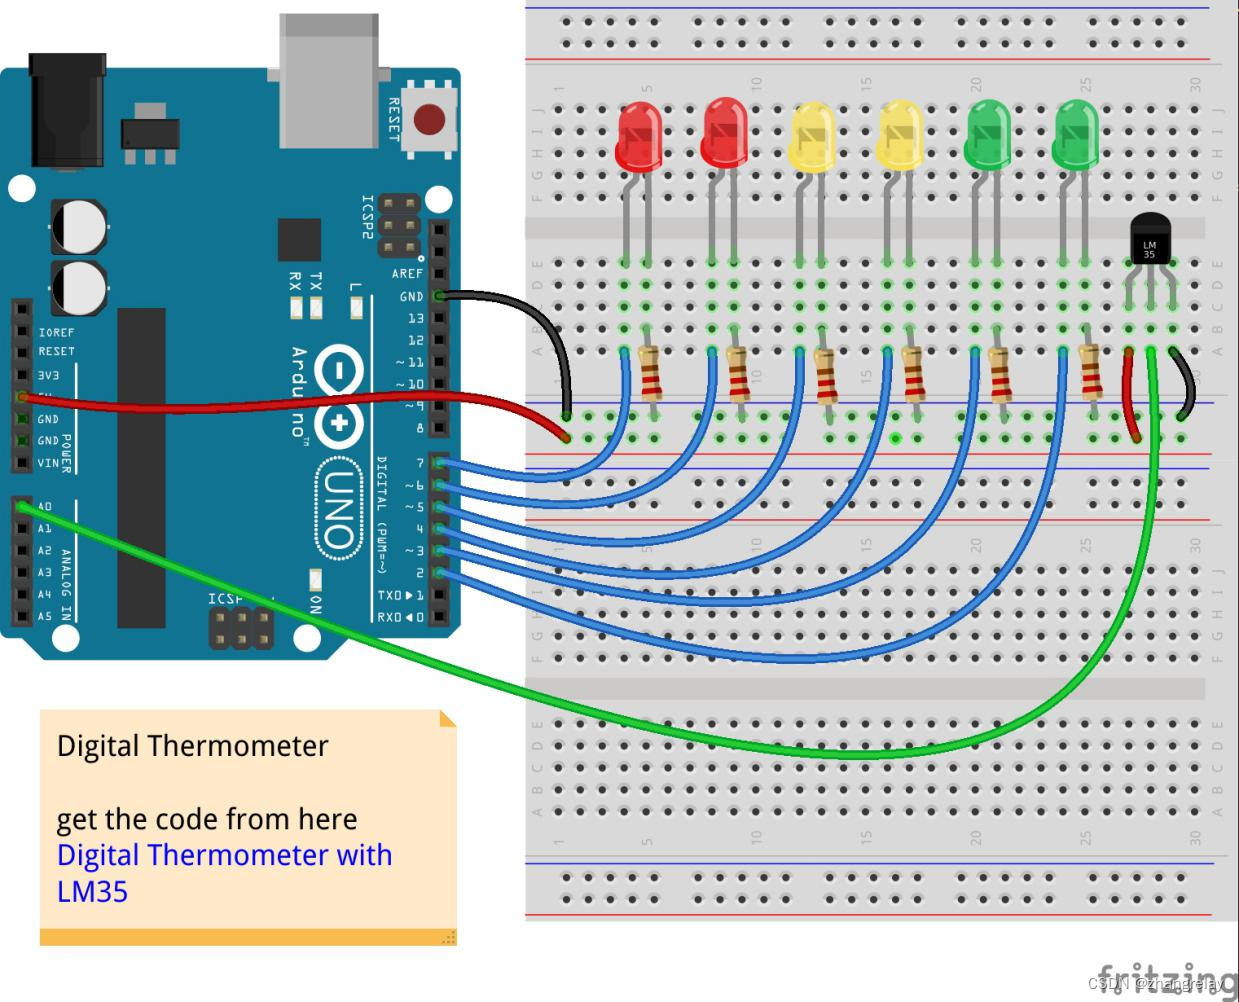
示意图
参考代码:
float temperature; // stores the temperature
int sensorPin = 0; // pin where the sensor is connected to
int startTemp=20;
// the start temperature > at this temperature, no LED will light up
void setup(){
Serial.begin(9600); // initialisation of the serial connection
for (int i=2;i<8; i++){ // output channels from 2 to 7
pinMode(i,OUTPUT); // pin is a output
}
}
void loop()
{
temperature = analogRead(sensorPin); // reading analog sensor value
temperature = temperature*0.488; // correcting to °C
for (int i=0;i<8; i++){
if (temperature>((i*2)+startTemp)){ // switch LED on, if temperature is higher than starttemp + (LED number*2)
digitalWrite(i,HIGH);
}
else {
digitalWrite(i,LOW); // else, switch it off
}
}
Serial.print(temperature);Serial.println(" °C"); // send the temperarue to the serial monitor
delay(500); // just wait a little
}
- 高级(ROS选修):
模拟量端口数据采集:
#if (Arduino[ESP32] >= 100)
#include <Arduino[ESP32].h>
#else
#include <WProgram.h>
#endif
#include <ros.h>
#include <rosserial_Arduino[ESP32]/Adc.h>
ros::NodeHandle nh;
rosserial_Arduino[ESP32]::Adc adc_msg;
ros::Publisher p("adc", &adc_msg);
void setup()
{
pinMode(13, OUTPUT);
nh.initNode();
nh.advertise(p);
}
//We average the analog reading to elminate some of the noise
int averageAnalog(int pin){
int v=0;
for(int i=0; i<4; i++) v+= analogRead(pin);
return v/4;
}
long adc_timer;
void loop()
{
adc_msg.adc0 = averageAnalog(0);
adc_msg.adc1 = averageAnalog(1);
adc_msg.adc2 = averageAnalog(2);
adc_msg.adc3 = averageAnalog(3);
adc_msg.adc4 = averageAnalog(4);
adc_msg.adc5 = averageAnalog(5);
p.publish(&adc_msg);
nh.spinOnce();
}
2.4 实践内容
阅读2.3中示意图、原理图和代码,在Arduino[ESP32]平台上完成实践。
2.5 实践问题
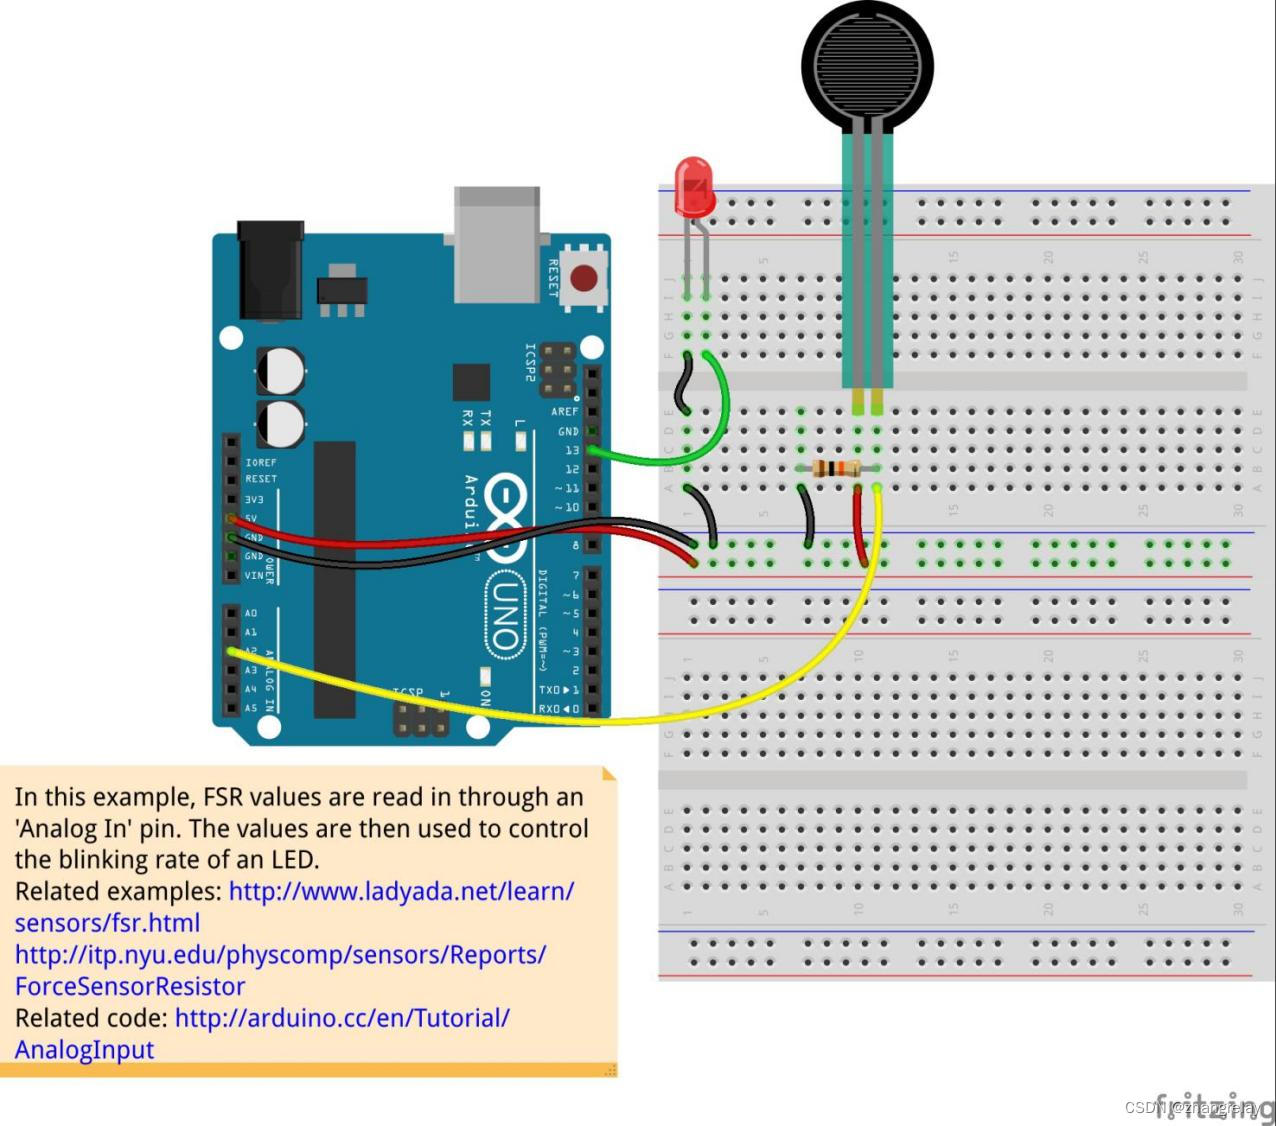
2.5.1 依据环境光亮度(光敏电阻)控制LED灯闪烁频率或亮度
在此示例中,光电管值通过“模拟输入”引脚读取。 然后使用这些值来控制 LED 的闪烁速率。 使用万用表,检查不同光照条件下光电管的最小和最大电阻。然后用Axel-Benz公式计算电阻值:Rref = sqrt(Rmin*Rmax) |

示意图
写出实现上述功能核心代码,并下载到Arduino[ESP32]验证(此题类似手机屏幕亮度自动调节)。
// These constants won't change. They're used to give names to the pins used:
const int analogInPin = A0; // Analog input pin that the potentiometer is attached to
const int analogOutPin = 9; // Analog output pin that the LED is attached to
int sensorValue = 0; // value read from the pot
int outputValue = 0; // value output to the PWM (analog out)
void setup() {
// initialize serial communications at 9600 bps:
Serial.begin(9600);
}
void loop() {
// read the analog in value:
sensorValue = analogRead(analogInPin);
// map it to the range of the analog out:
outputValue = map(sensorValue, 0, 1023, 0, 255);
// change the analog out value:
analogWrite(analogOutPin, outputValue);
// print the results to the Serial Monitor:
Serial.print("sensor = ");
Serial.print(sensorValue);
Serial.print("\t output = ");
Serial.println(outputValue);
// wait 2 milliseconds before the next loop for the analog-to-digital
// converter to settle after the last reading:
delay(2);
}
2.5.2 依据距离远近依次点亮LED
简单的停车助手 测量到附近物体的距离并显示为 LED 图表。 |
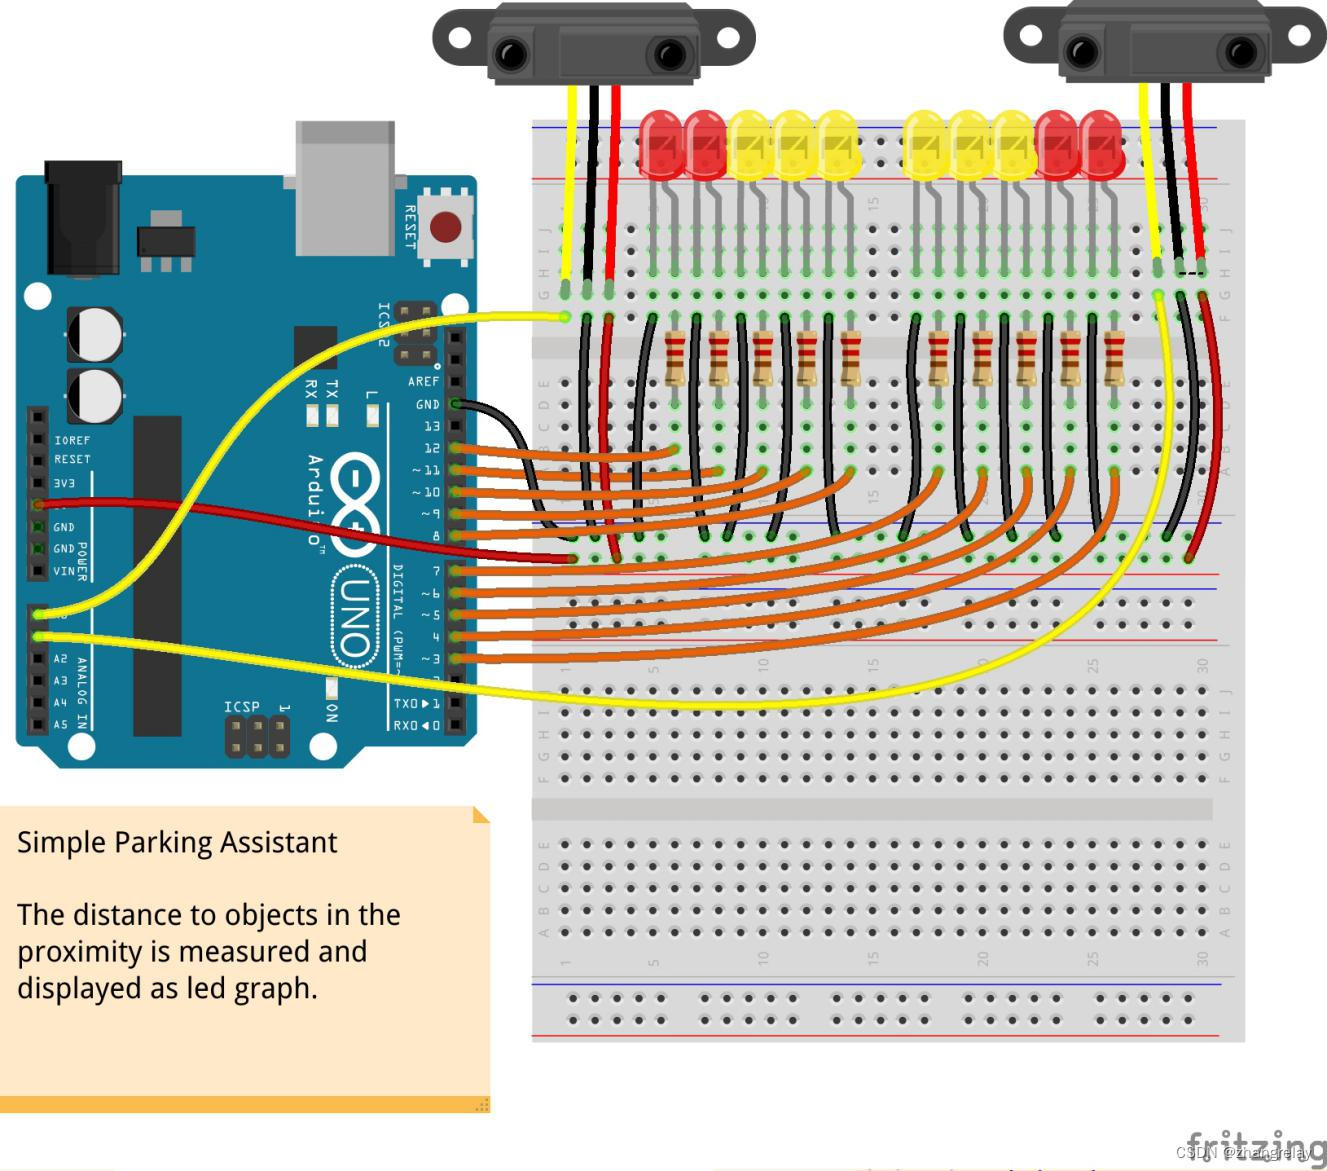
写出实现上述功能核心代码,并下载到Arduino[ESP32]验证。
#include <ros.h>
#include <std_msgs/Empty.h>
ros::NodeHandle nh;
void messageCb( const std_msgs::Empty& toggle_msg){
digitalWrite(13, HIGH-digitalRead(13)); // blink the led
}
ros::Subscriber<std_msgs::Empty> sub("toggle_led", &messageCb );
void setup()
{
pinMode(13, OUTPUT);
nh.initNode();
nh.subscribe(sub);
}
void loop()
{
nh.spinOnce();
delay(1);
}
2.6 实践总结
回顾本次实践,遇到哪些问题,如何解决,经验和启发有哪些?
DHT11是温湿度传感器,ESP32可以通过单总线读取DHT11,使用ESP32开发板,连接四路DHT11,发现,读值是正常的。
评分:
|
边栏推荐
- Ladies and gentlemen, oracle11g, cdc2.2, flink1.13.6, single-table incremental synchronization.Without adding data
- 幂函数 指数函数 对数函数
- Deep understanding of the array
- 神经网络的三种训练方法,神经网络训练全过程
- 2022 Henan Mengxin League Game (5): University of Information Engineering K - Matrix Generation
- 各位大佬,oracle11g,cdc2.2,flink1.13.6,单表增量同步。在没新增数据的情
- 复现dns外带数据结合sqlmap
- 神经网络可视化有3D版本了,美到沦陷 已开源
- ES13 - ES2022 - The 123rd ECMA Congress approves the ECMAScript 2022 language specification
- 复杂AB实验
猜你喜欢
![Chapter 12 Other Database Tuning Strategies [2. Index and Tuning] [MySQL Advanced]](/img/6d/f7fffb327f3191ac4c5a3dc7808c89.png)
Chapter 12 Other Database Tuning Strategies [2. Index and Tuning] [MySQL Advanced]

【Event Preview on August 9】Prometheus Summit

数据库公共字段自动填充

神经网络样本太少怎么办,神经网络训练样本太少

浅谈C语言整型数据的存储

时序动作定位 | ASM-Loc:弱监督时序动作定位的动作感知片段建模(CVPR 2022)

1413. 逐步求和得到正数的最小值

navicat for mysql 连接时报错:1251-Client does not support authentication protocol requested by server

复现dns外带数据结合sqlmap

语法基础(判断语句)
随机推荐
浅谈C语言整型数据的存储
人工神经网络模型的特点,人工神经网络模型定义
2022 Henan Mengxin League Game (5): University of Information Engineering F - Split Turf
C语言文件操作
761. 特殊的二进制序列
基于ABP的AppUser对象扩展
【电商业务】外行为何难区别 商品属性与商品规格
About MongoDb query Decimal128 to BigDecimal problem
Grammar Basics (Judgment Statements)
The constraints of the database learning table
MySQL之InnoDB引擎(六)
order by注入与limit注入,以及宽字节注入
Ladies and gentlemen, oracle11g, cdc2.2, flink1.13.6, single-table incremental synchronization.Without adding data
PLSQL学习第二天
2022河南萌新联赛第(五)场:信息工程大学 C - 丢手绢
语法基础(判断语句)
自动化测试框架Pytest(三)——自定义allure测试报告
2022 Henan Mengxin League No. 5: University of Information Engineering B - Transportation Renovation
全连接神经网络结构图,神经网络示意图怎么画
搭建 risc-v 编译环境