当前位置:网站首页>Take you to build a wheel and customize a View that can be dragged and sucked at will
Take you to build a wheel and customize a View that can be dragged and sucked at will
2022-08-10 23:11:00 【yechaoa】
1、效果

2、前言
在开发中,随意拖拽可吸边的悬浮View还是比较常见的,这种功能网上也有各种各样的轮子,其实写起来并不复杂,看完本文,你也可以手写一个,而且不到400行代码就能实现一个通用的随意拖拽可吸边的悬浮View组件.
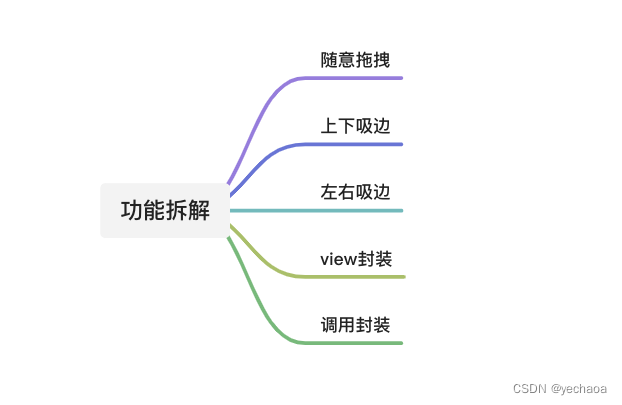
3、功能拆解
4、功能实现
4.1、基础实现
4.1.1、自定义view类
先定义一个FloatView类,继承自FrameLayout,实现构造方法.
创建一个ShapeableImageView,并添加到这个FloatView中.
class FloatView : FrameLayout {

    constructor(context: Context) : this(context, null)

    constructor(context: Context, attributeSet: AttributeSet?) : this(context, attributeSet, 0)

    constructor(context: Context, attributeSet: AttributeSet?, defStyle: Int) : super(context, attributeSet, defStyle) {
        initView()
    }

    private fun initView() {
        val lp = LayoutParams(LayoutParams.WRAP_CONTENT, LayoutParams.WRAP_CONTENT)
        layoutParams = lp

        val imageView = ShapeableImageView(context)
        imageView.setImageResource(R.mipmap.ic_avatar)

        addView(imageView)
    }
}
4.1.2、添加到window
在页面的点击事件中,通过DecorView把这个FloatView添加到window中
mBinding.btnAddFloat.setOnClickListener {
    val contentView = this.window.decorView as FrameLayout
    contentView.addView(FloatView(this))
}
来看下效果:
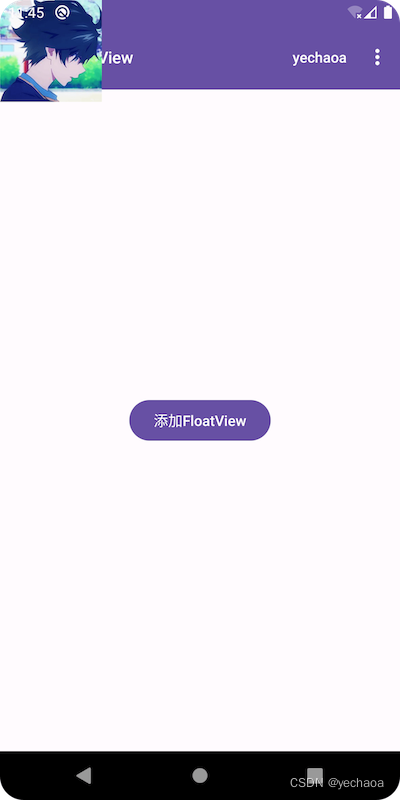
默认在左上角,盖住了标题栏,也延伸到了状态栏,不是很美观.
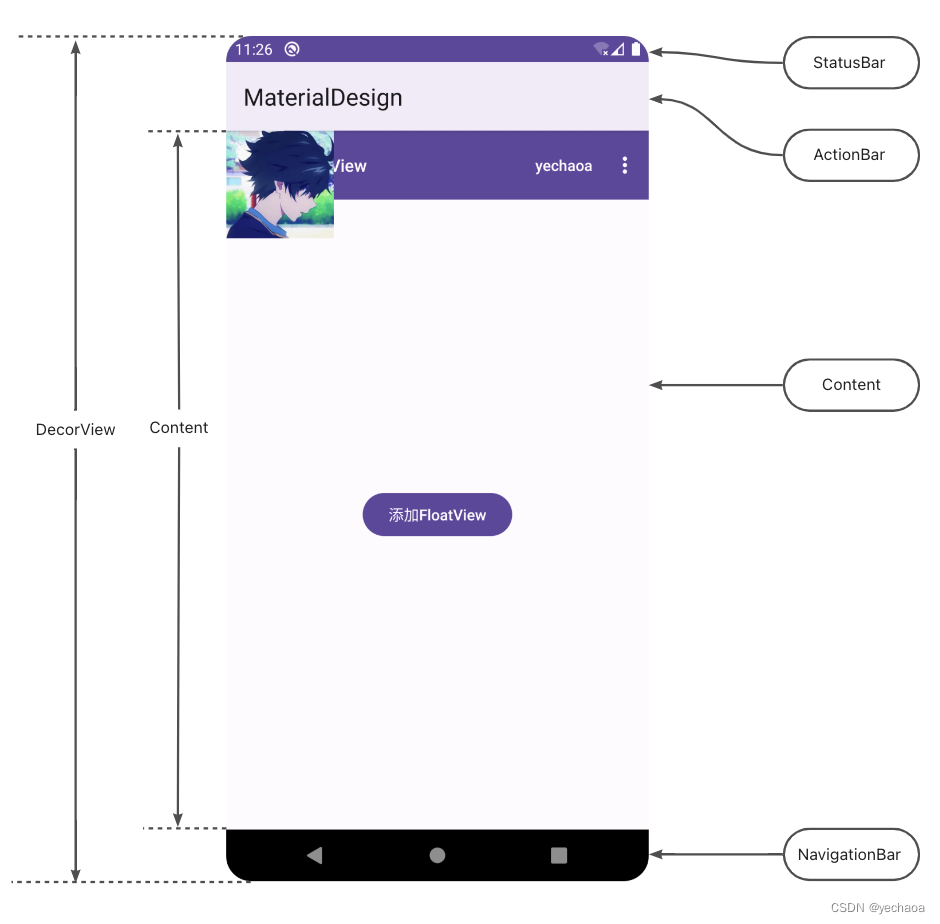
从这个视图层级关系中可以看出,我们是把FloatView添加到DecorView的根布局(rootView)里面了,实际下面还有一层contentView,contentView是不包含状态栏、导航栏和ActionBar的.
我们改一下添加的层级(content):
val contentView = this.window.decorView.findViewById(android.R.id.content) as FrameLayout
contentView.addView(FloatView(this))
再看下效果: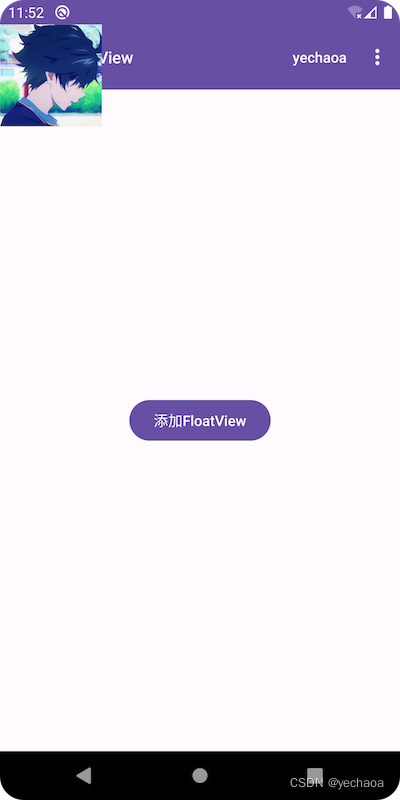
此时,是默认显示在状态栏下面了,但还是盖住了标题栏.
这是因为标题栏是在activity的layout中加的toolbar,不是默认的ActionBar,app主题是Theme.Material3.DayNight.NoActionBar,所以显示效果其实是正确的.
手动加上ActionBar看看效果:
这就验证了我们之前的论点了.
不管我们添加的根布局是rootView还是contentView,实际上可能都有需求不要盖住原有页面上的某些元素,这时候可以通过margin或者x/y坐标位置来限制view显示的位置.
4.1.3、视图层级关系
4.2、拖拽
4.2.1、View.OnTouchListener
实现View.OnTouchListener接口,重写onTouch方法,在onTouch方法中根据拖动的坐标实时修改view的位置.
    override fun onTouch(v: View, event: MotionEvent): Boolean {
        val x = event.x
        val y = event.y
        when (event.action) {
            MotionEvent.ACTION_DOWN -> {
                mDownX = event.x
                mDownY = event.y
            }
            MotionEvent.ACTION_MOVE -> {
                offsetTopAndBottom((y - mDownY).toInt())
                offsetLeftAndRight((x - mDownX).toInt())
            }
            MotionEvent.ACTION_UP -> {

            }
        }
        return true
    }
- MotionEvent.ACTION_DOWN 手指按下
- MotionEvent.ACTION_MOVE 手指滑动
- MotionEvent.ACTION_UP 手指抬起
效果:

ok,这就实现随意拖拽了.
4.2.2、动态修改view坐标
上面我们修改view坐标用的是offsetTopAndBottom和offsetLeftAndRight,分别是垂直方向和水平方向的偏移,当然也还有别的方式可以修改坐标
- view.layout()
- view.setX/view.setY
- view.setTranslationX/view.setTranslationY
- layoutParams.topMargin…
- offsetTopAndBottom/offsetLeftAndRight
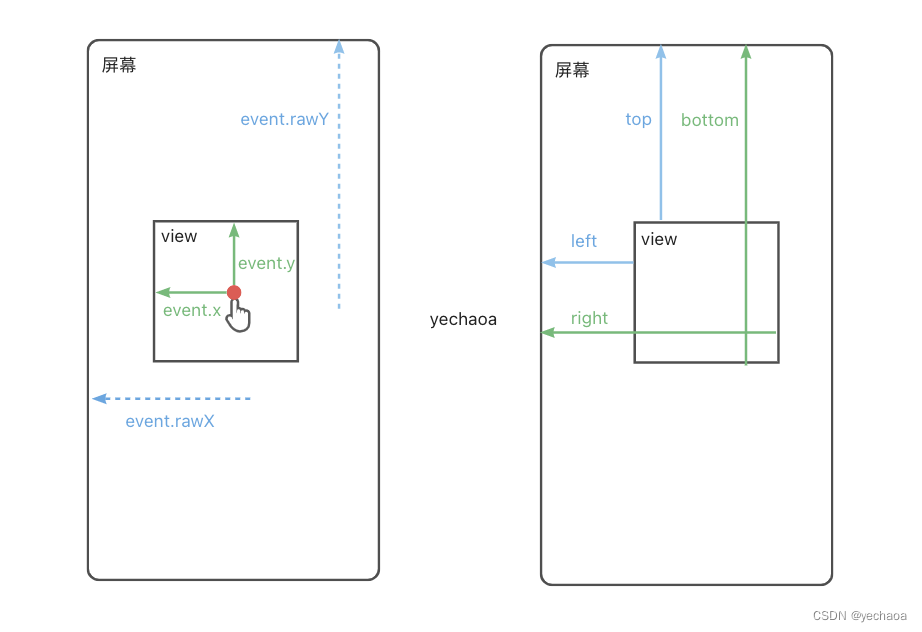
4.2.3、view坐标系
上面我们获取坐标用的是event.x,实际上还有event.rawX,他们的区别是什么,view在视图上的坐标又是怎么定义的?
搞清楚了这些,在做偏移计算时,就能达到事半功倍的效果,省去不必要的调试工作.
一图胜千言:
4.3、吸边
吸边的场景基本可以分为两种:
- 上下吸边
- 左右吸边
要么左右吸,要么上下吸,上下左右同时吸一般是违背交互逻辑的(四象限),用户也会觉得很奇怪.
吸边的效果其实就是当手指抬起(MotionEvent.ACTION_UP)的时候,根据滑动的距离,以及初始的位置,来决定view最终的位置.
比如默认在顶部,向下滑动的距离不足半屏,那就还是吸附在顶部,超过半屏,则自动吸附在底部,左右同理.
4.3.1、上下吸边
计算公式:
1.上半屏:
1.1.滑动距离<半屏=吸顶
1.2.滑动距离>半屏=吸底

2.下半屏:
2.1.滑动距离<半屏=吸底
2.2.滑动距离>半屏=吸顶
先看下效果:

可以看到基础效果我们已经实现了,但是顶部盖住了ToolBar,底部也被NavigationBar遮住了,我们再优化一下,把ToolBar和NavigationBar的高度也计算进去.
看下优化后的效果:

这样看起来就好很多了.
上图效果最终代码:
    private fun adsorbTopAndBottom(event: MotionEvent) {
        if (isOriginalFromTop()) {
            // 上半屏
            val centerY = mViewHeight / 2 + abs(event.rawY - mFirstY)
            if (centerY < getScreenHeight() / 2) {
                //滑动距离<半屏=吸顶
                val topY = 0f + mToolBarHeight
                animate().setInterpolator(DecelerateInterpolator()).setDuration(300).y(topY).start()
            } else {
                //滑动距离>半屏=吸底
                val bottomY = getContentHeight() - mViewHeight
                animate().setInterpolator(DecelerateInterpolator()).setDuration(300).y(bottomY.toFloat()).start()
            }
        } else {
            // 下半屏
            val centerY = mViewHeight / 2 + abs(event.rawY - mFirstY)
            if (centerY < getScreenHeight() / 2) {
                //滑动距离<半屏=吸底
                val bottomY = getContentHeight() - mViewHeight
                animate().setInterpolator(DecelerateInterpolator()).setDuration(300).y(bottomY.toFloat()).start()
            } else {
                //滑动距离>半屏=吸顶
                val topY = 0f + mToolBarHeight
                animate().setInterpolator(DecelerateInterpolator()).setDuration(300).y(topY).start()
            }
        }
    }
4.3.2、左右吸边
计算公式:
1.左半屏:
1.1.滑动距离<半屏=吸左
1.2.滑动距离>半屏=吸右

2.右半屏:
2.1.滑动距离<半屏=吸右
2.2.滑动距离>半屏=吸左
看下效果:

左右吸边的效果相对上下吸边来说要简单些,因为不用计算ToolBar和NavigationBar,计算逻辑与上下吸边相通,只不过参数是从屏幕高度变为屏幕宽度,Y轴变为X轴.
代码:
    private fun adsorbLeftAndRight(event: MotionEvent) {
        if (isOriginalFromLeft()) {
            // 左半屏
            val centerX = mViewWidth / 2 + abs(event.rawX - mFirstX)
            if (centerX < getScreenWidth() / 2) {
                //滑动距离<半屏=吸左
                val leftX = 0f
                animate().setInterpolator(DecelerateInterpolator()).setDuration(300).x(leftX).start()
            } else {
                //滑动距离<半屏=吸右
                val rightX = getScreenWidth() - mViewWidth
                animate().setInterpolator(DecelerateInterpolator()).setDuration(300).x(rightX.toFloat()).start()
            }
        } else {
            // 右半屏
            val centerX = mViewWidth / 2 + abs(event.rawX - mFirstX)
            if (centerX < getScreenWidth() / 2) {
                //滑动距离<半屏=吸右
                val rightX = getScreenWidth() - mViewWidth
                animate().setInterpolator(DecelerateInterpolator()).setDuration(300).x(rightX.toFloat()).start()
            } else {
                //滑动距离<半屏=吸左
                val leftX = 0f
                animate().setInterpolator(DecelerateInterpolator()).setDuration(300).x(leftX).start()
            }
        }
    }
Author:yechaoa
5、进阶封装
为什么要封装一下呢,因为现在的计算逻辑、参数配置都是在FloatView这一个类里,定制化太强反而不具备通用性,可以进行一个简单的抽取封装,向外暴露一些配置和接口,这样在其他的业务场景下也可以复用,避免重复造轮子.
5.1、View封装
5.1.1、BaseFloatView
把FloatView改成BaseFloatView,然后把一些定制化的能力交给子view去实现.
这里列举了3个方法:
    /**
     * 获取子view
     */
    protected abstract fun getChildView(): View

    /**
     * 是否可以拖拽
     */
    protected abstract fun getIsCanDrag(): Boolean

    /**
     * 吸边的方式
     */
    protected abstract fun getAdsorbType(): Int
5.1.2、子view
class AvatarFloatView(context: Context) : BaseFloatView(context) {

    override fun getChildView(): View {
        val imageView = ShapeableImageView(context)
        imageView.setImageResource(R.mipmap.ic_avatar)
        return imageView
    }

    override fun getIsCanDrag(): Boolean {
        return true
    }

    override fun getAdsorbType(): Int {
        return ADSORB_VERTICAL
    }
}
这样稍微抽一下,代码看起来就简洁很多了,只需要配置一下就可以拥有随意拖拽的能力了.
5.2、调用封装
5.2.1、管理类
新建一个FloatManager的管理类,它来负责FloatView的显示隐藏,以及回收逻辑.
设计模式还是使用单例,我们需要在这个单例类里持有Activity,因为需要通过Activity的window获取decorView然后把FloatView添加进去,但是Activity与单例的生命周期是不对等的,这就很容易造成内存泄露.
怎么解?也好办,管理一下activity的生命周期就好了.
在之前分析LifecycleScope源码的文章中有提到关于Activity生命周期的管理,得益于lifecycle的强大,这个问题解起来也变得更简单.
    private fun addLifecycle(activity: ComponentActivity?) {
        activity?.lifecycle?.addObserver(mLifecycleEventObserver)
    }

    private var mLifecycleEventObserver = LifecycleEventObserver { _, event ->
        if (event == Lifecycle.Event.ON_DESTROY) {
            hide()
        }
    }

    fun hide() {
        if (::mContentView.isInitialized && mFloatView != null && mContentView.contains(mFloatView!!)) {
            mContentView.removeView(mFloatView)
        }
        mFloatView?.release()
        mFloatView = null
        mActivity?.lifecycle?.removeObserver(mLifecycleEventObserver)
        mActivity = null
    }
- 添加生命周期的监听
- 在ON_DESTROY的时候处理回收逻辑
5.2.2、FloatManager完整代码
@SuppressLint("StaticFieldLeak")
object FloatManager {

    private lateinit var mContentView: FrameLayout
    private var mActivity: ComponentActivity? = null
    private var mFloatView: BaseFloatView? = null

    fun with(activity: ComponentActivity): FloatManager {
        mContentView = activity.window.decorView.findViewById(android.R.id.content) as FrameLayout
        mActivity = activity
        addLifecycle(mActivity)
        return this
    }

    fun add(floatView: BaseFloatView): FloatManager {
        if (::mContentView.isInitialized && mContentView.contains(floatView)) {
            mContentView.removeView(floatView)
        }
        mFloatView = floatView
        return this
    }

    fun setClick(listener: BaseFloatView.OnFloatClickListener): FloatManager {
        mFloatView?.setOnFloatClickListener(listener)
        return this
    }

    fun show() {
        checkParams()
        mContentView.addView(mFloatView)
    }

    private fun checkParams() {
        if (mActivity == null) {
            throw NullPointerException("You must set the 'Activity' params before the show()")
        }
        if (mFloatView == null) {
            throw NullPointerException("You must set the 'FloatView' params before the show()")
        }
    }

    private fun addLifecycle(activity: ComponentActivity?) {
        activity?.lifecycle?.addObserver(mLifecycleEventObserver)
    }

    private var mLifecycleEventObserver = LifecycleEventObserver { _, event ->
        if (event == Lifecycle.Event.ON_DESTROY) {
            hide()
        }
    }

    fun hide() {
        if (::mContentView.isInitialized && mFloatView != null && mContentView.contains(mFloatView!!)) {
            mContentView.removeView(mFloatView)
        }
        mFloatView?.release()
        mFloatView = null
        mActivity?.lifecycle?.removeObserver(mLifecycleEventObserver)
        mActivity = null
    }
}
5.2.3、调用方式
- 显示
FloatManager.with(this).add(AvatarFloatView(this)).show()
- 隐藏
FloatManager.hide()
- 带点击事件
FloatManager.with(this).add(AvatarFloatView(this))
    .setClick(object : BaseFloatView.OnFloatClickListener {
        override fun onClick(view: View) {
            Toast.makeText([email protected], "click", Toast.LENGTH_SHORT).show()
        }
    })
    .show()
6、Github
https://github.com/yechaoa/MaterialDesign
7、最后
写作不易,且看且珍惜啊喂~
边栏推荐
- VulnHub之DC靶场下载与DC靶场全系列渗透实战详细过程
- DC-9靶场下载及渗透实战详细过程(DC靶场系列)
- 威纶通触摸屏如何在报警的同时,显示出异常数据的当前值?
- Research on multi-element N-k fault model of power system based on AC power flow (implemented by Matlab code) [Power System Fault]
- Glide缓存核心原理详解
- 二叉树 | 翻转二叉树 | leecode刷题笔记
- 虎牙自动发弹幕换牌子
- 音乐播放器(未完成版本)
- BM7 list entry in central
- DC-8靶场下载及渗透实战详细过程(DC靶场系列)
猜你喜欢
阿里云贾朝辉:云XR平台支持彼真科技呈现国风科幻虚拟演唱会

Distribution Network Expansion Planning: Consider Decisions Using Probabilistic Energy Production and Consumption Profiles (Matlab Code Implementation)

LeetCode Daily 2 Questions 02: Reverse the words in a string (1200 each)

Why general company will say "go back messages such as" after the end of the interview, rather than just tell the interviewer the result?

H3C S5130 IRF做堆叠
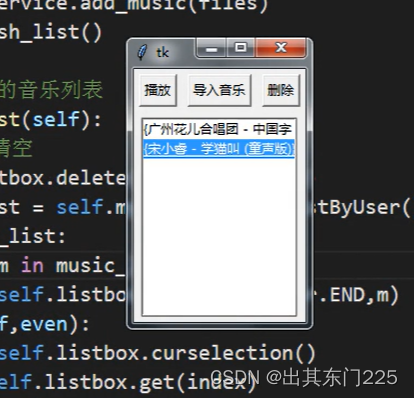
音乐播放器(未完成版本)

PyQt5 窗口自适应大小
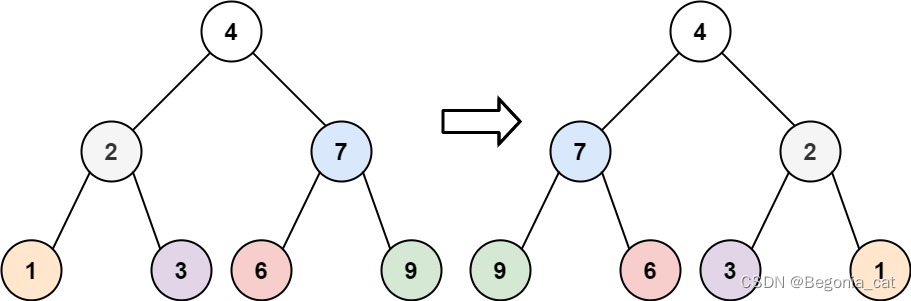
二叉树 | 翻转二叉树 | leecode刷题笔记

实例051:按位与

电力系统潮流计算(牛顿-拉夫逊法、高斯-赛德尔法、快速解耦法)(Matlab代码实现)
随机推荐
MySQL: MySQL Cluster - Principle and Configuration of Master-Slave Replication
OneNote tutorial, how to organize notebooks in OneNote?
mysql中的三大日志
【640. 求解方程】
XSLeaks 侧信道攻击 (unfinished)
JS学习 2022080
win系统下pytorch深度学习环境安装
消息队列总结
二叉树 | 对称二叉树、相同的树、子树相同 | leecode刷题笔记
How does the Weiluntong touch screen display the current value of abnormal data while alarming?
RecyclerView上下滑动时,不调用onBindViewHolder 导致列表的item不刷新
fme csmapreprojector转换器使用高程异常模型进行高程基准转换
Btree索引和Hash索引
STL-deque
浅谈cors
虚拟地址空间
实例049:lambda
浅谈jsfuck编码
Fatal error: cstring: No such file or directory
过滤器