当前位置:网站首页>Mysql database explanation (10)
Mysql database explanation (10)
2022-04-23 15:20:00 【C chord~】
Catalog
One .MySQL Master slave replication principle
2. How master-slave replication works
3. The principle of separation of reading and writing
2. Configure read-write separation
2. How master-slave replication works
3、 Master slave synchronization principle
introduction
In enterprise applications , Mature businesses usually have a large amount of data . A single Mysql In security 、 High availability and high concurrency can not meet the actual needs , Configure multiple master-slave database servers to realize read-write separation
One .MySQL Master slave replication principle
1.MySQL Replication type
- Statement based (SQL) Sentence copying
- Based on line ( Record ) Copy
- Based on hybrid replication ( The default usage is based on SQL Sentence copying , Use row based replication when this is not possible )
2. How master-slave replication works
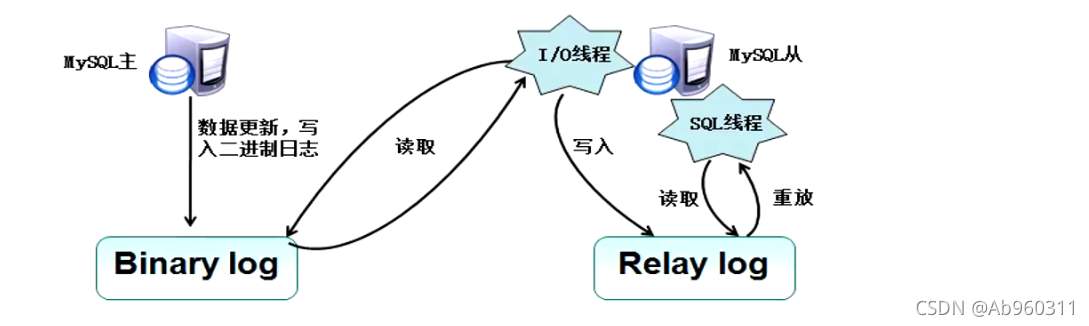
master server master Record database operations to Binary log, meanwhile Master Nodes for each I/O Thread starts a dump Threads , Used to send binary transactions to it , Open from server I/O The thread sends a synchronization request to the main server , The master server sends the binary log content to the slave server , The slave server synchronizes the binary log sent from the master server to the relay log , From the server SQL The thread writes the relay logging operation to the slave server database .
3. The principle of separation of reading and writing
- Read write separation is to write only on the primary server , Read only from service ;
- The main database handles transactional queries , Processing from database select Inquire about ;
4. Project deployment
4.1. Synchronization time
master server
yum -y install ntp

vim /etc/ntp.conf
 Add... At the end of the line
server 127.127.29.0							# Set local clock source , Pay attention to modifying the network segment
fudge 127.127.29.0 stratum 8					# Set the time level to 8( Restriction on 15 Inside )

systemctl start ntpd
From the server
yum -y install ntp ntpdate

systemctl start ntpd
/usr/sbin/ntpdate 192.168.29.11			# Time synchronization , Point to Master The server IP

crontab -e
*/30 * * * * /usr/sbin/ntpdate 192.168.29.11
2. The configuration file
master server
vim /etc/my.cnf
server_id = 1
log_bin=master-bin							# add to , The primary server turns on the binary log
log_slave=updates=true						# add to , Allows binary logs to be updated from the server

systemctl restart mysqld

mysql -u root -p
# Authorize the slave server , Allow it to copy all tables of all databases ( The first account )
grant replication slave on *.* to 'myslave'@'192.168.29.%' identified by '123321';

flush privileges;

 see master Database state
show master status\G
From the server
vim /etc/my.cnf
server-id = 2						# modify , Be careful id And Master Different , Two Slave Of id It has to be different
relay-log=relay-log-bin						# add to , Turn on relay log , Synchronize log records from the primary server to the local
relay-log-index=slave-relay-bin.index		# add to , Define the location and name of the relay log file

systemctl restart mysqld

mysql -u root -p
change master to master_host='192.168.29.11' , master_user='myslave',master_password='123321',master_log_file='master-bin.000001',master_log_pos=412;
# Configuration synchronization , Be careful  master_log_file  and  master_log_pos  The value of should be the same as Master Consistency of query

start slave;						# Start the synchronization , If an error is reported, execute  reset slave;
show slave status\G					# see  Slave  state

 Make sure  IO  and  SQL  Threads are  Yes, It means that the synchronization is normal .
Slave_IO_Running: Yes				# Responsible for communication with the host io signal communication
Slave_SQL_Running: Yes				# Be responsible for your own slave mysql process

# commonly  Slave_IO_Running: No  The possibility of :
1、 The Internet is not working
2、my.cnf Configuration problem
3、 password 、file file name 、pos The offset is not right
4、 The firewall is not closed
3. verification
Create libraries and tables on the master server , If successful, you can also view from the server .
Two . Read / write separation
1. install amoeba
 take jdk-6u14-linux-x64.bin  and  amoeba-mysql-binary-2.2.0.tar.gz.0  Upload to /opt Under the table of contents .

cd /opt/
cp jdk-6u14-linux-x64.bin /usr/local/

cd /usr/local/
chmod +x jdk-6u14-linux-x64.bin
./jdk-6u14-linux-x64.bin
 Press the space to the last line
 Press yes, Press enter

mv jdk1.6.0_14/ /usr/local/jdk1.6

vim /etc/profile
export JAVA_HOME=/usr/local/jdk1.6
export CLASSPATH=$CLASSPATH:$JAVA_HOME/lib:$JAVA_HOME/jre/lib
export PATH=$JAVA_HOME/lib:$JAVA_HOME/jre/bin/:$PATH:$HOME/bin
export AMOEBA_HOME=/usr/local/amoeba
export PATH=$PATH:$AMOEBA_HOME/bin

source /etc/profile
java -version

## install  Amoeba Software ##
mkdir /usr/local/amoeba
tar zxvf /opt/amoeba-mysql-binary-2.2.0.tar.gz -C /usr/local/amoeba/
chmod -R 755 /usr/local/amoeba/
/usr/local/amoeba/bin/amoeba
// If displayed amoeba start|stop  Description installation successful
2. Configure read-write separation
Configuration on the server amoeba docking
grant all on *.* to test@'192.168.29.%' identified by '123321';
amoeba Configure server docking on the server
cd /usr/local/amoeba/conf/

cp amoeba.xml{,.bak}
vim amoeba.xml									# modify amoeba The configuration file

30 modify
<property name="user">amoeba</property>

32 modify
<property name="password">123321</property>

115 modify
<property name="defaultPool">master</property>

117 Remove annotations –
<property name="writePool">master</property>
<property name="readPool">slaves</property>


cp dbServers.xml{,.bak}
vim dbServers.xml								# Modify the database configuration file

23 modify
<property name="schema">mysql</property>

26 modify
<!-- mysql user -->
<property name="user">test</property>

28-30 Remove annotations
<property name="password">123321</property>

45 modify , Set the name of the primary server Master
<dbServer name="master"  parent="abstractServer">

48 modify , Set the address of the primary server
<property name="ipAddress">192.168.29.11</property>

52 modify , Set the name of the slave server slave1
<dbServer name="slave1"  parent="abstractServer">

55 modify , Set up slave server 1 The address of
<property name="ipAddress">192.168.29.66</property>

58 Copy above 6 Line paste , Set up slave server 2 The name of slave2 And address
<dbServer name="slave2"  parent="abstractServer">
<property name="ipAddress">192.168.29.55</property>

65 modify
<dbServer name="slaves" virtual="true">

71 modify
<property name="poolNames">slave1,slave2</property>

/usr/local/amoeba/bin/amoeba start &					# start-up Amoeba Software , Press ctrl+c  return
netstat -anpt | grep java							# see 8066 Whether the port is open , The default port is TCP 8066
3. test
mysql -u amoeba -p123456 -h 192.168.29.33 -P8066
// adopt amoeba Server proxy access mysql , Connect through the client mysql Only the main service will record the data written after , Then sync to from -- From the server

 On the main server :
use db_test;
create table test (id int(10),name varchar(10),address varchar(20));

 On two slave servers :
stop slave;											# Turn off synchronization
use db_test;
// stay slave1 On :
insert into test values('1','zhangsan','this_is_slave1');

// stay slave2 On :
insert into test values('2','lisi','this_is_slave2');

// On the main server :
insert into test values('3','wangwu','this_is_master');

// On the client server :
use db_test;
select * from test;		// The client will report to slave1 and slave2 Reading data , Only the data added from the two servers is displayed , No data added on the primary server

insert into test values('4','qianqi','this_is_client');		// Only the primary server has this data

// Execute on two slave servers  start slave;  You can synchronize the data added on the primary server
start slave;
summary
1.MySQL Replication type
- Statement based (SQL) Sentence copying
- Based on line ( Record ) Copy
- Based on hybrid replication ( The default usage is based on SQL Sentence copying , Use row based replication when this is not possible )
2. How master-slave replication works
master server master Record the database through dump The thread logs the operation to Binary log, Open from server I/O The thread sends a synchronization request to the main server , The master server sends the binary log content to the slave server , The slave server synchronizes the binary log sent from the master server to the relay log , From the server SQL The thread writes the relay logging operation to the slave server database .
3、 Master slave synchronization principle
- adopt amoeba proxy server , The implementation only writes... On the main server , Read only from service ;
- The main database handles transactional queries , Processing from database select Inquire about ;
- Database replication is used to synchronize changes caused by transactional queries to slave databases in the cluster
版权声明
本文为[C chord~]所创,转载请带上原文链接,感谢
https://yzsam.com/2022/04/202204231406063932.html
边栏推荐
猜你喜欢
Thinkphp5 + data large screen display effect

X509 certificate cer format to PEM format
![Design of digital temperature monitoring and alarm system based on DS18B20 single chip microcomputer [LCD1602 display + Proteus simulation + C program + paper + key setting, etc.]](/img/c6/5241de0d670da3dae136a3047c6160.jpg)
Design of digital temperature monitoring and alarm system based on DS18B20 single chip microcomputer [LCD1602 display + Proteus simulation + C program + paper + key setting, etc.]
Leetcode149 - maximum number of points on a line - Math - hash table
Detailed explanation of kubernetes (XI) -- label and label selector
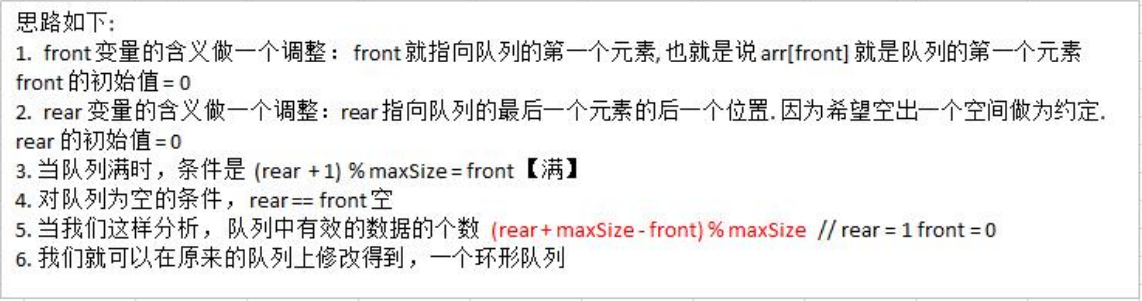
Advanced version of array simulation queue - ring queue (real queuing)
Comment eolink facilite le télétravail
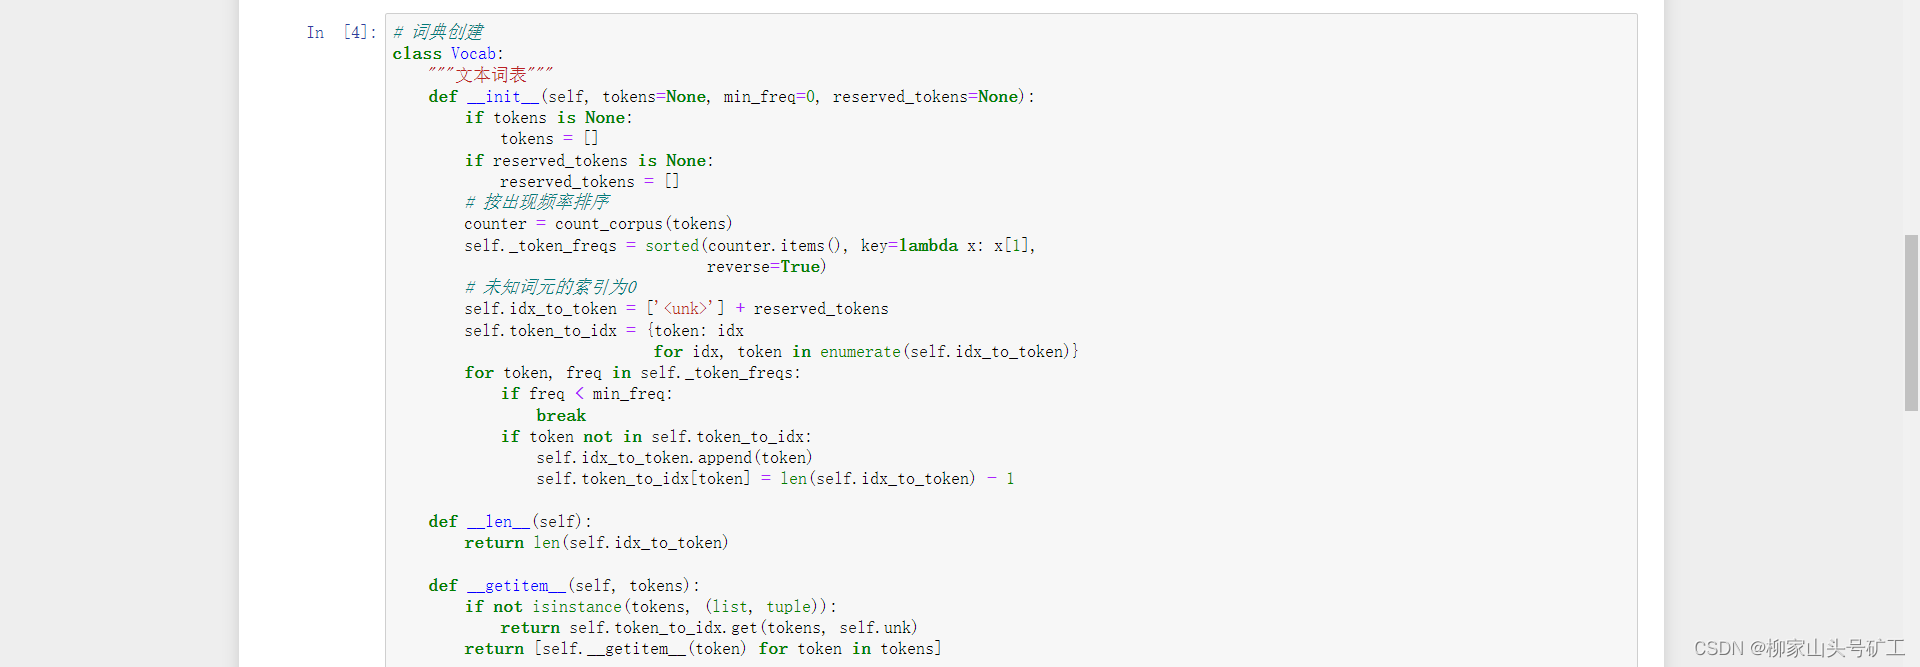
8.2 text preprocessing
让阿里P8都为之着迷的分布式核心原理解析到底讲了啥?看完我惊了

How to upload large files quickly?
随机推荐
8.2 text preprocessing
Error: unable to find remote key "17f718f726"“
JS - implémenter la fonction de copie par clic
重定向和请求转发详解
Llvm - generate for loop
Basic operation of circular queue (Experiment)
Detailed explanation of kubernetes (XI) -- label and label selector
ffmpeg安装遇错:nasm/yasm not found or too old. Use --disable-x86asm for a crippled build.
How to design a good API interface?
Borui data and F5 jointly build the full data chain DNA of financial technology from code to user
函数(第一部分)
Sword finger offer (2) -- for Huawei
TLS / SSL protocol details (28) differences between TLS 1.0, TLS 1.1 and TLS 1.2
C语言超全学习路线(收藏让你少走弯路)
JSON date time date format
On the day of entry, I cried (mushroom street was laid off and fought for seven months to win the offer)
Application of skiplist in leveldb
Common interview questions of operating system:
Leetcode149 - maximum number of points on a line - Math - hash table
Detailed explanation of C language knowledge points - data types and variables [2] - integer variables and constants [1]