当前位置:网站首页>Linux 配置MySQL
Linux 配置MySQL
2022-08-09 22:01:00 【熙攘。】
1、检查是否安装过sql
[[email protected] ~]# rpm -qa | grep mysql
[[email protected] ~]# rpm -qa | grep mariadb
如果有则卸载:
[[email protected] ~]# sudo yum remove mariadb-libs-5.5.68-1.el7.x86_64
已加载插件:fastestmirror, langpacks
正在解决依赖关系
--> 正在检查事务
---> 软件包 mariadb-libs.x86_64.1.5.5.68-1.el7 将被 删除
--> 正在处理依赖关系 libmysqlclient.so.18()(64bit),它被软件包 2:postfix-2.10.1-9.el7.x86_64 需要
--> 正在处理依赖关系 libmysqlclient.so.18(libmysqlclient_18)(64bit),它被软件包 2:postfix-2.10.1-9.el7.x86_64 需要
--> 正在检查事务
---> 软件包 postfix.x86_64.2.2.10.1-9.el7 将被 删除
--> 解决依赖关系完成依赖关系解决
=======================================================================================
Package 架构 版本 源 大小
=======================================================================================
正在删除:
mariadb-libs x86_64 1:5.5.68-1.el7 @anaconda 4.4 M
为依赖而移除:
postfix x86_64 2:2.10.1-9.el7 @anaconda 12 M事务概要
=======================================================================================
移除 1 软件包 (+1 依赖软件包)安装大小:17 M
是否继续?[y/N]:y
Downloading packages:
Running transaction check
Running transaction test
Transaction test succeeded
Running transaction
正在删除 : 2:postfix-2.10.1-9.el7.x86_64 1/2
正在删除 : 1:mariadb-libs-5.5.68-1.el7.x86_64 2/2
验证中 : 1:mariadb-libs-5.5.68-1.el7.x86_64 1/2
验证中 : 2:postfix-2.10.1-9.el7.x86_64 2/2删除:
mariadb-libs.x86_64 1:5.5.68-1.el7作为依赖被删除:
postfix.x86_64 2:2.10.1-9.el7完毕!
检查是否卸载干净:
[[email protected] ~]# rpm -qa | grep mysql
[[email protected] ~]# rpm -qa | grep mariadb
2、下载并上传MySQL压缩包
官网地址:MySQL :: Download MySQL Community Server

上传至 /usr/local 目录下,解压并重命名:


创建数据库文件存放的文件夹。这个文件夹将来存放每个数据库的库文件 :
[[email protected] local]# cd mysql
[[email protected] mysql]# mkdir mysqldb
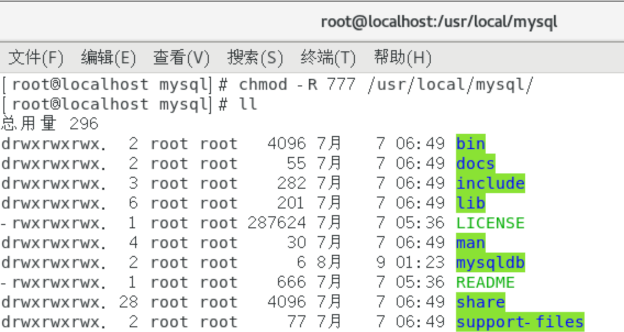
3、赋予myql文件权限
执行 chmod -R 777 /usr/local/mysql/ 命令:
[[email protected] ~ ]# chmod -R 777 /usr/local/mysql/
4、创建mysql组和用户
# 创建组
[[email protected] mysql]# groupadd mysql
# 创建用户(-s /bin/false参数指定mysql用户仅拥有所有权,而没有登录权限)
[[email protected] mysql]# useradd -r -g mysql -s /bin/false mysql
# 将用户添加到组中
[[email protected] mysql]# chown -R mysql:mysql ./

5、创建mysql配置文件
[[email protected] ~]# vi usr/local/mysql/etc/my.cnf
添加以下内容:
[mysqld]
# 设置3306端口
port=3306
# 设置mysql的安装目录
basedir=/usr/local/mysql
# 设置mysql数据库的数据的存放目录
datadir=/usr/local/mysql/mysqldb
# 允许最大连接数
max_connections=10000
# 允许连接失败的次数。这是为了防止有人从该主机试图攻击数据库系统
max_connect_errors=10
# 服务端使用的字符集默认为UTF8
character-set-server=utf8
# 创建新表时将使用的默认存储引擎
default-storage-engine=INNODB
# 默认使用“mysql_native_password”插件认证
default_authentication_plugin=mysql_native_password
[mysql]
# 设置mysql客户端默认字符集
default-character-set=utf8
[client]
# 设置mysql客户端连接服务端时默认使用的端口
port=3306
default-character-set=utf8
6、安装mysql
进入mysql 安装目录下:
[[email protected] ~]# cd /usr/local/mysql/bin/
安装mysql,并记住初始化随机密码:
[[email protected] bin]# ./mysqld --initialize --console
2022-08-08T17:36:53.599341Z 0 [Warning] [MY-010918] [Server] 'default_authentication_plugin' is deprecated and will be removed in a future release. Please use authentication_policy instead.
2022-08-08T17:36:53.599352Z 0 [System] [MY-013169] [Server] /usr/local/mysql/bin/mysqld (mysqld 8.0.30) initializing of server in progress as process 5176
2022-08-08T17:36:53.600411Z 0 [Warning] [MY-013242] [Server] --character-set-server: 'utf8' is currently an alias for the character set UTF8MB3, but will be an alias for UTF8MB4 in a future release. Please consider using UTF8MB4 in order to be unambiguous.
2022-08-08T17:36:53.605819Z 1 [System] [MY-013576] [InnoDB] InnoDB initialization has started.
2022-08-08T17:36:53.849746Z 1 [System] [MY-013577] [InnoDB] InnoDB initialization has ended.
2022-08-08T17:36:54.639630Z 6 [Note] [MY-010454] [Server] A temporary password is generated for [email protected]: tvrK&0h*Ip<:
7、启动mysql
更改配置文件 my.cnf 权限:
[[email protected] ~]# chmod -R 644 /usr/local/mysql/etc/my.cnf
进入mysql.server服务目录下并启动服务:
[[email protected] ~]# cd /usr/local/mysql/support-files
[[email protected] support-files]# ./mysql.server start
第一次启动会报错:

重新给mysql安装目录赋予一下权限后,再次执行即可:
[[email protected] support-files]# chmod -R 777 /usr/local/mysql
启动成功:
[[email protected] support-files]# ./mysql.server start
my_print_defaults: [Warning] World-writable config file '/usr/local/mysql/etc/my.cnf' is ignored.
Starting MySQL.my_print_defaults: [Warning] World-writable config file '/usr/local/mysql/etc/my.cnf' is ignored.
my_print_defaults: [Warning] World-writable config file '/usr/local/mysql/etc/my.cnf' is ignored.
Logging to '/usr/local/mysql/data/localhost.localdomain.err'.
ERROR! The server quit without updating PID file (/usr/local/mysql/data/localhost.localdomain.pid).
[[email protected] support-files]# chmod -R 644 /usr/local/mysql/etc/my.cnf
[[email protected] support-files]# ./mysql.server start
Starting MySQL. SUCCESS![[email protected] support-files]#
8、将mysql添加到系统进程中
[[email protected] bin]# cp /usr/local/mysql/support-files/mysql.server /etc/init.d/mysqld
9、设置mysql自启动
[[email protected] ~]# chmod +x /etc/init.d/mysqld
[[email protected] ~]# systemctl enable mysqld

设置成功。
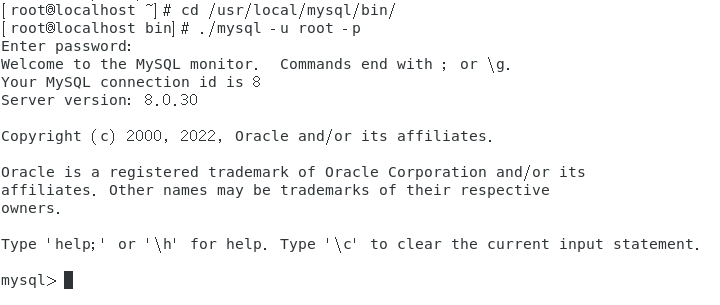
10、登录mysql
[[email protected] ~]# cd /usr/local/mysql/bin/
[[email protected] bin]# ./mysql -u root -p
输入一开始的随机密码进入mysql:
11、修改root用户登录密码
mysql> alter user 'root'@'localhost' IDENTIFIED WITH mysql_native_password BY 'mypassword';

12、设置允许远程登录
mysql> use mysql
mysql> update user set user.Host='%'where user.User='root';
mysql> flush privileges;
mysql> quit

13、重启服务
[[email protected] ~]# systemctl restart mysql
[[email protected] ~]# service mysql restart
查看mysql运行状态:
[[email protected] ~]# systemctl status mysql

14、开放端口3306
15、用navicat测试连接

边栏推荐
猜你喜欢

three.js镂空圆球拖拽变形js特效

p5.js实现的炫酷星体旋转动画
Evolution of MLOps

POWER SOURCE ETA ETA Power Repair FHG24SX-U Overview
The kvm virtual machine cannot be started, NOT available, and the PV is larger than the partition

leetcode:331. 验证二叉树的前序序列化

charts.js插件实现的散点图样式
Flask's routing (app.route) detailed

从源码方面来分析Fragment管理中 Add() 方法

leetcode:325. 和等于k的最长子数组长度
随机推荐
[Microservice~Nacos] Configuration Center of Nacos
“稚晖君”为2022昇腾AI创新大赛打call&nbsp;期待广大开发者加入
【微服务~Nacos】Nacos之配置中心
编译原理之文法
Arcgis工具箱无法使用,显示“XML包含错误“的解决方法
反射机制篇
重要的不是成为海贼王,而是像路飞一样去冒险
Leetcode.25 K个一组翻转链表(模拟/递归)
从产品角度看 L2 应用:为什么说这是一个游乐场?
一文让你快速了解隐式类型转换【整型提升】!
第 1 章 一大波数正在靠近——排序
FileZilla搭建FTP服务器图解教程
好未来,想成为第二个新东方
c:forEach varStatus属性
Blender程序化建模简明教程【PCG】
17-GuliMall 搭建虚拟域名访问环境
级联下拉菜单的实现「建议收藏」
typedef和#define的花里胡哨的用法
p5.js实现的炫酷星体旋转动画
【EF】 更新条目时出错。有关详细信息,请参见内部异常。[通俗易懂]