基于Flask开发后端、VUE开发前端框架,在WEB端部署YOLOv5目标检测模型

Overview

1. 效果:

视频链接:

https://www.bilibili.com/video/BV1Wr4y1K7Sh

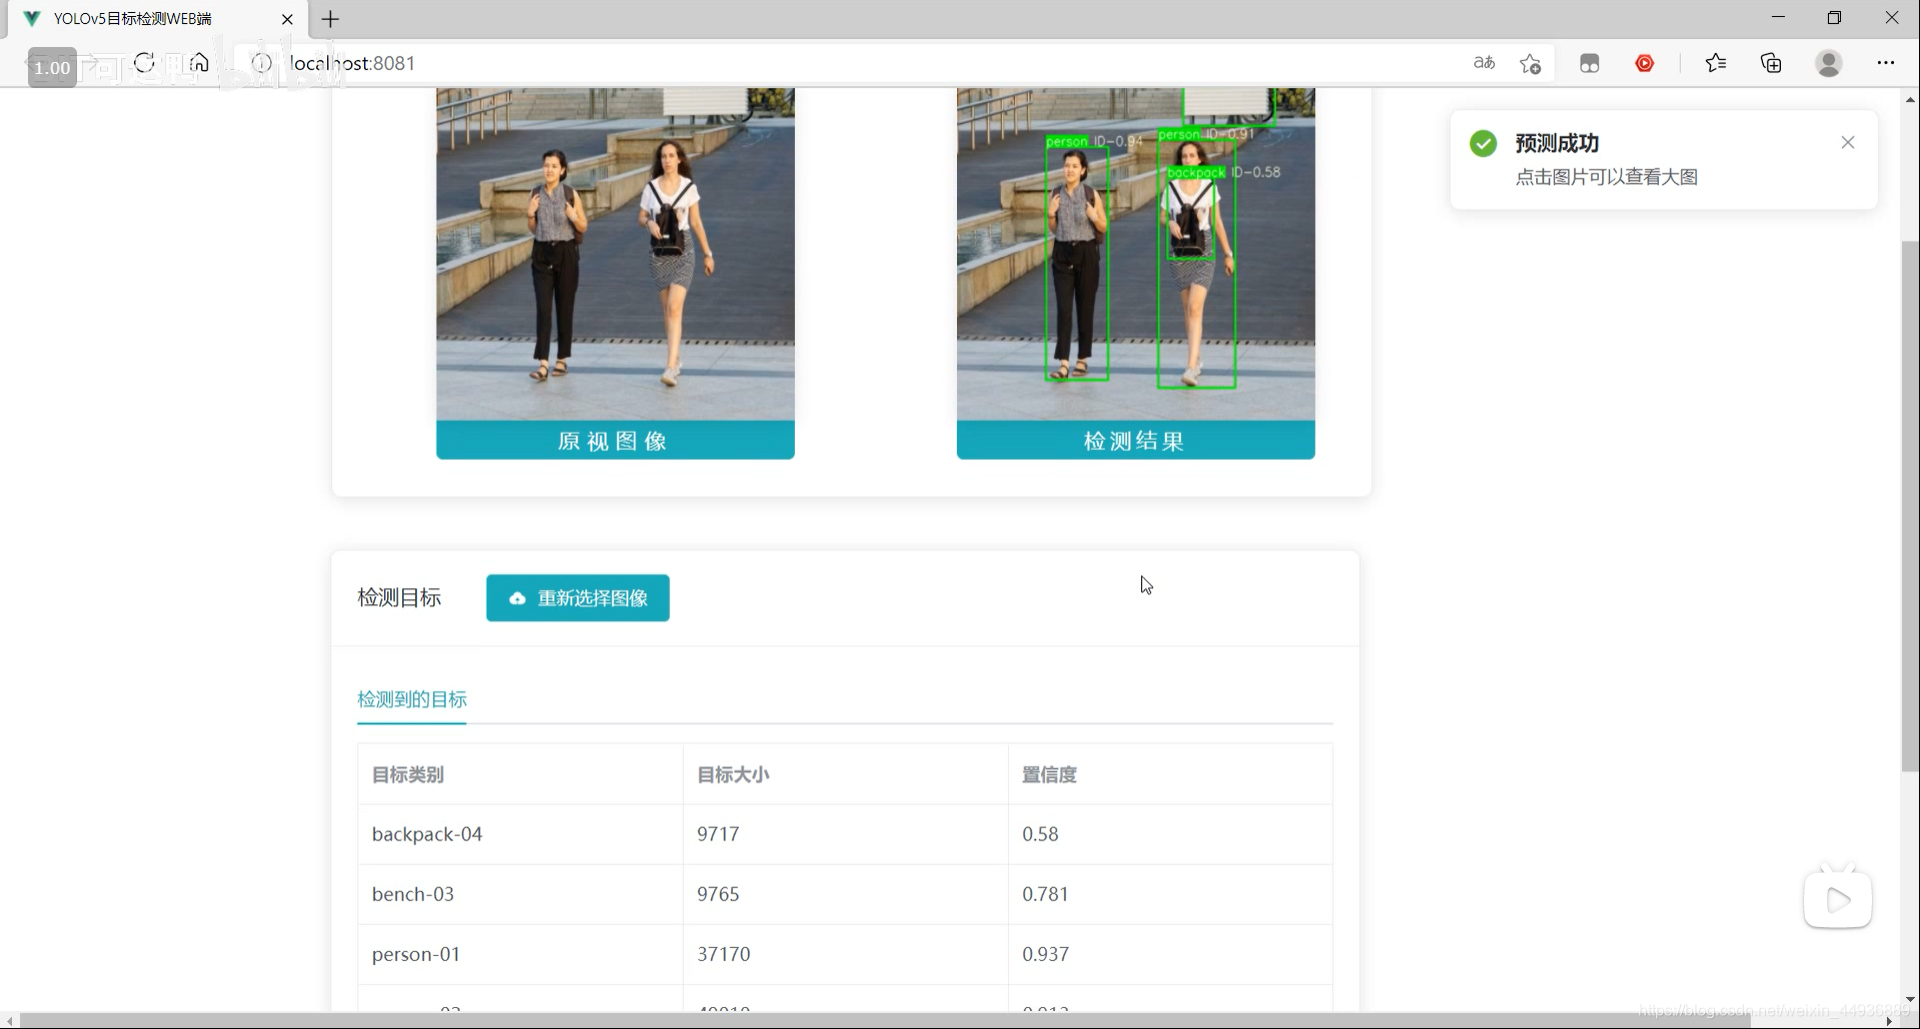
最终效果:

在这里插入图片描述

源码已经上传 Github:

https://github.com/Sharpiless/Yolov5-Flask-VUE

2. YOLOv5模型训练:

训练自己的数据集可以看我这篇博客:

【小白CV】手把手教你用YOLOv5训练自己的数据集(从Windows环境配置到模型部署)

这里演示的话我就用官方训练好的 yolov5m.pt 模型。

3. YOLOv5模型预测:

预测接口:

import torch
import numpy as np
from models.experimental import attempt_load
from utils.general import non_max_suppression, scale_coords, letterbox
from utils.torch_utils import select_device
import cv2
from random import randint


class Detector(object):

    def __init__(self):
        self.img_size = 640
        self.threshold = 0.4
        self.max_frame = 160
        self.init_model()

    def init_model(self):

        self.weights = 'weights/yolov5m.pt'
        self.device = '0' if torch.cuda.is_available() else 'cpu'
        self.device = select_device(self.device)
        model = attempt_load(self.weights, map_location=self.device)
        model.to(self.device).eval()
        model.half()
        # torch.save(model, 'test.pt')
        self.m = model
        self.names = model.module.names if hasattr(
            model, 'module') else model.names
        self.colors = [
            (randint(0, 255), randint(0, 255), randint(0, 255)) for _ in self.names
        ]

    def preprocess(self, img):

        img0 = img.copy()
        img = letterbox(img, new_shape=self.img_size)[0]
        img = img[:, :, ::-1].transpose(2, 0, 1)
        img = np.ascontiguousarray(img)
        img = torch.from_numpy(img).to(self.device)
        img = img.half()  # 半精度
        img /= 255.0  # 图像归一化
        if img.ndimension() == 3:
            img = img.unsqueeze(0)

        return img0, img

    def plot_bboxes(self, image, bboxes, line_thickness=None):
        tl = line_thickness or round(
            0.002 * (image.shape[0] + image.shape[1]) / 2) + 1  # line/font thickness
        for (x1, y1, x2, y2, cls_id, conf) in bboxes:
            color = self.colors[self.names.index(cls_id)]
            c1, c2 = (x1, y1), (x2, y2)
            cv2.rectangle(image, c1, c2, color,
                          thickness=tl, lineType=cv2.LINE_AA)
            tf = max(tl - 1, 1)  # font thickness
            t_size = cv2.getTextSize(
                cls_id, 0, fontScale=tl / 3, thickness=tf)[0]
            c2 = c1[0] + t_size[0], c1[1] - t_size[1] - 3
            cv2.rectangle(image, c1, c2, color, -1, cv2.LINE_AA)  # filled
            cv2.putText(image, '{} ID-{:.2f}'.format(cls_id, conf), (c1[0], c1[1] - 2), 0, tl / 3,
                        [225, 255, 255], thickness=tf, lineType=cv2.LINE_AA)
        return image

    def detect(self, im):

        im0, img = self.preprocess(im)

        pred = self.m(img, augment=False)[0]
        pred = pred.float()
        pred = non_max_suppression(pred, self.threshold, 0.3)

        pred_boxes = []
        image_info = {}
        count = 0
        for det in pred:
            if det is not None and len(det):
                det[:, :4] = scale_coords(
                    img.shape[2:], det[:, :4], im0.shape).round()

                for *x, conf, cls_id in det:
                    lbl = self.names[int(cls_id)]
                    x1, y1 = int(x[0]), int(x[1])
                    x2, y2 = int(x[2]), int(x[3])
                    pred_boxes.append(
                        (x1, y1, x2, y2, lbl, conf))
                    count += 1
                    key = '{}-{:02}'.format(lbl, count)
                    image_info[key] = ['{}×{}'.format(
                        x2-x1, y2-y1), np.round(float(conf), 3)]

        im = self.plot_bboxes(im, pred_boxes)
        return im, image_info

处理完保存到服务器本地临时的目录下:

import os

def pre_process(data_path):
    file_name = os.path.split(data_path)[1].split('.')[0]
    return data_path, file_name
import cv2

def predict(dataset, model, ext):
    global img_y
    x = dataset[0].replace('\\', '/')
    file_name = dataset[1]
    print(x)
    print(file_name)
    x = cv2.imread(x)
    img_y, image_info = model.detect(x)
    cv2.imwrite('./tmp/draw/{}.{}'.format(file_name, ext), img_y)
    return image_info
from core import process, predict


def c_main(path, model, ext):
    image_data = process.pre_process(path)
    image_info = predict.predict(image_data, model, ext)

    return image_data[1] + '.' + ext, image_info


if __name__ == '__main__':
    pass

4. Flask 部署:

然后通过Flask框架写相应函数:

@app.route('/upload', methods=['GET', 'POST'])
def upload_file():
    file = request.files['file']
    print(datetime.datetime.now(), file.filename)
    if file and allowed_file(file.filename):
        src_path = os.path.join(app.config['UPLOAD_FOLDER'], file.filename)
        file.save(src_path)
        shutil.copy(src_path, './tmp/ct')
        image_path = os.path.join('./tmp/ct', file.filename)
        pid, image_info = core.main.c_main(
            image_path, current_app.model, file.filename.rsplit('.', 1)[1])
        return jsonify({'status': 1,
                        'image_url': 'http://127.0.0.1:5003/tmp/ct/' + pid,
                        'draw_url': 'http://127.0.0.1:5003/tmp/draw/' + pid,
                        'image_info': image_info})

    return jsonify({'status': 0})

这样前端发出POST请求时,会对上传的图像进行处理。

5. VUE前端:

主要是通过VUE编写前端WEB框架。

核心前后端交互代码:

	// 上传文件
    update(e) {
      this.percentage = 0;
      this.dialogTableVisible = true;
      this.url_1 = "";
      this.url_2 = "";
      this.srcList = [];
      this.srcList1 = [];
      this.wait_return = "";
      this.wait_upload = "";
      this.feature_list = [];
      this.feat_list = [];
      this.fullscreenLoading = true;
      this.loading = true;
      this.showbutton = false;
      let file = e.target.files[0];
      this.url_1 = this.$options.methods.getObjectURL(file);
      let param = new FormData(); //创建form对象
      param.append("file", file, file.name); //通过append向form对象添加数据
      var timer = setInterval(() => {
        this.myFunc();
      }, 30);
      let config = {
        headers: { "Content-Type": "multipart/form-data" },
      }; //添加请求头
      axios
        .post(this.server_url + "/upload", param, config)
        .then((response) => {
          this.percentage = 100;
          clearInterval(timer);
          this.url_1 = response.data.image_url;
          this.srcList.push(this.url_1);
          this.url_2 = response.data.draw_url;
          this.srcList1.push(this.url_2);
          this.fullscreenLoading = false;
          this.loading = false;

          this.feat_list = Object.keys(response.data.image_info);

          for (var i = 0; i < this.feat_list.length; i++) {
            response.data.image_info[this.feat_list[i]][2] = this.feat_list[i];
            this.feature_list.push(response.data.image_info[this.feat_list[i]]);
          }

          this.feature_list.push(response.data.image_info);
          this.feature_list_1 = this.feature_list[0];
          this.dialogTableVisible = false;
          this.percentage = 0;
          this.notice1();
        });
    },

这段代码在点击提交图片时响应:

		<div slot="header" class="clearfix">
            <span>检测目标span>
            <el-button
              style="margin-left: 35px"
              v-show="!showbutton"
              type="primary"	
              icon="el-icon-upload"
              class="download_bt"
              v-on:click="true_upload2"
            >
              重新选择图像
              <input
                ref="upload2"
                style="display: none"
                name="file"
                type="file"
                @change="update"
              />
            el-button>
          div>

6. 启动项目:

在 Flask 后端项目下启动后端代码:

python app.py

在 VUE 前端项目下,先安装依赖:

npm install

然后运行前端:

npm run serve

然后在浏览器打开localhost即可:

在这里插入图片描述

关注我的公众号:

感兴趣的同学关注我的公众号——可达鸭的深度学习教程:

在这里插入图片描述

Owner
BIT可达鸭
Generate vibrant and detailed images using only text.

CLIP Guided Diffusion From RiversHaveWings. Generate vibrant and detailed images using only text. See captions and more generations in the Gallery See

Clay M. 401 Dec 28, 2022
Extremely simple and fast extreme multi-class and multi-label classifiers.

napkinXC napkinXC is an extremely simple and fast library for extreme multi-class and multi-label classification, that focus of implementing various m

Marek Wydmuch 43 Nov 14, 2022
Multilingual Image Captioning

Multilingual Image Captioning Authors: Bhavitvya Malik, Gunjan Chhablani Demo Link: https://huggingface.co/spaces/flax-community/multilingual-image-ca

Gunjan Chhablani 32 Nov 25, 2022
Rational Activation Functions - Replacing Padé Activation Units

Rational Activations - Learnable Rational Activation Functions First introduce as PAU in Padé Activation Units: End-to-end Learning of Activation Func

<a href=[email protected]"> 38 Nov 22, 2022
A demo of how to use JAX to create a simple gravity simulation

JAX Gravity This repo contains a demo of how to use JAX to create a simple gravity simulation. It uses JAX's experimental ode package to solve the dif

Cristian Garcia 16 Sep 22, 2022
[CVPR 2022 Oral] MixFormer: End-to-End Tracking with Iterative Mixed Attention

MixFormer The official implementation of the CVPR 2022 paper MixFormer: End-to-End Tracking with Iterative Mixed Attention [Models and Raw results] (G

Multimedia Computing Group, Nanjing University 235 Jan 03, 2023
Code for "Learning Graph Cellular Automata"

Learning Graph Cellular Automata This code implements the experiments from the NeurIPS 2021 paper: "Learning Graph Cellular Automata" Daniele Grattaro

Daniele Grattarola 37 Oct 26, 2022
PyTorch Code of "Memory In Memory: A Predictive Neural Network for Learning Higher-Order Non-Stationarity from Spatiotemporal Dynamics"

Memory In Memory Networks It is based on the paper Memory In Memory: A Predictive Neural Network for Learning Higher-Order Non-Stationarity from Spati

Yang Li 12 May 30, 2022
Continuum Learning with GEM: Gradient Episodic Memory

Gradient Episodic Memory for Continual Learning Source code for the paper: @inproceedings{GradientEpisodicMemory, title={Gradient Episodic Memory

Facebook Research 360 Dec 27, 2022
A benchmark for the task of translation suggestion

WeTS: A Benchmark for Translation Suggestion Translation Suggestion (TS), which provides alternatives for specific words or phrases given the entire d

zhyang 55 Dec 24, 2022
Implementation of gMLP, an all-MLP replacement for Transformers, in Pytorch

Implementation of gMLP, an all-MLP replacement for Transformers, in Pytorch

Phil Wang 383 Jan 02, 2023
Towards Improving Embedding Based Models of Social Network Alignment via Pseudo Anchors

PSML paper: Towards Improving Embedding Based Models of Social Network Alignment via Pseudo Anchors PSML_IONE,PSML_ABNE,PSML_DEEPLINK,PSML_SNNA: numpy

13 Nov 27, 2022
Taming Transformers for High-Resolution Image Synthesis

Taming Transformers for High-Resolution Image Synthesis CVPR 2021 (Oral) Taming Transformers for High-Resolution Image Synthesis Patrick Esser*, Robin

CompVis Heidelberg 3.5k Jan 03, 2023
Kaggle G2Net Gravitational Wave Detection : 2nd place solution

Kaggle G2Net Gravitational Wave Detection : 2nd place solution

Hiroshechka Y 33 Dec 26, 2022
On Nonlinear Latent Transformations for GAN-based Image Editing - PyTorch implementation

On Nonlinear Latent Transformations for GAN-based Image Editing - PyTorch implementation On Nonlinear Latent Transformations for GAN-based Image Editi

Valentin Khrulkov 22 Oct 24, 2022
Learning hidden low dimensional dyanmics using a Generalized Onsager Principle and neural networks

OnsagerNet Learning hidden low dimensional dyanmics using a Generalized Onsager Principle and neural networks This is the original pyTorch implemenati

Haijun.Yu 3 Aug 24, 2022
JDet is Object Detection Framework based on Jittor.

JDet is Object Detection Framework based on Jittor.

135 Dec 14, 2022
Reduce end to end training time from days to hours (or hours to minutes), and energy requirements/costs by an order of magnitude using coresets and data selection.

COResets and Data Subset selection Reduce end to end training time from days to hours (or hours to minutes), and energy requirements/costs by an order

decile-team 244 Jan 09, 2023
The Python code for the paper A Hybrid Quantum-Classical Algorithm for Robust Fitting

About The Python code for the paper A Hybrid Quantum-Classical Algorithm for Robust Fitting The demo program was only tested under Conda in a standard

Anh-Dzung Doan 5 Nov 28, 2022
Code release for NeuS

NeuS We present a novel neural surface reconstruction method, called NeuS, for reconstructing objects and scenes with high fidelity from 2D image inpu

Peng Wang 813 Jan 04, 2023