当前位置:网站首页>Keras deep learning combat (17) - image segmentation using U-Net architecture
Keras deep learning combat (17) - image segmentation using U-Net architecture
2022-08-10 19:02:00 【Hope Xiaohui】
Keras深度学习实战(17)——使用U-NetArchitecture for image segmentation
0. 前言
我们已经在系列博文Learn how to detect the object classes and locate the boundary of the object in the image frame,The image classification and target detection.图像分割 (Image Segmentation) Is another important in the field of computer vision and basic problem,Is also a very challenging task.在本节中,We will learn how to use the neural network model to perform image segmentation tasks.
1. Image segmentation research
1.1 图像分割简介
Image segmentation is to point to divide the image into several non-overlapping subdomain,Make the characteristics of the same area have a certain similarity、Characteristics of present evident differences between different sub area.Image segmentation is the foundation of computer vision is a task,Has been widely applied in many practical scenarios,例如自动驾驶、Medical image processing and facial segmentation, etc.
1.2 Image segmentation classification
According to the image object is in the segmentation result,Image segmentation can be divided into semantic segmentation、Instance segmentation and panoramic divided three types,Different types of segmentation results as shown in the figure below.
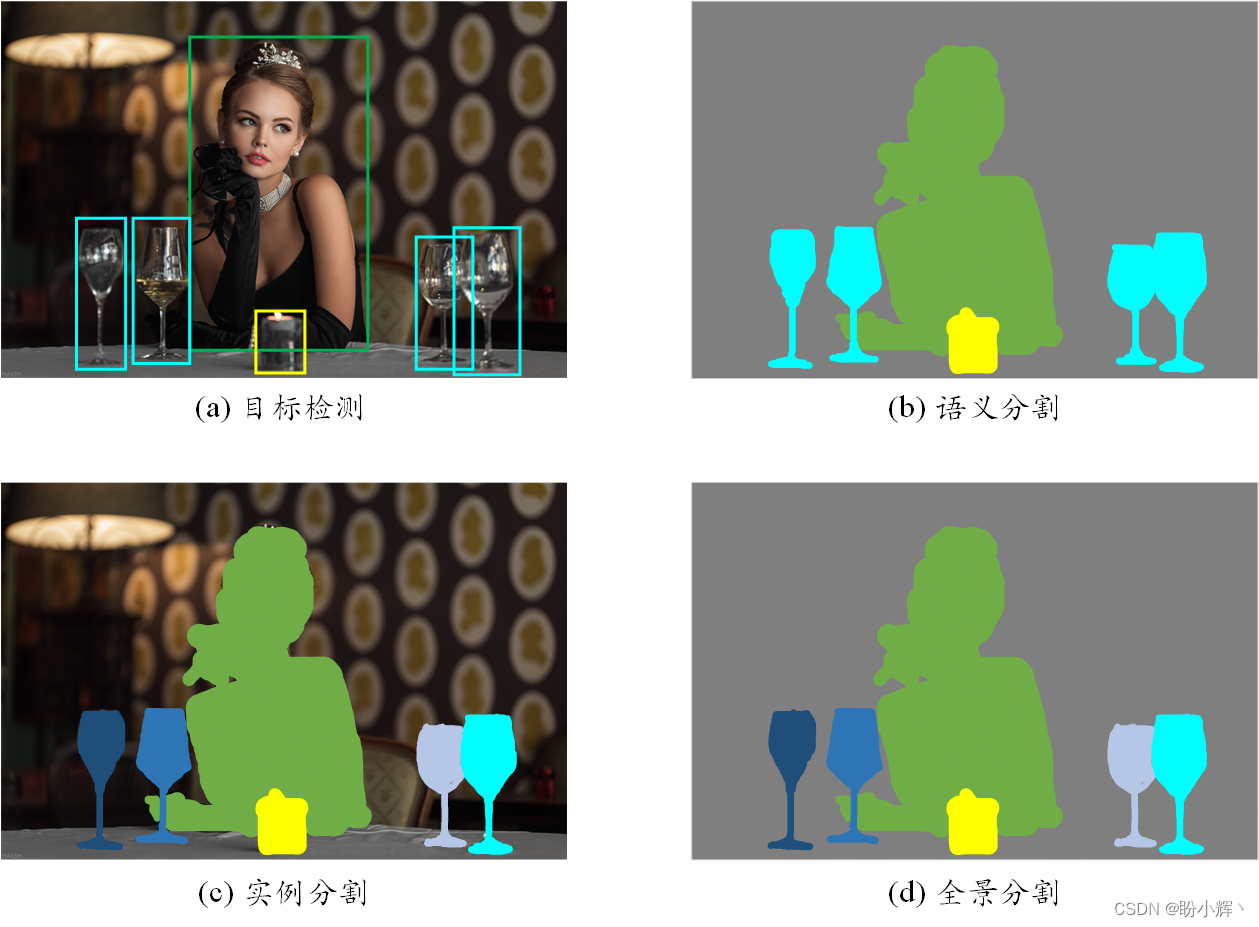
语义分割 (Semantic Segmentation) Is for the purposes of image analysis and process for distribution of each pixel in the image tag,Belongs to an object of all pixels are highlighted,Such as use value 1 The vehicle object pixels(Assuming that pixel values in 0 - 1 之间),用值 0.5 The character object pixels,While other pixels using other values show.
实例分割 (Instance Segmentation) Can be seen as a combination of target detection and semantic segmentation,Instance is divided into different objects belonging to the same object class instance assign a different label.Compared with the target detection marker object bounding box,Instance can accurately detect the edge of the object segmentation information;相比语义分割,Instance can be marked on the image segmentation in the same class objects of different individuals.例如,Use different color cover different characters.
全景分割 (Panorama Segmentation) Can be regarded as a combination of semantic segmentation and instance segmentation,Needs at the same time for all objects and background in image detection and segmentation.其中,Belongs to the semantic segmentation for segmenting the background region,The division of instance of object segmentation.
1.3 U-Net Architecture in the application of image segmentation
U-Net Is a kind of improvement based on the convolution of the neural network architecture,Can be trained on only a small amount of image data sets and the ability to get good segmentation result.The model is called U-Net,Is due to their similar U The architecture of form,模型的 U Structure is due to the convolution layer by layer of the sample will be directly connected to the characteristics of a,典型的 U-Net 架构如下图所示.
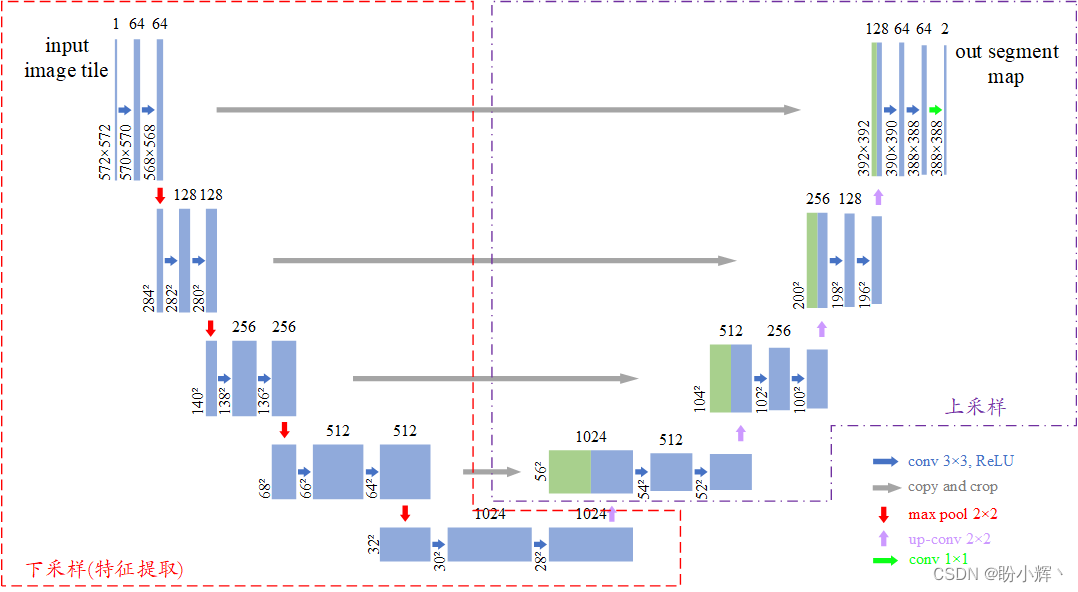
U-Net 是典型的编码器-解码器结构,And on the structure is symmetrical.在编码器阶段,Through multiple convolution and convolution operation to extract the image features,To get the smaller size features figure;在解码器阶段,对特征图进行上采样,And in the sampling process U-Net Using the special feature fusion way,将下采样(卷积)And the characteristic figure in the process of sampling in channel dimensions for matching implement feature fusion.U-Net The advantage of it to the bottom and top information,Enhance the ability of the decoder to recover local details,Effective capture abundant multi-scale information,To reduce the loss of information.
2. Model and the data set analysis
2.1 数据集分析
To training image segmentation model to detect the image in the car,The first thing we need to understand what data set.We used for image segmentation model data set contains 367 张图像,And each image has a corresponding object contains the mask image,This data set is 12 个不同类别的对象,The car the pixel value of the mask 8.As shown in the figure below for the original image and its corresponding car tags with the mask image.
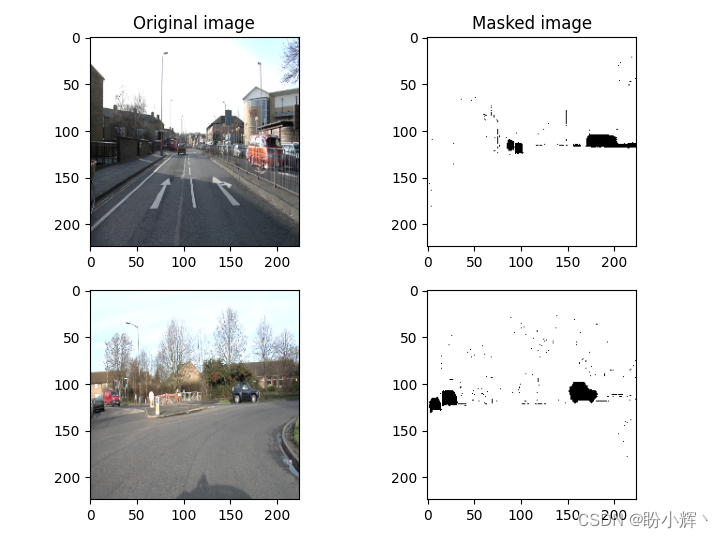
该数据集可从以下链接下载:https://pan.baidu.com/s/18c-5hBjsmLGdRaBUizxeKg,提取码: rh6p.
2.2 模型分析
本节,我们将训练基于 U-Net Architecture of image segmentation model to detect the image of the car.Before constructing model for training,We first briefly described to model training process:
- Need to deal with data sets including the input image objects and the picture with the mask of label image
- The image input to the preliminary training of
VGG16模型,以提取图像特征 - Step by step to obtain image characteristics of samples,以获得形状为
224 x 224 x 1的输出图像 - Connect convolution sampling layer on layer and formation
U形连接 - 我们知道,Low-level convolutional neural network output contains more information,Use shallow feature reconstruction image is much easier,If we through to the final few layer on sampling to reconstruction image,Is likely to lose most of the image information,So by low-level and high-level information fusion can better reconstructed image
- 构建并训练模型,The input image is mapped to a label image model:
- Label image is essentially a binary image,One black value corresponding to the pixel values
0,And white pixels as1 - To minimize the size as
224 x 224 x 1The real label image and binary cross entropy loss between predicted results
- Label image is essentially a binary image,One black value corresponding to the pixel values
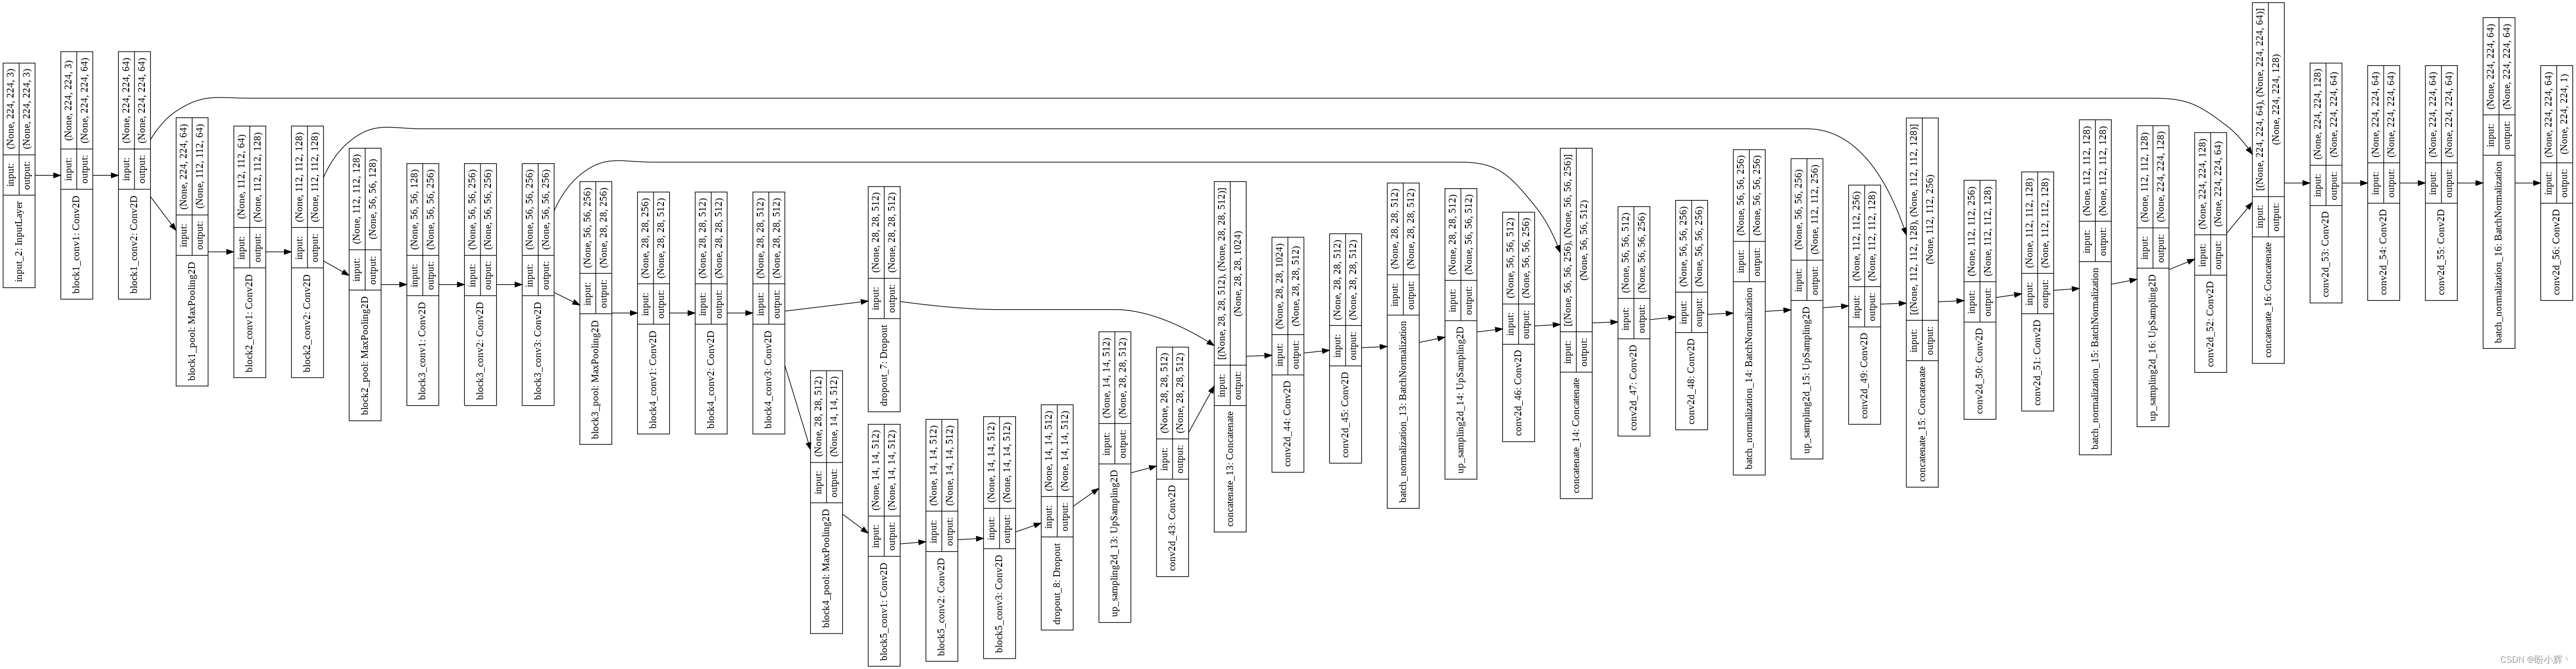
我们所采用的 U-Net 模型架构如下图所示:
3. 使用 U-Net Architecture for image segmentation
3.1 数据集读取
(1) 导入相关库,And the image and its corresponding mask like read for array:
from glob import glob
import os
import numpy as np
import matplotlib.pyplot as plt

dir_data = 'dataset1'
dir_seg = dir_data + '/annotations_prepped_train/'
dir_img = dir_data + '/images_prepped_train/'
all_img_paths = glob(os.path.join(dir_img, '*.png'))
all_mask_paths = glob(os.path.join(dir_seg, '*.png'))
(2) 创建输入和输出数组,And the input array normalization.Due to this data set is 12 个不同类别的对象,The car the pixel value of the mask 8,We need the car's mask is separated from the other elements.
import cv2
from scipy import ndimage
from skimage import io
x = []
y = []
for i in range(len(all_img_paths)):
    img = cv2.imread(all_img_paths[i])
    img = cv2.resize(img, (224, 224))
    # print(all_img_paths[i])
    mask_path = dir_seg + all_img_paths[i].split('/')[-1]
    img_mask = cv2.imread(mask_path, cv2.IMREAD_GRAYSCALE)
    img_mask = cv2.resize(img_mask, (224, 224))
    x.append(img)
    y.append(img_mask)
x = np.array(x)
y = np.array(y)
y2 = np.where(y==8, 0, 1)
查看数据集,The input image and the mask as an example of the following:
plt.subplot(221)
plt.imshow(cv2.cvtColor(x[0], cv2.COLOR_BGR2RGB))
plt.title('Original image')
plt.subplot(222)
plt.imshow(y2[0], cmap='gray')
plt.title('Masked image')
plt.subplot(223)
plt.imshow(cv2.cvtColor(x[2], cv2.COLOR_BGR2RGB))
plt.subplot(224)
plt.imshow(y2[2], cmap='gray')
plt.show()
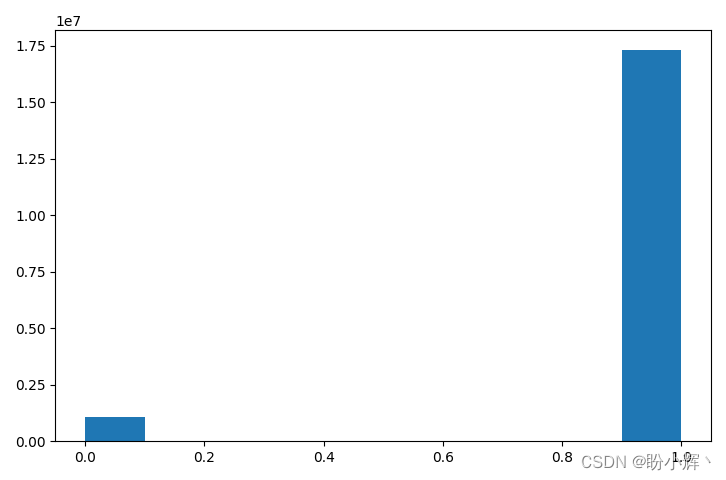
We can also contrast before and after the separation of mask image histogram:
plt.hist(y.flatten())
plt.show()
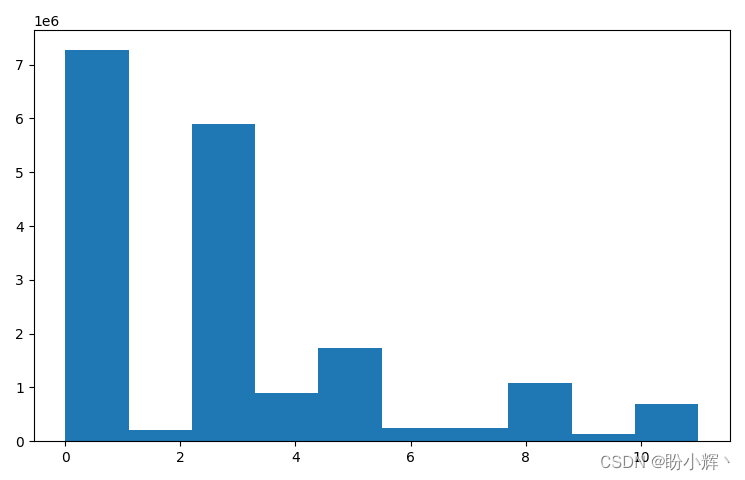
plt.hist(y2.flatten())
plt.show()
(3) The input and output arrays for plastic so that it can be passed to the neural network in,And scaling of the input array:
x = x.reshape(-1, 224, 224, 3)/255.
y2 = np.array(y2)
y2 = y2.reshape(y2.shape[0],y2.shape[1],y2.shape[2],1)
3.2 构建 U-Net 模型进行图像分割
(1) 构建模型,在该模型中,First image through preliminary training VGG16 模型,And extracting convolution characteristics.
首先,Import the required libraries and the preliminary training of VGG16 模型:
from keras.applications.vgg16 import VGG16
from keras.layers import Input, Conv2D, UpSampling2D, BatchNormalization
from keras.applications.vgg16 import preprocess_input
from keras.layers import concatenate, Dropout
from keras.models import Model

base_model = VGG16(input_shape=(224, 224, 3), include_top=False, weights='imagenet')
base_model.trainable = False
然后,Extract the input through preliminary training of VGG16 Model in the image characteristics of the convolution layers:
conv1 = Model(inputs=base_model.input,outputs=base_model.get_layer('block1_conv2').output).output
conv2 = Model(inputs=base_model.input,outputs=base_model.get_layer('block2_conv2').output).output
conv3 = Model(inputs=base_model.input,outputs=base_model.get_layer('block3_conv3').output).output
conv4 = Model(inputs=base_model.input,outputs=base_model.get_layer('block4_conv3').output).output
drop4 = Dropout(0.5)(conv4)
conv5 = Model(inputs=base_model.input,outputs=base_model.get_layer('block5_conv3').output).output
drop5 = Dropout(0.5)(conv5)
(2) 使用上采样 UpSampling Methods enlarge image characteristics,Then sampling on each layer will be calculated results with the same size VGG16 Convolution layer characteristics in series(According to the channel to connect,Namely under the condition of invariable in keeping the size,增加通道的数量):
up6 = Conv2D(512, 2, activation = 'relu', padding = 'same',kernel_initializer = 'he_normal')(UpSampling2D(size =(2,2))(drop5))
merge6 = concatenate([drop4,up6], axis = 3)
conv6 = Conv2D(512, 3, activation = 'relu', padding = 'same',kernel_initializer = 'he_normal')(merge6)
conv6 = Conv2D(512, 3, activation = 'relu', padding = 'same',kernel_initializer = 'he_normal')(conv6)
conv6 = BatchNormalization()(conv6)

up7 = Conv2D(256, 2, activation = 'relu', padding = 'same',kernel_initializer = 'he_normal')(UpSampling2D(size =(2,2))(conv6))
merge7 = concatenate([conv3,up7], axis = 3)
conv7 = Conv2D(256, 3, activation = 'relu', padding = 'same',kernel_initializer = 'he_normal')(merge7)
conv7 = Conv2D(256, 3, activation = 'relu', padding = 'same',kernel_initializer = 'he_normal')(conv7)
conv7 = BatchNormalization()(conv7)

up8 = Conv2D(128, 2, activation = 'relu', padding = 'same',kernel_initializer = 'he_normal')(UpSampling2D(size =(2,2))(conv7))
merge8 = concatenate([conv2,up8],axis = 3)
conv8 = Conv2D(128, 3, activation = 'relu', padding = 'same',kernel_initializer = 'he_normal')(merge8)
conv8 = Conv2D(128, 3, activation = 'relu', padding = 'same',kernel_initializer = 'he_normal')(conv8)
conv8 = BatchNormalization()(conv8)

up9 = Conv2D(64, 2, activation = 'relu', padding = 'same',kernel_initializer = 'he_normal')(UpSampling2D(size =(2,2))(conv8))
merge9 = concatenate([conv1,up9], axis = 3)
conv9 = Conv2D(64, 3, activation = 'relu', padding = 'same',kernel_initializer = 'he_normal')(merge9)
conv9 = Conv2D(64, 3, activation = 'relu', padding = 'same',kernel_initializer = 'he_normal')(conv9)
conv9 = Conv2D(64, 3, activation = 'relu', padding = 'same',kernel_initializer = 'he_normal')(conv9)
conv9 = BatchNormalization()(conv9)

conv10 = Conv2D(1, 1, activation = 'sigmoid')(conv9)
3.3 模型训练与测试
(1) Define the model of input and output,First of all, the input to a base_model,输出为 conv10 (形状为 224 x 224 x 1):
model = Model(inputs=base_model.input, outputs=conv10)
(2) Frozen pre training VGG16 Convolution of the model layer,That does not change in the process of model training VGG16 The weight of convolution of the model layer:
# Print the model name of each layer
for layer in model.layers:
    print(layer.name)

for layer in model.layers[:18]:
    layer.trainable = False
(3) 编译模型,And use the training data set fitting model:
from keras import optimizers
adam = optimizers.Adam(1e-3, decay = 1e-6)
model.compile(loss='binary_crossentropy',optimizer=adam, metrics=['acc'])
history = model.fit(x, y2,
validation_split=0.1,
batch_size=2,
epochs=20,
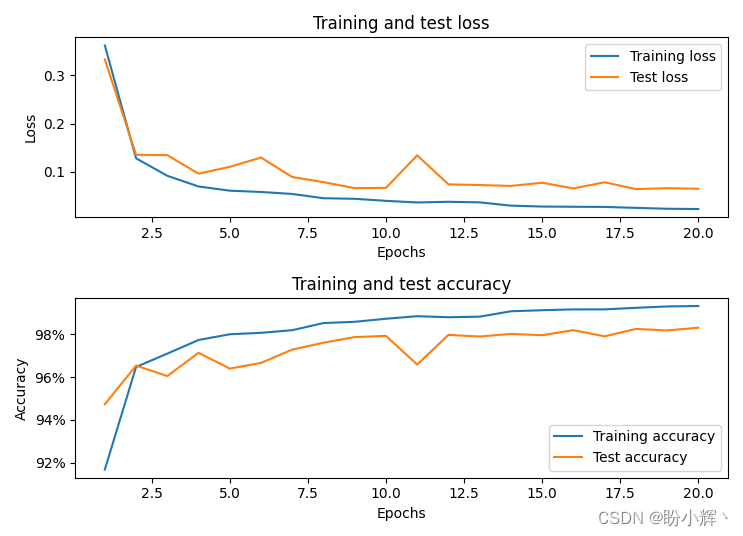
verbose=1)
模型训练过程中,On the training set and testing set of loss value changes and accuracy as shown below:
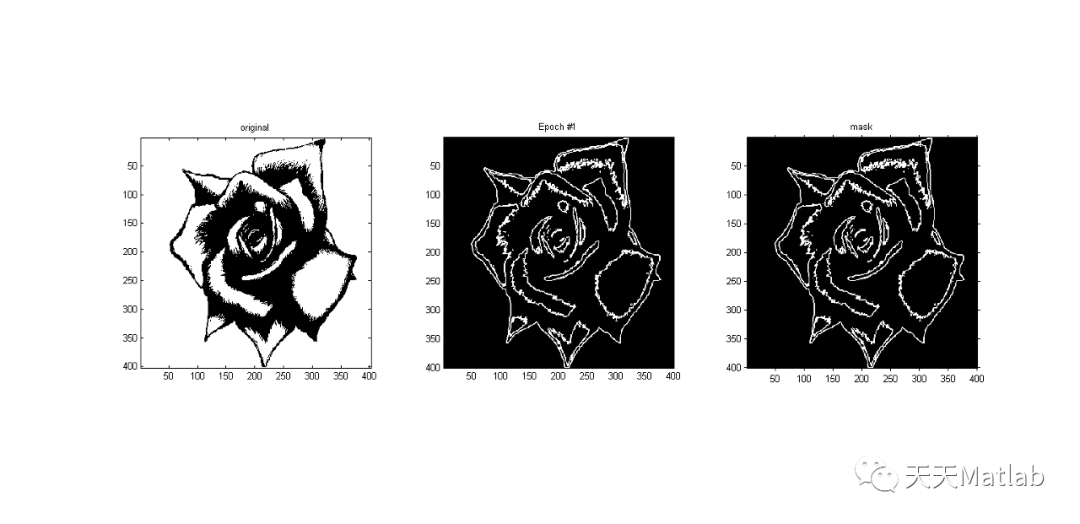
(4) Test training to complete the model on test images,Using the data set of the last two images,They did not use when training:
y_pred = model.predict(x[-2:].reshape(2,224,224,3))

import matplotlib.pyplot as plt
plt.subplot(231)
plt.imshow(x[-1,:,:,::-1])
plt.title('Original image')
plt.subplot(232)
plt.imshow(y2[-1,:,:,0], cmap='gray')
plt.title('Actual mask image')
plt.subplot(233)
plt.imshow(y_pred[-1,:,:,0], cmap='gray')
plt.title('Predicted mask image')
plt.subplot(234)
plt.imshow(x[-2,:,:,::-1])
plt.subplot(235)
plt.imshow(y2[-2,:,:,0], cmap='gray')
plt.subplot(236)
plt.imshow(y_pred[-2,:,:,0], cmap='gray')
plt.show()
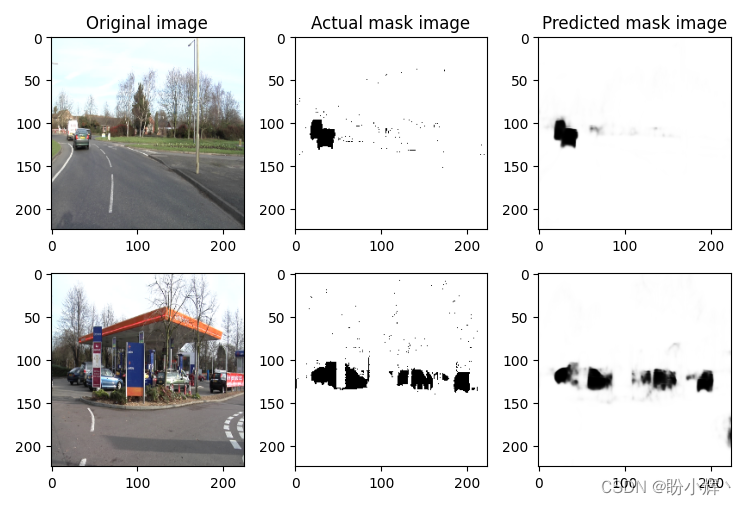
我们可以看到,对于给定的输入图像,The generated mask like has the very high availability,And in the prediction of mask does not exist as noise.
小结
Image segmentation is the foundation of computer vision is a task,Has been widely applied in many practical scenarios,Also one very challenging tasks in computer vision field.本节中,We first introduced the basic concept of image segmentation with the main types of.然后,We train a based on U-Net Architecture of image segmentation model,Used to detect the image of the car,对于给定的输入图像,Can generate high availability predictions label image.
系列链接
Keras深度学习实战(1)——神经网络基础与模型训练过程详解
Keras深度学习实战(2)——使用Keras构建神经网络
Keras深度学习实战(3)——神经网络性能优化技术
Keras深度学习实战(4)——深度学习中常用激活函数和损失函数详解
Keras深度学习实战(5)——批归一化详解
Keras深度学习实战(6)——深度学习过拟合问题及解决方法
Keras深度学习实战(7)——卷积神经网络详解与实现
Keras深度学习实战(8)——使用数据增强提高神经网络性能
Keras深度学习实战(9)——卷积神经网络的局限性
Keras深度学习实战(10)——Migration study explanation
Keras深度学习实战(11)——可视化神经网络中间层输出
Keras深度学习实战(12)——面部特征点检测
Keras深度学习实战(13)——目标检测基础详解
Keras深度学习实战(14)——从零开始实现R-CNN目标检测
Keras深度学习实战(15)——从零开始实现YOLO目标检测
Keras深度学习实战(16)——自编码器详解
边栏推荐
猜你喜欢


随机推荐
shell运算详解,看这一篇就够了!
120Hz OLED拒绝“烧屏”!华硕无双全能轻薄本
什么是企业知识库?有什么作用?如何搭建?
[教你做小游戏] 斗地主的手牌,如何布局?看25万粉游戏区UP主怎么说
漫谈测试成长之探索——测试文档
stm32中的CAN通讯列表模式配置解析与源码
[Image dehazing] Image dehazing based on color attenuation prior with matlab code
网络拓扑管理
Qt学习第三天
关于技术分享的思考
多线程与高并发(五)—— 源码解析 ReentrantLock
CAS:2055042-70-9_N-(叠氮基-PEG4)-生物素
MySQL数据高级查询之连接查询、联合查询、子查询[通俗易懂]
803. 区间合并(贪心)左端点、右端点排序均可
罗克韦尔Rockwell Automation EDI 项目
[Image segmentation] Image segmentation based on cellular automata with matlab code
FPGA工程师面试试题集锦91~100
set和map使用讲解
3D游戏建模学习路线
剑指 Offer II 042. 最近请求次数-队列法