当前位置:网站首页>激光条纹中心提取——Steger
激光条纹中心提取——Steger
2022-08-09 10:55:00 【[email protected]】
牛逼的Steger
好久没有记录了,记录一下今天学习的内容,据说Steger在激光条纹中心提取领域神一般的存在。文章和代码都分享给大家了哈,其中有四个文件,3个C++,一个python,python一个抠图文件,3个c++包含背景图+原图, 单张图提取, 多张图提取。
链接:https://pan.baidu.com/s/1y5mIgoeyt5-0jsqggKuK1Q
提取码:fasf
–来自百度网盘超级会员V5的分享
分享代码
#include <opencv2\core.hpp>
#include <opencv2\highgui.hpp>
#include <opencv2\imgproc.hpp>
#include <iostream>
#include <opencv2\imgproc\types_c.h>

using namespace std;
using namespace cv;

//-----------------------------------代码处理多张图片------------------------------------//
void center(Mat img1, int i) {

	Mat img2 = img1;
	Mat img00;//定义相减结果

	//图像相减
	/*addWeighted(img1, -1, img2, 1, 0, img00); imshow("背景图像", img1); imshow("线光图像", img2); imshow("图像相减结果", img00); imwrite("subresult.bmp", img00);*/

	Mat img;
	Mat img0;
	cvtColor(img2, img0, CV_BGR2GRAY);//颜色空间转换函数,转换成灰度图像,改变mat的通道数
	img = img0.clone();//复制图像

	//高斯滤波
	img.convertTo(img, CV_32FC1);//转换数据类型不同的mat,改变位深度,32位浮点型单通道
	GaussianBlur(img, img, Size(0, 0), 3, 3);
	//GaussianBlur(img, img, Size(0, 0), 0.5, 0.5);

	//一阶偏导数
	Mat m1, m2;
	m1 = (Mat_<float>(1, 2) << 1, -1);//x偏导(创造一个Mat类矩阵)一阶偏导=f(x+1,y)-f(x,y)
	m2 = (Mat_<float>(2, 1) << 1, -1);//y偏导(创造矩阵)一阶偏导=f(x,y+1)-f(x,y)

	Mat dx, dy;
	filter2D(img, dx, CV_32FC1, m1);//卷积
	filter2D(img, dy, CV_32FC1, m2);//卷积

	//二阶偏导数
	Mat m3, m4, m5;
	m3 = (Mat_<float>(1, 3) << 1, -2, 1);//求二阶x偏导的矩阵=f(x+1,y)+f(x-1,y)-2f(x,y)
	m4 = (Mat_<float>(3, 1) << 1, -2, 1);//二阶y偏导的矩阵
	m5 = (Mat_<float>(2, 2) << 1, -1, -1, 1);//二阶xy偏导矩阵=f(x+1,y+1)-f(x+1,y)-f(x,y+1)+f(x,y)

	Mat dxx, dyy, dxy;
	filter2D(img, dxx, CV_32FC1, m3);
	filter2D(img, dyy, CV_32FC1, m4);
	filter2D(img, dxy, CV_32FC1, m5);

	//hessian矩阵
	double maxD = -1;
	int imgcol = img.cols;
	int imgrow = img.rows;
	vector<double> Pt;
	for (int i = 0; i < imgcol; i++)
	{

		for (int j = 0; j < imgrow; j++)
		{

			if (img0.at<uchar>(j, i) > 200)
			{

				Mat hessian(2, 2, CV_32FC1);
				hessian.at<float>(0, 0) = dxx.at<float>(j, i);
				hessian.at<float>(0, 1) = dxy.at<float>(j, i);
				hessian.at<float>(1, 0) = dxy.at<float>(j, i);
				hessian.at<float>(1, 1) = dyy.at<float>(j, i);

				Mat eValue;
				Mat eVectors;
				eigen(hessian, eValue, eVectors);

				double nx, ny;
				double fmaxD = 0;
				if (fabs(eValue.at<float>(0, 0)) >= fabs(eValue.at<float>(1, 0)))  //求特征值最大时对应的特征向量
				{

					nx = eVectors.at<float>(0, 0);
					ny = eVectors.at<float>(0, 1);
					fmaxD = eValue.at<float>(0, 0);
				}
				else
				{

					nx = eVectors.at<float>(1, 0);
					ny = eVectors.at<float>(1, 1);
					fmaxD = eValue.at<float>(1, 0);
				}

				double t = -(nx * dx.at<float>(j, i) + ny * dy.at<float>(j, i)) / (nx * nx * dxx.at<float>(j, i) + 2 * nx * ny * dxy.at<float>(j, i) + ny * ny * dyy.at<float>(j, i));

				if (fabs(t * nx) <= 0.5 && fabs(t * ny) <= 0.5)
				{

					Pt.push_back(i);
					Pt.push_back(j);
				}
			}
		}
	}

	//在原图上显示提取结果
	for (int k = 0; k < Pt.size() / 2; k++)
	{

		Point rpt;
		rpt.x = Pt[2 * k + 0];
		rpt.y = Pt[2 * k + 1];
		circle(img2, rpt, 0.5, Scalar(0, 0, 255));
	}

	imshow("result", img2);
	//resizeWindow("result", 500, 500);
	string save_path = ".\\steger\\train\\center\\" + to_string(i)+ ".png";
	cout << save_path << endl;
	imwrite(save_path, img2);
	waitKey(10);
}
static void _split(const std::string& s, char delim,
	std::vector<std::string>& elems) {

	std::stringstream ss(s);
	std::string item;

	while (std::getline(ss, item, delim)) {

		elems.push_back(item);
	}
}

std::vector<std::string> split(const std::string& s, char delim) {

	std::vector<std::string> elems;
	_split(s, delim, elems);
	return elems;
}
int main()
{

	// 绝对路径
	string path = ".\\steger\\train\\result\\*.jpg";
	cout << path << endl;
	vector<Mat> images;
	vector<String> fn;
	glob(path, fn, false);
	cout << fn.size() << endl;
	size_t count = fn.size();
	cout << count << endl;
	for (int i = 0; i < count; i++) {

		images.push_back(imread(fn[i]));
		center(images[i], i);
		/*imshow("pic", images[i]); waitKey(10);*/
	}
	system("pause");
	return 0;
}
贴结果
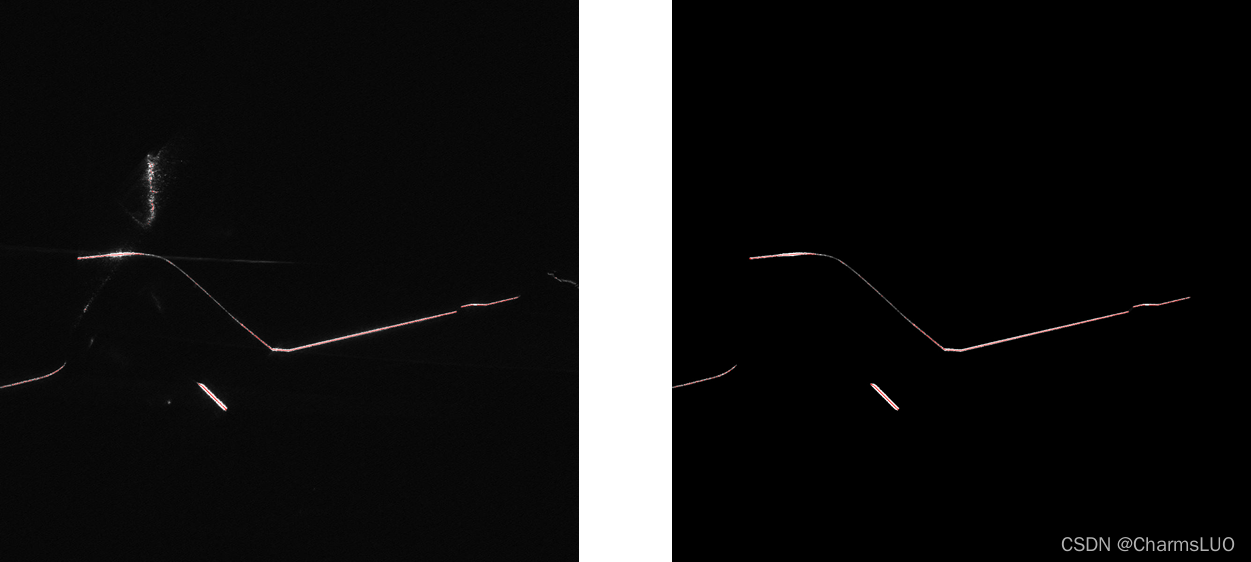
可以发现steger居然把背景背景噪声也计算进来了,左边是没有经过深度学习去操处理的结果
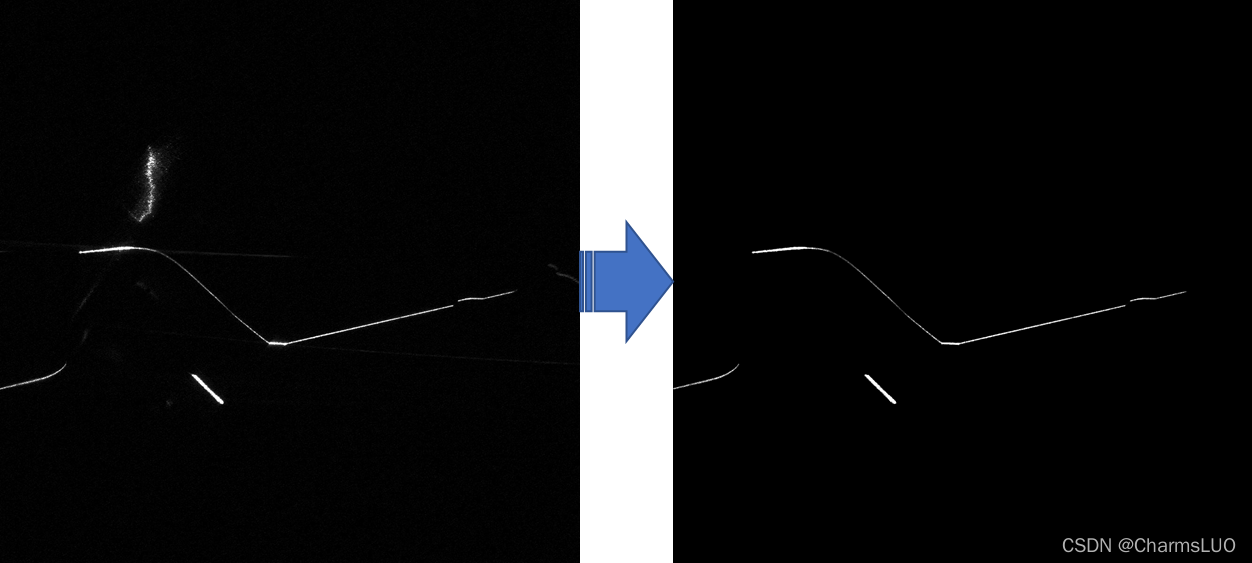
抠图去背景噪声
import cv2
import os

image_path = './steger/rain/images_name/'
label_path = './steger/train/masks_name/'
save_path = './steger/train/result/'
images = os.listdir(image_path)
for img in images:
    image = cv2.imread(os.path.join(image_path, img))
    # back = cv2.imread('3.jpg')
    # back = cv2.resize(back, (image.shape[0], image.shape[1]))
    mask = cv2.imread(os.path.join(label_path, img.split('.')[0] + '.png'), cv2.IMREAD_GRAYSCALE)

    # mask = ~mask # 取反
    mask = mask / 255.

    # print(mask.min())
    image[:,:,0] = image[:,:,0] * mask
    image[:,:,1] = image[:,:,1] * mask
    image[:,:,2] = image[:,:,2] * mask

    # add = cv2.add(image, back)
    cv2.imshow('1', image)
    cv2.imwrite(os.path.join(save_path, img), image)
    cv2.waitKey(10)
贴结果
我建立了一个激光条纹提取的群,欢迎小伙伴加入,学习交流:点击链接加入群聊【激光条纹中心提取】先申明本人是学生,不涉及营销、宣传、推广、盈利,单纯为了学习交流,所以心怀不轨的请绕道!!!
版权声明
本文为[[email protected]]所创,转载请带上原文链接,感谢
https://blog.csdn.net/CharmsLUO/article/details/122312450
边栏推荐
猜你喜欢

随机推荐
基于STM32设计的环境检测设备
golang源代码阅读,sync系列-Map
focusablejs
力扣(LeetCode)220. 存在重复元素 III(2022.08.08)
C语言数组题_校门外的树_标记法
faster-rcnn学习
Probably 95% of the people are still making PyTorch mistakes
The complete grammar of CSDN's markdown editor
matlab fcnchk 函数用法
绝了,这套RESTful API接口设计总结
性能测试(01)-jmeter元件-线程组、调试取样器
数据存储:对dataframe类,使用to_csv()将中文数据写入csv文件
乘积量化(PQ)
Input and output of cnn
获取指定年度所有周的工具类
pip common commands and changing source files
TensorFlow:NameError: name ‘input_data’ is not defined
Preparation for gold three silver four: how to successfully get an Ali offer (experience + interview questions + how to prepare)
Dialogue with the DPO of a multinational consumer brand: How to start with data security compliance?See you on 8.11 Live!
Pyhton实战汇总篇