当前位置:网站首页>分库分表 & ShardingSphere
分库分表 & ShardingSphere
2022-04-23 14:00:00 【Kramer_149】
基本概念
垂直分库和分表是在数据库设计的时候就考虑。
随着数据量增加,不要直接考虑分库分表。先使用缓存、读写分离、索引等方式,如果这些方式都不能解决问题了,再使用水平分库和水平分表。
分库分表带来的问题:
1、跨节点连接查询问题
2、多数据源管理问题
ShardingSphere可以解决
分表
垂直分表
示例:
用户在浏览商品列表时,只有对某商品感兴趣时才会查看该商品的详细描述。因此,商品信息中商品描述字段访问频次较低,且该字段存储占用空间较大,访问单个数据IO时间较长;商品信息中商品名称、商品图片、商品价格等其他字段数据访问频次较高。
由于这两种数据的特性不一样,因此他考虑将商品信息表拆分如下:

水平分表
水平分表是在同一个数据库内,把同一个表的数据按一定规则拆到多个表中。

分库
垂直分库
垂直分库是指按照业务将表进行分类,分布到不同的数据库上面,每个库可以放在不同的服务器上,它的核心理念是专库专用
它带来的提升是:
解决业务层面的耦合,业务清晰
能对不同业务的数据进行分级管理、维护、监控、扩展等
高并发场景下,垂直分库一定程度的提升IO、数据库连接数、降低单机硬件资源的瓶颈
垂直分库通过将表按业务分类,然后分布在不同数据库,并且可以将这些数据库部署在不同服务器上,从而达到多个服务器共同分摊压力的效果,但是依然没有解决单表数据量过大的问题。
库内垂直分表只解决了单一表数据量过大的问题,但没有将表分布到不同的服务器上,因此每个表还是竞争同一个物理机的CPU、内存、网络IO、磁盘。
示例:

水平分库
当在业务层面无法再进行垂直分库的时候,可以尝试使用水平分库。
水平分库是使用相同的库表结构来存储同类型的数据
示例:
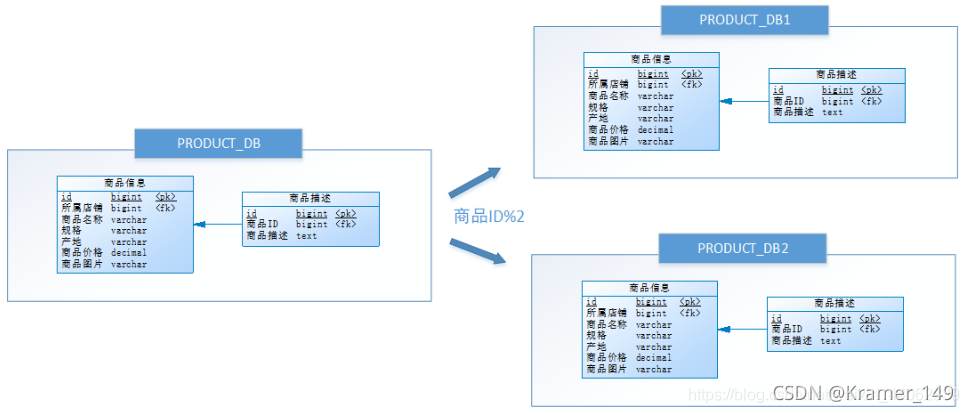
经过垂直分库后,数据库性能问题得到一定程度的解决,但是随着业务量的增长,PRODUCT_DB(商品库)单库存储数据已经超出预估。粗略估计,目前有8w店铺,每个店铺平均150个不同规格的商品,再算上增长,那商品数量得往1500w+上预估,并且PRODUCT_DB(商品库)属于访问非常频繁的资源,单台服务器已经无法支撑。此时该如何优化?
这里可以根据店铺ID为单数的和店铺ID为双数的商品信息分别放在两个库中
Java实现 - ShadingSphere
概念
ShadingSphere是一套开源的分布式数据库中间件解决方案。重点关注Sharding—JDBC、Sharding—Proxy。
定位是关系型数据库中间件,合理在分布式环境下使用关系型数据库操作。
Sharding—JDBC
是轻量级的Java框架,在 Java 的 JDBC 层提供的额外服务。 它使用客户端直连数据库,以 jar 包形式提供服务,无需额外部署和依赖,可理解为“增强版的 JDBC 驱动”,完全兼容 JDBC 和各种 ORM 框架(例如JPA、MyBatis)。也支持任意第三方连接池(例如druid、DBCP等)
作用
(它的作用“并不是”去做分库分表)
数据库工程师做好分库分表之后,Sharding—JDBC去操作已经分好的内容(例如向多个库中放数据,读数据等)。Sharding—JDBC目的是 简化分库分表之后的数据库相关操作。
Sharding—JDBC主要功能:
1、数据分片
2、读写分离
基本概念
逻辑表
水平拆分的数据表的总称。例如订单表拆分成 t_order_0、t_order_1、t_order_2、t_order_3等。他们的逻辑表名为t_order。
代码里写到表名就是逻辑表。
真实表
上述例子中的 t_order_0、t_order_1、t_order_2、t_order_3等。
数据节点
数据分片的最小物理单元,由数据库和表组成。例如 ds_0.t_order_0
指定了逻辑表分布在哪个库的哪个表
绑定表
指分片规则一致的主表和子表。例如:t_order和t_order_item表,均是按照order_id分片,绑定表之间的分区键完全相同,则此两张表为绑定关系。绑定表之间的多表联查不会出现笛卡尔积关联。比如两个表都分0和1,那么联查的时候只会0和0联查,1和1联查。(不绑定的话,会做一个笛卡尔积,执行4条查询)
广播表
指所有的分片数据源中都存在的表,表结构和表中数据在每个数据库完全一致。适用于数据量不大且需要与海量数据的表进行关联查询的场景。
分片键
用于分片的数据库字段。例如 将订单表中的订单主键的尾数取模分片,则订单主键为分片键。
分片算法
通过分片算法将数据分片,执行=、BETWEEN、IN分片。分片算法需要开发者自行实现。
分片策略
包含分片键和分片算法,由于分片算法的独立性,将其独立抽离。真正可用于分片操作的是分片键+分片算法,也就是分片策略。内置的分片策略大致分为尾数取模、哈希、范围、标签、事件等。由用户方配置等分片策略则更加灵活。常用的使用行表达式配置分片策略,它采用Groovy表达式。
standard:标准分片策略,提供对应SQL语句中的=,IN,BETWEEN AND的分片操作。只支持单分片键。
complex:符合分片策略,提供对应SQL语句中的=,IN,BETWEEN AND的分片操作。支持多分片键。
inline:行表达式分片策略。使用Groovy表达式,提供SQL语句中的=和IN的分片操作。只支持单分片键。
hint:通过Hint而非SQL解析的方式分片的策略。
none:不分片策略。
实操示例(水平分表)
1、环境:SpringBoot+MyBatisPlus+Sharding-JDBC+Druid连接池
springboot 2.2.1.RELEASE
2、依赖
<dependencies>
        <dependency>
            <groupId>org.springframework.boot</groupId>
            <artifactId>spring-boot-starter</artifactId>
        </dependency>

        <dependency>
            <groupId>org.springframework.boot</groupId>
            <artifactId>spring-boot-starter-test</artifactId>
        </dependency>

        <dependency>
            <groupId>com.alibaba</groupId>
            <artifactId>druid-spring-boot-starter</artifactId>
            <version>1.1.20</version>
        </dependency>

        <dependency>
            <groupId>mysql</groupId>
            <artifactId>mysql-connector-java</artifactId>
        </dependency>

        <dependency>
            <groupId>org.apache.shardingsphere</groupId>
            <artifactId>sharding-jdbc-spring-boot-starter</artifactId>
            <version>4.0.0-RC1</version>
        </dependency>

        <dependency>
            <groupId>com.baomidou</groupId>
            <artifactId>mybatis-plus-boot-starter</artifactId>
            <version>3.0.5</version>
        </dependency>

        <dependency>
            <groupId>org.projectlombok</groupId>
            <artifactId>lombok</artifactId>
        </dependency>
    </dependencies>
3、建表(水平分表)
CREATE TABLE course_1 (
                         cid BIGINT ( 20 ) PRIMARY KEY,
                         cname VARCHAR ( 50 ) NOT NULL,
                         user_id BIGINT ( 20 ) NOT NULL,
                         cstatus VARCHAR ( 10 ) NOT NULL
);
CREATE TABLE course_2 (
                         cid BIGINT ( 20 ) PRIMARY KEY,
                         cname VARCHAR ( 50 ) NOT NULL,
                         user_id BIGINT ( 20 ) NOT NULL,
                         cstatus VARCHAR ( 10 ) NOT NULL
);
4、创建实体类、mapper接口、启动类上加mapperscan注解
5、配置Sharding-JDBC分片策略
(1)、在项目application.properties配置
查找配置:官网——了解更多——左侧 用户手册——ShardingJDBC——配置手册——SpringBoot配置
# shardingjdbc分片策略
# 配置数据源,给数据源起名称,多个数据源名称用逗号隔开
spring.shardingsphere.datasource.names=m1

# 配置数据源具体内容,包含连接池、驱动、地址、用户名、密码
spring.shardingsphere.datasource.m1.type=com.alibaba.druid.pool.DruidDataSource
spring.shardingsphere.datasource.m1.driver-class-name=com.mysql.cj.jdbc.Driver
spring.shardingsphere.datasource.m1.url=jdbc:mysql://localhost:3306/sharding?serverTimezone=GMT%2B8
spring.shardingsphere.datasource.m1.username=root
spring.shardingsphere.datasource.m1.password=12345678

# 指定course逻辑表分布情况,配置表在哪个数据库里面,表名称都是什么
# 这里course表示逻辑表名(和mapper里的sql语句中的表名对应,可以自定义成abc之类的,然后mapper里面的sql语句也跟着改)
# $->{1..2}表示表的分布(表在哪个数据库,名称是什么),这个是数据节点
# 这里的$->{1..2} 使用的是行表达式,是有其独立的语法规则
spring.shardingsphere.sharding.tables.course.actual-data-nodes =m1.course_$->{1..2}

# 指定course逻辑表里面主键生成策略
spring.shardingsphere.sharding.tables.course.key-generator.column=cid
spring.shardingsphere.sharding.tables.course.key-generator.type=SNOWFLAKE

# 指定course逻辑表的分片规则
# 指定分片策略 约定cid值偶数添加到course_1表,如果cid是奇数添加到course_2表
spring.shardingsphere.sharding.tables.course.table-strategy.inline.sharding-column=cid
spring.shardingsphere.sharding.tables.course.table-strategy.inline.algorithm-expression=course_$->{cid % 2 + 1}

# 打开sql输出日志
spring.shardingsphere.props.sql.show=true
6、测试代码
@SpringBootTest
class ShardingJdbcDemoApplicationTests {

    @Autowired
    private CourseMapper courseMapper;

    @Test
    public void addCourse() {

        Course course=new Course();
        course.setCname("java");
        course.setUserId(100L);
        course.setCstatus("Normal");
        courseMapper.insert(course);
    }

}
**注:**这时会出现问题:
Description:
The bean 'dataSource', defined in class path resource [org/apache/shardingsphere/shardingjdbc/spring/boot/SpringBootConfiguration.class], could not be registered. A bean with that name has already been defined in class path resource [com/alibaba/druid/spring/boot/autoconfigure/DruidDataSourceAutoConfigure.class] and overriding is disabled.

Action:
Consider renaming one of the beans or enabling overriding by setting spring.main.allow-bean-definition-overriding=true
简单来说就是一个实体类不能对应两个表;
解决办法是:spring.main.allow-bean-definition-overriding=true 这句放到配置文件application.properties
执行流程
1、SQL解析
2、SQL路由,把针对逻辑表的数据操作映射到对数据节点操作的过程
3、SQL改写,把逻辑表course改为真实表course_1或course_2
4、SQL执行,执行真实sql语句
5、结果归并,若逻辑sql执行时有多句真实sql,则汇总结果
实操示例(水平分库)
0、需求
两个数据库,edu_db_1和edu_db_2,库中都存在两个表course_1和course_2。约定规则:userid为偶数加入edu_db_1中,userid为基数加入edu_db_2中。cid为偶数添加到course_1中,cid为奇数添加到course_2中。
1、创建数据库和表
sql脚本同水平分表
2、配置文件中配置数据库分片规则
分库策略和分表策略相似
# 分库策略,如何将一个逻辑表映射到多个数据源
spring.shardingsphere.sharding.tables.<逻辑表名>.database-strategy.<分片策略>.<分片策略属性名>=# 分片策略属性值

# 分表策略,如何将一个逻辑表映射为多个实际表
spring.shardingsphere.sharding.tables.<逻辑表名>.table-strategy.<分片策略>.<分片策略属性名>=# 分片策略属性值
示例:
# shardingjdbc分片策略
# 配置数据源,给数据源起名称,多个数据源名称用逗号隔开
spring.shardingsphere.datasource.names=m1,m2

# 配置数据源具体内容,包含连接池、驱动、地址、用户名、密码
spring.shardingsphere.datasource.m1.type=com.alibaba.druid.pool.DruidDataSource
spring.shardingsphere.datasource.m1.driver-class-name=com.mysql.cj.jdbc.Driver
spring.shardingsphere.datasource.m1.url=jdbc:mysql://localhost:3306/edu_db_1?serverTimezone=GMT%2B8
spring.shardingsphere.datasource.m1.username=root
spring.shardingsphere.datasource.m1.password=12345678

spring.shardingsphere.datasource.m2.type=com.alibaba.druid.pool.DruidDataSource
spring.shardingsphere.datasource.m2.driver-class-name=com.mysql.cj.jdbc.Driver
spring.shardingsphere.datasource.m2.url=jdbc:mysql://localhost:3306/edu_db_2?serverTimezone=GMT%2B8
spring.shardingsphere.datasource.m2.username=root
spring.shardingsphere.datasource.m2.password=12345678

# 数据节点:指定数据库分布情况,数据库里面表的分库情况
spring.shardingsphere.sharding.tables.course.actual-data-nodes=m$->{1..2}.course_$->{1..2}

# 指定course表里面主键生成策略
spring.shardingsphere.sharding.tables.course.key-generator.column=cid
spring.shardingsphere.sharding.tables.course.key-generator.type=SNOWFLAKE

# 指定表的分片策略 约定cid值偶数添加到course_1表,如果cid是奇数添加到course_2表
spring.shardingsphere.sharding.tables.course.table-strategy.inline.sharding-column=cid
spring.shardingsphere.sharding.tables.course.table-strategy.inline.algorithm-expression=course_$->{cid % 2 + 1}

# 指定数据库的分片策略 约定user_id为偶数添加到m1,user_id为奇数添加到m2
spring.shardingsphere.sharding.tables.course.database-strategy.inline.sharding-column=user_id
spring.shardingsphere.sharding.tables.course.database-strategy.inline.algorithm-expression=m$->{user_id % 2 + 1}
# 下面这个是对所有逻辑表都采用这个分库方式,上面是对具体表采用具体策略
#spring.shardingsphere.sharding.default-database-strategy.inline.sharding-column=user_id
#spring.shardingsphere.sharding.default-database-strategy.inline.algorithm-expression=m$->{user_id % 2 + 1}

# 打开sql输出日志
spring.shardingsphere.props.sql.show=true

# 一个实体类对应两张表
spring.main.allow-bean-definition-overriding=true
3、测试代码
同水平分表
实操示例(已完成项目分库)
server.port=8004
mybatis-plus.configuration.log-impl=org.apache.ibatis.logging.stdout.StdOutImpl

# shardingjdbc分片策略
# 配置数据源,给数据源起名称,多个数据源名称用逗号隔开
spring.shardingsphere.datasource.names=appidclia1ed623aa87a900b,appidclia1e788aeac38100d

# 配置数据源具体内容,包含连接池、驱动、地址、用户名、密码
spring.shardingsphere.datasource.appidclia1ed623aa87a900b.type=com.alibaba.druid.pool.DruidDataSource
spring.shardingsphere.datasource.appidclia1ed623aa87a900b.driver-class-name=com.mysql.cj.jdbc.Driver
spring.shardingsphere.datasource.appidclia1ed623aa87a900b.url=jdbc:mysql://localhost:3306/appidcli_a1ed623aa87a900b?serverTimezone=GMT%2B8
spring.shardingsphere.datasource.appidclia1ed623aa87a900b.username=root
spring.shardingsphere.datasource.appidclia1ed623aa87a900b.password=12345678

spring.shardingsphere.datasource.appidclia1e788aeac38100d.type=com.alibaba.druid.pool.DruidDataSource
spring.shardingsphere.datasource.appidclia1e788aeac38100d.driver-class-name=com.mysql.cj.jdbc.Driver
spring.shardingsphere.datasource.appidclia1e788aeac38100d.url=jdbc:mysql://localhost:3306/appidcli_a1e788aeac38100d?serverTimezone=GMT%2B8
spring.shardingsphere.datasource.appidclia1e788aeac38100d.username=root
spring.shardingsphere.datasource.appidclia1e788aeac38100d.password=12345678

# 数据节点
spring.shardingsphere.sharding.tables.buffer_course.actual-data-nodes=appid$->{
    ['clia1e788aeac38100d','clia1e788aeac38100d']}.buffer_course
spring.shardingsphere.sharding.tables.buffer_course_member.actual-data-nodes=appid$->{
    ['clia1e788aeac38100d','clia1e788aeac38100d']}.buffer_course_member
spring.shardingsphere.sharding.tables.buffer_class.actual-data-nodes=appid$->{
    ['clia1e788aeac38100d','clia1e788aeac38100d']}.buffer_class
spring.shardingsphere.sharding.tables.buffer_task.actual-data-nodes=appid$->{
    ['clia1e788aeac38100d','clia1e788aeac38100d']}.buffer_task
spring.shardingsphere.sharding.tables.buffer_task_collaborator.actual-data-nodes=appid$->{
    ['clia1e788aeac38100d','clia1e788aeac38100d']}.buffer_task_collaborator
spring.shardingsphere.sharding.tables.announcement.actual-data-nodes=appid$->{
    ['clia1e788aeac38100d','clia1e788aeac38100d']}.announcement
spring.shardingsphere.sharding.tables.calendar.actual-data-nodes=appid$->{
    ['clia1e788aeac38100d','clia1e788aeac38100d']}.calendar
spring.shardingsphere.sharding.tables.chat.actual-data-nodes=appid$->{
    ['clia1e788aeac38100d','clia1e788aeac38100d']}.chat
spring.shardingsphere.sharding.tables.chat_member.actual-data-nodes=appid$->{
    ['clia1e788aeac38100d','clia1e788aeac38100d']}.chat_member
spring.shardingsphere.sharding.tables.company.actual-data-nodes=appid$->{
    ['clia1e788aeac38100d','clia1e788aeac38100d']}.company
spring.shardingsphere.sharding.tables.course_config.actual-data-nodes=appid$->{
    ['clia1e788aeac38100d','clia1e788aeac38100d']}.course_config
spring.shardingsphere.sharding.tables.course_config_material.actual-data-nodes=appid$->{
    ['clia1e788aeac38100d','clia1e788aeac38100d']}.course_config_material
spring.shardingsphere.sharding.tables.event_info.actual-data-nodes=appid$->{
    ['clia1e788aeac38100d','clia1e788aeac38100d']}.event_info
spring.shardingsphere.sharding.tables.event_config.actual-data-nodes=appid$->{
    ['clia1e788aeac38100d','clia1e788aeac38100d']}.event_config
spring.shardingsphere.sharding.tables.global_sync_config.actual-data-nodes=appid$->{
    ['clia1e788aeac38100d','clia1e788aeac38100d']}.global_sync_config
spring.shardingsphere.sharding.tables.lark_operation_sync_log.actual-data-nodes=appid$->{
    ['clia1e788aeac38100d','clia1e788aeac38100d']}.lark_operation_sync_log
spring.shardingsphere.sharding.tables.task.actual-data-nodes=appid$->{
    ['clia1e788aeac38100d','clia1e788aeac38100d']}.task
spring.shardingsphere.sharding.tables.task_collaborator.actual-data-nodes=appid$->{
    ['clia1e788aeac38100d','clia1e788aeac38100d']}.task_collaborator
spring.shardingsphere.sharding.tables.task_config.actual-data-nodes=appid$->{
    ['clia1e788aeac38100d','clia1e788aeac38100d']}.task_config
spring.shardingsphere.sharding.tables.upstream_data_sync_log.actual-data-nodes=appid$->{
    ['clia1e788aeac38100d','clia1e788aeac38100d']}.upstream_data_sync_log
spring.shardingsphere.sharding.tables.upstream_operation_sync_log.actual-data-nodes=appid$->{
    ['clia1e788aeac38100d','clia1e788aeac38100d']}.upstream_operation_sync_log

# 下面这个是对所有库都采用这个分库方式,上面是对具体表采用具体策略
spring.shardingsphere.sharding.default-database-strategy.inline.sharding-column=appId
spring.shardingsphere.sharding.default-database-strategy.inline.algorithm-expression=appid$->{
    appId}

# 打开sql输出日志
spring.shardingsphere.props.sql.show=true

# 一个实体类对应两张表
spring.main.allow-bean-definition-overriding=true
实操示例(垂直分库)
0、有两个数据库:user_db、course_db。当查询用户的时候就去user_db中的t_user表
1、创建数据库t_user包含三个字段:user_id、username、ustatus
2、创建实体类User,接口UserMapper
3、配置垂直分库策略
在application.properties中进行配置
(这里包含前面的数据源,如果不用可以去掉)
# shardingjdbc分片策略
# 配置数据源,给数据源起名称,多个数据源名称用逗号隔开
spring.shardingsphere.datasource.names=m1,m2,m0

# 配置数据源具体内容,包含连接池、驱动、地址、用户名、密码
spring.shardingsphere.datasource.m1.type=com.alibaba.druid.pool.DruidDataSource
spring.shardingsphere.datasource.m1.driver-class-name=com.mysql.cj.jdbc.Driver
spring.shardingsphere.datasource.m1.url=jdbc:mysql://localhost:3306/edu_db_1?serverTimezone=GMT%2B8
spring.shardingsphere.datasource.m1.username=root
spring.shardingsphere.datasource.m1.password=12345678

spring.shardingsphere.datasource.m2.type=com.alibaba.druid.pool.DruidDataSource
spring.shardingsphere.datasource.m2.driver-class-name=com.mysql.cj.jdbc.Driver
spring.shardingsphere.datasource.m2.url=jdbc:mysql://localhost:3306/edu_db_2?serverTimezone=GMT%2B8
spring.shardingsphere.datasource.m2.username=root
spring.shardingsphere.datasource.m2.password=12345678

spring.shardingsphere.datasource.m0.type=com.alibaba.druid.pool.DruidDataSource
spring.shardingsphere.datasource.m0.driver-class-name=com.mysql.cj.jdbc.Driver
spring.shardingsphere.datasource.m0.url=jdbc:mysql://localhost:3306/user_db?serverTimezone=GMT%2B8
spring.shardingsphere.datasource.m0.username=root
spring.shardingsphere.datasource.m0.password=12345678

# 配置user_db数据库里面t_user 做到专库专表
# t_user是规则,后面策略的地方会用,相当于绑定
spring.shardingsphere.sharding.tables.t_user.actual-data-nodes=m$->{0}.t_user

# 指定course表里面主键生成策略
spring.shardingsphere.sharding.tables.t_user.key-generator.column=user_id
spring.shardingsphere.sharding.tables.t_user.key-generator.type=SNOWFLAKE

# 指定表的分片策略,由于未水平分表,则全部都放入t_user表中
spring.shardingsphere.sharding.tables.t_user.table-strategy.inline.sharding-column=user_id
spring.shardingsphere.sharding.tables.t_user.table-strategy.inline.algorithm-expression=t_user

# 打开sql输出日志
spring.shardingsphere.props.sql.show=true

# 一个实体类对应两张表
spring.main.allow-bean-definition-overriding=true
4、测试程序
@Test
    public void addUser() {

        User user=new User();
        user.setUsername("zhangsan");
        user.setUstatus("Normal");
        userMapper.insert(user);
    }
实操示例(操作公共表)
公共表:在项目中存储稳定数据的表,表的数据较少发生变化,并且在查询的时候经常关联这张表。
一般,在每个数据库中都创建这个公共表(相同的),该数据的时候进行同步
1、多个数据库中都创建公共表
edu_db_1、edu_db_2、user_db
create table t_udict(
	dictid bigint(20) primary key,
	ustatus varchar(100) not null,
	uvalue varchar(100) not null
)
2、项目配置文件中配置公共表
在application.properties中进行配置(原有基础上增加以下内容)
# 配置公共表
spring.shardingsphere.sharding.broadcast-tables=t_udict
# 公共表主键策略
spring.shardingsphere.sharding.tables.t_udict.key-generator.column=dictid
spring.shardingsphere.sharding.tables.t_udict.key-generator.type=SNOWFLAKE
3、创建实体和接口mapper
4、测试代码
当添加或修改的时候,这几个库的都会改变。
    @Test
    public void addDict(){

        Udict udict=new Udict();
        udict.setUstatus("a");
        udict.setUvalue("start");
        udictMapper.insert(udict);
    }

    @Test
    public void deleteDict(){

        QueryWrapper<Udict> wrapper=new QueryWrapper<>();
        wrapper.eq("dictid",667028606819500033L);
        udictMapper.delete(wrapper);
    }
ShardingJDBC实现读写分离
为了确保数据库产品的稳定性,很多数据库都拥有双机热备功能。第一台服务器是对外提供增删改业务的生产服务器;第二台服务器主要进行读操作。原理:让主数据库(master)处理事务性增、删、改操作,而从数据库处理select查询操作。
一主一从为例:主服务器开启binlog日志,记录增删改操作。从服务器实时监控主服务器binlog日志变化。
ShardingJDBC通过sql语句语义分析,实现读写分离。
实操示例
1、创建两个数据库服务,设置主从关系,并启动。
Windows系统参考视频
2、ShardingJDBC操作
ShardingJDBC作用是根据语义不同访问不同数据库
application.properties配置
spring.shardingsphere.datasource.names=m0,s0

# 主数据源
spring.shardingsphere.datasource.m0.type=com.alibaba.druid.pool.DruidDataSource
spring.shardingsphere.datasource.m0.driver-class-name=com.mysql.cj.jdbc.Driver
spring.shardingsphere.datasource.m0.url=jdbc:mysql://localhost:3306/user_db?serverTimezone=GMT%2B8
spring.shardingsphere.datasource.m0.username=root
spring.shardingsphere.datasource.m0.password=root

# 从数据库数据源
spring.shardingsphere.datasource.s0.type=com.alibaba.druid.pool.DruidDataSource
spring.shardingsphere.datasource.s0.driver-class-name=com.mysql.cj.jdbc.Driver
spring.shardingsphere.datasource.s0.url=jdbc:mysql://localhost:3307/user_db?serverTimezone=GMT%2B8
spring.shardingsphere.datasource.s0.username=root
spring.shardingsphere.datasource.s0.password=12345678

# 主库从库逻辑数据源定义(指定谁是主谁是从),ds0对应的是user_db数据库
spring.shardingsphere.sharding.master-slave-rules.ds0.master-data-source-name=m0
spring.shardingsphere.sharding.master-slave-rules.ds0.slave-data-source-names=s0

# t_user分表策略,固定分配至ds0的t_user真实表,用ds0表示主服务器和从服务器中的user_db数据库
spring.shardingsphere.sharding.tables.t_user.actual-data-nodes=ds0.t_user

# 指定course表里面主键生成策略
spring.shardingsphere.sharding.tables.course.key-generator.column=cid
spring.shardingsphere.sharding.tables.course.key-generator.type=SNOWFLAKE

# 指定分片策略 约定cid值偶数添加到course_1表,如果cid是奇数添加到course_2表
spring.shardingsphere.sharding.tables.course.table-strategy.inline.sharding-column=cid
spring.shardingsphere.sharding.tables.course.table-strategy.inline.algorithm-expression=course_$->{cid % 2 + 1}

# 打开sql输出日志
spring.shardingsphere.props.sql.show=true

# 一个实体类对应两张表
spring.main.allow-bean-definition-overriding=true
3、测试程序
省略,上面的代码就行。
Sharding—Proxy
定位为透明化的数据库代理端,提供封装了数据库二进制协议的服务端版本,用于完成对异构语言的支持。 目前提供 MySQL 和 PostgreSQL(兼容 openGauss 等基于 PostgreSQL 的数据库)版本,它可以使用任何兼容 MySQL/PostgreSQL 协议的访问客户端(如:MySQL Command Client, MySQL Workbench, Navicat 等)操作数据,对 DBA 更加友好。
相当于程序员写代码只用操作ShardingProxy,然后ShardingProxy再具体去操作我们的数据库。也就是个代理。
ShardingProxy独立应用,使用安装服务,进行分库分表活着读写分离配置,最终启动后才能使用。
安装
官方网站
下载之后,把压缩文件解压,启动bin目录启动文件(windiws用.bat,linux用.sh)就可以了。
(如果lib下的jar包后缀名不对,需要手动修改)
配置
配置文件在conf目录下
1、server.yaml
打开两段文件
rules:
  - !AUTHORITY
    users:
      - root@%:root
      - sharding@:sharding
    provider:
      type: ALL_PRIVILEGES_PERMITTED
  - !TRANSACTION
    defaultType: XA
    providerType: Atomikos

props:
  max-connections-size-per-query: 1
  kernel-executor-size: 16  # Infinite by default.
  proxy-frontend-flush-threshold: 128  # The default value is 128.
  proxy-opentracing-enabled: false
  proxy-hint-enabled: false
  sql-show: false
  check-table-metadata-enabled: false
  show-process-list-enabled: false
2、 config-sharding.yaml
设置分库分表规则
注:需要复制mysql驱动的jar包到lib中
schemaName: sharding_db

dataSources:
  ds_0:
    url: jdbc:mysql://127.0.0.1:3306/demo_ds_0?serverTimezone=UTC&useSSL=false
    username: root
    password:
    connectionTimeoutMilliseconds: 30000
    idleTimeoutMilliseconds: 60000
    maxLifetimeMilliseconds: 1800000
    maxPoolSize: 50
    minPoolSize: 1
  ds_1:
    url: jdbc:mysql://127.0.0.1:3306/demo_ds_1?serverTimezone=UTC&useSSL=false
    username: root
    password:
    connectionTimeoutMilliseconds: 30000
    idleTimeoutMilliseconds: 60000
    maxLifetimeMilliseconds: 1800000
    maxPoolSize: 50
    minPoolSize: 1

rules:
- !SHARDING
  tables:
    t_order:
      actualDataNodes: ds_${
    0..1}.t_order_${
    0..1}
      tableStrategy:
        standard:
          shardingColumn: order_id
          shardingAlgorithmName: t_order_inline
      keyGenerateStrategy:
        column: order_id
        keyGeneratorName: snowflake
    t_order_item:
      actualDataNodes: ds_${
    0..1}.t_order_item_${
    0..1}
      tableStrategy:
        standard:
          shardingColumn: order_id
          shardingAlgorithmName: t_order_item_inline
      keyGenerateStrategy:
        column: order_item_id
        keyGeneratorName: snowflake
  bindingTables:
    - t_order,t_order_item
  defaultDatabaseStrategy:
    standard:
      shardingColumn: user_id
      shardingAlgorithmName: database_inline
  defaultTableStrategy:
    none:

  shardingAlgorithms:
    database_inline:
      type: INLINE
      props:
        algorithm-expression: ds_${
    user_id % 2}
    t_order_inline:
      type: INLINE
      props:
        algorithm-expression: t_order_${
    order_id % 2}
    t_order_item_inline:
      type: INLINE
      props:
        algorithm-expression: t_order_item_${
    order_id % 2}

  keyGenerators:
    snowflake:
      type: SNOWFLAKE
      props:
        worker-id: 123
3、启动服务
默认端口是3307
指定端口:cmd启动服务,使用命令start.bat 3308就能指定窗口启动。
4、通过Sharding-Proxy启动端口进行连接
cmd窗口连接,连接方式和连接mysql一样。
3307是启动服务的端口
mysql -P3307 -uroot -p
5、本地数据库校验
回到本地真实数据库,检查是否有数据。
分库分表
读写分离
版权声明
本文为[Kramer_149]所创,转载请带上原文链接,感谢
https://blog.csdn.net/m0_46199937/article/details/121288937
边栏推荐
- Question bank and answer analysis of the 2022 simulated examination of the latest eight members of Jiangxi construction (quality control)
- Express②(路由)
- Dynamic subset division problem
- 收藏博客贴
- JS force deduction brush question 103 Zigzag sequence traversal of binary tree
- The latest development of fed digital currency
- 1256:献给阿尔吉侬的花束
- Move blog to CSDN
- Crontab timing task output generates a large number of mail and runs out of file system inode problem processing
- STM32学习记录0007——新建工程(基于寄存器版)
猜你喜欢

Express ② (routage)

Business case | how to promote the activity of sports and health app users? It is enough to do these points well
![MySQL [acid + isolation level + redo log + undo log]](/img/52/7e04aeeb881c8c000cc9de82032e97.png)
MySQL [acid + isolation level + redo log + undo log]
Taobao released the baby prompt "your consumer protection deposit is insufficient, and the expiration protection has been started"

联想产品经理林林:天津当地网络运营商网络故障 ZUI系统后台服务器暂时无法正常工作
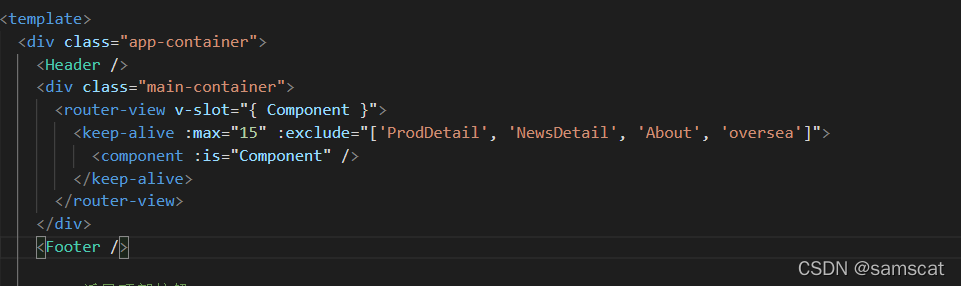
Record a strange bug: component copy after cache component jump
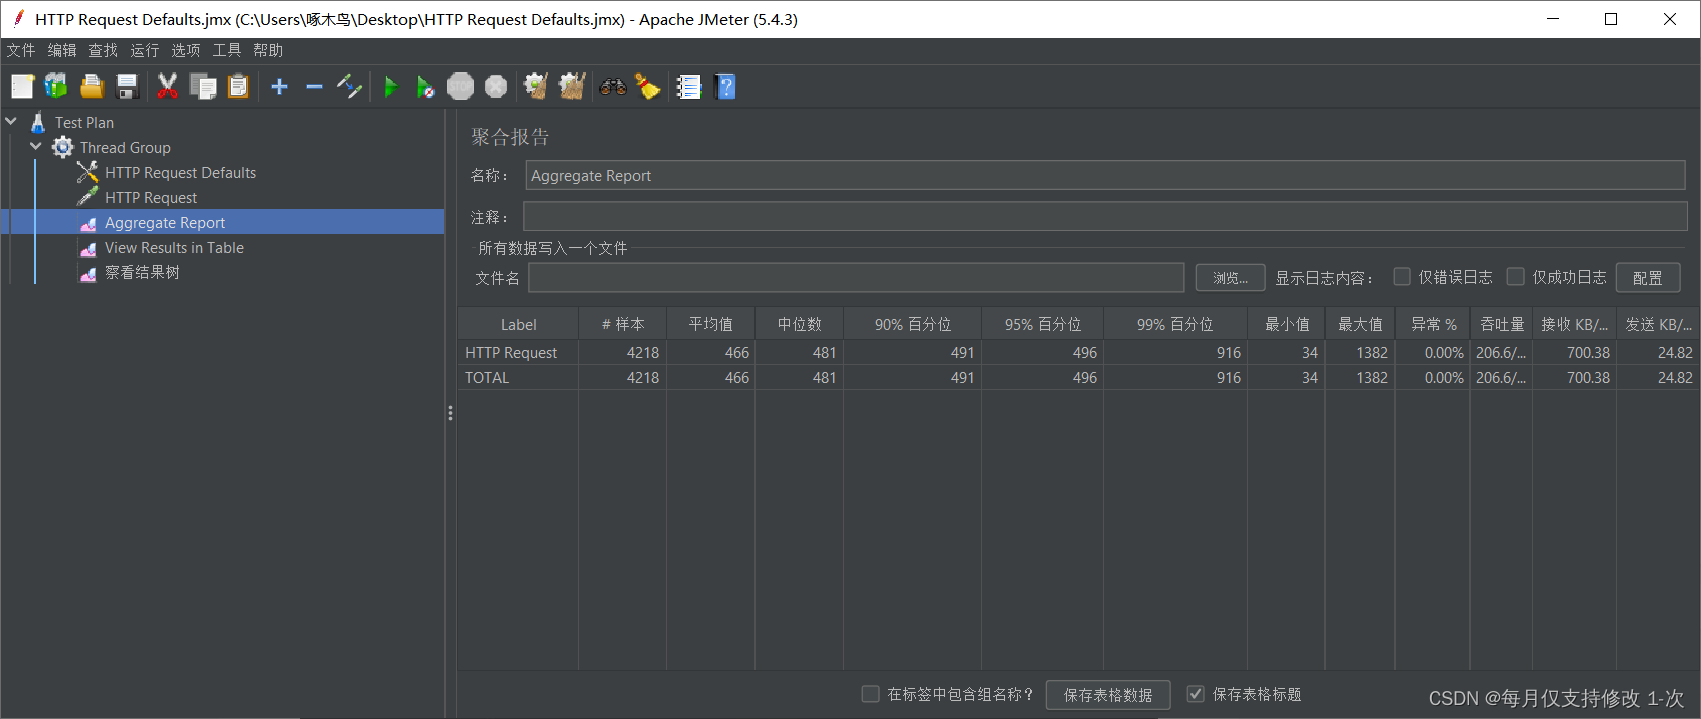
JMeter pressure test tool
第一章 电商秒杀商品回顾

Port occupied 1
Quartus prime hardware experimental development (de2-115 board) experiment II function adjustable comprehensive timer design
随机推荐
【报名】TF54:工程师成长地图与卓越研发组织打造
[code analysis (2)] communication efficient learning of deep networks from decentralized data
Small case of web login (including verification code login)
Solution of discarding evaluate function in surprise Library
Basic SQL query and learning
Introduction to spark basic operation
Dynamic subset division problem
JS brain burning interview question reward
JS force deduction brush question 103 Zigzag sequence traversal of binary tree
Choreographer full resolution
STM32 learning record 0007 - new project (based on register version)
大专的我,闭关苦学 56 天,含泪拿下阿里 offer,五轮面试,六个小时灵魂拷问
redis如何解决缓存雪崩、缓存击穿和缓存穿透问题
Express②(路由)
scikit-learn构建模型的万能模板
Jenkins construction and use
Atcoder beginer contest 248c dice sum (generating function)
Go语言 RPC通讯
33 million IOPs, 39 microsecond delay, carbon footprint certification, who is serious?
leetcode--380.O(1) 时间插入、删除和获取随机元素