当前位置:网站首页>Simple interaction between server and client
Simple interaction between server and client
2022-08-11 09:25:00 【It's classmate Xiaoming.】
文章目录
Simple interaction between server and client
语言的跨平台
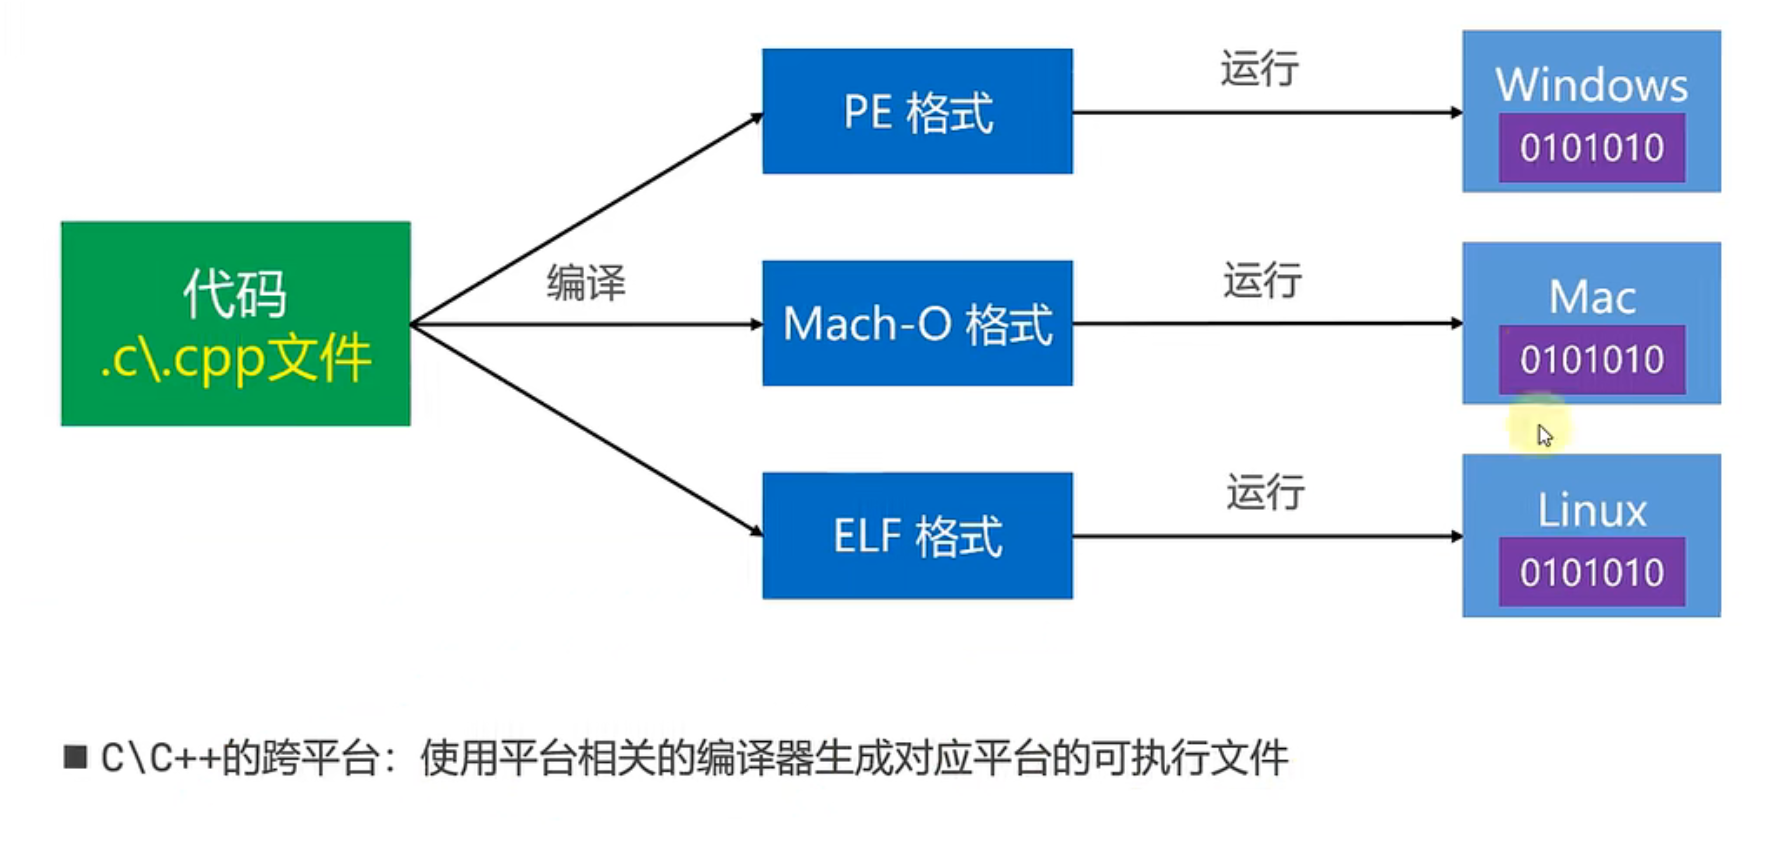
c/c++的跨平台原理
对于不同的操作系统,A different compilation is required,Generate executable files in different formats.
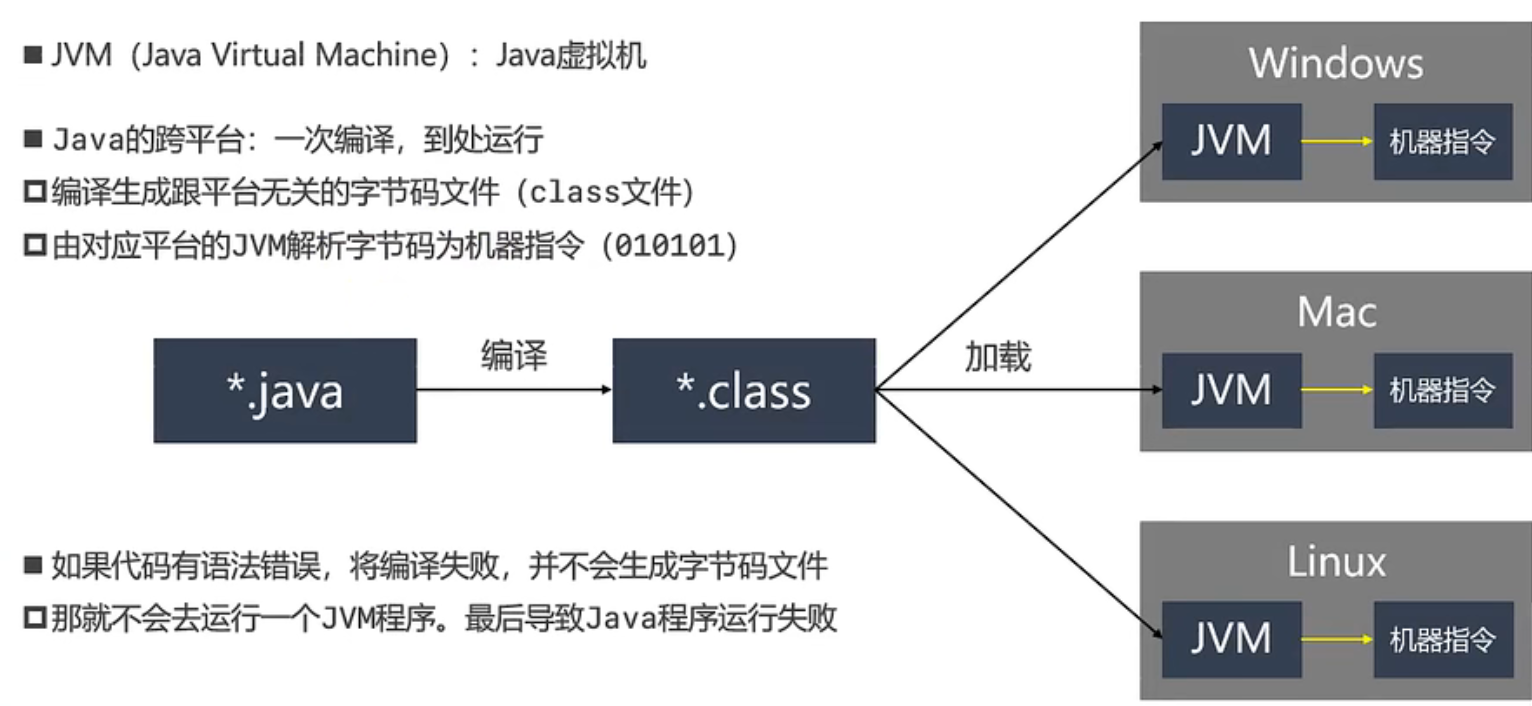
java的跨平台原理
对于不同的操作系统,只需编译一次.The generated bytecode file after compilation,对于操作系统来说,is not an executable file.如果要执行,A software needs to be installed on a different operating systemJVM(java虚拟机),And need to open this program.当.javaThe file is generated after compiling.classWhen the file needs to be executed,is needed to start thisJVM程序,然后使得JVM来加载这个.class文件(Parse and translate this file into machine instructions).
补充:JDK中是带有JRE的(Java Runtime Environment),JRE中包含着JVM.So download itJDK就可以运行.class字节码文件了.
js的跨平台原理
对于不同的操作系统,不需要编译,Just need to open different browsers in different operating systems,然后浏览器对js文件进行解释,Then make it executable(机器指令).
客户端vs服务器
端口
Both the server and the client are essentially computers,It's just that the client may require a higher graphics card, etc,What the server is asking for is changed memory.Each server will have multiple ports,After the port will correspond to the server software,When the client sends data to the server's port,Server software listens for data and parses and executes code.If the server wants to transmit data back to the client,It is also transmitted through the port.
所以,If you want to build a server environment,One port is required,Then build server software for this port.
部署项目
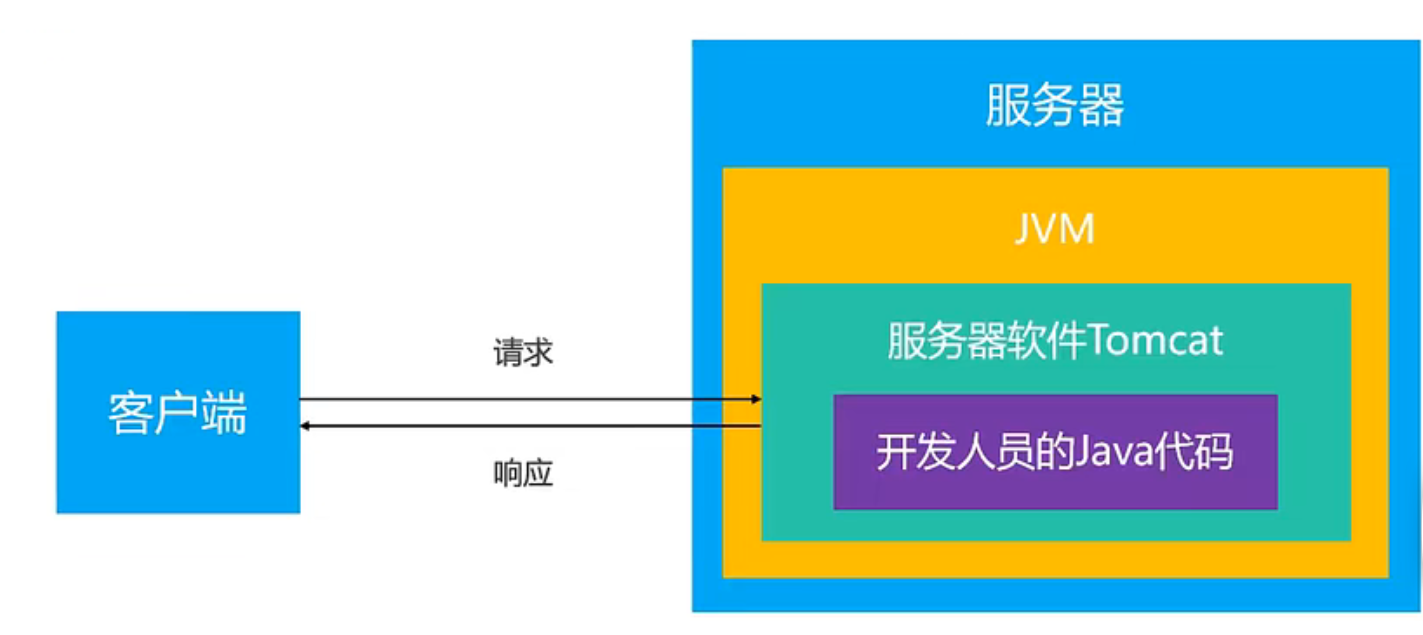
A client may send multiple requests to the same port,The server software is then asked to create different projects(Develop different backends,可以使用javaCode writing and creation),It is up to the server software to identify different requests and respond.If the server software is too stressed,You can create multiple ports and create server software,to share other projects.If the server is under too much pressure,Then make another machine.
所以,If the selected language is java,The server software can then be deployed on the portTomcat,Used to run developer-createdJava代码.又由于Tomcat软件是由java编写,So if you need to run this software,那么就需要有JVM来加载(If sent by the clientjavaThe code's request needs to be executed,需要先启动JVM,然后再启动Tomcatto find and execute the developer accordinglyjava代码,最后由TomcatSend a response to the client).
How the client accesses the server softwarejava项目
以访问tomcat中的项目为例:
http://IP地址:端口号/项目
http://10.10.128.49:8080/qq/img
使用http协议,通过IPaddress to find the server,Then find the port number again,Finally, select the item to be executed in the port number,In the project, select the folder you want to access,后面还可以加 ? 来添加参数
If the computer that does the server happens to be the current machine(The client is himself,The server is also itself),Then enter your ownIP即可,或者输入:127.0.0.1,或者localhost.完整:
http://localhost:8080/)后面就可以根据webappsThe existing project in the folder to test.
现在在idea中创建的javaItems are normal items,Just have fun for yourself,Others cannot find this in the server through the web pagejava项目,So it should be added for the projectweb模块(项目右键,选择add framework support,选择web),然后就会出现一个web文件夹,In the folder are the resources to be provided to the client.
测试:
在web文件夹下创建了一个html文件和一个图片,This is the resource that is ready to be served to the client,But how can the client access it?Server software needs to be installedTomcat,These resources need to be deployed toTomcat中,然后Tomcat利用默认的8080Port to listen for resources and requests sent by clients,然后Tomcatresources are sent out.
So the next step should startTomcat,并把项目部署到Tomcat中.在idea中点击add configuration,在其中找到tomcat server(local的),输入地址后,It will be automatically recognized on the computertomcat,(这时vshas already been deployedtomcat,但是tomcatIt is not clear what resources to manage),继续点development,Select the current project to deploy toTomcat中.TomcatMany projects will be deployed in the future,是通过Application contextto distinguish the search,So this logo can be changed to be more refined,project1->p1,然后就可以通过/p1to find the corresponding resource service.
http://IP地址:端口号/资源路径
http://127.0.0.1:8080/p1
使用http协议,通过IP地址找到服务器,Found by port numberTomcat,Find resources by resource path,It has now been foundproject1项目中的web文件夹,然后再添加/scene.jpgYou can access the pictures.(First make sure that in the upper right cornertomcat已经打开)
When attributes such as resource folders are changed,可以按debug,选择rodeplay重新部署.
登录页面
login.html:
<!DOCTYPE html>
<html lang="en">
<head>
    <meta charset="UTF-8">
    <title>登录</title>
</head>
<body>

<form action="/p1">
    <div>用户名<input name="username"></div>
    <div>密码<input name="password"></div>
    <button type="submit">登录</button>>
</form>

</body>
</html>
http://127.0.0.1:8080/p1/login.html
The address of the server submitted here is setp1项目,You can also write the full name,也可以直接/p1(自动的将/p1拼接到8080后面,Because the current location is8080The web files in the project under the port).Upload the entered username and password to p1中来,但是p1There will be no special response,It just jumps to by defaultp1的index.jsp
Responds to data uploaded on the login page
需要使用servlet技术,需要引用tomcat的库.
因为idea中已经引用了tomcat,所以直接在idea中引用即可.file->project Structure->modules->dependencies->±>library->tomcat库->ok.这样在external library中就可以找到tomcat库.
创建一个LoginServlets类
1,继承HttpServlet,才能处理HTTP请求
2,使用@WebServlet,说明处理的请求路径
http://127.0.0.1:8080/p1/login
LoginServlet
package com.kevin.servlet;
import javax.servlet.ServletException;
import javax.servlet.annotation.WebServlet;
import javax.servlet.http.HttpServlet;
import javax.servlet.http.HttpServletRequest;
import javax.servlet.http.HttpServletResponse;
import java.io.IOException;

@WebServlet("/login")
public class LoginServlet extends HttpServlet{

    //处理get请求
    @Override
    protected void doGet(HttpServletRequest req, HttpServletResponse resp) throws ServletException, IOException {

        System.out.println("doGet----");
    }

    //处理post请求
    @Override
    protected void doPost(HttpServletRequest req, HttpServletResponse resp) throws ServletException, IOException {

        System.out.println("doPost----");
    }
}
html
<!DOCTYPE html>
<html lang="en">
<head>
    <meta charset="UTF-8">
    <title>登录</title>
</head>
<body>

<form action="/p1/login" method="get">
    <div>用户名<input name="username"></div>
    <div>密码<input name="password"></div>
    <button type="submit">登录</button>>
</form>

</body>
</html>
The uploaded server address is under the projectlogin,The upload form isget
This is after input,will print in the backgrounddoGet----,parameters and displayed directly on the URL.
receive and respond
HttpServletRequest req : 请求:Used to get the data sent by the client
HttpServletResponse resp:响应:Used to return data to the client
LoginServlet
package com.kevin.servlet;


import javax.servlet.ServletException;
import javax.servlet.annotation.WebServlet;
import javax.servlet.http.HttpServlet;
import javax.servlet.http.HttpServletRequest;
import javax.servlet.http.HttpServletResponse;
import java.io.IOException;

@WebServlet("/login")
public class LoginServlet extends HttpServlet{

    //处理get请求
    @Override
    protected void doGet(HttpServletRequest request, HttpServletResponse response) throws ServletException, IOException {

       doPost(request,response);
    }

    //处理post请求
    @Override
    protected void doPost(HttpServletRequest request, HttpServletResponse response) throws ServletException, IOException {

        String username = request.getParameter("username");
        String password = request.getParameter("password");

        if("123".equals(username)&&"456".equals(password))
        {

            response.getWriter().write("Login Success!!");
        }
        else
        {

            response.getWriter().write("Login Failure!!");
        }
    }
}
html
<!DOCTYPE html>
<html lang="en">
<head>
    <meta charset="UTF-8">
    <title>登录</title>
</head>
<body>

<form action="/p1/login" method="post">
    <div>用户名<input name="username"></div>
    <div>密码<input name="password"></div>
    <button type="submit">登录</button>>
</form>

</body>
</html>
用户名123 密码:456
页面显示成功
边栏推荐
- Network model (U - net, U - net++, U - net++ +)
- 持续集成/持续部署(2)Jenkins & SonarQube
- 【无标题】超时超时超时超时超时
- HDRP Custom Pass Shader 获取世界坐标和近裁剪平面坐标
- 1002 A+B for Polynomials
- wordpress插件开发03-简单的all in one seo 插件开发
- unity shader 测试执行时间
- excel将数据按某一列值分组并绘制分组折线图
- 基于 VIVADO 的 AM 调制解调(2)工程实现
- Validate the execution flow of the interceptor
猜你喜欢
Typora和基本的Markdown语法
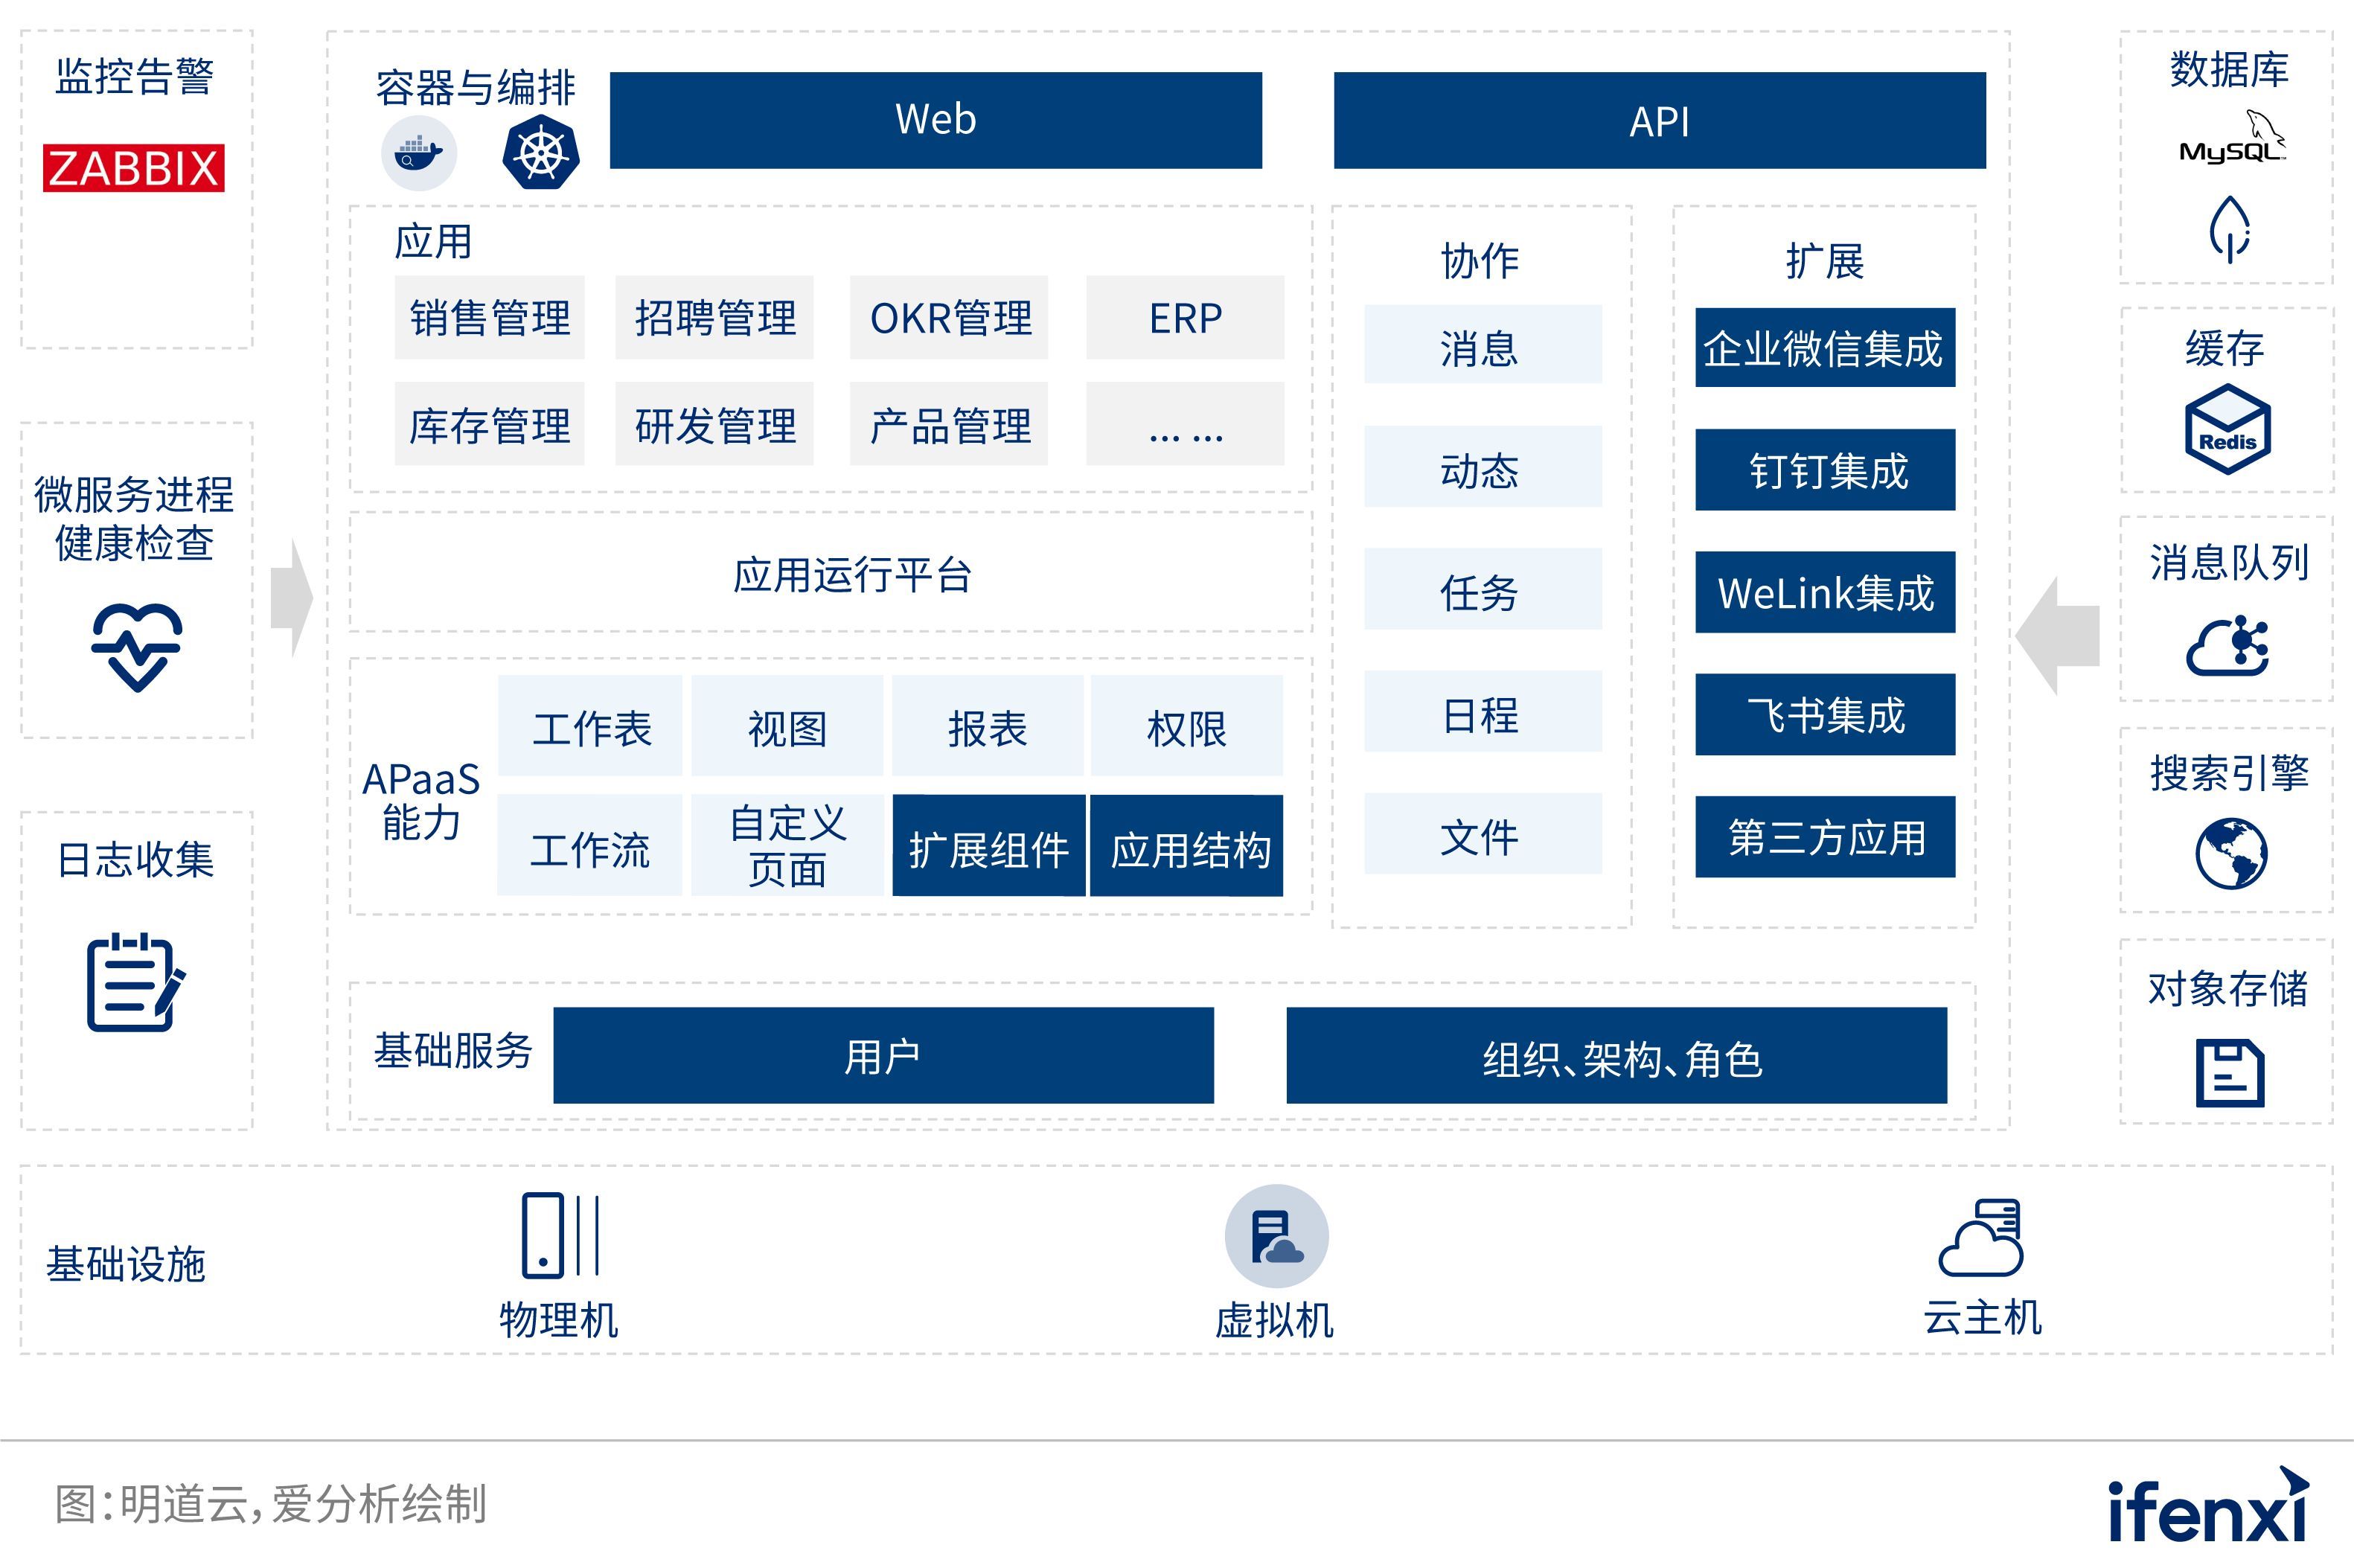
The no-code platform helps Zhongshan Hospital build an "intelligent management system" to realize smart medical care
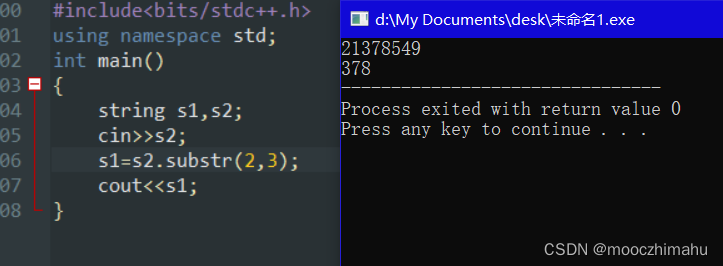
Detailed Explanation of the Level 5 Test Center of the Chinese Institute of Electronics (1)-string type string
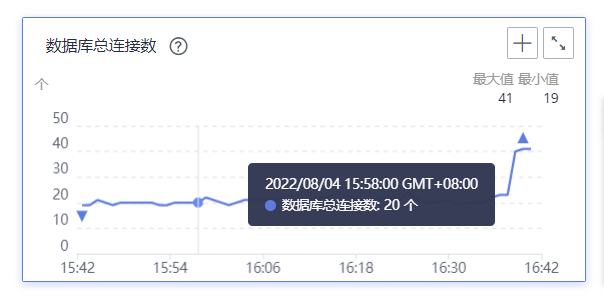
What should I do if the mysql data query causes the cup to be full because the query time span is too large
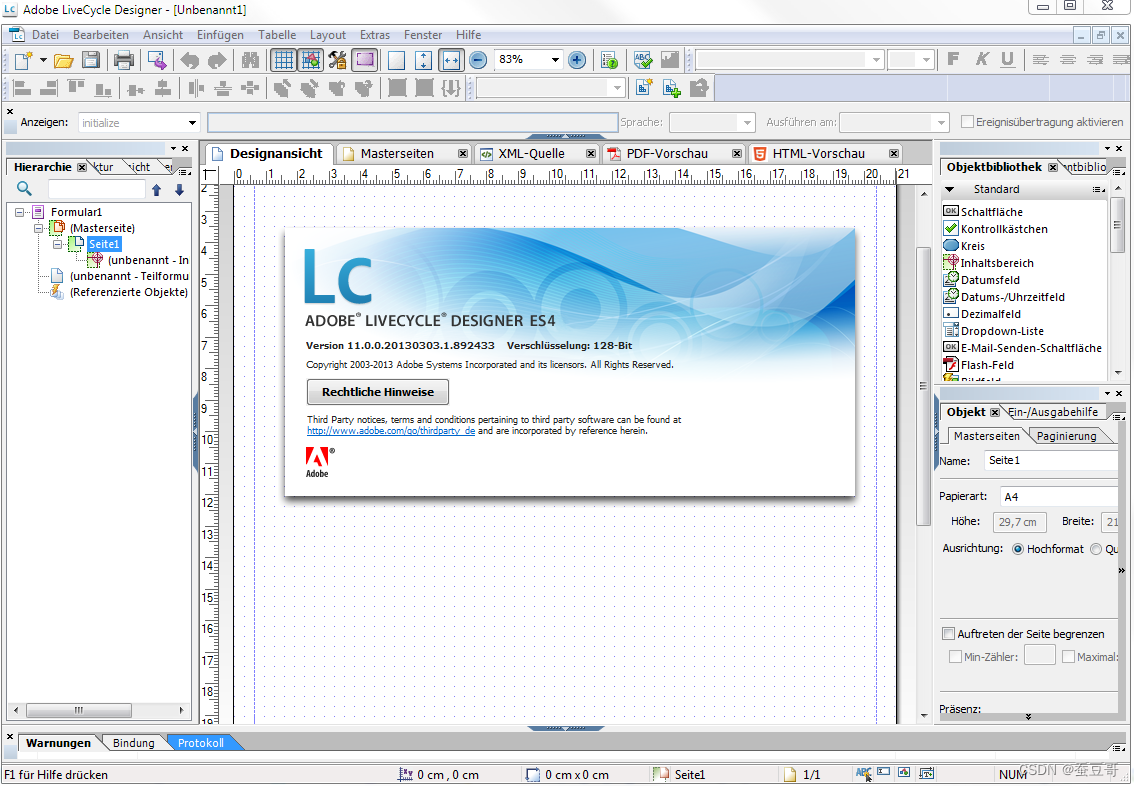
Adobe LiveCycle Designer 报表设计器
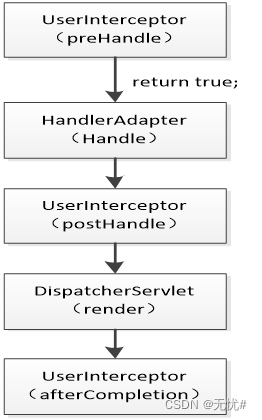
验证拦截器的执行流程
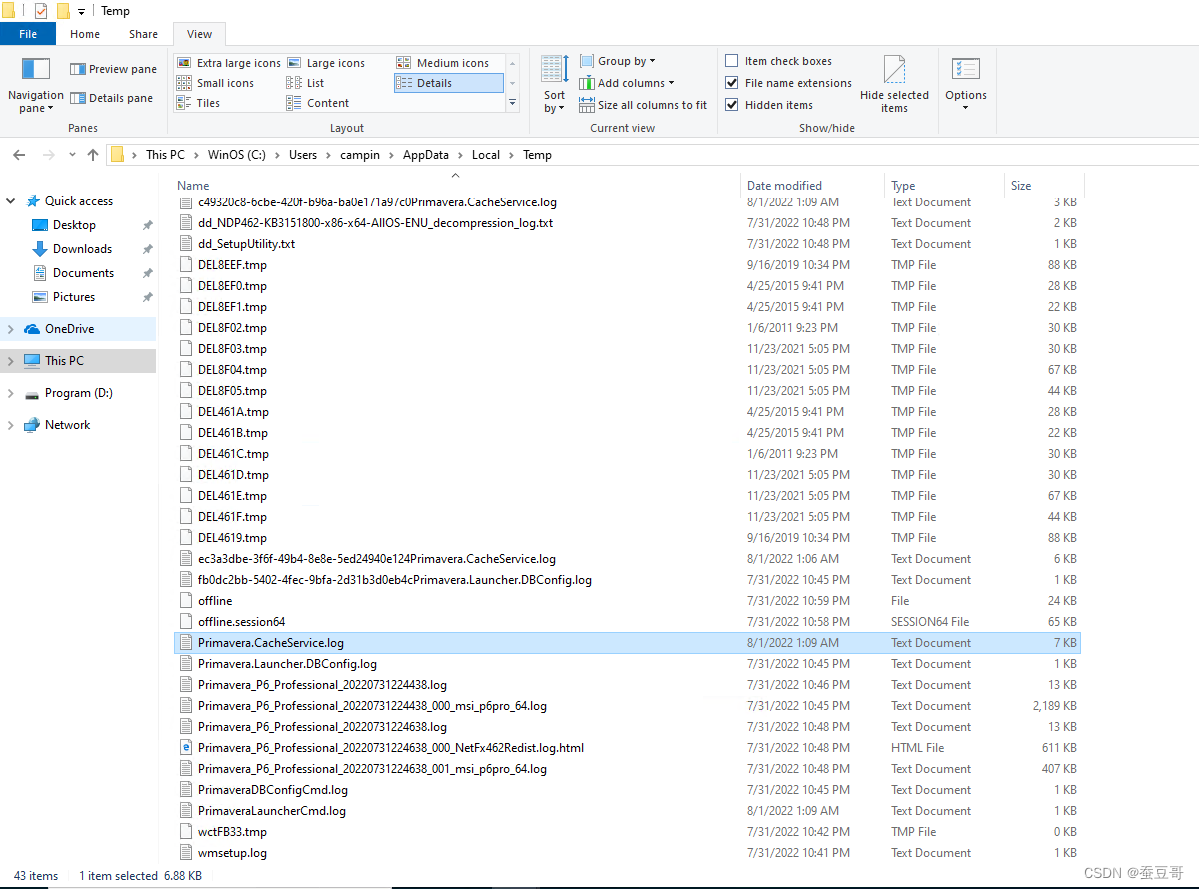
Primavera P6 Professional 21.12 登录异常案例分享

canvas文字绘制(大小、粗体、倾斜、对齐、基线)

WordpressCMS主题开发02-制作顶部header.php和footer.php
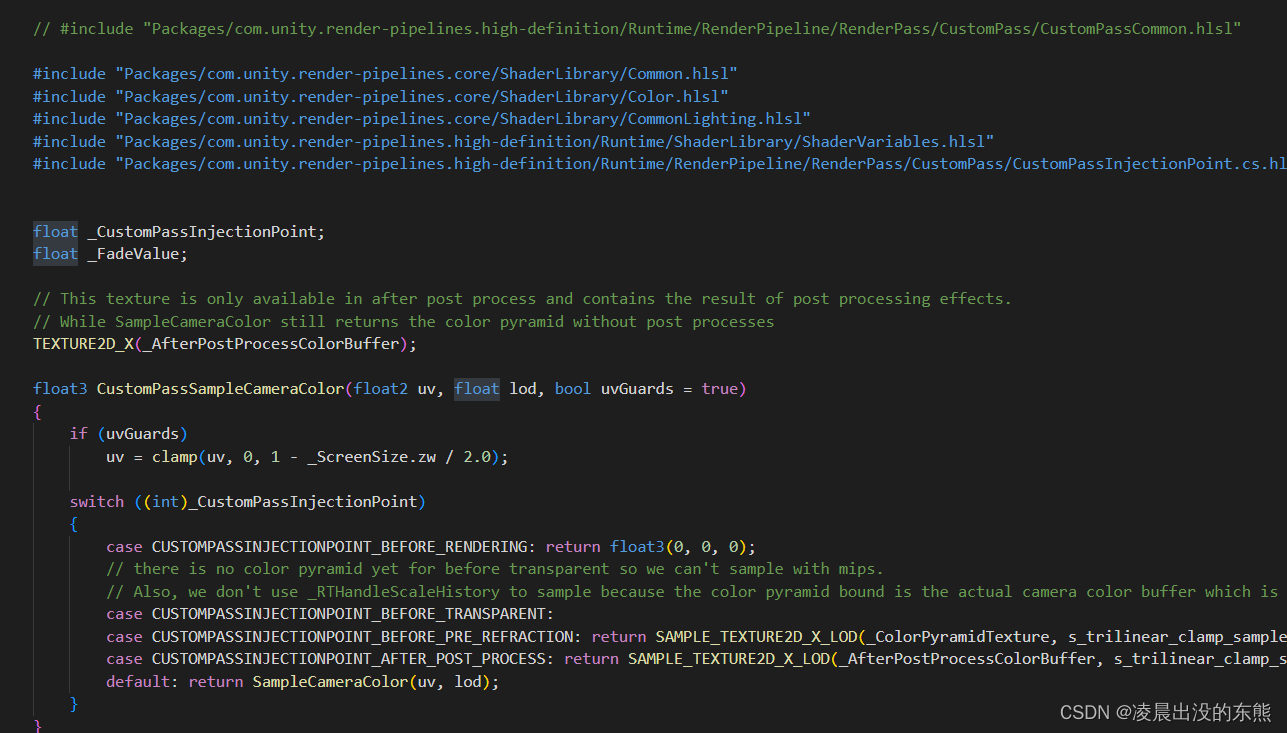
HDRP Custom Pass Shader 获取世界坐标和近裁剪平面坐标
随机推荐
mysql数据查询因为查询的时间跨度过大导致cup爆满应该怎么办
WordpressCMS主题开发02-制作顶部header.php和footer.php
Primavera P6 Professional 21.12 登录异常案例分享
UNITY gameobject代码中setacvtive(false)与面板中直接去掉勾 效果不一样
mindspore中MindDataset读取mindrecord文件问题
Oacle数据库使用问题
Validate the execution flow of the interceptor
canvas图形操作(缩放、旋转、位移)
Primavera Unifier 高级公式使用分享
HDRP shader 获取阴影(Custom Pass)
MySQL性能调优,必须掌握这一个工具!!!(1分钟系列)
wordpress插件开发02-首页文章自动摘要插件开发
ES6: Expansion of Numerical Values
idea 方法注释:自定义修改method的return和params,void不显示
Primavera Unifier - AEM Form Designer Essentials
【无标题】超时超时超时超时超时
数据库基础
模型训练出现NAN
游戏服务器中集群网关的设计
How to use QTableWidget