当前位置:网站首页>持续集成/持续部署(2)Jenkins & SonarQube
持续集成/持续部署(2)Jenkins & SonarQube
2022-08-11 08:31:00 【AHui_CSDN】
jenkins
安装jenkins
第一步: 安装java环境
使用rpm包安装
[[email protected] ~]# ll
total 166040
-rw-r--r-- 1 root root 170023183 Aug 14  2018 jdk-8u181-linux-x64.rpm
[[email protected] ~]# rpm -ivh jdk-8u181-linux-x64.rpm
warning: jdk-8u181-linux-x64.rpm: Header V3 RSA/SHA256 Signature, key ID ec551f03: NOKEY
Preparing...                          ################################# [100%]
Updating / installing...
   1:jdk1.8-2000:1.8.0_181-fcs        ################################# [100%]
或者使用yum -y install java
第二步: 下载上传jenkins安装包
https://mirrors.jenkins-ci.org/redhat/
第三步: 安装jenkins
[[email protected] ~]# rpm -ivh jenkins-2.176.1-1.1.noarch.rpm
warning: jenkins-2.176.1-1.1.noarch.rpm: Header V4 DSA/SHA1 Signature, key ID d50582e6: NOKEY
Preparing...                          ################################# [100%]
Updating / installing...
   1:jenkins-2.176.1-1.1              ################################# [100%]
修改启动jenkins的用户为root
[[email protected] ~]# grep JENKINS_USER /etc/sysconfig/jenkins
JENKINS_USER="root"
第四步: 启动jenkins 加入开机自动运行
[[email protected] ~]# systemctl start jenkins
[[email protected] ~]# systemctl enable jenkins
jenkins默认端口为8080
[[email protected] ~]# netstat -tnulp
Active Internet connections (only servers)
Proto Recv-Q Send-Q Local Address           Foreign Address         State       PID/Program name
tcp        0      0 127.0.0.1:25            0.0.0.0:*               LISTEN      1275/master
tcp        0      0 0.0.0.0:22              0.0.0.0:*               LISTEN      1192/sshd
tcp6       0      0 ::1:25                  :::*                    LISTEN      1275/master
tcp6       0      0 :::8080                 :::*                    LISTEN      2443/java
通过页面配置登录jenkins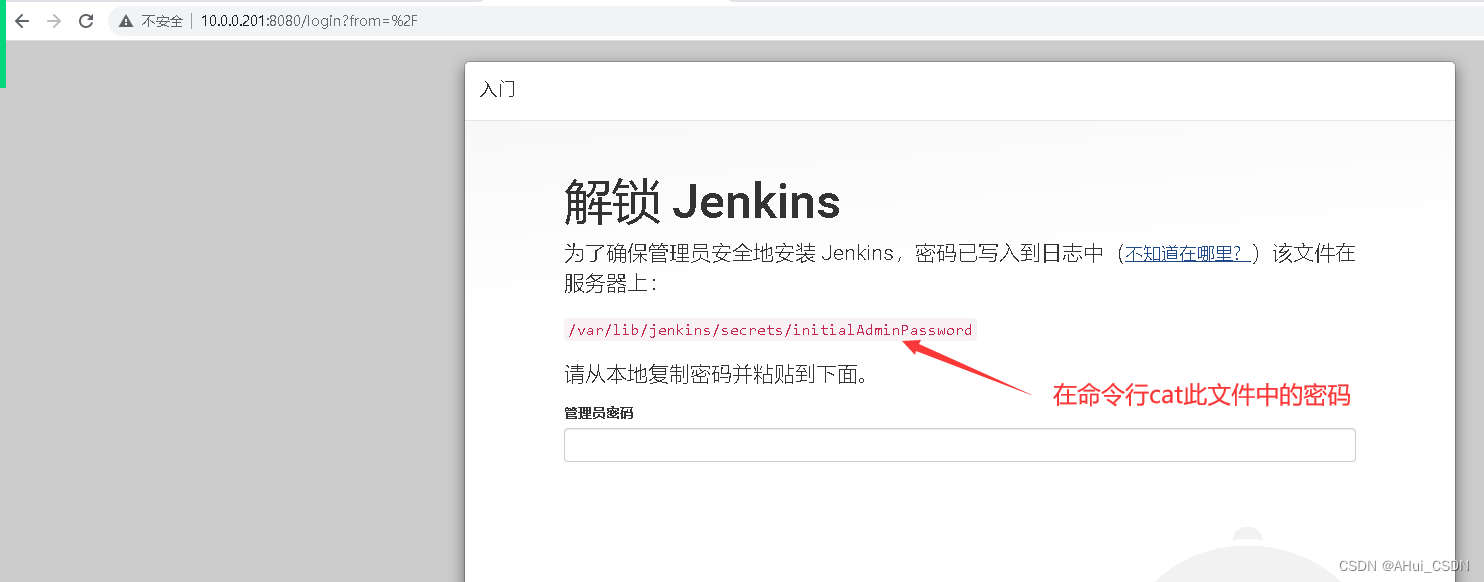
[[email protected] ~]# cat /var/lib/jenkins/secrets/initialAdminPassword
24ca0fe2a923400b8c4f635da34bc865

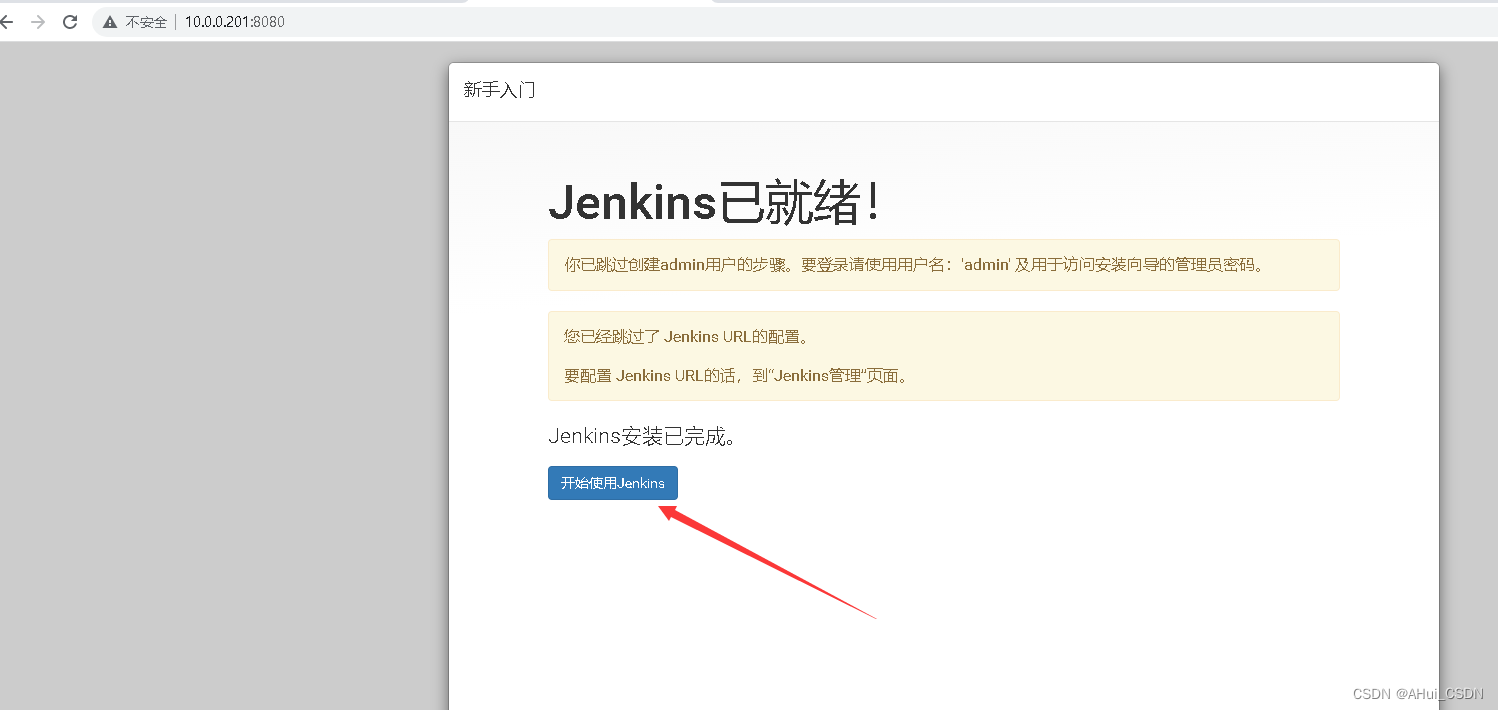
修改jenkins的登录密码
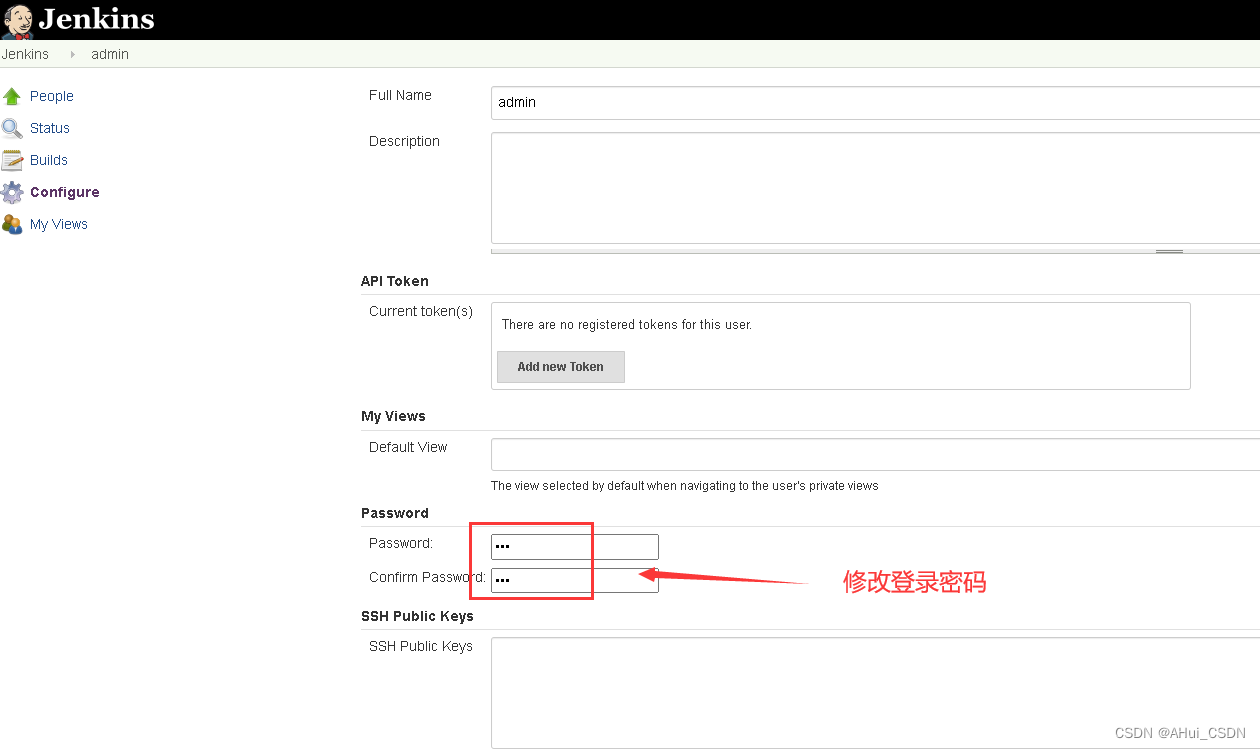
用户名 admin 密码 123
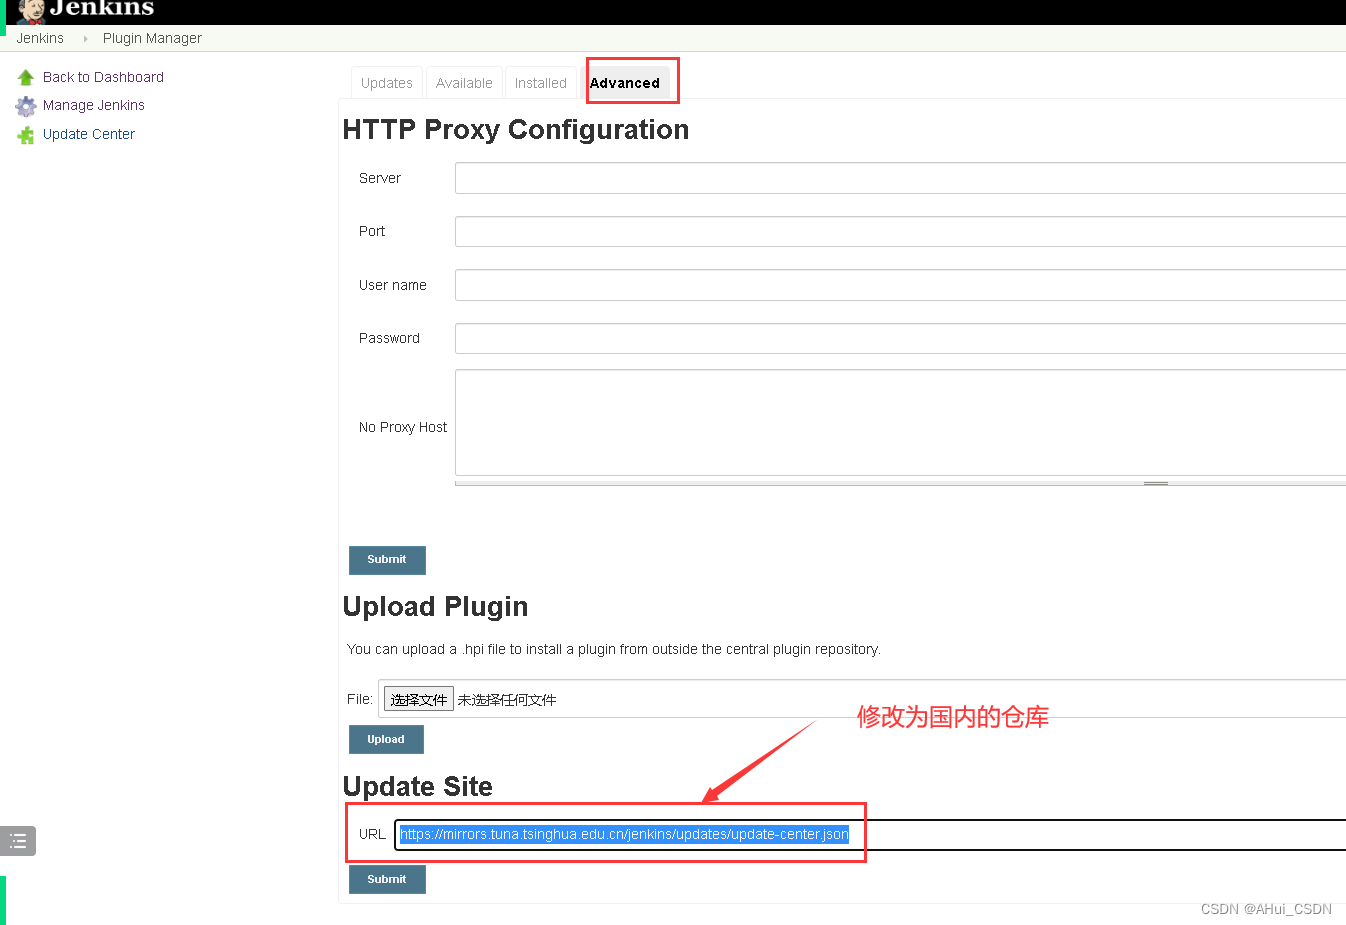
插件管理 修改为国内仓库
jenkins安装插件
命令行上传插件压缩包
[[email protected] plugins]# ll
total 283056
-rw-r--r-- 1 root root 289849332 Oct 26  2019 jenkins_plugins.tar.gz
[[email protected] plugins]# tar xf jenkins_plugins.tar.gz
[[email protected] plugins]# mv plugins/* .
重启重新加载插件
[[email protected] plugins]# systemctl restart jenkins
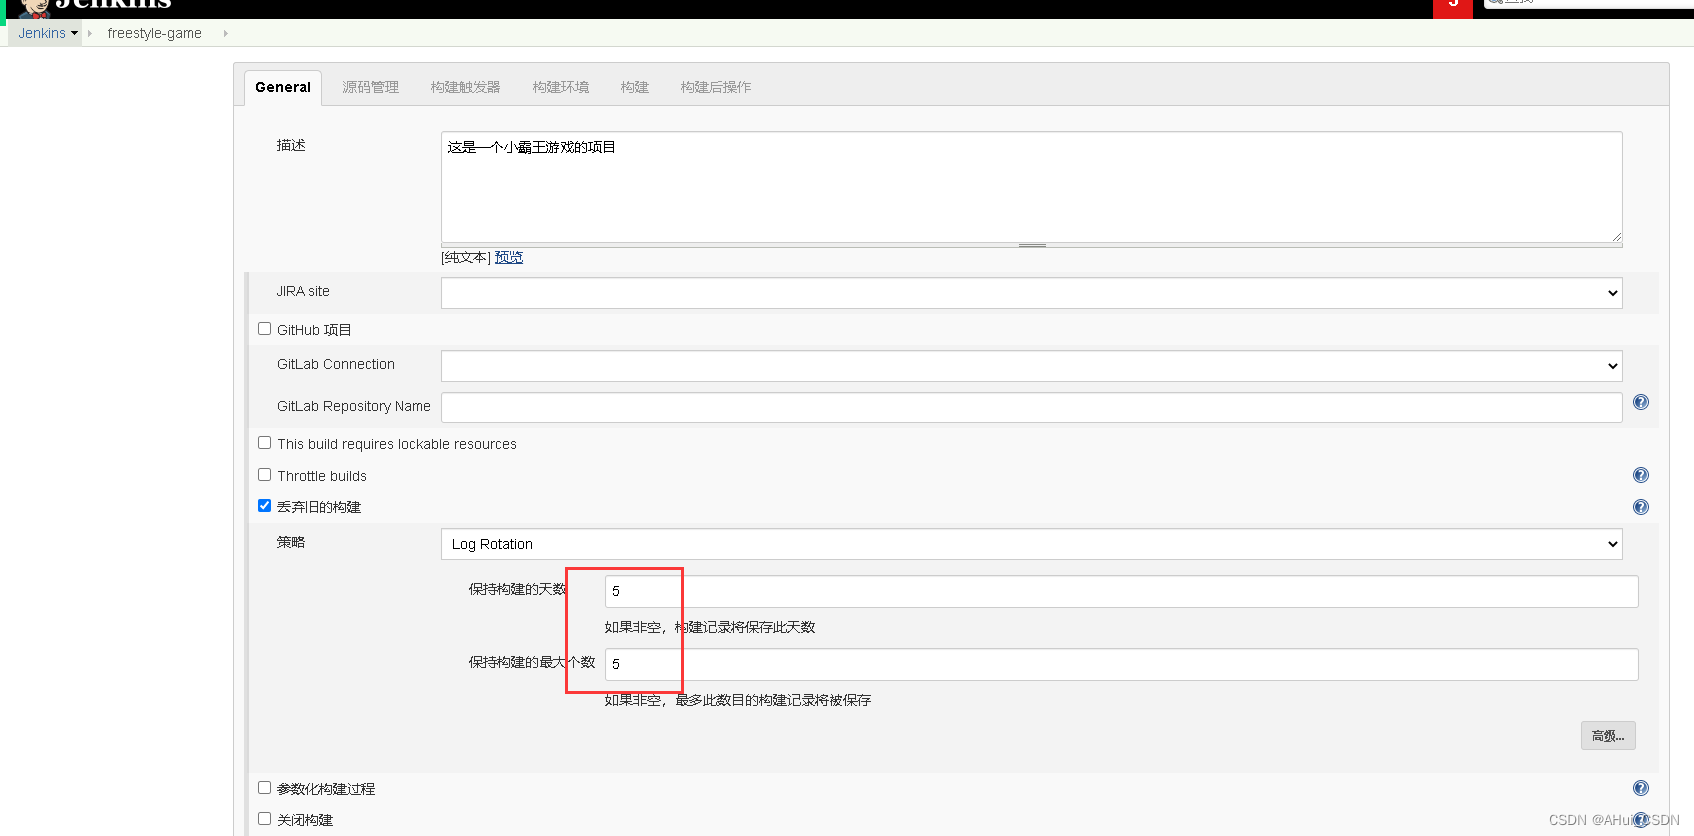
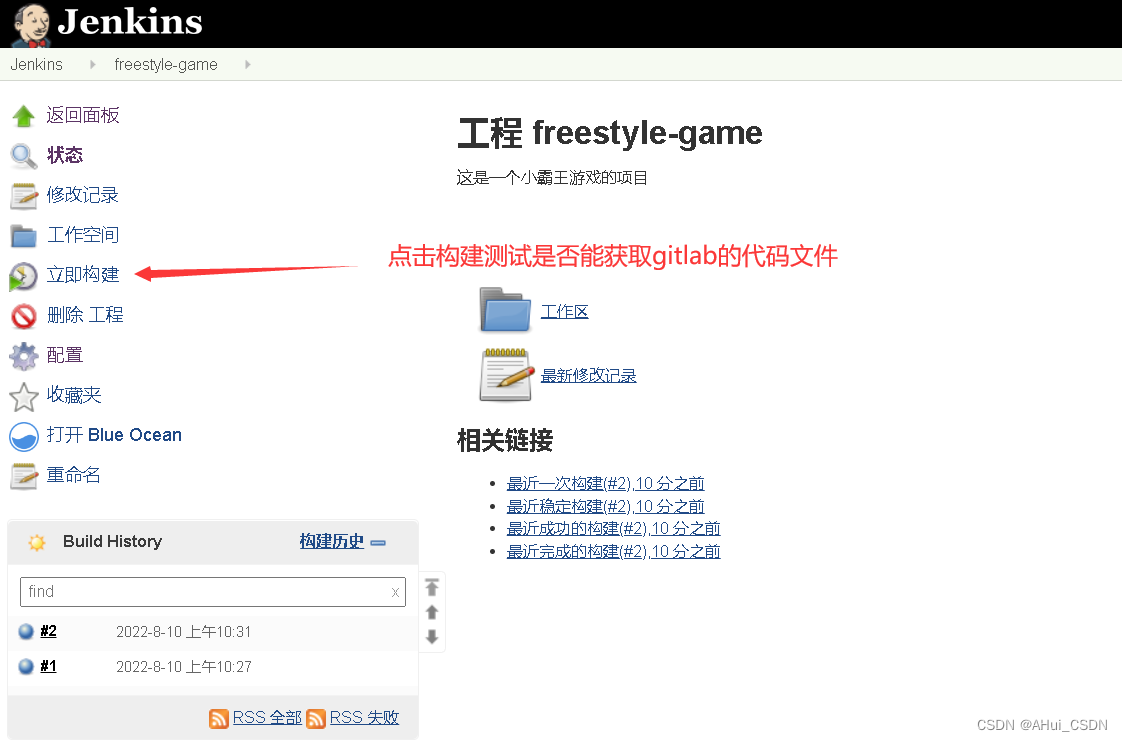
jenkins创建一个测试项目
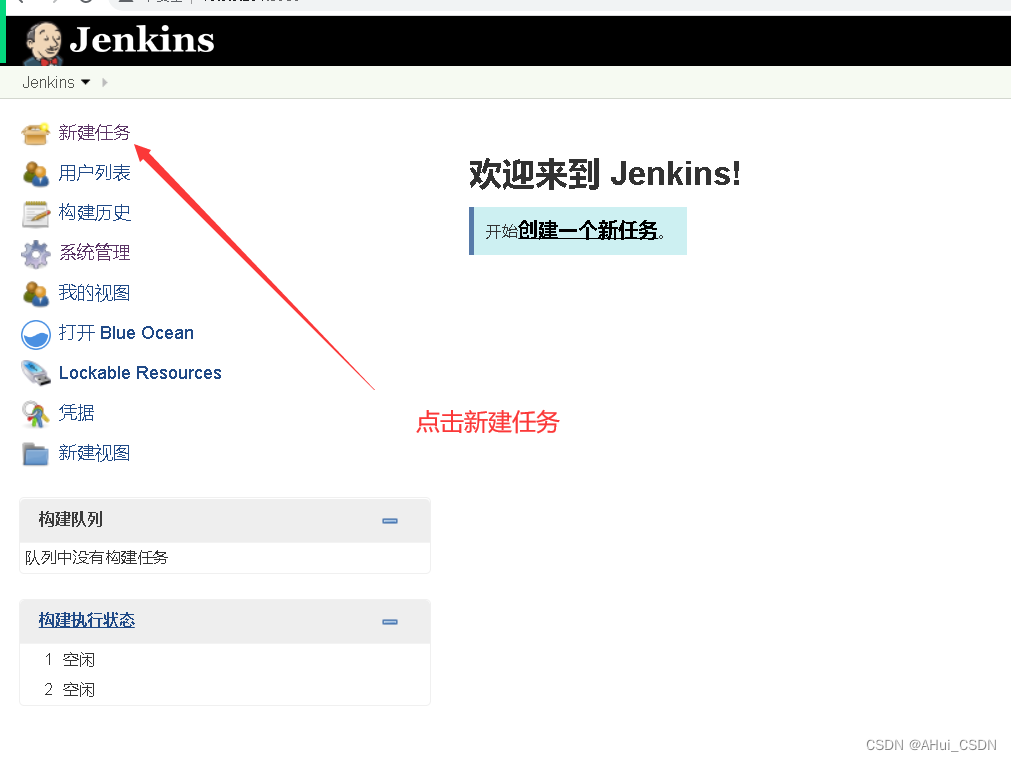
创建一个自由风格的项目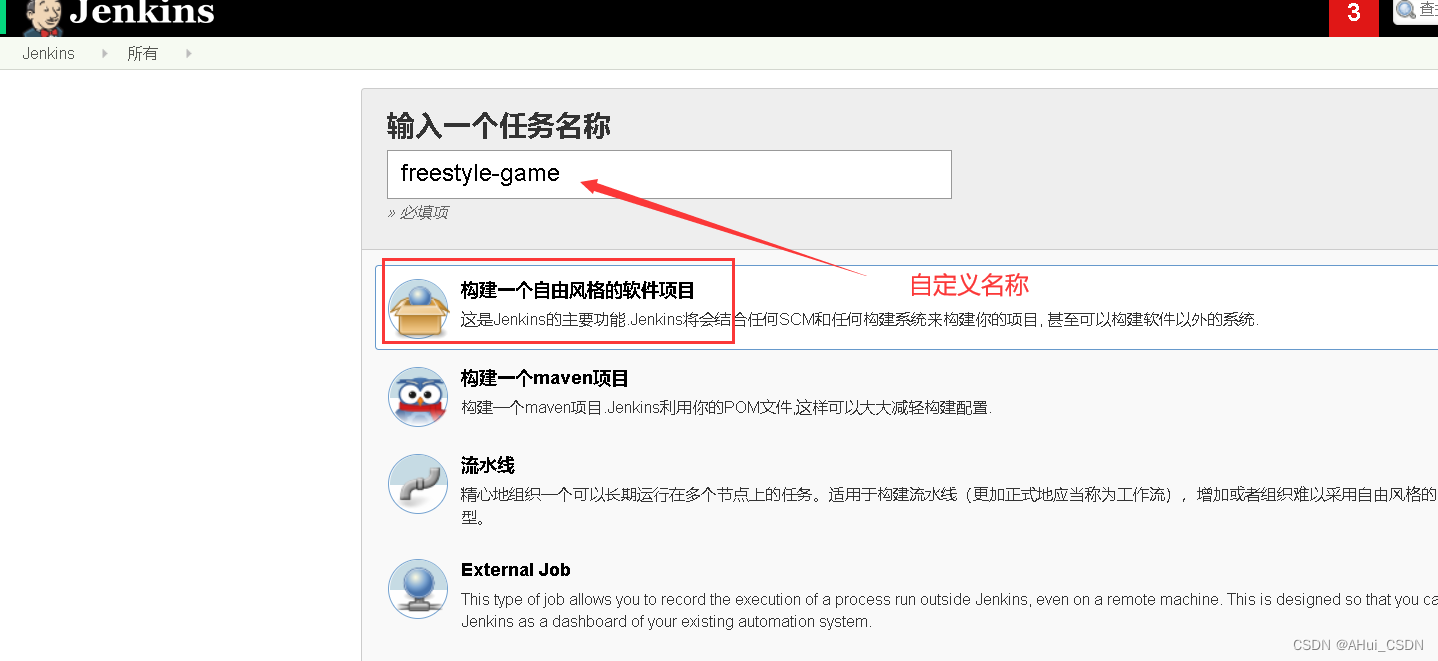
执行shell命令测试当前的路径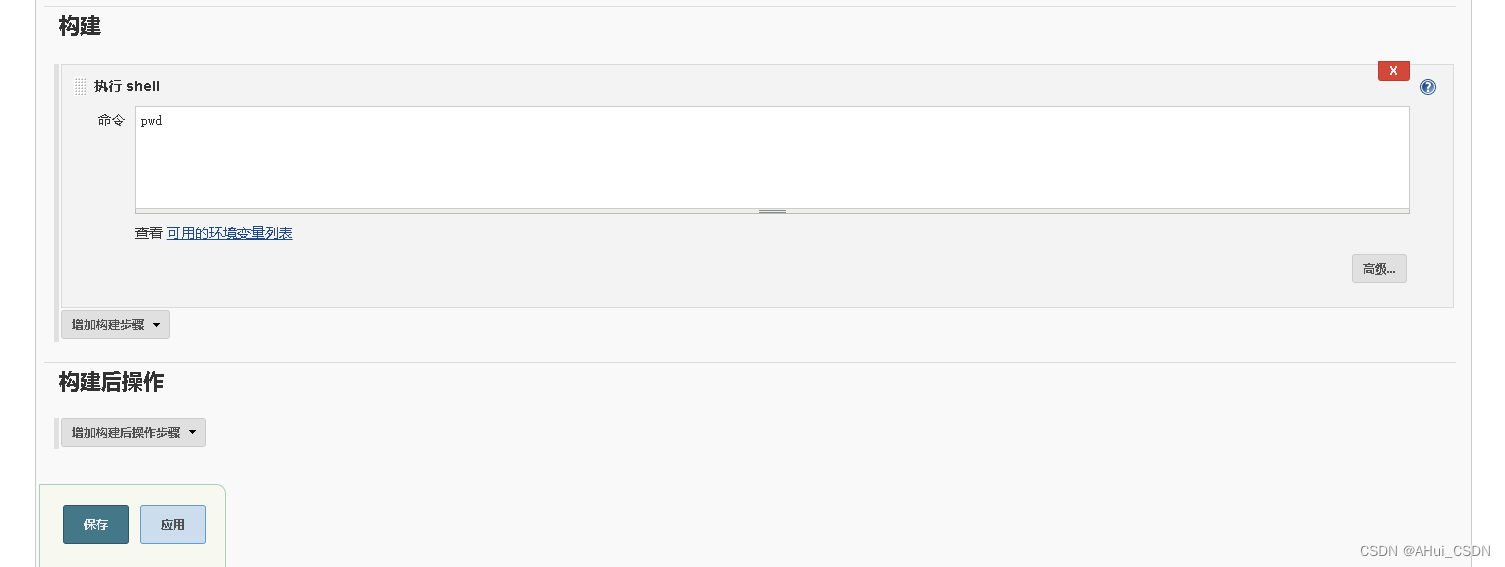
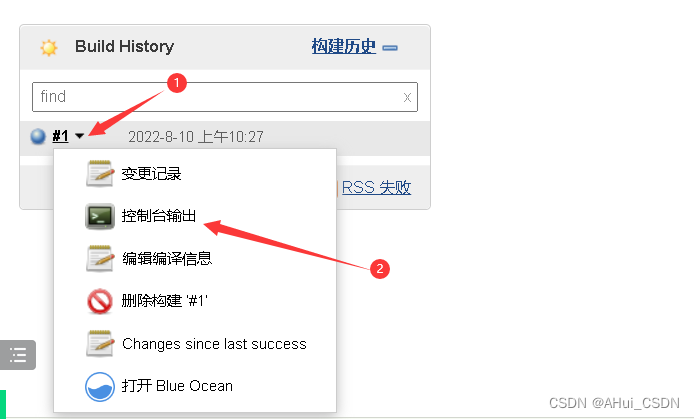
构建执行项目: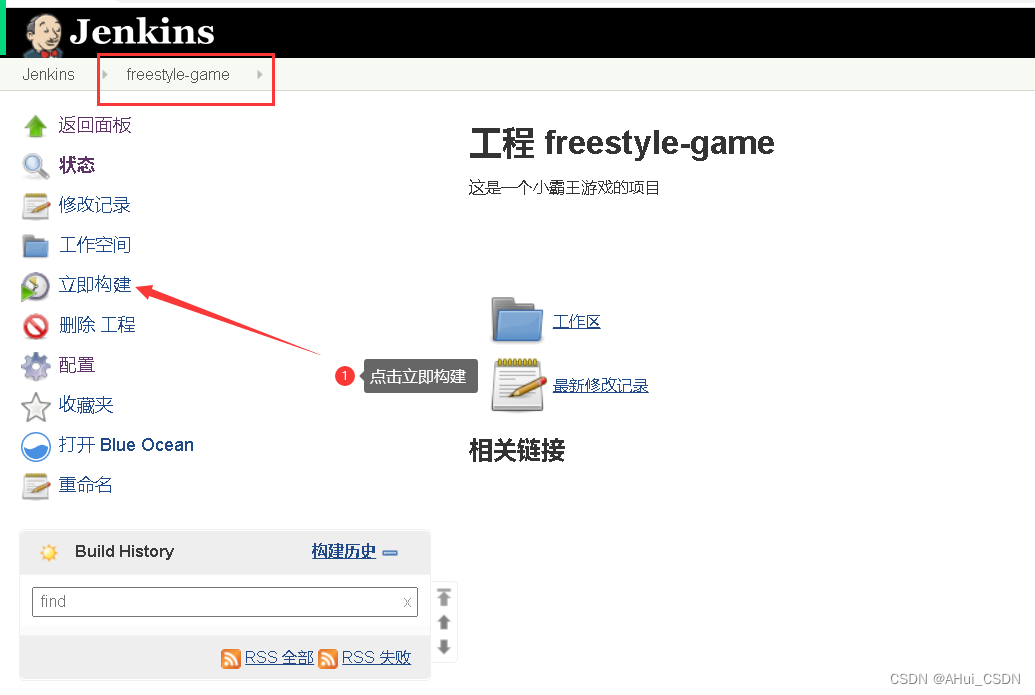
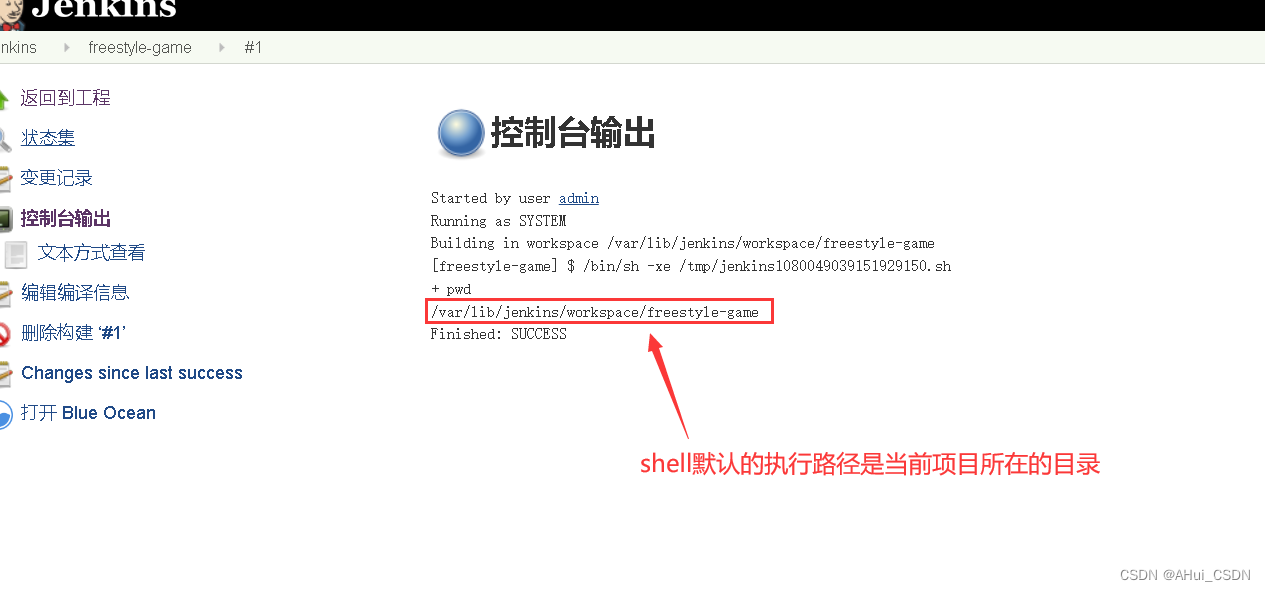
注意: jenkins的家目录下默认是没有workspace工作目录
创建项目后自动生成项目的家目录
[[email protected] freestyle-game]# pwd
/var/lib/jenkins/workspace/freestyle-game
下载gitlab的代码到jenkins的本地
配置jenkins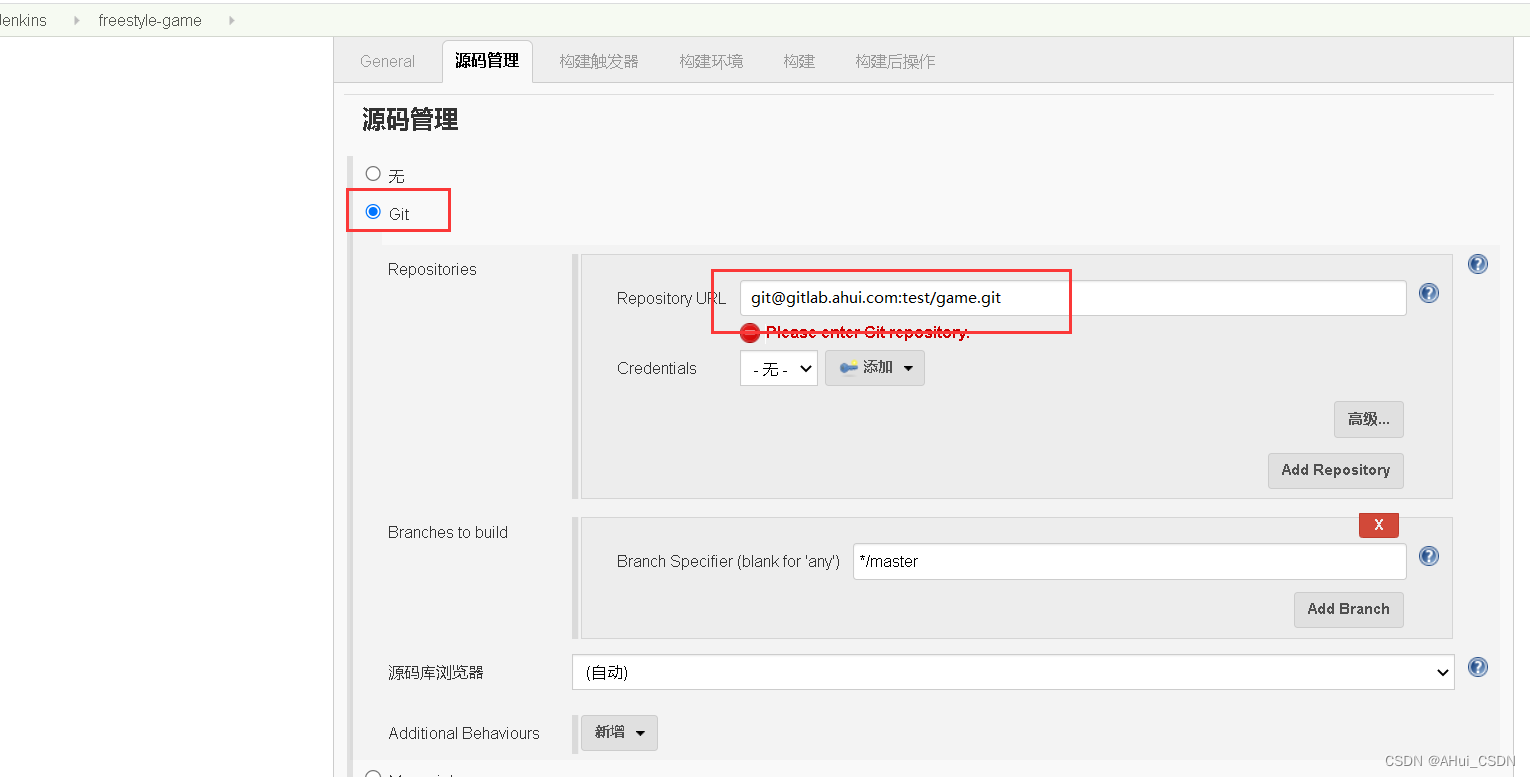
配置好后无法拉取代码
第一步: 在201jenkins服务器做hosts解析
[[email protected] ~]# cat /etc/hosts
127.0.0.1   localhost localhost.localdomain localhost4 localhost4.localdomain4
::1         localhost localhost.localdomain localhost6 localhost6.localdomain6
10.0.0.200 gitlab.ahui.com
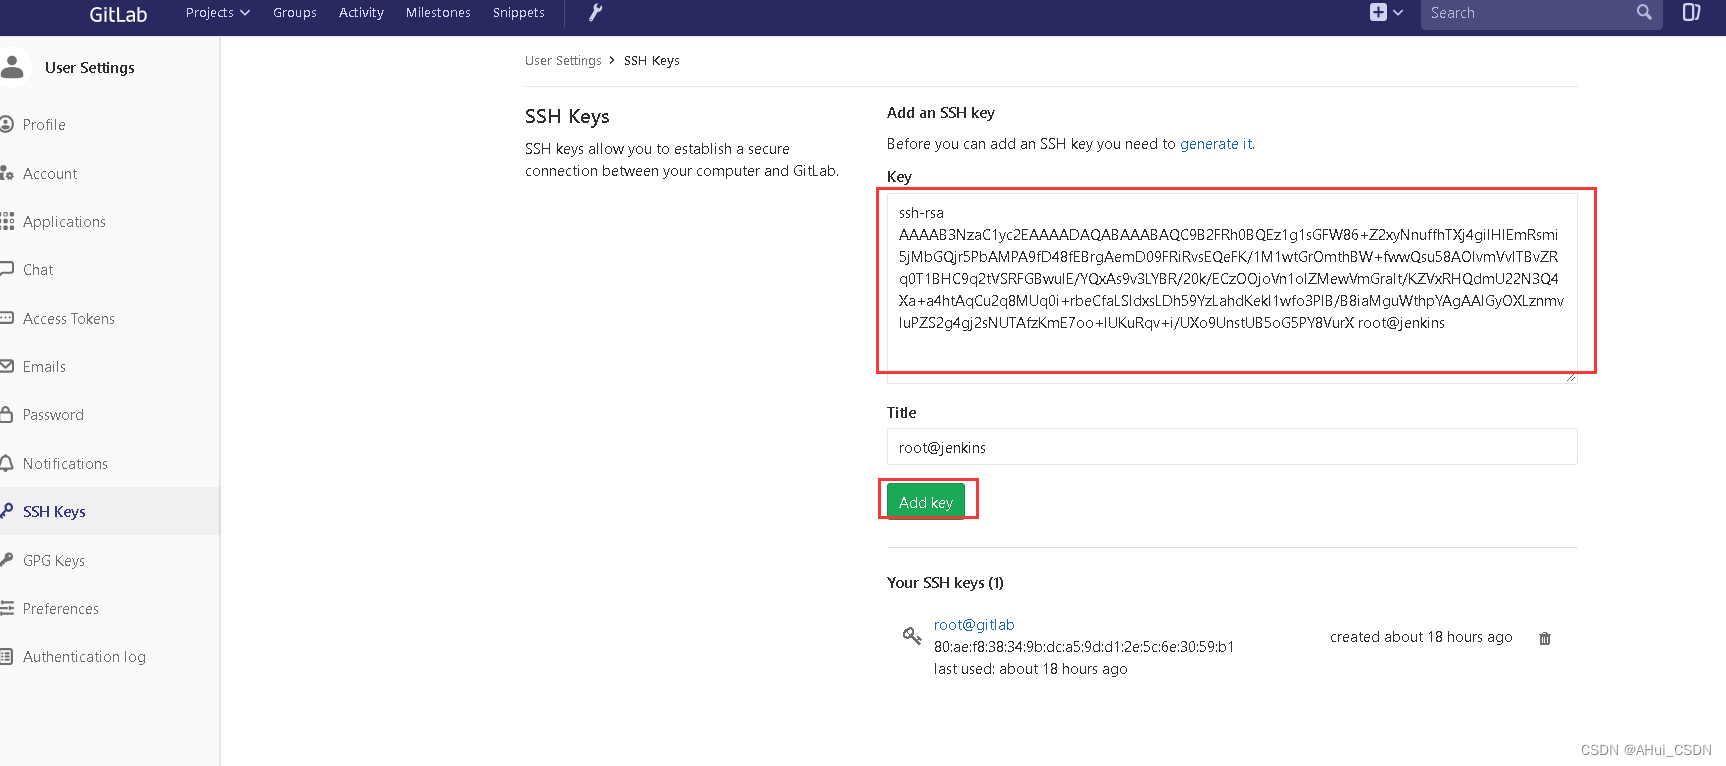
第二步: jenkins生成秘钥对
[[email protected] ~]# ssh-keygen
第三步: 将jenkins的公钥放到gitalb的root管理员
[[email protected] ~]# cat .ssh/id_rsa.pub
ssh-rsa AAAAB3NzaC1yc2EAAAADAQABAAABAQC9B2FRh0BQEz1g1sGFW86+Z2xyNnuffhTXj4gilHIEmRsmi5jMbGQjr5PbAMPA9fD48fEBrgAemD09FRiRvsEQeFK/1M1wtGrOmthBW+fwwQsu58AOIvmVvlTBvZRq0T1BHC9q2tVSRFGBwulE/YQxAs9v3LYBR/20k/ECzOOjoVn1oIZMewVmGraIt/KZVxRHQdmU22N3Q4Xa+a4htAqCu2q8MUq0i+rbeCfaLSldxsLDh59YzLahdKekl1wfo3PlB/B8iaMguWthpYAgAAlGyOXLznmvluPZS2g4gj2sNUTAfzKmE7oo+IUKuRqv+i/UXo9UnstUB5oG5PY8VurX [email protected]
在jenkins的命令行clone项目测试
[[email protected] ~]# git clone [email protected]:test/game.git
Cloning into 'game'...
remote: Counting objects: 101, done.
remote: Compressing objects: 100% (99/99), done.
remote: Total 101 (delta 5), reused 0 (delta 0)
Receiving objects: 100% (101/101), 7.35 MiB | 2.46 MiB/s, done.
Resolving deltas: 100% (5/5), done.
注意: 只有在命令行能下载成功 然后才可以配置到页面上
最后检查jenkins的项目目录下是否获取了gitlab game的项目代码
[[email protected] ~]# cd /var/lib/jenkins/workspace/freestyle-game/
[[email protected] freestyle-game]# ll
total 48
-rw-r--r-- 1 root root 28032 Aug 10 10:41 bgm.mp3
drwxr-xr-x 2 root root    23 Aug 10 10:41 css
drwxr-xr-x 2 root root    23 Aug 10 10:41 images
-rw-r--r-- 1 root root  8957 Aug 10 10:41 index.html
drwxr-xr-x 2 root root   213 Aug 10 10:41 js
drwxr-xr-x 2 root root  4096 Aug 10 10:41 roms
-rw-r--r-- 1 root root   811 Aug 10 10:41 shuoming.html
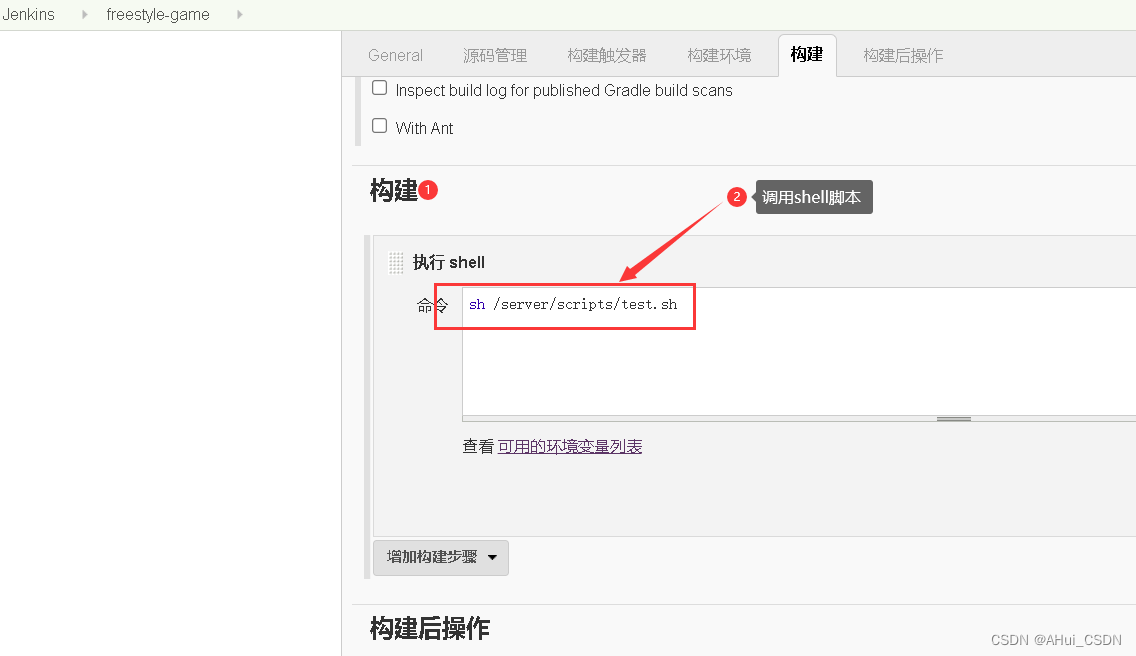
将代码通过shell推送到web服务器
第一步: jenkins和web服务器做免秘钥认证
[[email protected] ~]# ssh-copy-id -i .ssh/id_rsa.pub 10.0.0.7
第二步: 配置jenkins执行shell命令推送代码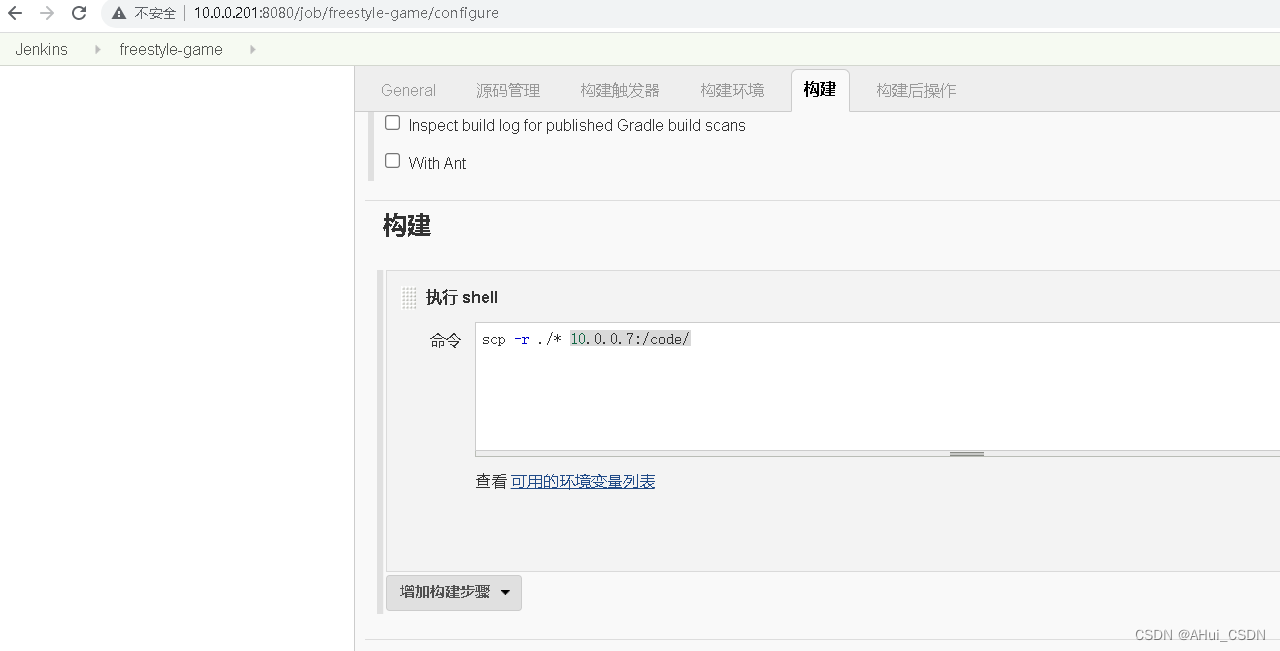
点击立即构建测试web服务器代码是否发生变化
需求: 如果发布到web服务器出现问题 想回滚到上一个版本
利用软连接方式做回滚操作
web服务器配置文件
[[email protected] conf.d]# cat test.conf
server {
	listen 80;
	server_name _;

	location / {
	root /code/html;
	index index.html index.htm;
	}
}
jenkins脚本
[[email protected] scripts]# cat test.sh
#!/bin/bash
#变量配置
ip=10.0.0.7
#打包代码
tar zcf /tmp/game_${BUILD_ID}.tar.gz ./*
#拷贝代码到web服务器
scp /tmp/game_${BUILD_ID}.tar.gz $ip:/code/
#在web服务器上创建唯一的目录
ssh $ip "mkdir /code/game_${BUILD_ID}"
#解压代码到目录中并且删除压缩包
ssh $ip "tar xf /code/game_${BUILD_ID}.tar.gz -C /code/game_${BUILD_ID};rm -rf /code/game_${BUILD_ID}.tar.gz"
#删除默认的html目录 做软连接到当前版本目录
ssh $ip "cd /code;rm -rf html; ln -s game_${BUILD_ID} html"
配置jenkins触发器
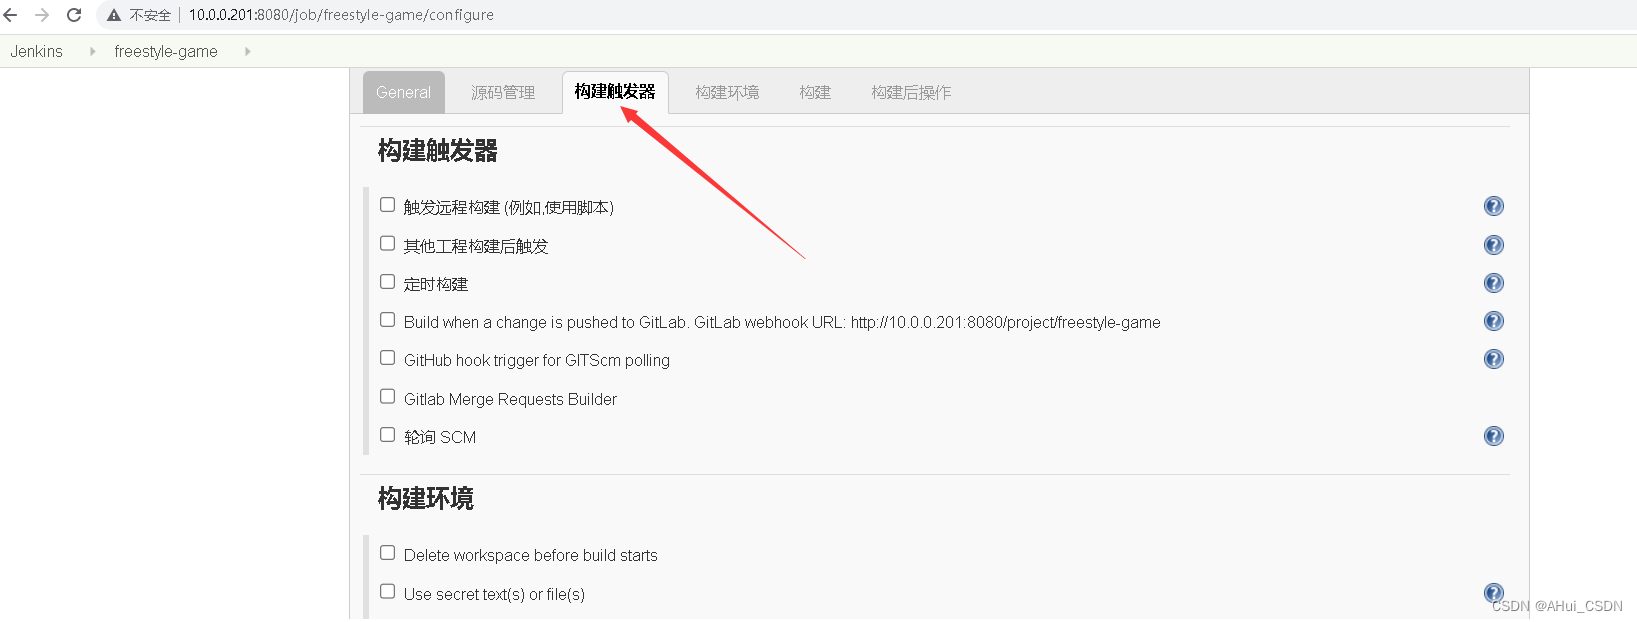
如果开发有提交代码到master或者分支合并到master则自动触发jenkins项目:
自动拉取代码并且执行脚本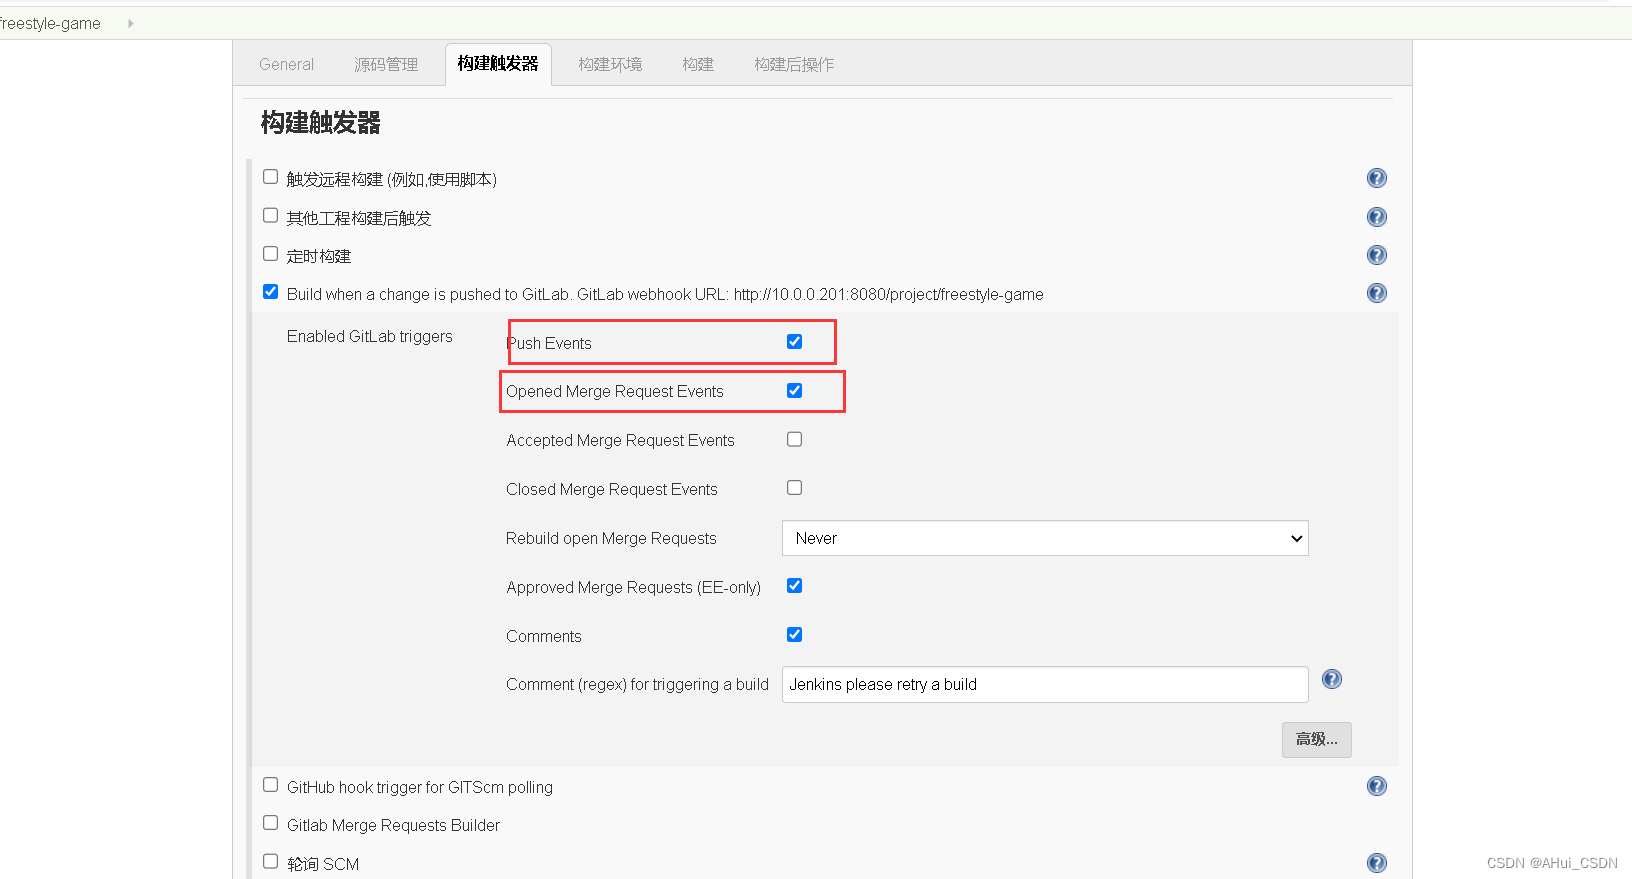
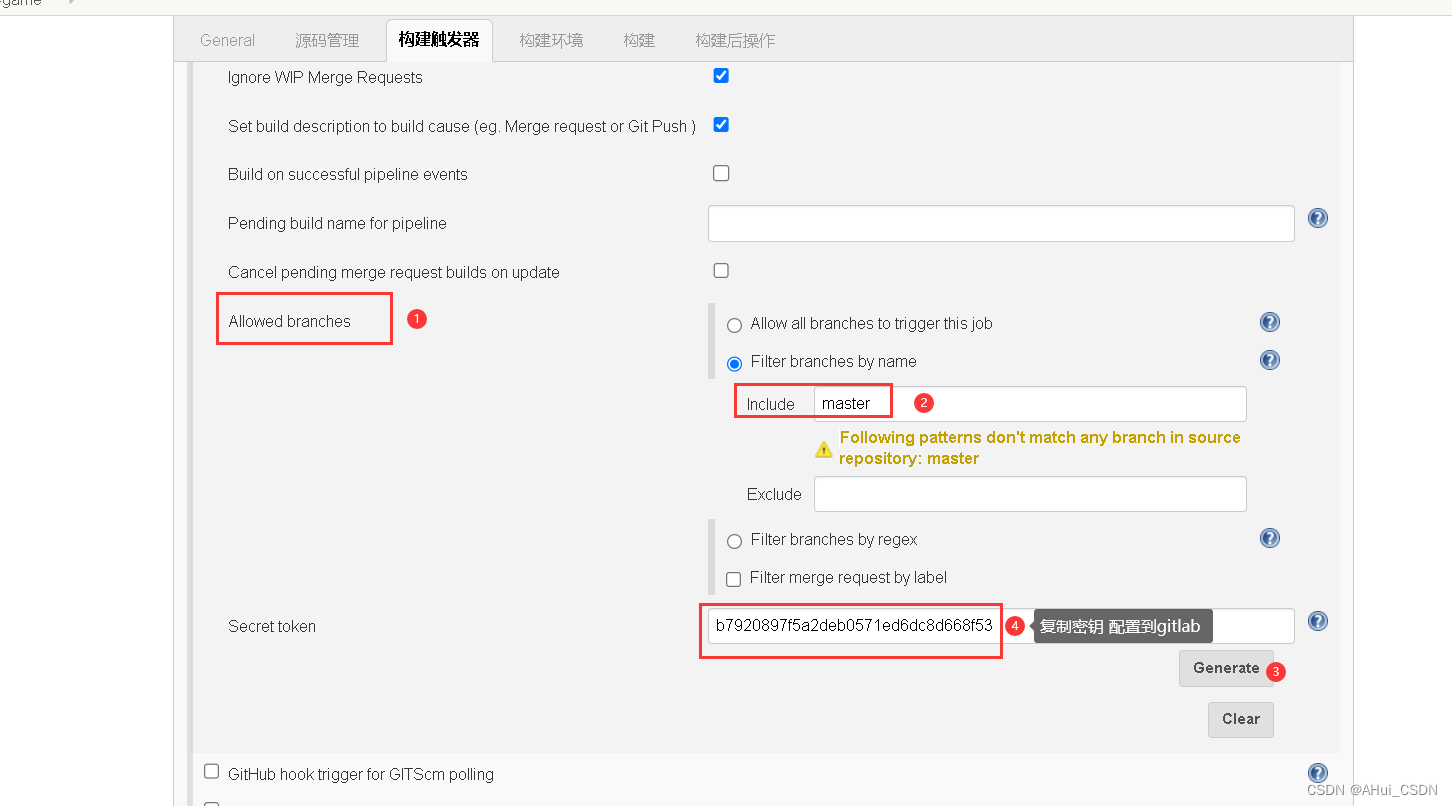
配置gitlab 触发的时候拿着jenkins的钥匙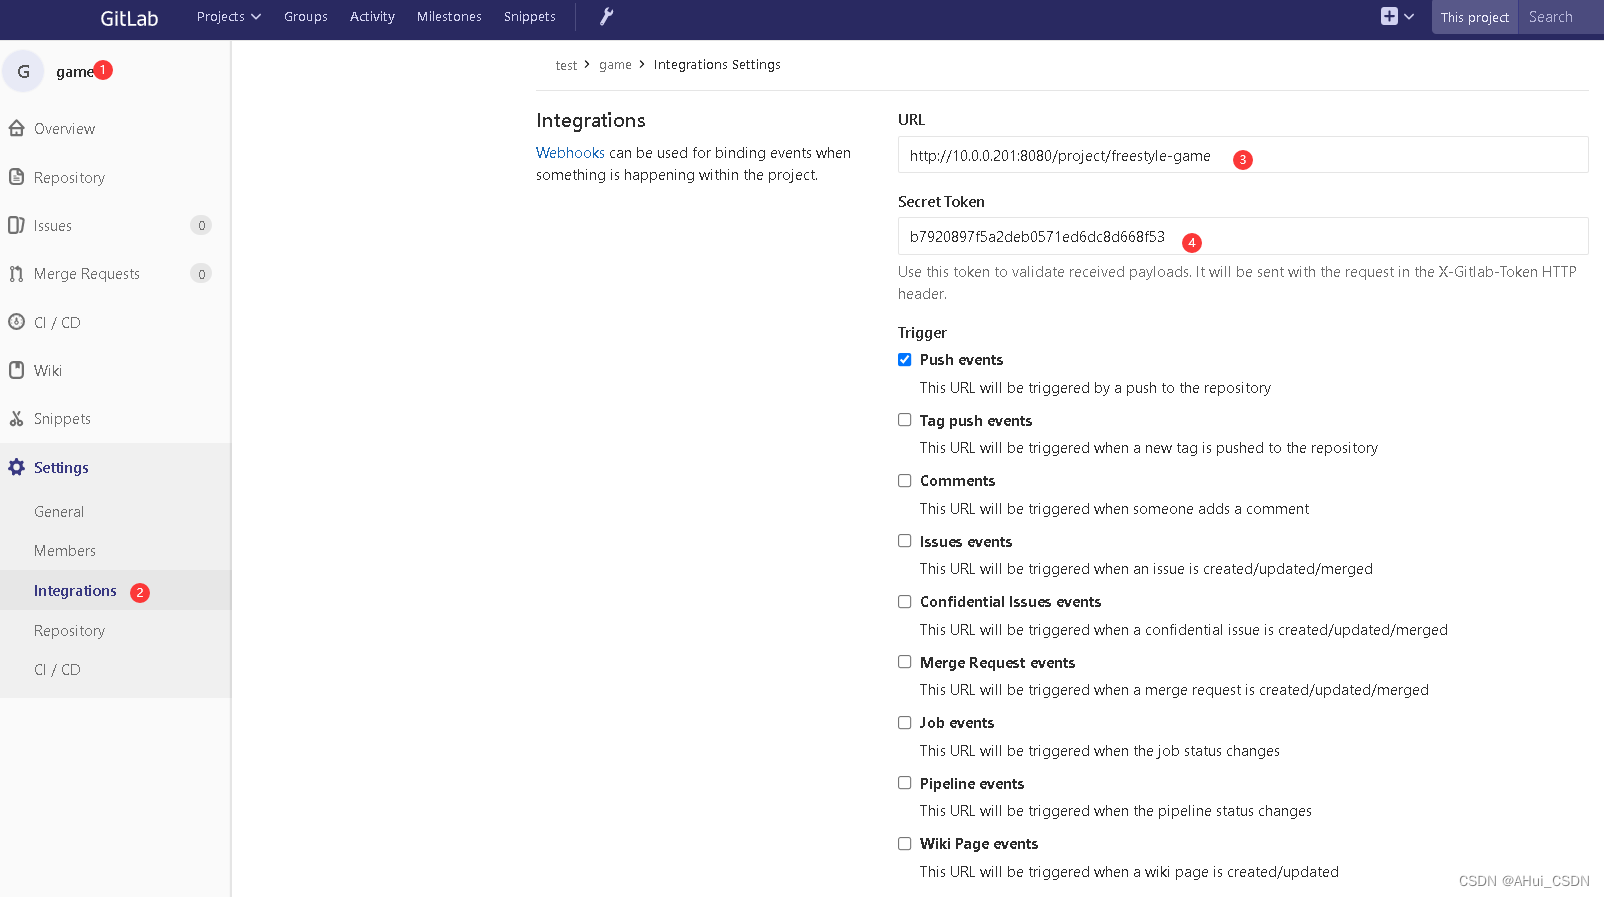
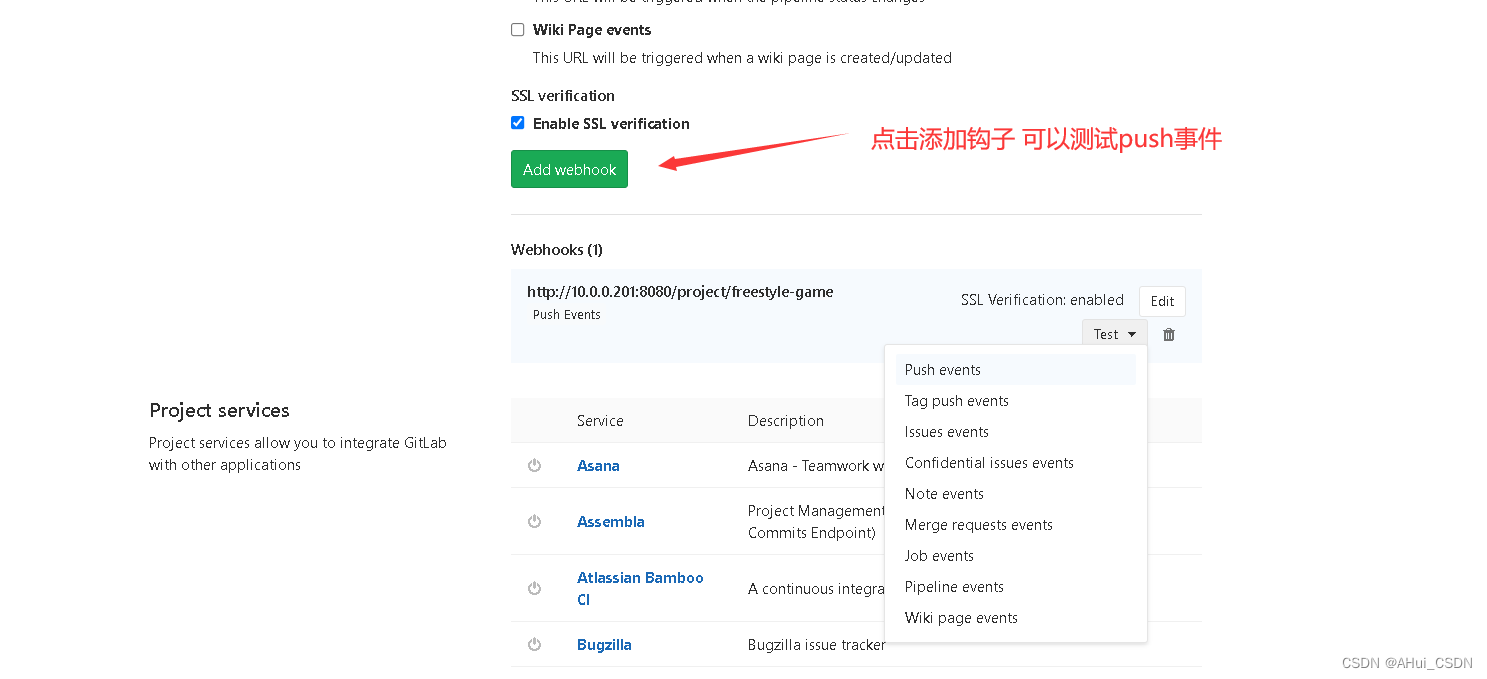
触发配置完毕:
测试: 开发写代码提交到master主干或者分支合并到master主干----> 直接通过浏览器查看结果即可
SonarQube
1.安装jdk环境
上传rpm包
[[email protected] ~]# rpm -ivh jdk-8u181-linux-x64.rpm
warning: jdk-8u181-linux-x64.rpm: Header V3 RSA/SHA256 Signature, key ID ec551f03: NOKEY
Preparing...                          ################################# [100%]
Updating / installing...
   1:jdk1.8-2000:1.8.0_181-fcs        ################################# [100%]
2.安装数据库
 wget https://dev.mysql.com/get/mysql80-community-release-el7-3.noarch.rpm
 rpm -ivh mysql80-community-release-el7-3.noarch.rpm
修改仓库的版本:
[[email protected] ~]# vim /etc/yum.repos.d/mysql-community.repo
name=MySQL 5.6 Community Server
baseurl=http://repo.mysql.com/yum/mysql-5.6-community/el/7/$basearch/
enabled=1			 #开启5.6
gpgcheck=1
gpgkey=file:///etc/pki/rpm-gpg/RPM-GPG-KEY-mysql
......
......
name=MySQL 8.0 Community Server
baseurl=http://repo.mysql.com/yum/mysql-8.0-community/el/7/$basearch/
enabled=0			#关闭8.0
gpgcheck=1
gpgkey=file:///etc/pki/rpm-gpg/RPM-GPG-KEY-mysql
安装5.6数据库并启动
[[email protected] ~]# yum install mysql-community-server -y
[[email protected] ~]# systemctl start mysqld
设置数据库密码
[[email protected] ~]# mysqladmin -uroot passwd 123
创建sonar库
[[email protected] ~]# mysql -uroot -p123 -e "CREATE DATABASE sonar DEFAULT CHARACTER SET utf8;"
[[email protected] ~]# mysql -u root -p123 -e "show databases"
3.安装sonarqube
上传soanrqube 安装包
解压到/usr/local目录并修改名称
[[email protected] ~]# unzip sonarqube-7.0.zip -d /usr/local/
[[email protected] ~]# mv /usr/local/sonarqube-7.0/ /usr/local/sonarqube
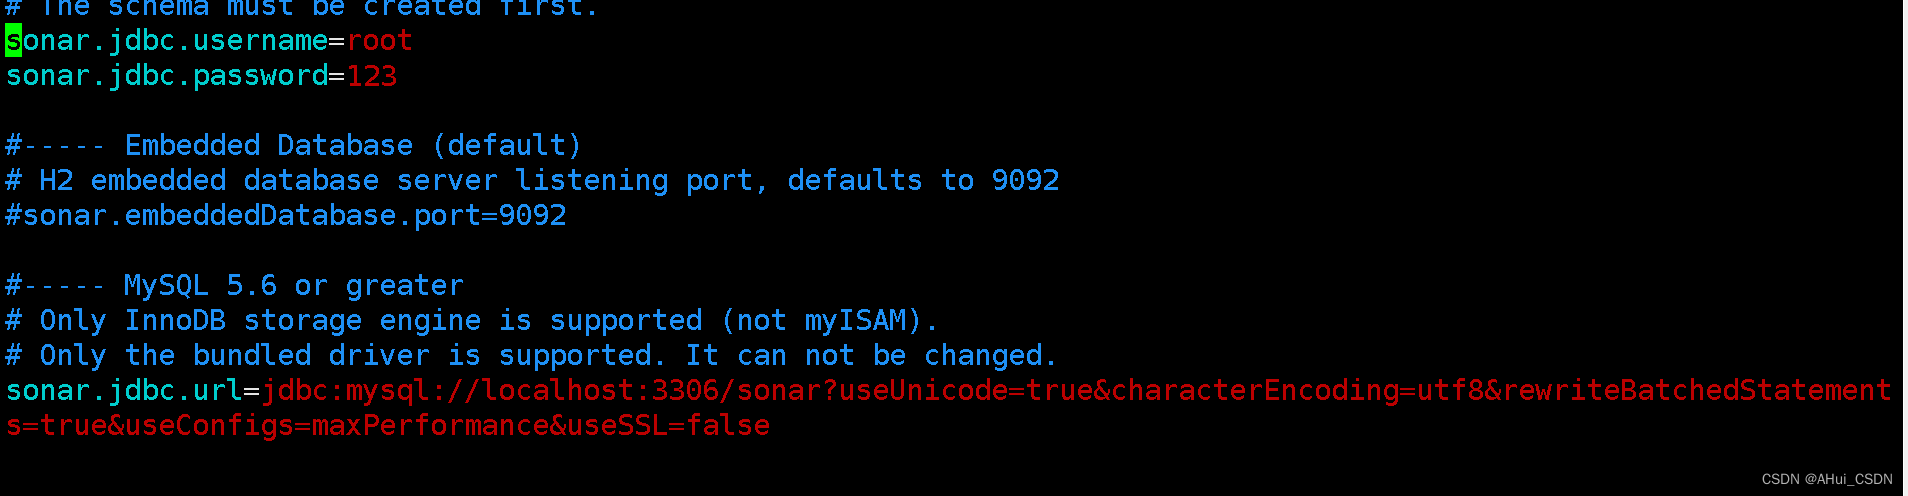
配置sonar连接数据库
[[email protected] ~]# vim /usr/local/sonarqube/conf/sonar.properties
创建soanr普通用户
[[email protected] ~]# useradd sonar
授权代码文件属主属组
[[email protected] ~]# chown -R sonar.sonar /usr/local/sonarqube/
启动soanrqube服务 注意必须使用普通用户启动
[[email protected] ~]# su - sonar -c "/usr/local/sonarqube/bin/linux-x86-64/sonar.sh start"
Starting SonarQube...
Started SonarQube.
检查端口查看是否启动(sonarqbue默认端口为9000)
[[email protected] ~]# netstat -tnulp
Active Internet connections (only servers)
Proto Recv-Q Send-Q Local Address           Foreign Address         State       PID/Program name
tcp        0      0 0.0.0.0:22              0.0.0.0:*               LISTEN      1201/sshd
tcp        0      0 127.0.0.1:25            0.0.0.0:*               LISTEN      1349/master
tcp        0      0 127.0.0.1:32000         0.0.0.0:*               LISTEN      4383/java
tcp6       0      0 :::9000                 :::*                    LISTEN      4521/java
tcp6       0      0 127.0.0.1:9001          :::*                    LISTEN      4405/java
tcp6       0      0 :::3306                 :::*                    LISTEN      3004/mysqld
tcp6       0      0 :::22                   :::*                    LISTEN      1201/sshd
tcp6       0      0 ::1:25                  :::*                    LISTEN      1349/master
sonarqbue日志文件
[[email protected] ~]# tailf /usr/local/sonarqube/logs/sonar.log
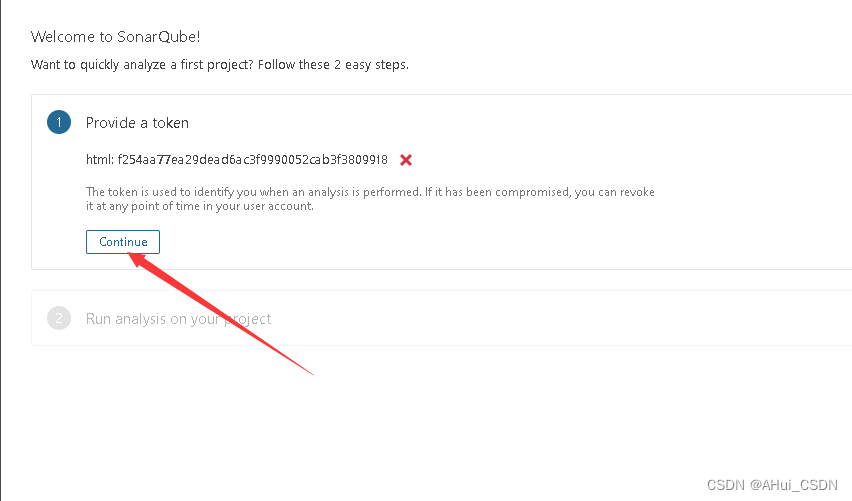
最后通过浏览器访问10.0.0.202:9000 登录sonarqube
默认用户名称: admin
默认密码: admin
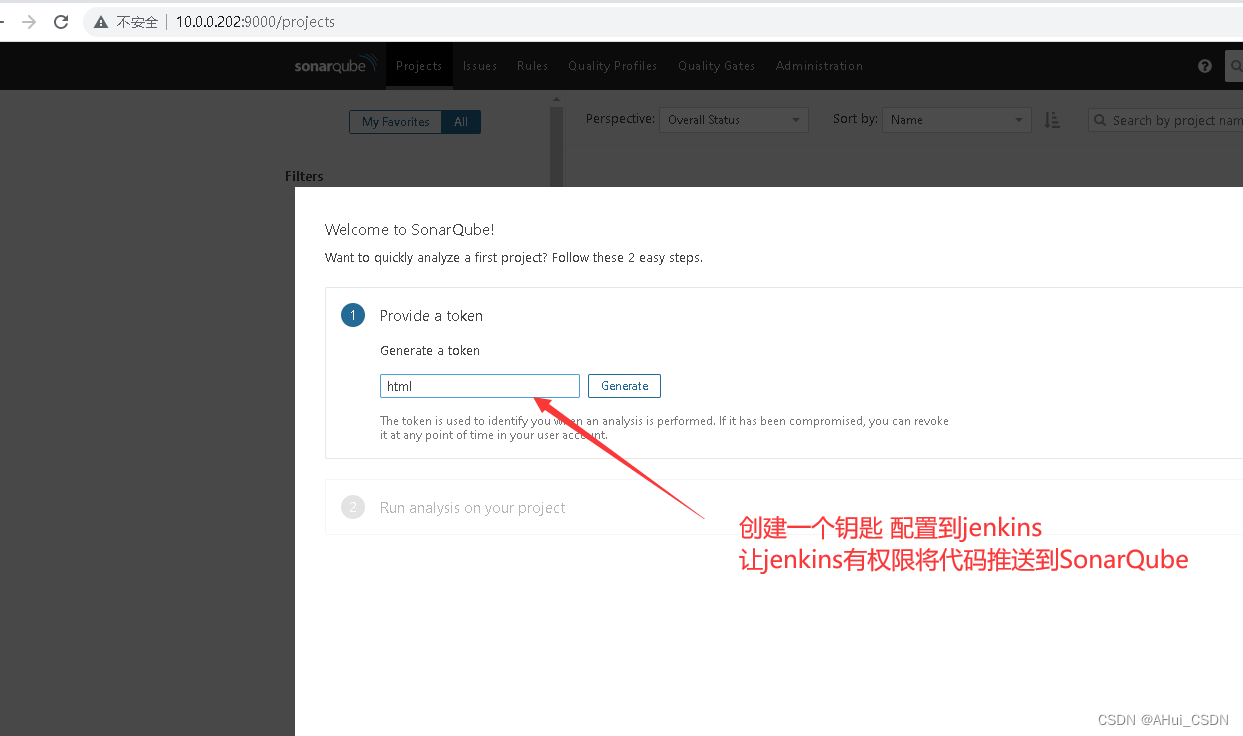
安装sonarqub插件
上传soanr插件压缩包
[[email protected] plugins]# cd /usr/local/sonarqube/extensions/plugins
[[email protected] plugins]# rm -rf * #删除所有自带插件
[[email protected] plugins]# rz #上传插件包
[[email protected] plugins]# tar xf sonar_plugins.tar.gz #解压
解压后重启sonar
[[email protected] plugins]# su - sonar -c "/usr/local/sonarqube/bin/linux-x86-64/sonar.sh restart"
在jenkins安装sonar客户端
上传客户端rpm包
[[email protected] ~]# unzip sonar-scanner-cli-4.2.0.1873-linux.zip
[[email protected] ~]# mv sonar-scanner-4.2.0.1873-linux/ /usr/local/sonar
[[email protected] ~]# tail -1 /etc/profile
export PATH="/usr/local/sbin:/usr/local/bin:/usr/sbin:/usr/bin:/root/bin:/usr/local/sonar/bin/"
[[email protected] ~]# source /etc/profile
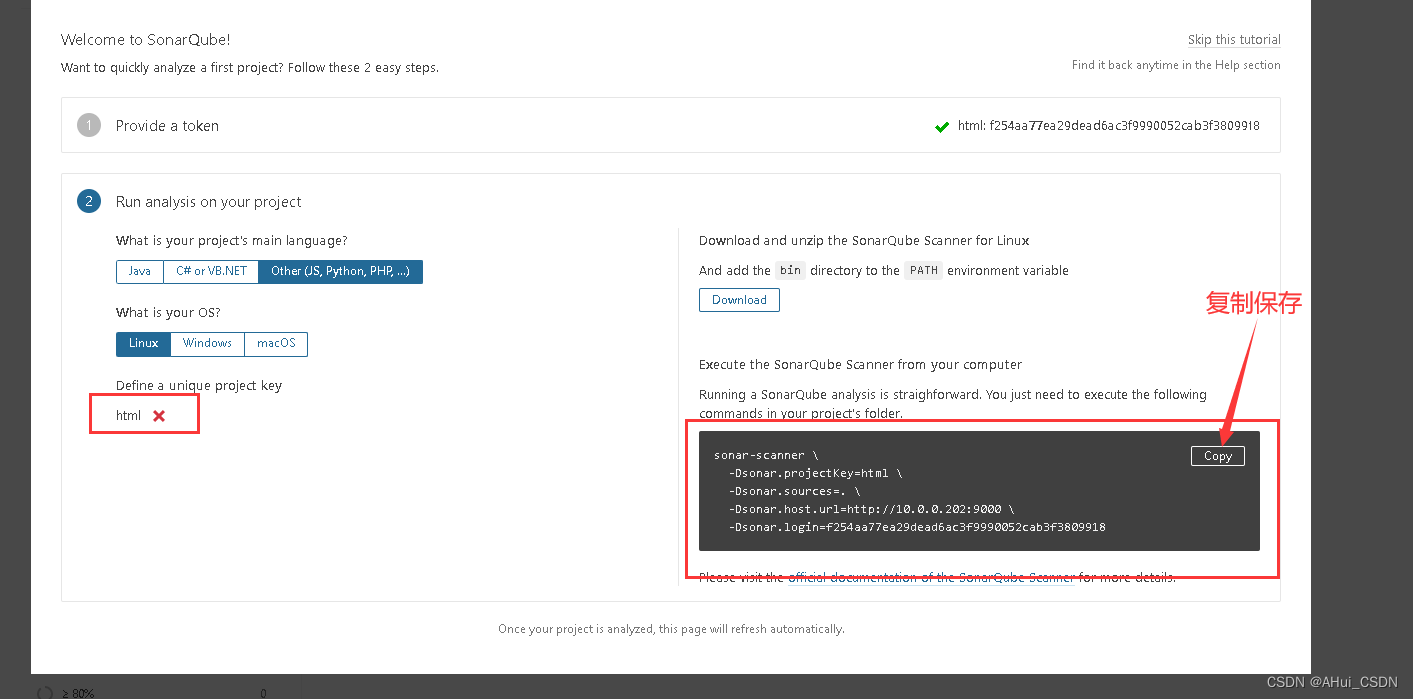
在命令行进入代码目录执行扫描
[[email protected] ~]# cd /var/lib/jenkins/workspace/freestyle-game
sonar-scanner \
  -Dsonar.projectKey=html \
  -Dsonar.sources=. \
  -Dsonar.host.url=http://10.0.0.202:9000 \
  -Dsonar.login=f254aa77ea29dead6ac3f9990052cab3f3809918
jenkins集成sonar
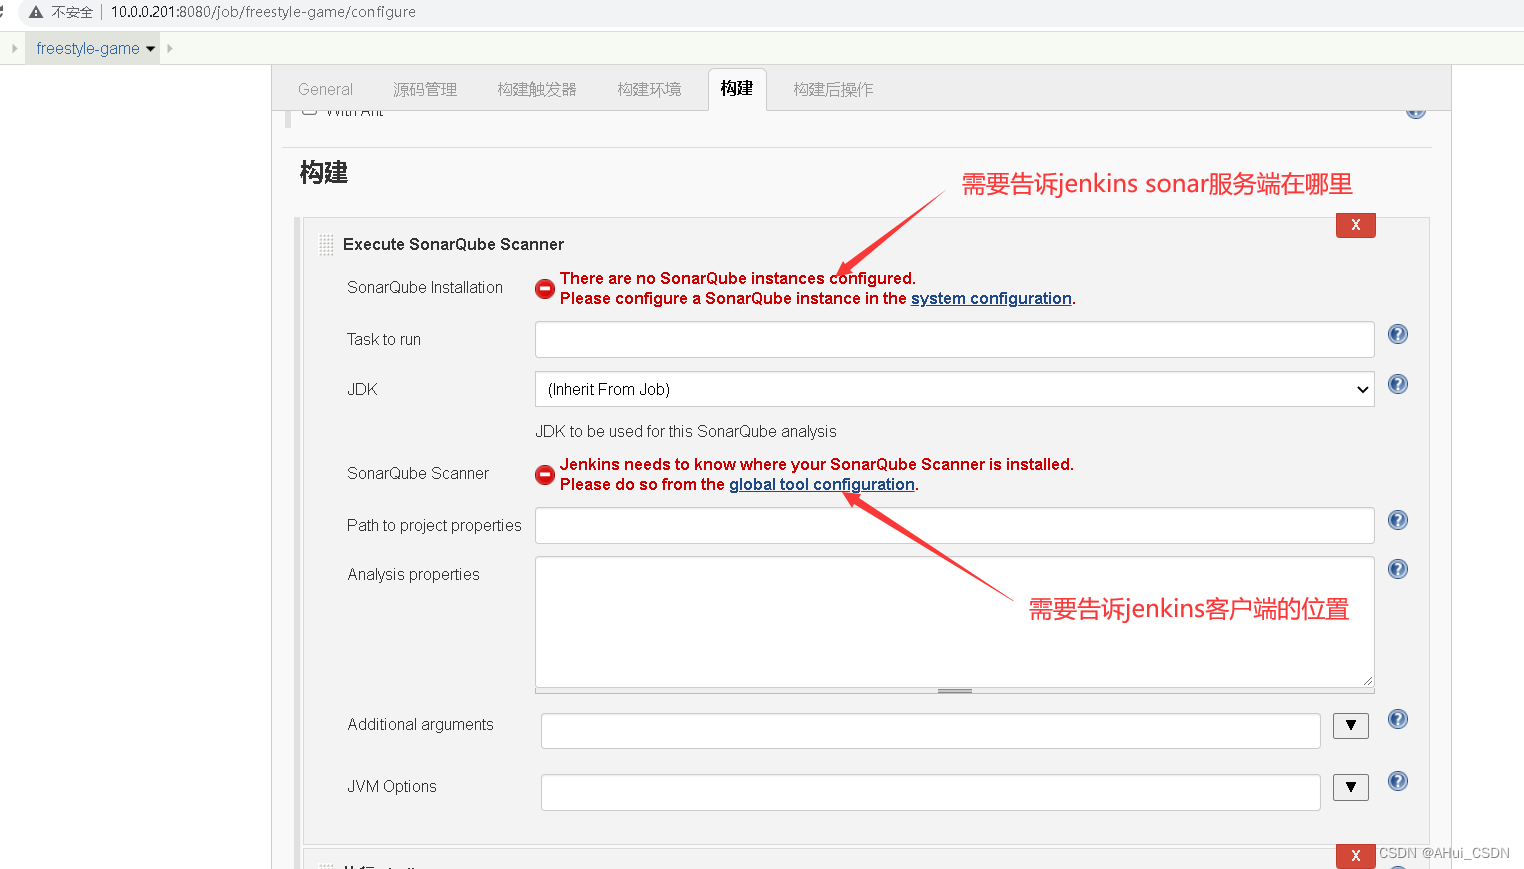
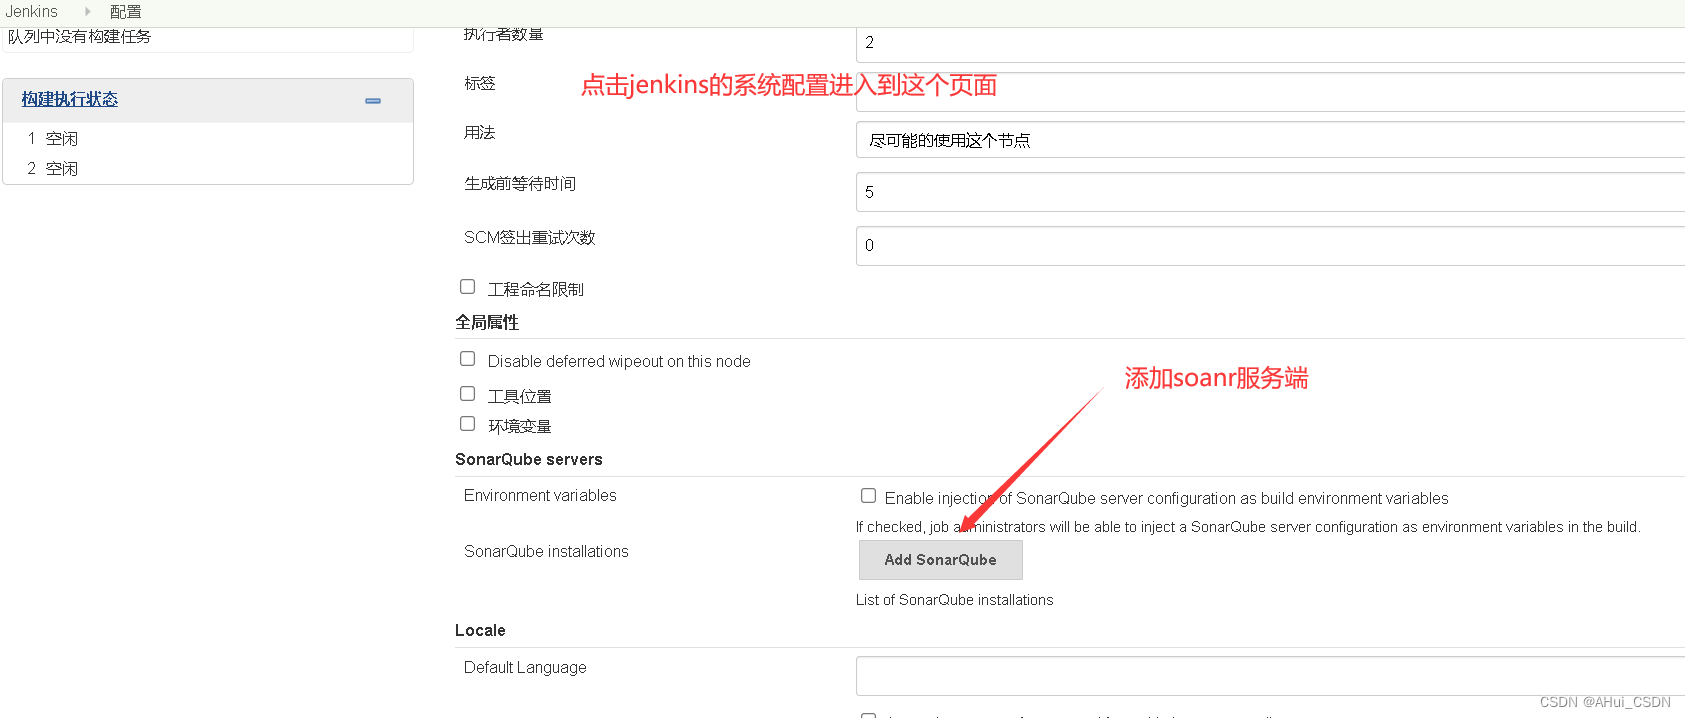
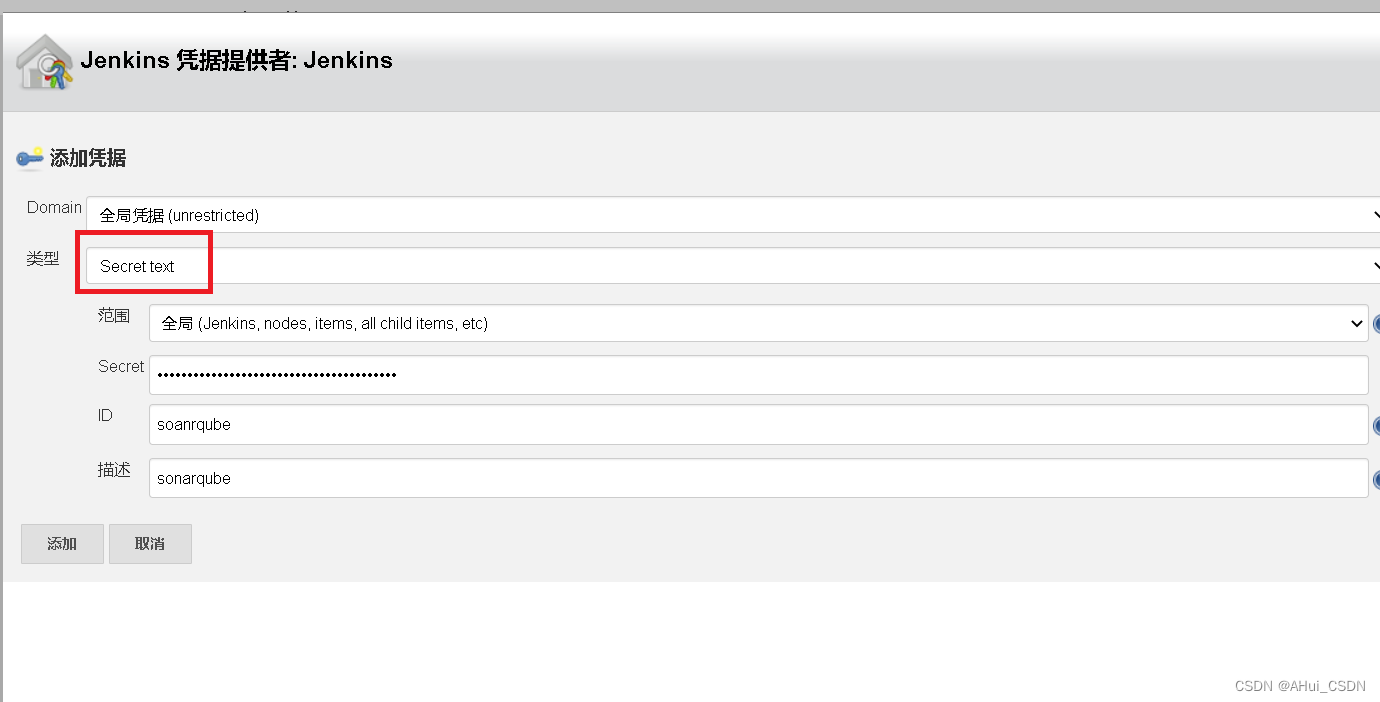
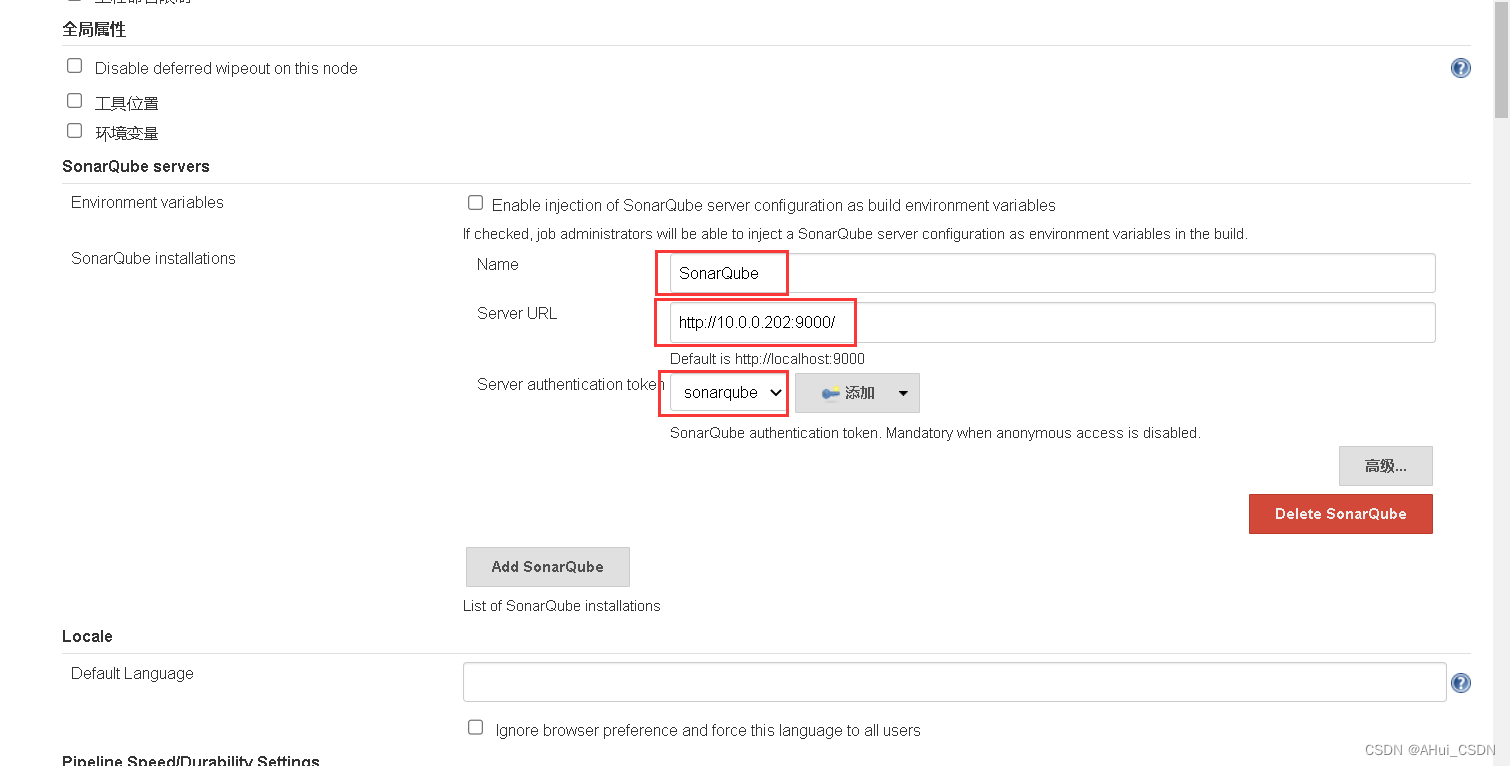
告诉jenkins sonar客户端的位置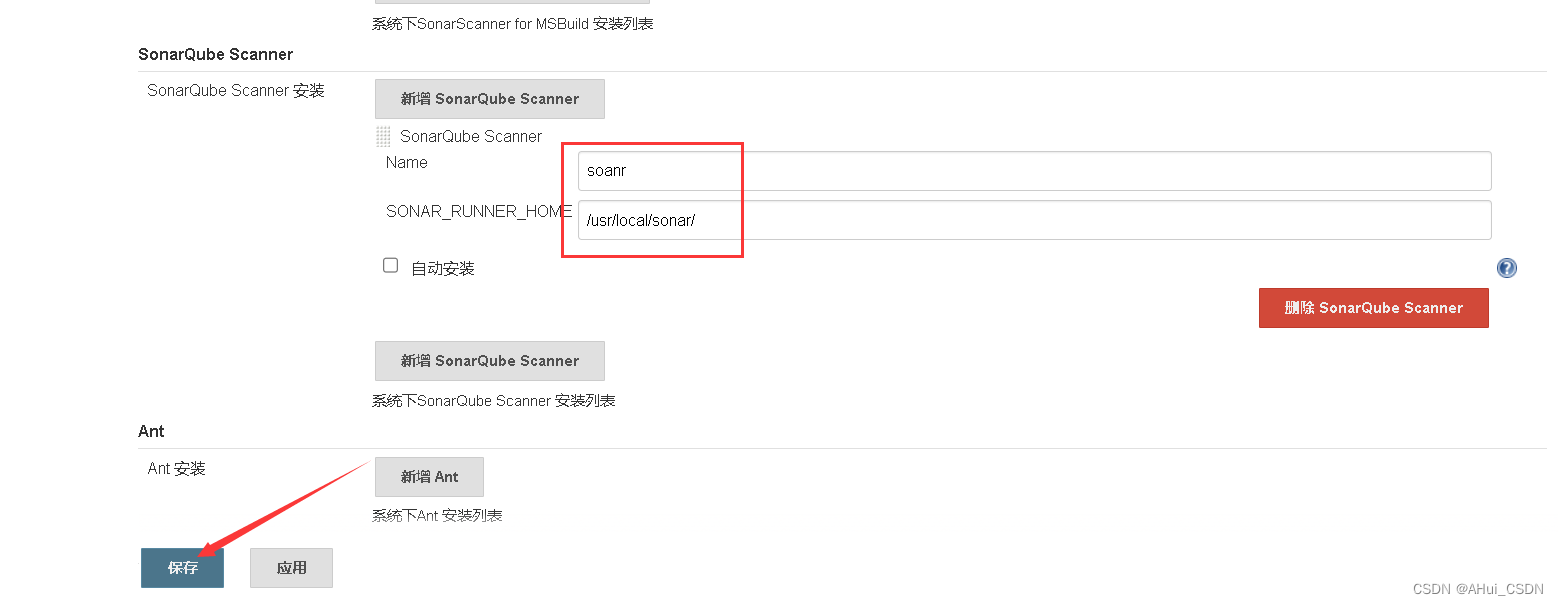
配置命令
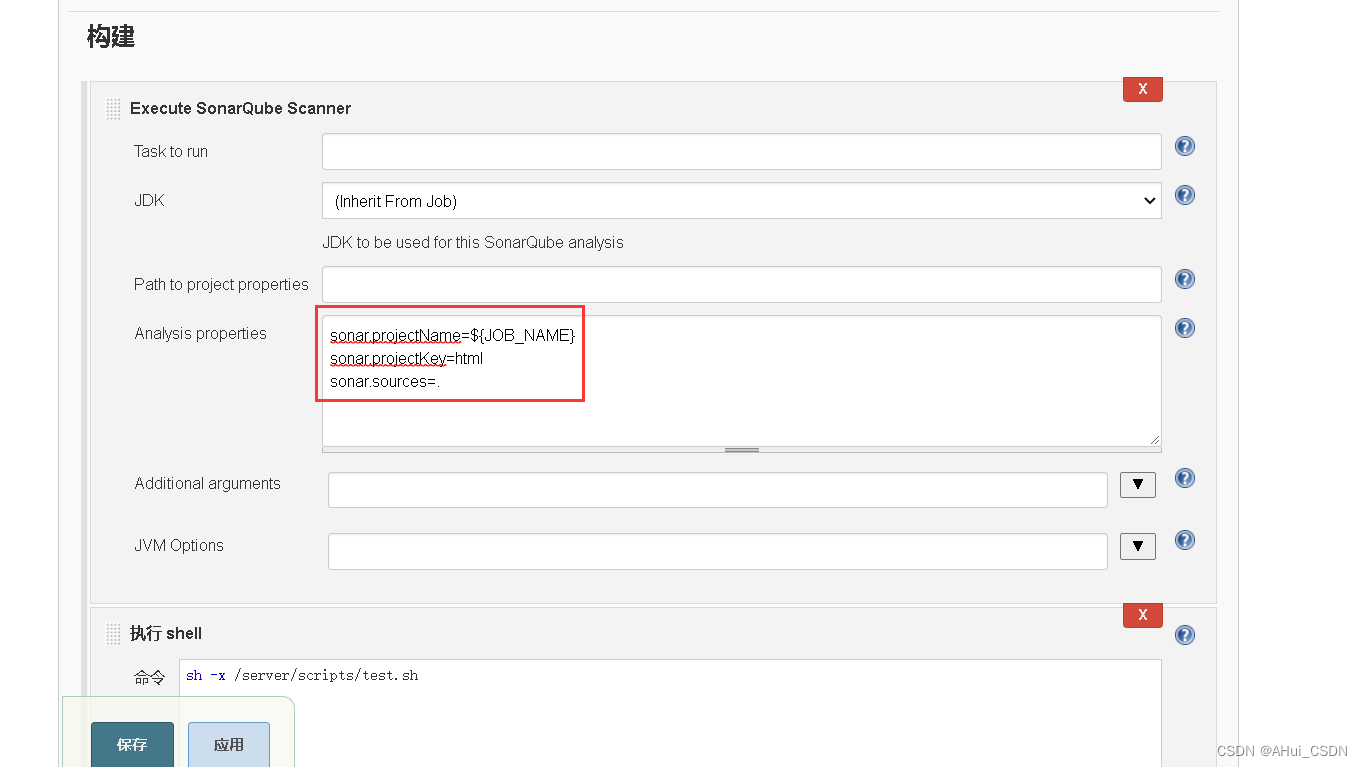
sonar.projectName=${JOB_NAME}    # 在soanr服务端显示的名称
sonar.projectKey=html			 # 自定义的key值
sonar.sources=.					 # 代码所在的位置
边栏推荐
猜你喜欢


随机推荐
万字长文带你了解多态的底层原理,这一篇就够了
CIKM 2022 AnalytiCup Competition: Federal Heterogeneous Task Learning
Mysql JSON对象和JSON数组查询
2022-08-10:为了给刷题的同学一些奖励,力扣团队引入了一个弹簧游戏机, 游戏机由 N 个特殊弹簧排成一排,编号为 0 到 N-1, 初始有一个小球在编号 0 的弹簧处。若小球在编号为 i 的弹
mysql添加用户以及设置权限
dsu on tree(树上启发式合并)学习笔记
分门别类输入输出,Go lang1.18入门精炼教程,由白丁入鸿儒,go lang基本数据类型和输入输出EP03
Getting Started with Kotlin Algorithms Calculating Prime Numbers and Optimization
nodejs微服务中跨域,请求,接口,参数拦截等功能
优炫数据库支持多列分区吗?
轻量级网络(一):MobileNet V1,V2, V3系列
idea 方法注释:自定义修改method的return和params,void不显示
C语言-结构体
【实战系列】OpenApi设计规范
oracle数据库中列转行,列会有变化
Machine Learning Summary (2)
向日葵安装教程--向日葵远程桌面控制
picker选择器出现object解决办法
RestTemplate工具类
基于C#通过PLCSIM ADV仿真软件实现与西门子1500PLC的S7通信方法演示