当前位置:网站首页>YOLOv3 SPP源码分析
YOLOv3 SPP源码分析
2022-08-10 19:05:00 【神洛华】
文章目录
参考github项目YOLOv3 SPP、作者的bilibili讲解视频
以下代码中双引号"““注释””"部分为根据作者视频讲解添加的注释
打开上面项目地址,README中指出项目源自ultralytics/yolov3。作者发现训练中很多trick没啥效果,所以优化了其训练脚本。所以YOLOv3 SPP
中是针对ultralytics/yolov3做了一些简化。
一、代码使用简介
1.1 项目README说明
- 文件结构:
  ├── cfg: 配置文件目录
  │    ├── hyp.yaml: 训练网络的相关超参数
  │    └── yolov3-spp.cfg: yolov3-spp网络结构配置
  │
  ├── data: 存储训练时数据集相关信息缓存
  │    └── pascal_voc_classes.json: pascal voc数据集标签
  │
  ├── runs: 保存训练过程中生成的所有tensorboard相关文件(loss、mAP等)
  ├── build_utils: 搭建训练网络时使用到的工具
  │     ├── datasets.py: 数据读取以及预处理方法
  │     ├── img_utils.py: 部分图像处理方法
  │     ├── layers.py: 实现的一些基础层结构
  │     ├── parse_config.py: 调用yolov3-spp.cfg,解析yolov3-spp.cfg文件每一层的信息
  │     ├── torch_utils.py: 使用pytorch实现的一些工具
  │     └── utils.py: 训练网络过程中使用到的一些方法
  │
  ├── train_utils: 训练验证网络时使用到的工具(包括多GPU训练以及使用cocotools)
  ├── weights: 所有训练和相关预训练权重(下面会给出百度云的下载地址)
  ├── model.py: 模型搭建文件,调用parse_config.py
  ├── train.py: 针对单GPU或者CPU的用户使用
  ├── train_multi_GPU.py: 针对使用多GPU的用户使用
  ├── trans_voc2yolo.py: 将voc数据集标注信息(.xml)转为yolo标注格式(.txt)
  ├── calculate_dataset.py: 1)统计训练集和验证集的数据并生成相应.txt文件
  │                         2)创建data.data文件
  │                         3)根据yolov3-spp.cfg结合数据集类别数创建my_yolov3.cfg文件
  └── predict_test.py: 简易的预测脚本,使用训练好的权重进行预测测试
- 训练数据的准备以及目录结构
标注数据时直接生成yolo格式的标签文件.txt。每个txt是一张图片的标注信息,每一行是图片中一个目标的类别索引+真实框相对坐标)
标注好的数据集请按照以下目录结构进行摆放:
├── my_yolo_dataset 自定义数据集根目录
│         ├── train   训练集目录
│         │     ├── images  训练集图像目录
│         │     └── labels  训练集标签目录
│         └── val    验证集目录
│               ├── images  验证集图像目录
│               └── labels  验证集标签目录
- 利用标注好的数据集生成一系列相关准备文件
├── data 利用数据集生成的一系列相关准备文件目录
│    ├── my_train_data.txt:  该文件里存储的是所有训练图片的路径地址
│    ├── my_val_data.txt:  该文件里存储的是所有验证图片的路径地址
│    ├── my_data_label.names:  该文件里存储的是所有类别的名称,一个类别对应一行(这里会根据`.json`文件自动生成)
│    └── my_data.data:  该文件里记录的是类别数类别信息、train以及valid对应的txt文件
- train.txt和test.txt文件格式如下:(保存的是图片路径)

- my_data_label.names:类似coco数据集格式里面的label_list:

- my_data.data:

- 使用trans_voc2yolo.py脚本进行转换将VOC标注数据转为YOLO标注数据(如果你的数据已经是YOLO格式了,可跳过该步骤)。
- 使用calculate_dataset.py脚本可生成my_train_data.txt文件、my_val_data.txt文件以及my_data.data文件,并生成新的my_yolov3.cfg文件
- 更新my_yolov3.cfg文件,比如最终预测的卷积核个数为(5+n)*3

- 其它参考项目README说明
1.2 train.py说明
train.py完整代码如下:
import datetime
import argparse

import yaml
import torch.optim as optim
import torch.optim.lr_scheduler as lr_scheduler
from torch.utils.tensorboard import SummaryWriter

from models import *
from build_utils.datasets import *
from build_utils.utils import *
from train_utils import train_eval_utils as train_util
from train_utils import get_coco_api_from_dataset


def train(hyp):
    device = torch.device(opt.device if torch.cuda.is_available() else "cpu")
    print("Using {} device training.".format(device.type))

    wdir = "weights" + os.sep  # weights dir
    best = wdir + "best.pt"
    results_file = "results{}.txt".format(datetime.datetime.now().strftime("%Y%m%d-%H%M%S"))

    cfg = opt.cfg
    data = opt.data
    epochs = opt.epochs
    batch_size = opt.batch_size
    accumulate = max(round(64 / batch_size), 1)  # accumulate n times before optimizer update (bs 64)
    """每训练64张图片才更新一次权重。如果显存小batch_size=4,就是训练16个steps更新一次,这样有助于模型训练。"""
    weights = opt.weights  # initial training weights
    imgsz_train = opt.img_size
    imgsz_test = opt.img_size  # test image sizes
    multi_scale = opt.multi_scale

    # Image sizes
    # 图像要设置成32的倍数。项目中测试图片size=512,最小预测特征图size=16,缩小了32倍
    gs = 32  # (pixels) grid size
    assert math.fmod(imgsz_test, gs) == 0, "--img-size %g must be a %g-multiple" % (imgsz_test, gs)
    """上面一行表示图片size不是32整数倍就报错"""
    grid_min, grid_max = imgsz_test // gs, imgsz_test // gs
    if multi_scale:"""启用多尺度训练"""
        imgsz_min = opt.img_size // 1.5
        imgsz_max = opt.img_size // 0.667

        # 将给定的最大,最小输入尺寸向下调整到32的整数倍
        grid_min, grid_max = imgsz_min // gs, imgsz_max // gs
        imgsz_min, imgsz_max = int(grid_min * gs), int(grid_max * gs)
        imgsz_train = imgsz_max  # initialize with max size
        print("Using multi_scale training, image range[{}, {}]".format(imgsz_min, imgsz_max))

    # configure run
    # init_seeds() # 初始化随机种子,保证结果可复现
    """通过.data文件读取相应的数据信息"""
    data_dict = parse_data_cfg(data)
    train_path = data_dict["train"]
    test_path = data_dict["valid"]
    nc = 1 if opt.single_cls else int(data_dict["classes"])  # number of classes
    """根据目标类别个数和指定图片大小调整class loss和object loss"""
    hyp["cls"] *= nc / 80  # update coco-tuned hyp['cls'] to current dataset
    hyp["obj"] *= imgsz_test / 320

    # Remove previous results
    for f in glob.glob(results_file):
        os.remove(f)

    # Initialize model
    model = Darknet(cfg).to(device)"""通过Darknet方法搭建模型"""

    # 是否冻结权重,只训练predictor预测器的权重
    """如果先训练预测器权重,再训练darknet-53之外的所有网络参数效果最好。而如果训练所有网络参数,效果比仅仅训练预测器更差。"""
    if opt.freeze_layers:
        # 索引减一对应的是predictor的索引,YOLOLayer并不是predictor
        output_layer_indices = [idx - 1 for idx, module in enumerate(model.module_list) if
                                isinstance(module, YOLOLayer)]
        # 冻结除predictor和YOLOLayer外的所有层
        freeze_layer_indeces = [x for x in range(len(model.module_list)) if
                                (x not in output_layer_indices) and
                                (x - 1 not in output_layer_indices)]
        # Freeze non-output layers
        # 总共训练3x2=6个parameters(权重和偏置)
        for idx in freeze_layer_indeces:
            for parameter in model.module_list[idx].parameters():
                parameter.requires_grad_(False)
    else:
        # 如果freeze_layer为False,默认仅训练除darknet53之后的部分
        # 若要训练全部权重,删除以下代码
        """这里是针对yolov3spp cfg进行调整,如果不是使用这个问题文件,冻结就会报错"""
        darknet_end_layer = 74  # only yolov3spp cfg
        # Freeze darknet53 layers
        # 总共训练21x3+3x2=69个parameters
        for idx in range(darknet_end_layer + 1):  # [0, 74]
            for parameter in model.module_list[idx].parameters():
                parameter.requires_grad_(False)

    """optimizer:只训练需要更新梯度的参数,优化器参数在 hyp.yaml中指定"""
    pg = [p for p in model.parameters() if p.requires_grad]
    optimizer = optim.SGD(pg, lr=hyp["lr0"], momentum=hyp["momentum"],
                          weight_decay=hyp["weight_decay"], nesterov=True)

    scaler = torch.cuda.amp.GradScaler() if opt.amp else None

    start_epoch = 0
    best_map = 0.0
    """载入权重文件,一般是pt或者pth结尾。除了模型参数还有优化器、train loss epochs信息等等"""
    if weights.endswith(".pt") or weights.endswith(".pth"):
        ckpt = torch.load(weights, map_location=device)

        # load model
        try:#载入后提取权重信息,初始化模型
            ckpt["model"] = {
    k: v for k, v in ckpt["model"].items() if model.state_dict()[k].numel() == v.numel()}
            model.load_state_dict(ckpt["model"], strict=False)
        except KeyError as e:
            s = "%s is not compatible with %s. Specify --weights '' or specify a --cfg compatible with %s. " \
                "See https://github.com/ultralytics/yolov3/issues/657" % (opt.weights, opt.cfg, opt.weights)
            raise KeyError(s) from e

        # load optimizer
        if ckpt["optimizer"] is not None:
            optimizer.load_state_dict(ckpt["optimizer"])
            if "best_map" in ckpt.keys():
                best_map = ckpt["best_map"]

        # load results
        if ckpt.get("training_results") is not None:
            with open(results_file, "w") as file:
                file.write(ckpt["training_results"])  # write results.txt

        # epochs
        start_epoch = ckpt["epoch"] + 1
        if epochs < start_epoch:
            print('%s has been trained for %g epochs. Fine-tuning for %g additional epochs.' %
                  (opt.weights, ckpt['epoch'], epochs))
            epochs += ckpt['epoch']  # finetune additional epochs

        if opt.amp and "scaler" in ckpt:
            scaler.load_state_dict(ckpt["scaler"])

        del ckpt

    # Scheduler https://arxiv.org/pdf/1812.01187.pdf
    """定义cos学习率"""
    lf = lambda x: ((1 + math.cos(x * math.pi / epochs)) / 2) * (1 - hyp["lrf"]) + hyp["lrf"]  # cosine
    scheduler = lr_scheduler.LambdaLR(optimizer, lr_lambda=lf)
    scheduler.last_epoch = start_epoch  # 指定从哪个epoch开始

    # Plot lr schedule
    # y = []
    # for _ in range(epochs):
    # scheduler.step()
    # y.append(optimizer.param_groups[0]['lr'])
    # plt.plot(y, '.-', label='LambdaLR')
    # plt.xlabel('epoch')
    # plt.ylabel('LR')
    # plt.tight_layout()
    # plt.savefig('LR.png', dpi=300)

    # model.yolo_layers = model.module.yolo_layers

    # dataset
    # 训练集的图像尺寸指定为multi_scale_range中最大的尺寸
    """LoadImagesAndLabels方法在dataset.py中实现"""
    train_dataset = LoadImagesAndLabels(train_path, imgsz_train, batch_size,
                                        augment=True,
                                        hyp=hyp,  # augmentation hyperparameters
                                        rect=opt.rect,  # rectangular training
                                        cache_images=opt.cache_images,
                                        single_cls=opt.single_cls)

    # 验证集的图像尺寸指定为img_size(512)
    val_dataset = LoadImagesAndLabels(test_path, imgsz_test, batch_size,
                                      hyp=hyp,
                                      rect=True,  # 将每个batch的图像调整到合适大小,可减少运算量(并不是512x512标准尺寸)
                                      cache_images=opt.cache_images,
                                      single_cls=opt.single_cls)

    # dataloader
    nw = min([os.cpu_count(), batch_size if batch_size > 1 else 0, 8])  # number of workers线程数
    train_dataloader = torch.utils.data.DataLoader(train_dataset,
                                                   batch_size=batch_size,
                                                   num_workers=nw,
                                                   # Shuffle=True unless rectangular training is used
                                                   shuffle=not opt.rect,
                                                   pin_memory=True,
                                                   collate_fn=train_dataset.collate_fn)

    val_datasetloader = torch.utils.data.DataLoader(val_dataset,
                                                    batch_size=batch_size,
                                                    num_workers=nw,
                                                    pin_memory=True,
                                                    collate_fn=val_dataset.collate_fn)

    # Model parameters
    """将以下三个参数添加到模型变量中,主要是build_utils/utils.py文件的compute_loss函数计算损失中会用到"""
    model.nc = nc  # attach number of classes to model
    model.hyp = hyp  # attach hyperparameters to model
    model.gr = 1.0  # giou loss ratio (obj_loss = 1.0 or giou)
    # 计算每个类别的目标个数,并计算每个类别的比重
    # model.class_weights = labels_to_class_weights(train_dataset.labels, nc).to(device) # attach class weights

    # start training
    # caching val_data when you have plenty of memory(RAM)
    # coco = None
    """事先遍历验证集,读取标签信息,方便后面pycocotools计算mAP"""
    coco = get_coco_api_from_dataset(val_dataset)

    print("starting traning for %g epochs..." % epochs)#开始训练
    print('Using %g dataloader workers' % nw)
    for epoch in range(start_epoch, epochs):
        """每轮迭代都使用train_one_epoch方法,返回这一轮平均损失和学习率"""
        mloss, lr = train_util.train_one_epoch(model, optimizer, train_dataloader,
                                               device, epoch,
                                               accumulate=accumulate,  # 迭代多少batch才训练完64张图片
                                               img_size=imgsz_train,  # 输入图像的大小
                                               multi_scale=multi_scale,
                                               grid_min=grid_min,  # grid的最小尺寸
                                               grid_max=grid_max,  # grid的最大尺寸
                                               gs=gs,  # grid step: 32
                                               print_freq=50,  # 每训练多少个step打印一次信息
                                               warmup=True,
                                               scaler=scaler)
        # update scheduler
        scheduler.step()

        if opt.notest is False or epoch == epochs - 1:#notes默认False,每轮验证一次精度
            # evaluate on the test dataset
            result_info = train_util.evaluate(model, val_datasetloader,
                                              coco=coco, device=device)
            """上面得到的coco评测指标只保留下面三项,coco指标在csdn笔记coco数据集章节中有介绍"""
            coco_mAP = result_info[0]
            voc_mAP = result_info[1]
            coco_mAR = result_info[8]

            # write into tensorboard,通过tensorboard绘制
            if tb_writer:
                tags = ['train/giou_loss', 'train/obj_loss', 'train/cls_loss', 'train/loss', "learning_rate",
                        "[email protected][IoU=0.50:0.95]", "[email protected][IoU=0.5]", "[email protected][IoU=0.50:0.95]"]

                for x, tag in zip(mloss.tolist() + [lr, coco_mAP, voc_mAP, coco_mAR], tags):
                    tb_writer.add_scalar(tag, x, epoch)

            # write into txt
            with open(results_file, "a") as f:
                # 记录coco的12个指标加上训练总损失和lr,保存到txt文件中,方面后续绘制曲线
                result_info = [str(round(i, 4)) for i in result_info + [mloss.tolist()[-1]]] + [str(round(lr, 6))]
                txt = "epoch:{} {}".format(epoch, ' '.join(result_info))
                f.write(txt + "\n")

            # update best mAP(IoU=0.50:0.95)
            if coco_mAP > best_map:
                best_map = coco_mAP
            """如果savebest=True,每次只保存mAP最高的模型的参数,否则每轮都保存模型参数"""
            if opt.savebest is False:
                # save weights every epoch
                with open(results_file, 'r') as f:
                    save_files = {

                        'model': model.state_dict(),
                        'optimizer': optimizer.state_dict(),
                        'training_results': f.read(),
                        'epoch': epoch,
                        'best_map': best_map}
                    if opt.amp:
                        save_files["scaler"] = scaler.state_dict()
                    torch.save(save_files, "./weights/yolov3spp-{}.pt".format(epoch))
            else:
                # only save best weights
                if best_map == coco_mAP:
                    with open(results_file, 'r') as f:
                        save_files = {

                            'model': model.state_dict(),
                            'optimizer': optimizer.state_dict(),
                            'training_results': f.read(),
                            'epoch': epoch,
                            'best_map': best_map}
                        if opt.amp:
                            save_files["scaler"] = scaler.state_dict()
                        torch.save(save_files, best.format(epoch))


if __name__ == '__main__':
    parser = argparse.ArgumentParser()
    parser.add_argument('--epochs', type=int, default=30)
    parser.add_argument('--batch-size', type=int, default=4)
    parser.add_argument('--cfg', type=str, default='cfg/my_yolov3.cfg', help="*.cfg path")
    parser.add_argument('--data', type=str, default='data/my_data.data', help='*.data path')
    parser.add_argument('--hyp', type=str, default='cfg/hyp.yaml', help='hyperparameters path')
    parser.add_argument('--multi-scale', type=bool, default=True,
                        help='adjust (67%% - 150%%) img_size every 10 batches')
    parser.add_argument('--img-size', type=int, default=512, help='test size')
    parser.add_argument('--rect', action='store_true', help='rectangular training')
    parser.add_argument('--savebest', type=bool, default=False, help='only save best checkpoint')
    parser.add_argument('--notest', action='store_true', help='only test final epoch')
    parser.add_argument('--cache-images', action='store_true', help='cache images for faster training')
    parser.add_argument('--weights', type=str, default='weights/yolov3-spp-ultralytics-512.pt',
                        help='initial weights path')
    parser.add_argument('--name', default='', help='renames results.txt to results_name.txt if supplied')
    parser.add_argument('--device', default='cuda:0', help='device id (i.e. 0 or 0,1 or cpu)')
    parser.add_argument('--single-cls', action='store_true', help='train as single-class dataset')
    parser.add_argument('--freeze-layers', type=bool, default=False, help='Freeze non-output layers')
    # 是否使用混合精度训练(需要GPU支持混合精度)
    parser.add_argument("--amp", default=False, help="Use torch.cuda.amp for mixed precision training")
    opt = parser.parse_args()

    # 检查文件是否存在
    opt.cfg = check_file(opt.cfg)
    opt.data = check_file(opt.data)
    opt.hyp = check_file(opt.hyp)
    print(opt)
    #如果上面文件都存在,加载配置文件
    with open(opt.hyp) as f:
        hyp = yaml.load(f, Loader=yaml.FullLoader)

    print('Start Tensorboard with "tensorboard --logdir=runs", view at http://localhost:6006/')
    tb_writer = SummaryWriter(comment=opt.name)#实例化tensorboard
    train(hyp)#开启训练
拉到最下面if __name__ == '__main__':处:
--hyp是超参对应的yaml文件,即cfg文件夹下的 hyp.yaml--multi-scale:是否进行多尺度训练。默认启用,训练图片大小为img-size的67% - 150%随机选取。--img-size:测试图片尺寸大小。训练时不限制图片大小,因为使用多尺度训练--savebest:是否只保存最高mAP的模型权重。默认关闭,每次验证后都保存权重--notest:只在最后一个epoch验证模型,节省时间,默认关闭--weights:预训练模型权重。如果训练时断开了,可以设为最后保存的模型权重freeze-layers:是否冻结网络部分权重。默认为ture,只训练三个预测特征层的权重,测试发现这样做效果也不错,而且大大加快训练速度。设为False,会训练darknet-53之外的所有网络参数。如果先训练预测器权重,再训练darknet-53之外的所有网络参数效果最好。而如果训练所有网络层参数,效果比仅仅 训练预测器更差。- 训练中有如下保错,不影响。多GPU训练15min。训练完在runs文件夹下会保存tensorboard保存的一系列数据曲线文件events,还会生成results.txt文件。后续可以根据这12个数据自行绘制曲线


- 训练完成后,打开runs文件夹,在此文件夹打开powershell,输入以下命令,最后打开localhost:6006网站就可以看到绘制的曲线。


colab中输入下面代码启用
%load_ext tensorboard				#启动tensorboard

%tensorboard --logdir='runs/log_dir' #根据日志文件生成视图
1.3 predict_test.py文件
import os
import json
import time

import torch
import cv2
import numpy as np
from matplotlib import pyplot as plt
from PIL import Image

from build_utils import img_utils, torch_utils, utils
from models import Darknet
from draw_box_utils import draw_objs


def main():
    img_size = 512  # 必须是32的整数倍 [416, 512, 608]
    cfg = "cfg/my_yolov3.cfg"  # 改成生成的.cfg文件
    weights = "weights/yolov3spp-29.pt"  # 改成自己训练好的权重文件
    json_path = "./data/pascal_voc_classes.json"  # json标签文件
    img_path = "my_yolo_dataset/val/images/2011_003261.jpg"
    assert os.path.exists(cfg), "cfg file {} dose not exist.".format(cfg)
    assert os.path.exists(weights), "weights file {} dose not exist.".format(weights)
    assert os.path.exists(json_path), "json file {} dose not exist.".format(json_path)
    assert os.path.exists(img_path), "image file {} dose not exist.".format(img_path)

    """读取json文件,转换成索引对应类别名称的形式"""
    with open(json_path, 'r') as f:
        class_dict = json.load(f)

    category_index = {
    str(v): str(k) for k, v in class_dict.items()}

    input_size = (img_size, img_size)

    device = torch.device("cuda:0" if torch.cuda.is_available() else "cpu")

    model = Darknet(cfg, img_size)#实例化模型
    model.load_state_dict(torch.load(weights, map_location='cpu')["model"])#载入训练好的模型权重
    model.to(device)

    model.eval()
    with torch.no_grad():
        """init初始化生成一个空的图片传入网络进行正向传播。在网络第一次验证的时候,会初始化一系列的网络结构,会比较慢 传入一个空的图片来对它进行初始化"""
        img = torch.zeros((1, 3, img_size, img_size), device=device)
        model(img)

        img_o = cv2.imread(img_path)  # opencv读取的图片是BGR格式
        assert img_o is not None, "Image Not Found " + img_path
        """resize图片,auto=True表示输入的图片长边缩放到512,短边等比例缩放(保持长宽比不变)。短边不够512的部分用(0,0,0)填充 这样做输入图片其实不到512*512,可以减少运算量"""
        img = img_utils.letterbox(img_o, new_shape=input_size, auto=True, color=(0, 0, 0))[0]
        # Convert
        img = img[:, :, ::-1].transpose(2, 0, 1)  # BGR to RGB, to 3x416x416
        img = np.ascontiguousarray(img)#判断在内存中是否是连续,不是就变成连续的

        img = torch.from_numpy(img).to(device).float()
        img /= 255.0  # scale (0, 255) to (0, 1),不需要减均值除标准差
        img = img.unsqueeze(0)  # 新增batch维度
        t1 = torch_utils.time_synchronized()
        pred = model(img)[0]  # only get inference result
        t2 = torch_utils.time_synchronized()
        print(t2 - t1)
        """对结果进行NMS非极大值抑制处理"""
        pred = utils.non_max_suppression(pred, conf_thres=0.1, iou_thres=0.6, multi_label=True)[0]
        t3 = time.time()
        print(t3 - t2)

        if pred is None:
            print("No target detected.")
            exit(0)

        # process detections
        """将预测边界框映射回原图像的尺度上,因为输入网络之前,我们对图像进行了缩放"""
        pred[:, :4] = utils.scale_coords(img.shape[2:], pred[:, :4], img_o.shape).round()
        print(pred.shape)
        """提取bboxes、scores、classes信息,使用draw_objs方法进行绘制"""
        bboxes = pred[:, :4].detach().cpu().numpy()
        scores = pred[:, 4].detach().cpu().numpy()
        classes = pred[:, 5].detach().cpu().numpy().astype(int) + 1

        pil_img = Image.fromarray(img_o[:, :, ::-1])
        plot_img = draw_objs(pil_img,
                    bboxes,
                    classes,
                    scores,
                    category_index=category_index,
                    box_thresh=0.2,
                    line_thickness=3,
                    font='arial.ttf',
                    font_size=20)
        plt.imshow(plot_img)
        plt.show()
        # 保存预测的图片结果
        plot_img.save("test_result.jpg")


if __name__ == "__main__":
    main()
二、配置文件解析
2.1 yolov3-spp.cfg模型配置文件
打开yolov3_spp/cfg/yolov3-spp.cfg文件,有[net] 、[convolutional]、[shortcut] 等一系列层结构。模型是按照这个层结构依次搭建出来的。
- net不需要管,从第一个[convolutional]层开始
- [convolutional]层中启用batch_normalize,卷积层偏置就起不到任何作用,需要去掉。
- [shortcut] 中融合是resnet网络中两个shape相同的矩阵进行相加的操作。线性激活就是y=x,不做任何处理。

可将yolov3_spp/cfg/yolov3-spp.cfg`文件和下面图片一一对照。第一个 [shortcut] 是和# Downsample这一层的[convolutional]融合,也就是下图框出的两个卷积层的输出进行融合。
- maxpool最大池化下采样层,只在spp结构中使用。maxpool层为了不改变输入特征层的大小,进行了padding填充,然后结果进行拼接。

- route层,也是spp结构中使用

- [upsample]层:stride=2,即将特征图放大至原来的两倍
- [yolo]层:接在三个侧预期预测器后面的结构,对预测结果进行处理,生成一系列anchors。
- classes:目标类别数
- mask:使用哪些anchors进行预测。0.1.2表示使用[10,13, 16,30, 33,23]这三组anchors。
- anchors:18组数表示每个网格生成9个anchors,每个anchor用宽度和高度表示。前三组用于检测小目标,后三组检测大目标。
- 后五个参数用不到,不作讲解

2.2 parse_config.py解析cfg配置文件
下面是yolov3_spp/build_utils/parse_config.py文件,用于解析刚刚的yolov3-spp.cfg配置文件。将cfg每一层的结构解析为列表中的一个元素,每个元素都是字典形式,包含这一层的type及其它结构信息。
import os
import numpy as np


def parse_model_cfg(path: str):
    # 检查文件是否存在,是否以.cfg结尾
    if not path.endswith(".cfg") or not os.path.exists(path):
        raise FileNotFoundError("the cfg file not exist...")

    # 读取文件信息
    with open(path, "r") as f:
        lines = f.read().split("\n")

    # 去除空行和注释行
    lines = [x for x in lines if x and not x.startswith("#")]
    # 去除每行开头和结尾的空格符
    lines = [x.strip() for x in lines]

    mdefs = []  # module definitions
    for line in lines:
        """遍历读取所有层结构"""
        if line.startswith("["):  # 表示一个新的层结构
            mdefs.append({
    })
            """在mdefs列表末尾添加一个字典,键是type,值为层结构名称"""
            mdefs[-1]["type"] = line[1:-1].strip()  # 记录module类型
            # 如果是卷积模块,设置默认不使用BN(普通卷积层后面会重写成1,最后的预测层conv保持为0)
            if mdefs[-1]["type"] == "convolutional":
                mdefs[-1]["batch_normalize"] = 0
        else: #不是[开头就是一些参数
            key, val = line.split("=")#用等号分割为key何value
            key = key.strip()#去除空格
            val = val.strip()

            if key == "anchors":
                #只有最后的yolo层有anchors这个参数,值为anchors = 10,13, 16,30, 33,23, 30,61, 62,45, 59,119, 116,90, 156,198, 373,326
                val = val.replace(" ", "")  # 将空格去除。下面用,分割遍历,转为float类型。然后reshape成9*2大小
                mdefs[-1][key] = np.array([float(x) for x in val.split(",")]).reshape((-1, 2))  # np anchors
            elif (key in ["from", "layers", "mask"]) or (key == "size" and "," in val):
                """from是shortcut层,layers是route层"""
                mdefs[-1][key] = [int(x) for x in val.split(",")]#val转int再转为列表
            else:
                # TODO: .isnumeric() actually fails to get the float case
                if val.isnumeric():  # return int or float。
                    """val.isnumeric()判断是否是数值的情况。(int(val) - float(val)) == 0是来判断是整型还是浮点型"""
                    mdefs[-1][key] = int(val) if (int(val) - float(val)) == 0 else float(val)
                else:
                    mdefs[-1][key] = val  # return string 是字符的情况

    # check all fields are supported
    supported = ['type', 'batch_normalize', 'filters', 'size', 'stride', 'pad', 'activation', 'layers', 'groups',
                 'from', 'mask', 'anchors', 'classes', 'num', 'jitter', 'ignore_thresh', 'truth_thresh', 'random',
                 'stride_x', 'stride_y', 'weights_type', 'weights_normalization', 'scale_x_y', 'beta_nms', 'nms_kind',
                 'iou_loss', 'iou_normalizer', 'cls_normalizer', 'iou_thresh', 'probability']

    # 遍历检查每个模型的配置
    for x in mdefs[1:]:  # 0对应net配置
        # 遍历每个配置字典中的key值
        for k in x:
            if k not in supported:
                raise ValueError("Unsupported fields:{} in cfg".format(k))

    return mdefs


def parse_data_cfg(path):
    # Parses the data configuration file
    if not os.path.exists(path) and os.path.exists('data' + os.sep + path):  # add data/ prefix if omitted
        path = 'data' + os.sep + path

    with open(path, 'r') as f:
        lines = f.readlines()

    options = dict()
    for line in lines:
        line = line.strip()
        if line == '' or line.startswith('#'):
            continue
        key, val = line.split('=')
        options[key.strip()] = val.strip()

    return options
三、 网络搭建
网络搭建部分在model.py中,先看后面class Darknet(nn.Module)部分。
self.module_defs = parse_model_cfg(cfg)解析yolov3的cfg文件。在这一步设置断点运行,得到module_defs 列表,内容如下:
- 通过
create_modules函数传入解析好的modules列表搭建yolov3_spp网络。 - 正向传播得到yolo_layer层输出yolo_out为最终输出(推理测试时yolo_out会有一些后处理)
model.py整体代码如下
from build_utils.layers import *
from build_utils.parse_config import *

ONNX_EXPORT = False


def create_modules(modules_defs: list, img_size):
    """ Constructs module list of layer blocks from module configuration in module_defs :param modules_defs: 通过.cfg文件解析得到的每个层结构的列表 :param img_size: :return: """

    img_size = [img_size] * 2 if isinstance(img_size, int) else img_size
    """ 1.pop方法删除解析cfg列表中的第一个配置(对应[net]的配置) 2.output_filters记录每个模块的输出channel(写在遍历的最后),第一个模块输入channels=3(RGB图片) 3.实例化nn.ModuleList(),后面搭建的时会将每一层模块依次传入到module_list中 4.routs统计哪些特征层的输出会被后续的层使用到(可能是特征融合,也可能是拼接) """
    modules_defs.pop(0)  # cfg training hyperparams (unused)
    output_filters = [3]  # input channels
    module_list = nn.ModuleList()
    routs = []  # list of layers which rout to deeper layers
    yolo_index = -1

    # 遍历搭建每个层结构
    for i, mdef in enumerate(modules_defs):
        """ 1.如果一个模块包含多个层结构,就将它传入到Sequential中 2.用mdef["type"]来依次判断每个模块的类型。 3.yolov3_spp中每个convolutional都有stride,所以其实不用管(mdef['stride_y'], mdef["stride_x"]) """
        modules = nn.Sequential()

        if mdef["type"] == "convolutional":
            bn = mdef["batch_normalize"]  # 1 or 0 / use or not
            filters = mdef["filters"]
            k = mdef["size"]  # kernel size
            stride = mdef["stride"] if "stride" in mdef else (mdef['stride_y'], mdef["stride_x"])
            if isinstance(k, int):
                """ 作者说项目主要是搭建yolov3_spp网络,所以相比u版yolov3_spp源代码,这里删除了很多用不到的代码 in_channels对应上一层输出通道数,output_filters[-1]就是最后一个模块输出矩阵channnel数 bn为True就不使用bias """
                modules.add_module("Conv2d", nn.Conv2d(in_channels=output_filters[-1],
                                      out_channels=filters,
                                      kernel_size=k,
                                      stride=stride,
                                      padding=k // 2 if mdef["pad"] else 0,
                                      bias=not bn))
            else:
                raise TypeError("conv2d filter size must be int type.")

            if bn:
                modules.add_module("BatchNorm2d", nn.BatchNorm2d(filters))#参数对应上一层输出矩阵channels
            else:
                """ 如果该卷积操作没有bn层,意味着该层为yolo的predictor,即三个预测器。 预测器的输出会传到后面yolo layer中,所以需要将预测器序号添加到routs中 """
                routs.append(i)  # detection output (goes into yolo layer)

            if mdef["activation"] == "leaky":
                modules.add_module("activation", nn.LeakyReLU(0.1, inplace=True))
            else:
                pass

        elif mdef["type"] == "BatchNorm2d":
            pass

        elif mdef["type"] == "maxpool":#SPP层才有maxpool层
            k = mdef["size"]  # kernel size
            stride = mdef["stride"]
            modules= nn.MaxPool2d(kernel_size=k,stride=stride,padding=(k-1)//2)

        elif mdef["type"] == "upsample":
            if ONNX_EXPORT:  # 是否导出ONNX模型
                g = (yolo_index + 1) * 2 / 32  # gain
                modules = nn.Upsample(size=tuple(int(x * g) for x in img_size))
            else:
                modules = nn.Upsample(scale_factor=mdef["stride"])#stride为上采样率,传入scale_factor

        elif mdef["type"] == "route":  # [-2], [-1,-3,-5,-6], [-1, 61]
            """ filters记录当前层输出矩阵的channel。如果l>0,那么需要l+1,因为最开始output_filters添加了元素3。 所以第一个模块的输出channel,不是output_filters列表第一个元素。而是索引1的元素,即l+1 如果l<0也就是倒着数,顺序没有问题,就可以直接写入l layers是一个值,filters=output_filters[layers];是多个值,filters就是这些层channnel数的加和(SPP结构中的拼接操作) 有些模块输出后续要使用(SPP和yolo预测结构中),routs通过extend方法记录了这些模块的索引。 i是当前route索引,l<0时l表示相对于i的倒数索引,真正索引应该是i+l。如果l>0就是直接记录这些层索引,直接用l就行 FeatureConcat类来创建多个层拼接模块,这个类在build_utils.layers中 """
            layers = mdef["layers"]
            filters = sum([output_filters[l + 1 if l > 0 else l] for l in layers])
            routs.extend([i + l if l < 0 else l for l in layers])
            modules = FeatureConcat(layers=layers)

        elif mdef["type"] == "shortcut":
            layers = mdef["from"]
            filters = output_filters[-1]#获取shortcut模块上一层的输出
            # routs.extend([i + l if l < 0 else l for l in layers])
            """layers是只有一个值的列表,索引0获取这个值。i+layers[0]就是需要shortcut的另一个层的索引 WeightedFeatureFusion也在build_utils.layers中,weight参数没有用到,不用管 """
            routs.append(i + layers[0])
            modules = WeightedFeatureFusion(layers=layers, weight="weights_type" in mdef)

        elif mdef["type"] == "yolo":
            yolo_index += 1  # 记录是第几个yolo_layer。三个预测特征层索引为[0,1,2],前面赋值yolo_index=-1
            stride = [32, 16, 8]  # 预测特征层对应原图的缩放比例
            """一共9组anchors,每组有长宽两个参数。通过mask参数选择取其中哪三个anchors YOLOLayer在forword中返回io和p,分别是[预测框绝对坐标、obj概率、classes概率],以及[预测框偏移量、obj、classes] """
            modules = YOLOLayer(anchors=mdef["anchors"][mdef["mask"]],  # anchor list
                                nc=mdef["classes"],  # number of classes
                                img_size=img_size,#ONNX导出才用,不用管
                                stride=stride[yolo_index])

            # Initialize preceding Conv2d() bias
            """(这一步是根据focal loss论文对predictor的bias进行初始化:https://arxiv.org/pdf/1708.02002.pdf section 3.3)"""
            try:
                j = -1#yolo_layer前一层,也就是predictor层
                # bias: shape(255,) 索引0对应Sequential中的Conv2d
                # view: shape(3, 85)
                """#j是上一层,0是卷积层。predictor中没有bn层和激活层,只有卷积层,在Sequential中索引为0"""
                b = module_list[j][0].bias.view(modules.na, -1)
                b.data[:, 4] += -4.5  # obj
                b.data[:, 5:] += math.log(0.6 / (modules.nc - 0.99))  # cls (sigmoid(p) = 1/nc)
                module_list[j][0].bias = torch.nn.Parameter(b.view(-1), requires_grad=True)
            except Exception as e:
                print('WARNING: smart bias initialization failure.', e)
        else:
            print("Warning: Unrecognized Layer Type: " + mdef["type"])

        # Register module list and number of output filters
        module_list.append(modules)
        output_filters.append(filters)#convolutional、shortcut、route层才有,其它层矩阵通道数不变

    routs_binary = [False] * len(modules_defs)#根据routs列表的索引,判断哪些层在后面会用到
    for i in routs:
        routs_binary[i] = True
    return module_list, routs_binary


class YOLOLayer(nn.Module):
    """ 对YOLO的predictor输出进行处理 """
    def __init__(self, anchors, nc, img_size, stride):
        super(YOLOLayer, self).__init__()
        self.anchors = torch.Tensor(anchors)
        self.stride = stride  # layer stride 特征图上一步对应原图上的步距 [32, 16, 8]
        self.na = len(anchors)  # 每个预测特征层使用三种尺度的anchors
        self.nc = nc  # number of classes (80)
        self.no = nc + 5  # 每个anchor预测多少个参数。anchor参数和置信度、每个类别的分数 (85:x,y,w,h,obj,cls1, ...)
        """nx/ny是预测特征层宽度和高度,ng是grid cell的size"""
        self.nx, self.ny, self.ng = 0, 0, (0, 0)  # initialize number of x, y gridpoints
        # anchors是原图上的anchor大小,除以stride将anchors大小缩放到预测特征层尺度(grid网格上的尺度)
        self.anchor_vec = self.anchors / self.stride # size=[3,2],3个anchor,高宽两个元素
        """ self.anchor_wh的size=[1,3,1,1,2],分别对应batch_size, na, grid_h, grid_w, wh anchor的个数3和wh个数2是不变的,其它会随着输入不同而变化,设置为1就行 """
        # 值为1的维度对应的值不是固定值,后续操作可根据broadcast广播机制自动扩充
        self.anchor_wh = self.anchor_vec.view(1, self.na, 1, 1, 2)# size=[1,3,1,1,2]
        self.grid = None

        if ONNX_EXPORT:
            self.training = False
            self.create_grids((img_size[1] // stride, img_size[0] // stride))  # number x, y grid points

    def create_grids(self, ng=(13, 13), device="cpu"):
        """ 更新grids信息并生成新的grids参数。ng对应forword里面的(nx,ny) :param ng: 特征图大小 :param device: :return: """
        self.nx, self.ny = ng
        self.ng = torch.tensor(ng, dtype=torch.float)

        # build xy offsets 构建每个grid cell处的anchor的xy偏移量(在feature map上的)
        if not self.training:  # 训练模式不需要回归到最终预测boxes,不需要求self.grid,而只需要计算损失。
            """xv和yv就分别是这些网格左上角的x坐标和y坐标。通过torch.stack方法将xv和yv拼接得到网格左上角坐标"""
            yv, xv = torch.meshgrid([torch.arange(self.ny, device=device),
                          torch.arange(self.nx, device=device)])
            # batch_size, na, grid_h, grid_w, wh
            self.grid=torch.stack((xv,yv),2).view((1,1,self.ny,self.nx,2)).float()#调整成self.anchor_vec的shape

        if self.anchor_vec.device != device:
            self.anchor_vec = self.anchor_vec.to(device)
            self.anchor_wh = self.anchor_wh.to(device)

    def forward(self, p):#p为predictor预测的参数,包括预测框偏移量
        if ONNX_EXPORT:
            bs = 1  # batch size
        else:#ny,nx是grid cell的高度和宽度
            bs, _, ny, nx = p.shape  # batch_size, predict_param(255), grid(13), grid(13)
            """判断self.nx,self.ny)是否等于当前输入特征矩阵的(nx,ny)。不相等说明grid size发生了变化。 self.grid=None表示第一次正向传播的时候,这两种情况都要生成grid 参数"""
            if (self.nx, self.ny) != (nx, ny) or self.grid is None:  # fix no grid bug
                self.create_grids((nx, ny), p.device)

        # view: predictor得到的最终矩阵p从shape(batch_size,255,13,13)->shape(batch_size,3,85,13,13)
        # permute: (batch_size,3,85,13,13) -> (batch_size,3,13,13,85)。na=3,一个特征层预测三个anchors。no=classes+5
        # 最终结果是[bs,anchor数,grid_size,grid_size,xywh+obj+classes]
        # permute之后内存不连续,contiguous()方法将其变为内存连续的变量
        p = p.view(bs,self.na,self.no,self.ny,self.nx).permute(0,1,3,4,2).contiguous()

        if self.training:
            return p
        elif ONNX_EXPORT:
            # Avoid broadcasting for ANE operations
            m = self.na * self.nx * self.ny  # 3*
            ng = 1. / self.ng.repeat(m, 1)
            grid = self.grid.repeat(1, self.na, 1, 1, 1).view(m, 2)
            anchor_wh = self.anchor_wh.repeat(1, 1, self.nx, self.ny, 1).view(m, 2) * ng

            p = p.view(m, self.no)
            # xy = torch.sigmoid(p[:, 0:2]) + grid # x, y
            # wh = torch.exp(p[:, 2:4]) * anchor_wh # width, height
            # p_cls = torch.sigmoid(p[:, 4:5]) if self.nc == 1 else \
            # torch.sigmoid(p[:, 5:self.no]) * torch.sigmoid(p[:, 4:5]) # conf
            p[:, :2] = (torch.sigmoid(p[:, 0:2]) + grid) * ng  # x, y
            p[:, 2:4] = torch.exp(p[:, 2:4]) * anchor_wh  # width, height
            p[:, 4:] = torch.sigmoid(p[:, 4:])
            p[:, 5:] = p[:, 5:self.no] * p[:, 4:5]
            return p
        else:  # inference推理验证的情况
            # [bs, anchor, grid, grid, xywh + obj + classes]
            io = p.clone()  # inference output
            """ io[..., :2]这三个点就是前面四个维度,即batch_size、anchor、gird、grid。 最后一个维度是xywh+obj+classes,取前两个就是xy偏移量。self.grid就是每个网格左上角的坐标 xy偏移量用sigmoid限制+self.grid就是预测框在网格上的xy坐标(绝对坐标) """
            io[..., :2] = torch.sigmoid(io[..., :2]) + self.grid  # xy 计算在feature map上的xy坐标
            io[..., 2:4] = torch.exp(io[..., 2:4]) * self.anchor_wh  # wh 计算预测框在feature map上的wh
            io[..., :4] *= self.stride    #换算映射回原图尺度。self.stride是gird网格相对原图的缩放比例
            torch.sigmoid_(io[..., 4:])    #obj+classes经过sigmoid函数得到概率
            return io.view(bs,-1,self.no),p  # view [1,3,13,13,85] as [1,507,85]。实际中是多尺度训练,不一定是13*13的网格


class Darknet(nn.Module):
    """ YOLOv3 spp object detection model img_size在训练过程中不起任何作用,可暂时忽略。img_size只在导出ONNX格式模型时起作用 verbose意思是在实例化模型的时候要不要打印模型每一层的信息,默认False不打印 """
    def __init__(self, cfg, img_size=(416, 416), verbose=False):
        super(Darknet, self).__init__()
        # 这里传入的img_size只在导出ONNX模型时起作用
        self.input_size = [img_size] * 2 if isinstance(img_size, int) else img_size
        # 解析网络对应的.cfg文件。也就是parse_config.py中解析cfg文件的函数
        self.module_defs = parse_model_cfg(cfg)
        # 根据解析的网络结构一层一层去搭建。create_modules返回module_list模块和routs_binary
        self.module_list, self.routs = create_modules(self.module_defs, img_size)
        # 获取所有YOLOLayer层的索引
        self.yolo_layers = get_yolo_layers(self)

        # 打印下模型的信息,如果verbose为True则打印详细信息
        self.info(verbose) if not ONNX_EXPORT else None  # print model description

    def forward(self, x, verbose=False):
        return self.forward_once(x, verbose=verbose)

    def forward_once(self, x, verbose=False):
        # yolo_out收集每个yolo_layer层的输出,out收集每个模块的输出
        # x表示输入图像
        yolo_out, out = [], []
        if verbose:
            print('0', x.shape)
            str = ""

        for i, module in enumerate(self.module_list):
            name = module.__class__.__name__
            if name in ["WeightedFeatureFusion", "FeatureConcat"]:  # sum, concat。分别是shortcut层和spp层的操作
                if verbose:
                    l = [i - 1] + module.layers  # layers
                    sh = [list(x.shape)] + [list(out[i].shape) for i in module.layers]  # shapes
                    str = ' >> ' + ' + '.join(['layer %g %s' % x for x in zip(l, sh)])
                x = module(x,out)  # WeightedFeatureFusion(), FeatureConcat()
            elif name == "YOLOLayer":
                yolo_out.append(module(x))
            else:  # run module directly, i.e. mtype = 'convolutional', 'upsample', 'maxpool', 'batchnorm2d' etc.
                x = module(x)

            out.append(x if self.routs[i] else [])#routs就是真假矩阵列表,判断哪些层输出后面要用。如果是False后面用不到,这个位置存空列表
            if verbose:
                print('%g/%g %s -' % (i, len(self.module_list), name), list(x.shape), str)
                str = ''

        if self.training:  # train模式YOLOLayer只返回p,只需要yolo_out就行
            return yolo_out
        elif ONNX_EXPORT:  # export
            # x = [torch.cat(x, 0) for x in zip(*yolo_out)]
            # return x[0], torch.cat(x[1:3], 1) # scores, boxes: 3780x80, 3780x4
            p = torch.cat(yolo_out, dim=0)

            # # 根据objectness虑除低概率目标
            # mask = torch.nonzero(torch.gt(p[:, 4], 0.1), as_tuple=False).squeeze(1)
            # # onnx不支持超过一维的索引(pytorch太灵活了)
            # # p = p[mask]
            # p = torch.index_select(p, dim=0, index=mask)
            #
            # # 虑除小面积目标,w > 2 and h > 2 pixel
            # # ONNX暂不支持bitwise_and和all操作
            # mask_s = torch.gt(p[:, 2], 2./self.input_size[0]) & torch.gt(p[:, 3], 2./self.input_size[1])
            # mask_s = torch.nonzero(mask_s, as_tuple=False).squeeze(1)
            # p = torch.index_select(p, dim=0, index=mask_s) # width-height 虑除小目标
            #
            # if mask_s.numel() == 0:
            # return torch.empty([0, 85])

            return p
        else:  # inference or test
            """推理验证模式yolo_layer返回两个值,以zip方法分开赋值给x和p两个列表"""
            x, p = zip(*yolo_out)  # inference output, training output
            """1表示在第二个维度进行拼接。拼接后size=[1,16128,25],即[bs,生成的anchors数,classes+5]"""
            x = torch.cat(x, 1)  # 拼接yolo outputs。
            return x, p

    def info(self, verbose=False):
        """ 打印模型的信息 :param verbose: :return: """
        torch_utils.model_info(self, verbose)


def get_yolo_layers(self):
    """ 获取网络中三个"YOLOLayer"模块对应的索引 :param self: if m.__class__.__name__=='YOLOLayer':如果模块名为'YOLOLayer',就记录其索引。在yolov3_spp中是[89,101,113] """
    return [i for i, m in enumerate(self.module_list) if m.__class__.__name__ == 'YOLOLayer']
下面依次分析:
YOLOLayer在非训练模式下,要
create_grids。forword中要根据预测框偏移量求预测框实际坐标,即YOLOLayer里面的最后面else部分代码,求预测框实际坐标示意图如下:
- l i x ^ \hat{l_{i}^{x}} lix^、 l i y ^ \hat{l_{i}^{y}} liy^是上图右侧中的 σ ( t x ) \sigma(t_{x}) σ(tx)、 σ ( t x ) \sigma(t_{x}) σ(tx),表示预测框中心点相对于grid cell左上角这个点的偏移量,也对应 L l o c L_{loc} Lloc中的 l i m ^ \hat{l_{i}^{m}} lim^。
- g表示anchor匹配到的真实框。 g i x ^ \hat{g_{i}^{x}} gix^表示真实框相对于grid cell左上角这个点的x偏移量
- l i m ^ \hat{l_{i}^{m}} lim^和 g i m ^ \hat{g_{i}^{m}} gim^分别是预测框偏移量和真实框偏移量,差值平方和的均值就是定位损失。
class YOLOLayer(nn.Module)的forword部分,训练时没必要求self.grid,直接跳过create_grids函数中的torch.meshgrid:假设得到一个4*4的grid网格,记录每个网格的左上角坐标。torch.meshgrid得到的xv和yv就分别是这些网格的x坐标和y坐标。通过torch.stack方法将xv和yv拼接得到网格左上角坐标。示意图如下:
调试predict_test.py脚本,运行model.py。在
class Darknet(nn.Module):类下的x, p = zip(*yolo_out)处设置断点,查看推理验证时返回的输出x和p。

class YOLOLayer(nn.Module)中给出了yolo_layer层的输出:- p为yolo_layer前一层predictor层的输出,包含了预测边界框的偏移量参数,obj和classes。
shape=(batch_size,255,13,13),通过p=p.view(bs,self.na,self.no,self.ny,self.nx).permute(0,1,3,4,2).contiguous()处理后,shape=(batch_size,3,13,13,85),即[bs,anchor数,grid_size,grid_size,xywh+obj+classes]。训练模式yolo_layer直接返回这个输出结果p。 - 推理和测试模式下,返回两个结果:
io.view(bs,-1,self.no),p。前一个结果io.view(bs,-1,self.no)是将p包含的预测框偏移量xywh结合grid cell坐标和高宽,得到预测框绝对坐标和高宽,obj和classes经过sigmoid函数得到概率值。shape=[bs,-1,self.no],实际中是多尺度训练,第二个维度不一定是13*13*3。
- p为yolo_layer前一层predictor层的输出,包含了预测边界框的偏移量参数,obj和classes。
- Darknet的输出,是经过
module_list中一系列层结构前向传播,最终得到yolo_layer层的输出yolo_out。- 训练模式下,结果就是yolo_out,即训练模式yolo_layer输出p,
shape=(batch_size,3,13,13,85)。三个yolo_layer有三个p,yolo_out就是三个元素的列表。 - 推理测试模式下,
yolo_out=io.view(bs,-1,self.no),p。通过x, p = zip(*yolo_out)处理,由于有三个yolo_layer,所以x是包含三个元素的列表,每个元素是一个yolo_layer输出的第一个元素io.view(bs,-1,self.no)。p也有三个元素,都是yolo_layer输出的第二个元素,也就是原先predictor输出p只进行view和permute操作的结果。 x = torch.cat(x, 1)表示将预测的三个yolo_layer输出的第一个元素io.view(bs,-1,self.no)在第二个维度进行拼接。作者演示拼接前x.shape=[1,768,25],拼接后x.shape=[1,16128,25],表示测试了一张图片,这张图片生成了16128个anchors。
- 训练模式下,结果就是yolo_out,即训练模式yolo_layer输出p,
至此模型部分搭建完成。
四、自定义数据集
数据处理部分在yolov3_spp/build_utils/datasets.py中,先略过。
五、匹配正样本
- train.py当中,通过
mloss, lr = train_util.train_one_epoch(model, optimizer, train_dataloader,...)来计算损失。 - 打开
yolov3_spp/train_utils/train_eval_utils.py,在train_one_epoch函数中,第61行loss_dict = compute_loss(pred, targets, model)。这里是通过build_utils/utils.py文件的compute_loss方法计算损失。 - 在
compute_loss函数中,一开始初始化了类别损失、定位损失和object损失都为0。tcls,tbox,indices,anchors =build_targets(p,targets,model)是通过build_targets方法计算所有的正样本。 - 在utils.py文件的
build_targets函数中,下图位置设置断点,调试trian.py脚本。- 可以看到预测输出p有三个元素,每个元素是一个预测特征层的输出。size=[4,3,15,15,25]。
- target是标注信息,size=[18,6]。18表示当前batch图片中一共有18个目标,每个目标记录6个参数。这6个参数对应targets(image_idx,class,x,y,w,h)。
- image_idx表示这个目标属于当前batch哪张图片的目标,后五个分别是当前目标所属的类别,以及相对坐标信息。


下面逐步解析build_targets函数。
build_targets中,at = torch.arange(na).view(na,1).repeat(1,nt)创建的[3.nt]形状矩阵如下:(假设目标数nt=4)。右侧表示第一个预测特征层默认使用anchors模板为[116,90,156,198,373,326],除以32就是映射到第一个预测特征层上的anchors模块的wh。
build_targets中,for遍历中,有计算j=wh_iou(anchors,t[:,4:6]) > model.hyp['iou_t']# iou(3,nt)=wh_iou(anchors(3,2),gwh(nt,2))。j表示计算当前预测特征层所有网格中,网格的anchors模板和目标真实框IOU值大于model.hyp['iou_t的网格位置,示意图如下:
- 这里表示有四个位置的网格,生成的anchors模板匹配到了目标。True的个数对应匹配正样本的个数。
a,t = at[j], t.repeat(na, 1, 1)[j]。通过at[j]计算出匹配的anchors模板索引,赋值给a。t=t.repeat(na, 1, 1)[j],等号右侧t在代码中是targets在当前预测特征层的绝对坐标等信息,表示为[image_idx,class,x,y,w,h]。假设nt=4,也就是有四个targets,对应gt0到gt3。因为na=3(三个anchors模板),将t repeat三次,再根据上面得到的位置索引j,提取对应位置的target信息t(下图最下面一行)。t的个数就是正样本的个数。
- 最终的 a和t可一一对应起来。这样就找出每个正样本对应的anchors模板信息和target信息。需要注意的是,此时的anchors模板信息只记录了anchors的wh,没有记录在哪个grid cell中。需要下一步来处理
- 通过以下代码计算gij,即正样本匹配到的targets所在的grid cell左上角坐标。以上面示意图的t[0]:[0,1,3.6,4.3,20,20]为例,
gxy = t[:, 2:4]=[3.6,4.3]是匹配的target的xy坐标。向下取整为[3,4]就是对应的grid cell左上角的坐标。 - yolo中目标落在哪个网格,就用这个网格生成的anchor来预测这个目标。这个网格左上角坐标就是生成的anchor模板中心点的坐标。前面计算的a=[0,1,1,2]记录了每个目标是对应哪个anchor模板。所以现在就知道了anchor模板的中心点和wh信息。
#t是所有正样本匹配到的target信息(image_idx,class,x,y,w,h),shape=[nt,6]
b,c = t[:, :2].long().T  # image_idx,class 转置后shape=[2,nt]
gxy = t[:, 2:4]  # target xy
gwh = t[:, 4:6]  # target wh
"""yolov3中,都是以grid cell左上角为中心点来生成anchors模板的,所以offsets=0"""
gij = (gxy - offsets).long()  # 匹配targets所在的grid cell左上角坐标
gi, gj = gij.T  # grid xy indices

- 当前预测特征层所有正样本信息Append到indices列表中:
"""pytorch 1.12中直接训练报错RuntimeError: result type Float can't be cast to the desired output type long int。所以这里改了原代码 1. 在原284行gain[2:] = torch.tensor(p[i].shape)[[3, 2, 3, 2]]下面插入shape=p[i].shape 2. 在原311行indices.append((b, a, gj.clamp_(0, gain[3]-1), gi.clamp_(0, gain[2]-1))) 改为indices.append((b, a, gj.clamp_(0, shape[2] - 1), gi.clamp_(0, shape[3] - 1))) """
indices.append((b, a,gj.clamp_(0,shape[2]-1), gi.clamp_(0, shape[3] - 1)))
断点调试,可以看到a是所有正样本匹配到的anchor模板的索引,b是所有正样本匹配到的image_idx。clamp_方法是将它限制在当前特征层内部,防止越界。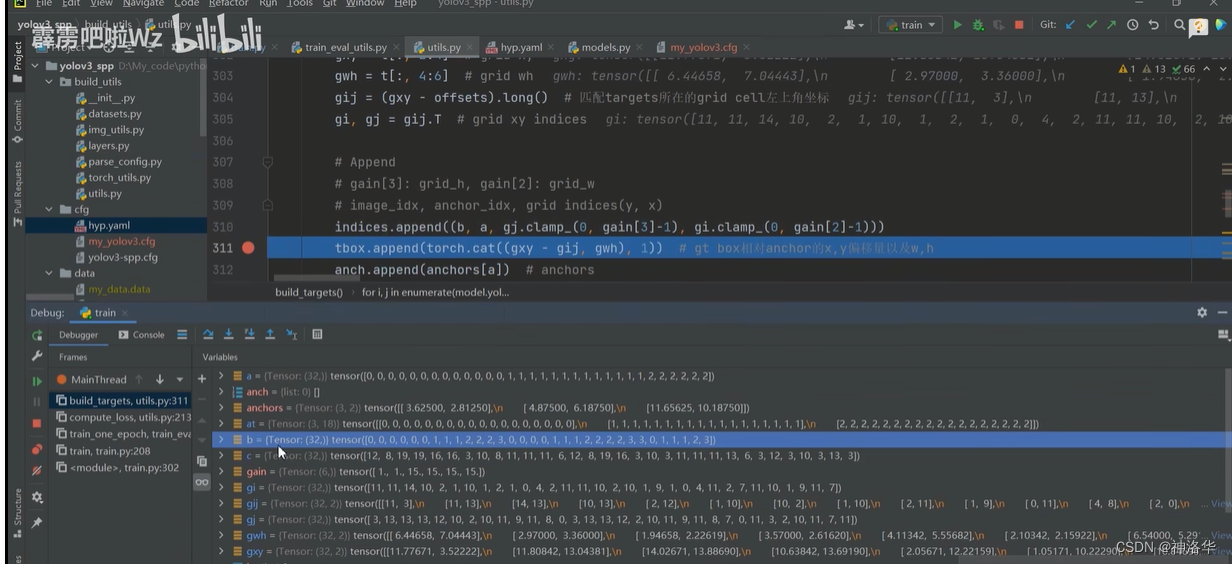
build_targets匹配正样本部分完整代码如下:
def build_targets(p, targets, model):
    # Build targets for compute_loss(), input targets(image_idx,class,x,y,w,h)
    nt = targets.shape[0]  #target的shape为[当前batch图片的目标数量,6],6就是(image_idx,class,x,y,w,h)。
    tcls, tbox, indices, anch = [], [], [], []#p是一个三元素列表,每个元素是一个预测特征层的输出
    """gain是相对于每个targets(image_idx,class,x,y,w,h)这六个元素的增益,所以初始化为6个1"""
    gain = torch.ones(6,device=targets.device) # normalized to gridspace
    #model类型是nn.parallel.DataParallel或nn.parallel.DistributedDataParallel,表示是多GPU运行
    multi_gpu = type(model) in (nn.parallel.DataParallel, nn.parallel.DistributedDataParallel)

    for i,j in enumerate(model.yolo_layers):  # 遍历每一个预测特征层,在yolov3_spp中是[89,101,113]这三层
        # 获取该yolo predictor对应的anchors模板。其shape=[3,2],三个anchors模板,每个模板wh两个参数
        # 注意anchor_vec是anchors缩放到对应特征层上的尺度
        """比如i=0表示第一个预测特征层,相对于原图下采样32倍。这一层默认采用[116,90,156,198,373,326]这三个anchors模板。 将这三个尺度都除以32就是第一个预测特征层采用的三个anchors尺度,其shape=[3,2],值可以自己算。 """
        anchors = model.module.module_list[j].anchor_vec if multi_gpu else model.module_list[j].anchor_vec
        #p[i]是 第1个预测特征层输出, p[i].shape: [batch_size,3,grid_h,grid_w,num_params],num_params=5+classes
        gain[2:] = torch.tensor(p[i].shape)[[3,2,3,2]]  # [1,1,grid_w,grid_h,grid_w,grid_h]
        shape=p[i].shape      #grid_w,grid_h:当前预测特征层grid网格的宽度和高度
        na=anchors.shape[0]    #当前预测特征层anchors模板数量,也就是3
        #通过下一行代码将na,shape=[3] -> [3,1] -> [3,nt],最后转为shape=[3,nt],nt是目标数量
        at=torch.arange(na).view(na,1).repeat(1,nt)  # anchor tensor,same as .repeat_interleave(nt)

        # Match targets to anchors
        a,t,offsets=[],targets*gain,0  #targets*gain就是将targets相对坐标,转换为当前特征层的绝对坐标(这里不懂)
        if nt:  # 如果存在target的话
            """ 通过计算anchor模板与所有target的wh_iou来匹配正样本。计算方式是anchors模板和target真实框左上角重合,再计算IOU 所以这里anchors指三个anchors模板,而不是当前层所有的anchors。 当预测框足够密集时,这种方式可以粗略计算IOU。Faster-RCNN/SSD中是精确计算所有anchors和targets的IOU hyp['iou_t']是cfg/hpy.yaml配置文件中的'iou_t'参数。j表示哪几个位置的网格生成的anchors模板匹配到了targets。 """
            # anchors.shape=[3,2];t[:,4:6].shape=[nt,2]。这两个都是根据wh计算IOU。j.shape=[3,nt],iou_t=0.20。
            j=wh_iou(anchors,t[:,4:6]) > model.hyp['iou_t']  # iou(3,nt)=wh_iou(anchors(3,2),gwh(nt,2))

            # 获取正样本对应的anchor模板(只有wh信息)与target信息.na=3
            a,t=at[j],t.repeat(na,1,1)[j]  # t.repeat(na,1,1):[nt,6] -> [3,nt,6]。详细t的含义见csdn笔记

        # Define。t是所有正样本匹配到的target信息(image_idx,class,x,y,w,h),shape=[nt,6]
        # long等于to(torch.int64), 数值向下取整
        b,c = t[:, :2].long().T  # image_idx,class 转置后shape=[2,nt]
        gxy = t[:, 2:4]  # target xy
        gwh = t[:, 4:6]  # target wh
        """yolov3中,都是以grid cell左上角为中心点来生成anchors模板的,所以offsets=0 gxy是target的xy坐标,向下取整就是对应grid cell左上角的坐标,即下面的gij 现在就知道正样本对应的anchor模板中心点坐标gij,以及前面a记录了三个anchors中使用了哪个anchors来匹配。 """
        gij = (gxy - offsets).long()  # 匹配targets所在的grid cell左上角坐标
        gi, gj = gij.T  # grid xy indices

        """ 1. 当前预测特征层所有正样本信息Append到indices列表中。clamp_方法是将它限制在当前特征层内部,防止越界。 2. indices.append((b, a, gj.clamp_(0, gain[3]-1), gi.clamp_(0, gain[2]-1)))#这行直接运行报错,注释掉改为下一行 3. gain:[1,1,grid_w,grid_h,grid_w,grid_h]。gain[3]:grid_h, gain[2]:grid_2 shape=p[i].shape=[batch_size,3,grid_h,grid_w,num_params] 4. indices信息是:image_idx, anchor_idx, grid indices(y,x) 5. gxy-gij是每个正样本和对应gt(target)的偏移量,gwh是target wh """
        indices.append((b,a,gj.clamp_(0,shape[2]-1),gi.clamp_(0,shape[3]-1)))  # image, anchor, grid
        tbox.append(torch.cat((gxy-gij, gwh), 1))  # gt box相对anchor的x,y偏移量以及w,h
        anch.append(anchors[a])  # 所有正样本anchors的wh
        tcls.append(c)  # 所有正样本的class
        if c.shape[0]:  # if any targets。c.shape[0]>0表示存在正样本
            # 目标的标签数值不能大于给定的目标类别数,assert xx是防止越界的情况
            assert c.max() < model.nc, 'Model accepts %g classes labeled from 0-%g, however you labelled a class %g. ' \
                                       'See https://github.com/ultralytics/yolov3/wiki/Train-Custom-Data' % (
                                           model.nc, model.nc - 1, c.max())

    return tcls, tbox, indices, anch
六、损失计算
在build_utils/utils.py文件中使用 compute_loss方法计算损失。
在计算类别损失中,代码为:
if model.nc > 1:  # cls loss (如果目标检测的类别数大于1,才计算class loss)
	"""cn是上面的class_negtive,值为0,ps是xywh+classes"""
	 t = torch.full_like(ps[:,5:], cn, device=device)  # 正样本对每个类别的标签都初始化为0
	 t[range(nb), tcls[i]] = cp		#将正样本对应的正确类别处标签设为1。
	 lcls += BCEcls(ps[:, 5:], t)  # BCE
- ps[:,5:]:所有正样本在网络中预测的所有类别的分数
- t:和上面形状一样,默认用0填充
- tcls:build_targets函数返回的所有正样本的类别class,i是当前特征层。nb是正样本个数

- 最终三种loss乘以对应权重(hyp.yaml中的giou、cls、obj),就是最终loss。
compute_loss函数最终返回包含这三种loss的字典。 train_eval_utils.py文件的train_one_epoch函数,调用了loss_dict = compute_loss(pred, targets, model)。compute_loss完整代码如下:
def compute_loss(p, targets, model):  # predictions, targets, model
    device = p[0].device           #p.shape=[bs,anchors=3,grid_w,gird_h,xywh+obj+classes]
    """p为预测信息,targets是标注信息。下面分别初始化分类损失、定位损失、object损失"""
    lcls = torch.zeros(1, device=device)  # Tensor(0)
    lbox = torch.zeros(1, device=device)  # Tensor(0)
    lobj = torch.zeros(1, device=device)  # Tensor(0)
    tcls,tbox,indices,anchors =build_targets(p,targets,model)  # build_targets计算所有的正样本
    h = model.hyp  # hpy.yaml配置文件参数
    red = 'mean'  # Loss reduction (sum or mean)。这里mean表示最后的损失进行一个求平均的操作

    # Define criteria,分类损失和object损失
    """ BCEWithLogitsLoss结合sigmoid和BCELoss,即BCEWithLogitsLoss计算后不需要再过一个sigmoid BCEWithLogitsLoss内部会有一个更高效和稳定的sigmoid方法 pos_weight是针对正负样本不平衡的问题。在项目中[h['cls_pw']=[h['obj_pw']=1,所以其实不起作用 """
    BCEcls = nn.BCEWithLogitsLoss(pos_weight=torch.tensor([h['cls_pw']],device=device),reduction=red)
    BCEobj = nn.BCEWithLogitsLoss(pos_weight=torch.tensor([h['obj_pw']],device=device),reduction=red)

    # class label smoothing https://arxiv.org/pdf/1902.04103.pdf eqn 3
    cp,cn = smooth_BCE(eps=0.0)#class_positive=1,class_negtive=0,可查看smooth_BCE函数

    # focal loss
    g = h['fl_gamma']  # focal loss gamma.如果h['fl_gamma']>0就是用focal loss
    if g > 0:
        BCEcls, BCEobj = FocalLoss(BCEcls, g), FocalLoss(BCEobj, g)

    # per output
    for i, pi in enumerate(p):  # 遍历每个预测特征层的输出
        b,a,gj,gi=indices[i]  # 获取第i个预测特征层的所有正样本信息[image_idx,anchor_idx,grid_y,grid_x]
        """tobj是为预测特征层的每个anchors都构建标签target_obj,和pi前三个维度形状一致,最后一个维度用0填充。 比如p.shape=[bs,3,grid_w,gird_h,25],tobj.shape=[bs,3,grid_w,gird_h]。 """
        tobj = torch.zeros_like(pi[...,0],device=device) #后面会在正样本对应位置设置标签

        nb = b.shape[0]  # 当前预测特征层正样本个数
        if nb:       #如果nb>0,存在正样本的话
            # 获取预测特征层上匹配到的所有正样本的预测信息。b对应batch_size个图片的image_idx,a对应anchor_idx
            ps = pi[b,a,gj,gi]  # prediction subset corresponding to targets,就是[xywh+obj+classes]

            # GIoU
            pxy = ps[:, :2].sigmoid()               #正样本预测偏移量xy,会经过sigmoid函数
            pwh = ps[:, 2:4].exp().clamp(max=1E3) * anchors[i] #正样本的wh。clamp设置上限
            pbox = torch.cat((pxy, pwh),1)  # pxy,pwh在维度1上拼接,得到预测box信息
            """giou是当前预测特征层每个预测框和gt(真实框)的GIoU,tbox哪来的?"""
            giou = bbox_iou(pbox.t(),tbox[i],x1y1x2y2=False, GIoU=True)  # giou(prediction, target)
            lbox += (1.0-giou).mean()  # giou loss=1-giou

            """ 之前tobj都填充0,下一行是为所有正样本构建标签。 如果定义objcet包含背景和前景,那么正样本处的anchors标签设置为1,背景标签为0 object不含背景时,train.py中设置model.gr=1,正样本标签就等于giou """
            tobj[b,a,gj,gi]=(1.0-model.gr)+model.gr*giou.detach().clamp(0).type(tobj.dtype)  # giou ratio

            # train.py中设置了model.nc=nc
            if model.nc > 1:  # cls loss (如果目标检测的类别数大于1,才计算class loss)
                """ps是xywh+obj+classes,t是和ps[:,5:]形状一样,用cn填充。cn是上面的class_negtive,值为0"""
                t = torch.full_like(ps[:,5:], cn, device=device)  # 正样本对每个类别的标签都初始化为0
                t[range(nb), tcls[i]] = cp    #将正样本对应的正确类别处标签设为1。nb正样本个数,tcls所有正样本对应的类别
                lcls += BCEcls(ps[:,5:], t)  # BCE,只有一个类别时,lcls=0

            # Append targets to text file
            # with open('targets.txt', 'a') as file:
            # [file.write('%11.5g ' * 4 % tuple(x) + '\n') for x in torch.cat((txy[i], twh[i]), 1)]
        """obj loss.tobj形状是pi[...,0],正样本处值为giou,其余为0。 pi[...,4]是当前预测特征层网络预测的所有anchors的objcet"""
        lobj += BCEobj(pi[...,4],tobj)

    # 乘上每种损失的对应权重
    lbox *= h['giou']
    lobj *= h['obj']
    lcls *= h['cls']

    # loss = lbox + lobj + lcls
    return {
    "box_loss": lbox,
            "obj_loss": lobj,
            "class_loss": lcls}
边栏推荐
- [教你做小游戏] 只用几行原生JS,写一个函数,播放音效、播放BGM、切换BGM
- DefaultSelectStrategy NIOEventLoop执行策略
- 2816. 判断子序列(双指针)
- Redis persistence mechanism
- GBASE 8s 高可用RSS集群搭建
- MySQL 查询出重复出现两次以上的数据 - having
- 杭电多校七 1003-Counting Stickmen(组合数学)
- 关于npm/cnpm/npx/pnpm与yarn
- 云渲染的应用正在扩大,越来越多的行业需要可视化服务
- Today's bug, click on the bug that the Windows dynamic wallpaper disappears in the win10 taskbar, and no solution has been found yet.
猜你喜欢

弘玑Cyclone与风变科技达成战略合作:优势互补聚焦数字化人才培养

瑞吉外卖学习笔记4
测试/开发程序员值这么多钱么?“我“不会愿赌服输......
多种深度模型实现手写字母MNIST的识别(CNN,RNN,DNN,逻辑回归,CRNN,LSTM/Bi-LSTM,GRU/Bi-GRU)

越折腾越好用的 3 款开源 APP

云渲染的应用正在扩大,越来越多的行业需要可视化服务
[Teach you how to make a small game] Write a function with only a few lines of native JS to play sound effects, play BGM, and switch BGM

『牛客|每日一题』岛屿数量
【毕业设计】基于STM32的天气预报盒子 - 嵌入式 单片机 物联网

选择是公有云还或是私有云,这很重要吗?
随机推荐
LeetCode·27.移除元素·双指针
MATLAB设计,FPGA实现,联合ISE和Modelsim仿真的FIR滤波器设计
The servlet mapping path matching resolution
西安凯新(CAS:2408831-65-0)Biotin-PEG4-Acrylamide 特性
WCF and TCP message communication practice, c # 】 【 realize group chat function
Optimization is a habit The starting point is to 'stand close to the critical'
[Go WebSocket] 你的第一个Go WebSocket服务: echo server
UnitTest中的Path must be within the project 问题
【C#】WCF和TCP消息通信练习,实现群聊功能
What is the upstream bandwidth and downstream bandwidth of the server?
Win11如何清除最近打开过的文件记录?
Linux服务器安装Redis,详细步骤。
新建离线同步节点时选择数据去向-表时报错,数据库类型是adb pg,怎么办?
[教你做小游戏] 斗地主的手牌,如何布局?看25万粉游戏区UP主怎么说
“2022零信任神兽方阵”启动调研,欢迎各单位填报信息
spark学习笔记(九)——sparkSQL核心编程-DataFrame/DataSet/DF、DS、RDD三者之间的转换关系
[Natural Language Processing] [Vector Representation] PairSupCon: Pairwise Supervised Contrastive Learning for Sentence Representation
FEMRL: A Framework for Large-Scale Privacy-Preserving Linkage of Patients’ Electronic Health Rec Paper Summary
laya打包发布apk
小分子PEG CAS:1352814-07-3生物素-PEG6-丙酸叔丁酯
![[Teach you how to make a small game] Write a function with only a few lines of native JS to play sound effects, play BGM, and switch BGM](/img/30/714d803d4087f5c9c5800a969055fe)