当前位置:网站首页>squid代理
squid代理
2022-04-23 14:07:00 【C和弦~】
目录
tail -f /var/log/httpd/access_log
一.Squid代理服务器
- Squid主要提供缓存加速、应用层过滤控制的功能。
1.1 代理类型
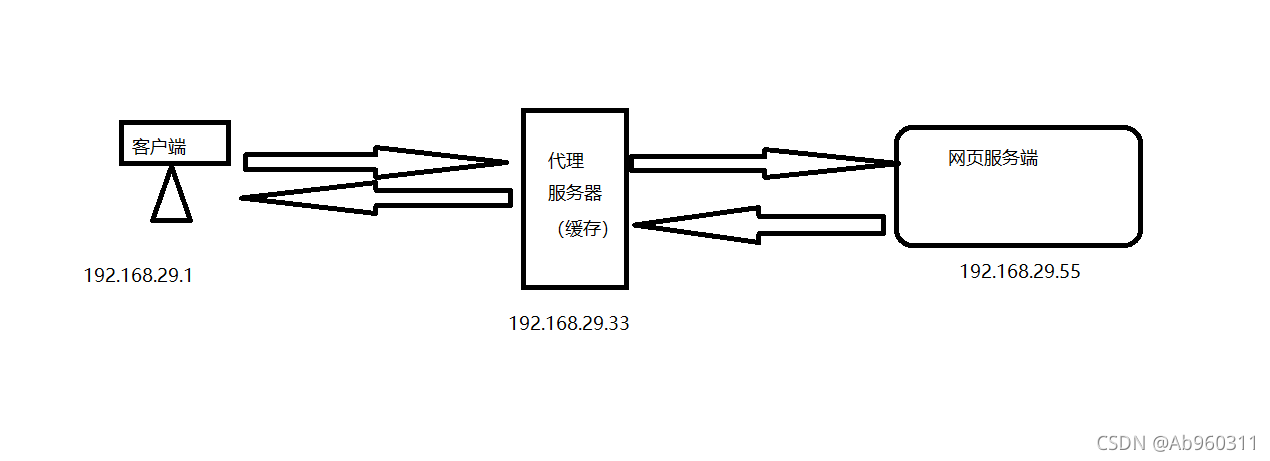
- 传统代理:适用于Internet,需在客户机指定代理服务器的地址和端口。
- 透明代理:客户机不需指定代理服务器的地址和端口,而是通过默认路由、防火墙策略将Web访问重定向给代理服务器处理。
- 反向代理:如果 Squid 反向代理服务器中缓存了该请求的资源,则将该请求的资源直接返回给客户端;否则反向代理服务器将向后台的 WEB 服务器请求资源,然后将请求的应答返回给客户端,同时也将该应答缓存(静态)在本地,供下一个请求者使用。
1.2 代理的工作机制
- 代替客户机向网站请求数据,从而可以隐藏用户的真实IP地址。
- 将获得的网页数据(静态 Web 元素)保存到缓存中并发送给客户机,以便下次请求相同的数据时快速响应。
二.传统代理项目部署
2.1 架构图
2.2 squit 端配置
[root@localhost ~]yum -y install gcc gcc-c++ make
[root@localhost ~]# cd /opt  #上传安装包
[root@localhost opt]# tar xvf squid-3.5.28.tar.gz
[root@localhost opt]# cd
[root@localhost opt]# cd squid-3.5.28/
./configure --prefix=/usr/local/squid --sysconfdir=/etc --enable-arp-acl --enable-linux-netfilter --enable-linux-tproxy --enable-async-io=100 --enable-err-language="Simplify_Chinese" --enable-underscore --enable-poll --enable-gnuregex

[root@localhost squid-3.5.27]# make && make install
[root@localhost squid-3.5.27]# ln -s /usr/local/squid/sbin/* /usr/local/sbin      ##创建链接文件,优化路径
[root@localhost squid-3.5.27]# useradd -M -s /sbin/nologin squid                      ###创建程序用户、组
[root@localhost squid-3.5.27]# chown -R squid:squid /usr/local/squid/var/       	##改变目录属主
[root@localhost ~] vi /etc/squid.conf #放在http_access deny all 之前,允许任意客户机使用代理服务,控制规则自上而下匹配
vim /etc/squid.conf
......
-----56行--插入------
http_access allow all #放在http_access deny all 之前,允许任意客户机使用代理服务,控制规则自上而下匹配
http_access deny all
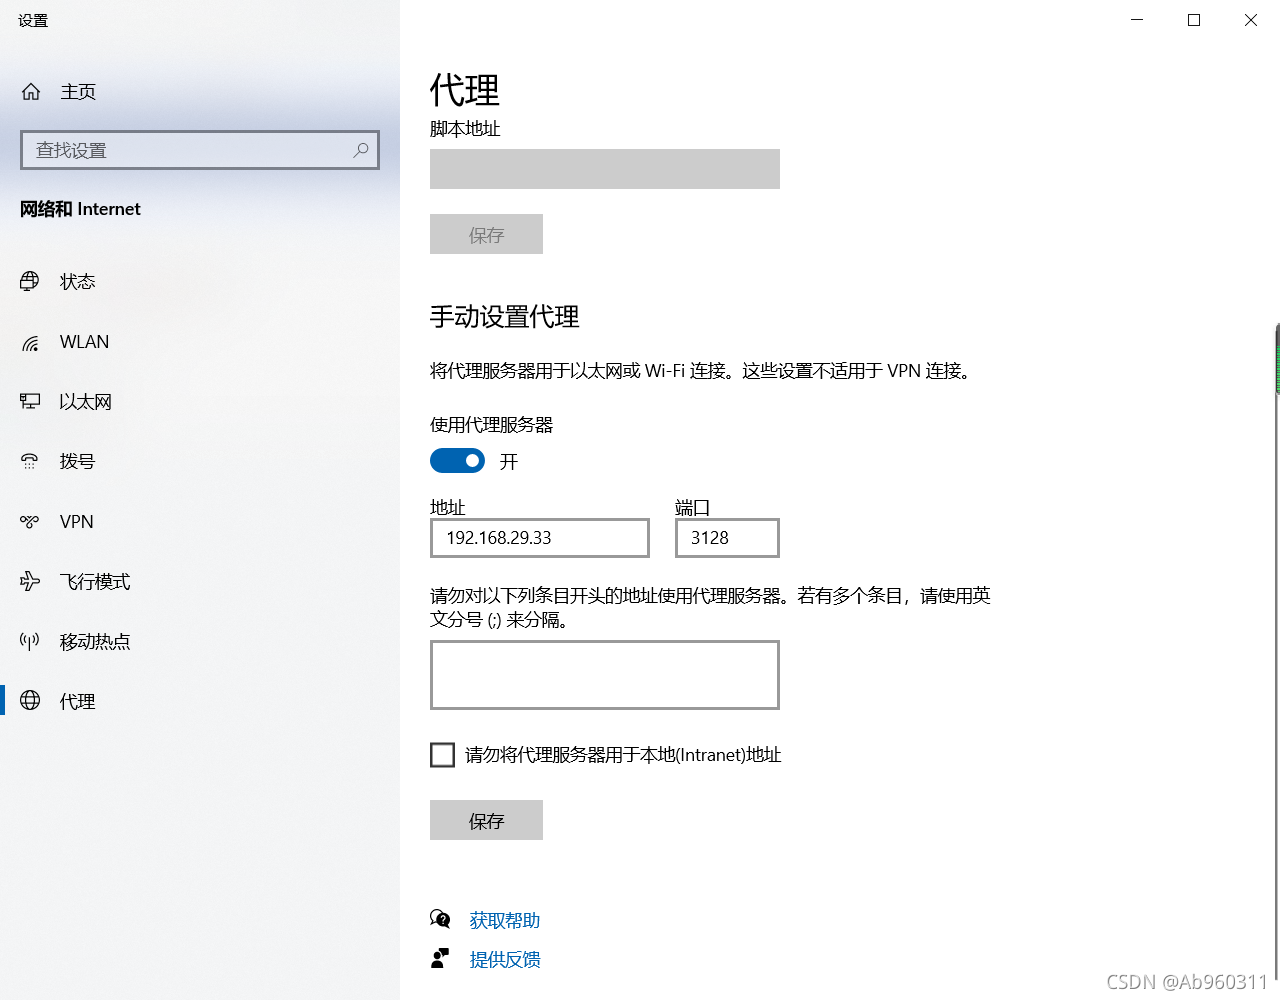
http_port 3128 #用来指定代理服务监听的地址和端口(默认的端口号为3128)
-----61行--插入------
cache_effective_user squid #添加,指定程序用户,用来设置初始化、运行时缓存的账号,否则启动不成功
cache_effective_group squid #添加,指定账号基本组
coredump_dir /usr/local/squid/var/cache/squid #指定缓存文件目录[root@localhost ~] squid -k parse ##检查配置文件
[root@localhost ~] squid –k rec ##重新加载配置文件
[root@localhost ~] squid -zX ##初始化缓存目录
[root@localhost ~]# squid ##启动squid服务
[root@localhost ~]# netstat -anpt | grep squid ##确认squid服务处于正常监听状态
tcp6 0 0 :::3128 :::* LISTEN 6699/(squid-1) [root@localhost ~]# vi /etc/init.d/squid
#!/bin/bash
#chkconfig: 35 90 25
#config: /etc/squid.conf
#pidfile: /usr/local/squid/var/run/squid.pid
#Description: Squid - Internet Object Cache
PID="/usr/local/squid/var/run/squid.pid"
CONF="/etc/squid.conf"
CMD="/usr/local/squid/sbin/squid"
case "$1" in
start)
netstat -utpln | grep squid &>/dev/null
if [ $? -eq 0 ]
then
echo "Squid is running"
else
$CMD
fi
;;
stop)
$CMD -k kill &>/dev/null
rm -rf $PID &>/dev/null
;;
status)
[ -f $PID ] &>/dev/null
if [ $? -eq 0 ]
then
netstat -utpln | grep squid
else
echo "Squid is not running"
fi
;;
restart)
$0 stop &>/dev/null
echo "正在关闭Squid..."
$0 start &>/dev/null
echo "正在启动Squid..."
;;
reload)
$CMD -k reconfigure
;;
check)
$CMD -k parse
;;
*)
echo "用法:{start | stop | restart | reload | check | status}"
esac[root@localhost ~]#chmod +x /etc/init.d/squid
[root@localhost ~]#chkconfig --add squid
[root@localhost ~]#chkconfig squid on
[root@localhost squid-3.5.27]# service squid restart ##测试正常
正在关闭Squid...
正在启动Squid...vim /etc/squid.conf
......
http_access allow all
http_access deny all
http_port 3128
cache_effective_user squid
cache_effective_group squid
#63行插入
cache_mem 64 MB
#指定缓存功能所使用的内存空间大小,便于保持访问较频繁的WEB对象,容量最好为4的倍数,单位为MB,建议设为物理内存的1/4
reply_body_max_size 10 MB
#允许用户下载的最大文件大小,以字节为单位,当下载超过指定大小的Web对象时,浏览器的报错页面中会出现“请求或访问太大”的提示默认设置0表示不进行限制
maximum_object_size 4096 KB
#允许保存到缓存空间的最大对象大小,以KB为单位,超过大小限制的文件将不被缓存,而是直接转发给用户
service squid restart
systemctl restart squid
#修改防火墙规则
iptables -F
iptables -I INPUT -p tcp --dport 3128 -j ACCEPT2.2 Web配置
systemctl stop firewalld.service
setenforce 0
yum -y install httpd
systemctl start httpd
netstat -natp | grep 80
2.3 客户端配置
客户端配置(添加代理) 谷歌浏览器: 设置--》高级--》系统--》打开代理设置--》设置代理
2.4 测试
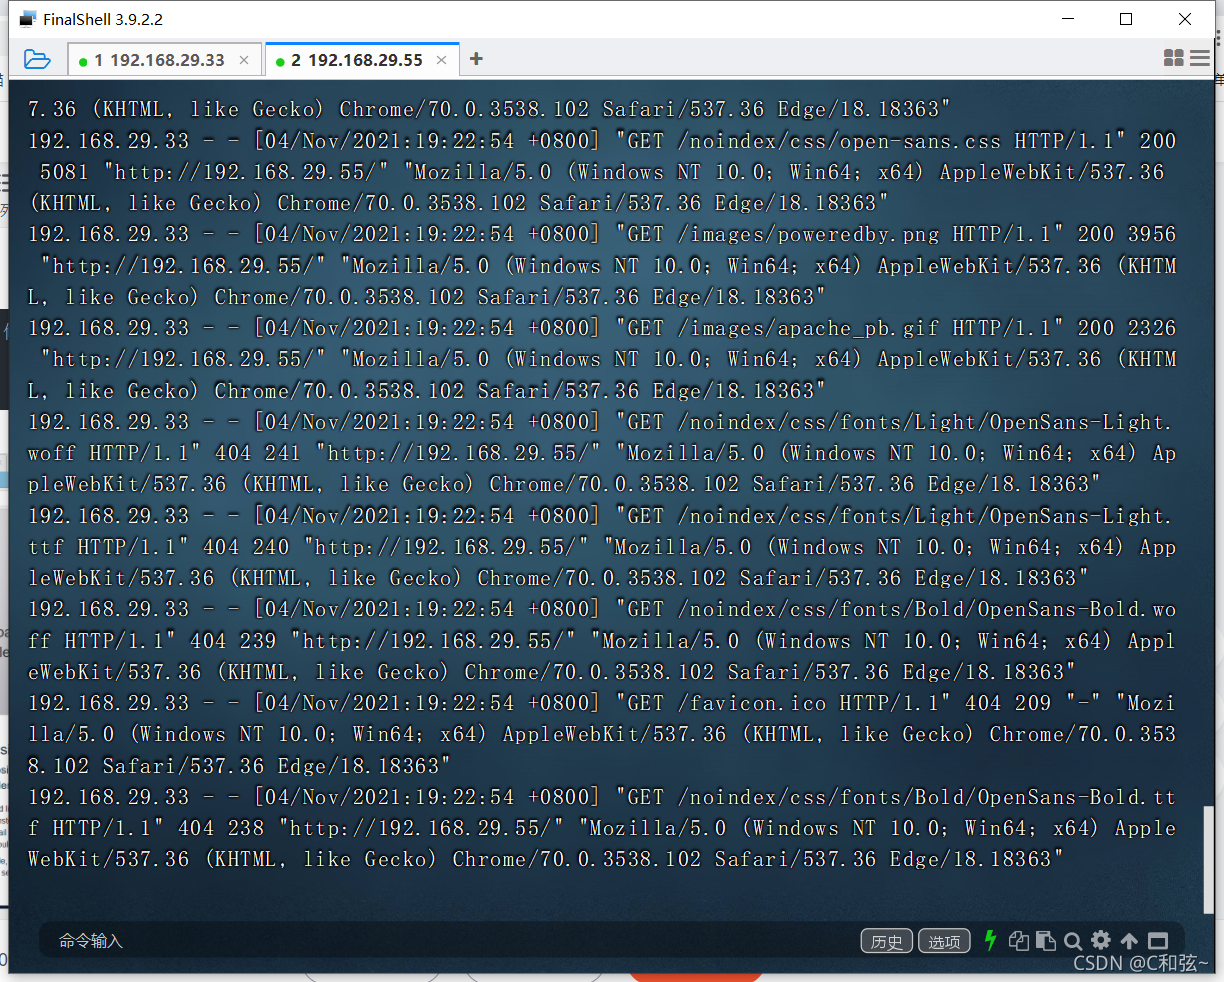
网页端访问web端服务器

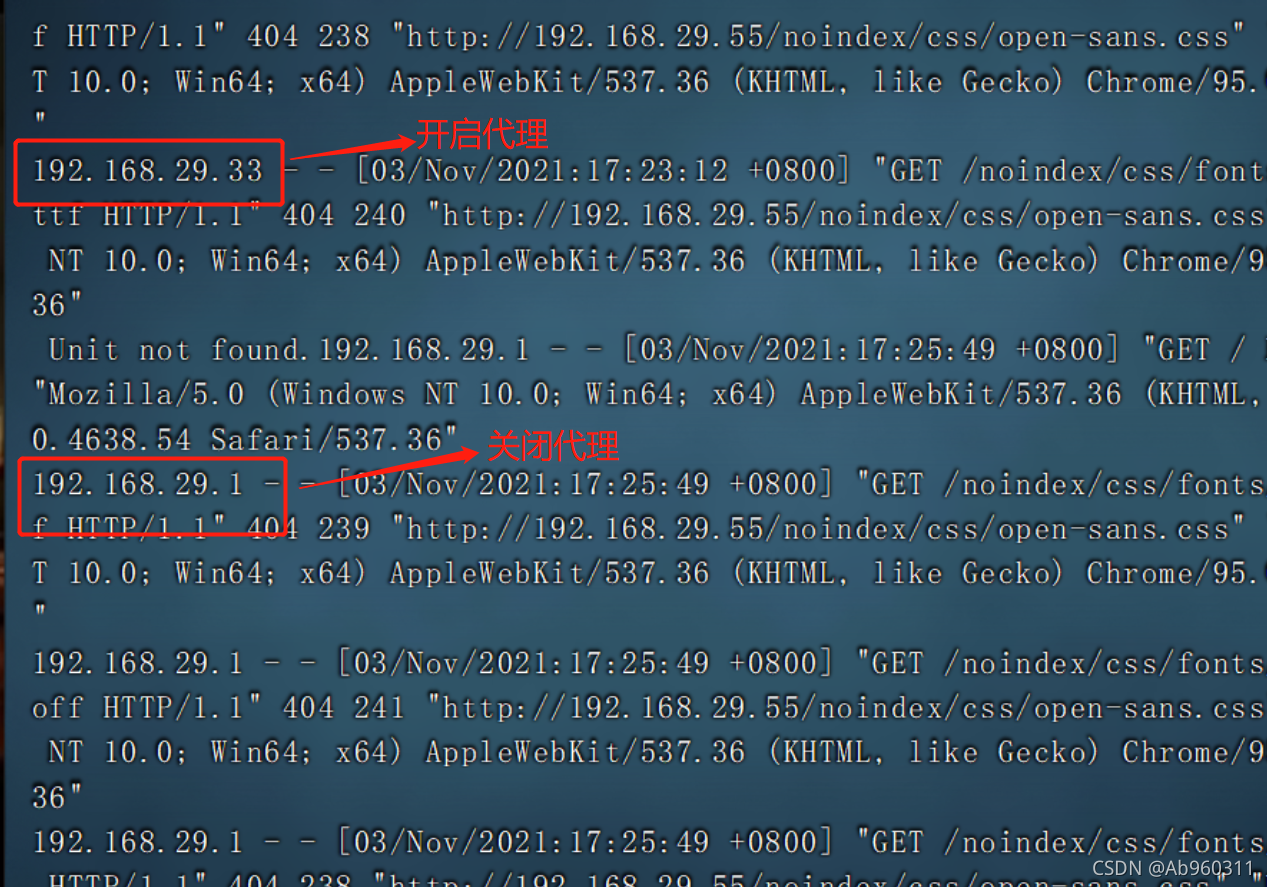
2.5 #动态查看访问日志,观察来访IP
tail -f /var/log/httpd/access_log
三 .透明代理
基于传统模式上建设
首先在代理服务器上添加一张网卡
3.1 Squid服务器配置
cd /etc/sysconfig/network-scripts/
cp ifcfg-ens33 ifcfg-ens36
vim ifcfg-ens36
修改36的IP为192.168.100.1
systemctl restart network
vim /etc/squid.conf
#60行修改添加提供内网服务的IP地址,和支持透明代理选项 transparent
......
http_access allow all
http_access deny all
http_port 192.168.100.1:3128 transparent
systemctl restart squid
echo 'net.ipv4.ip_forward = 1' >> /etc/sysctl.conf
sysctl -p
iptables -F
iptables -t nat -F
#添加防火墙规则(将来源为100网段:80/443端口的流量重定向到3128端口)
iptables -t nat -I PREROUTING -i ens37 -s 192.168.100.0/24 -p tcp --dport 80 -j REDIRECT --to 3128
iptables -t nat -I PREROUTING -i ens37 -s 192.168.100.0/24 -p tcp --dport 443 -j REDIRECT --to 3128
#若进行重启,则需要配置以下规则
iptables -I INPUT -p tcp --dport 3128 -j ACCEPT3.2 测试
3、客户端关闭代理,修改win10地址为100网段

#访问web1服务器
四、ACL访问控制
4.1 修改配置文件
vim /etc/squid.conf
acl localhost src 192.168.100.100/24
http_access deny host
systemctl restart squid
4.2 测试
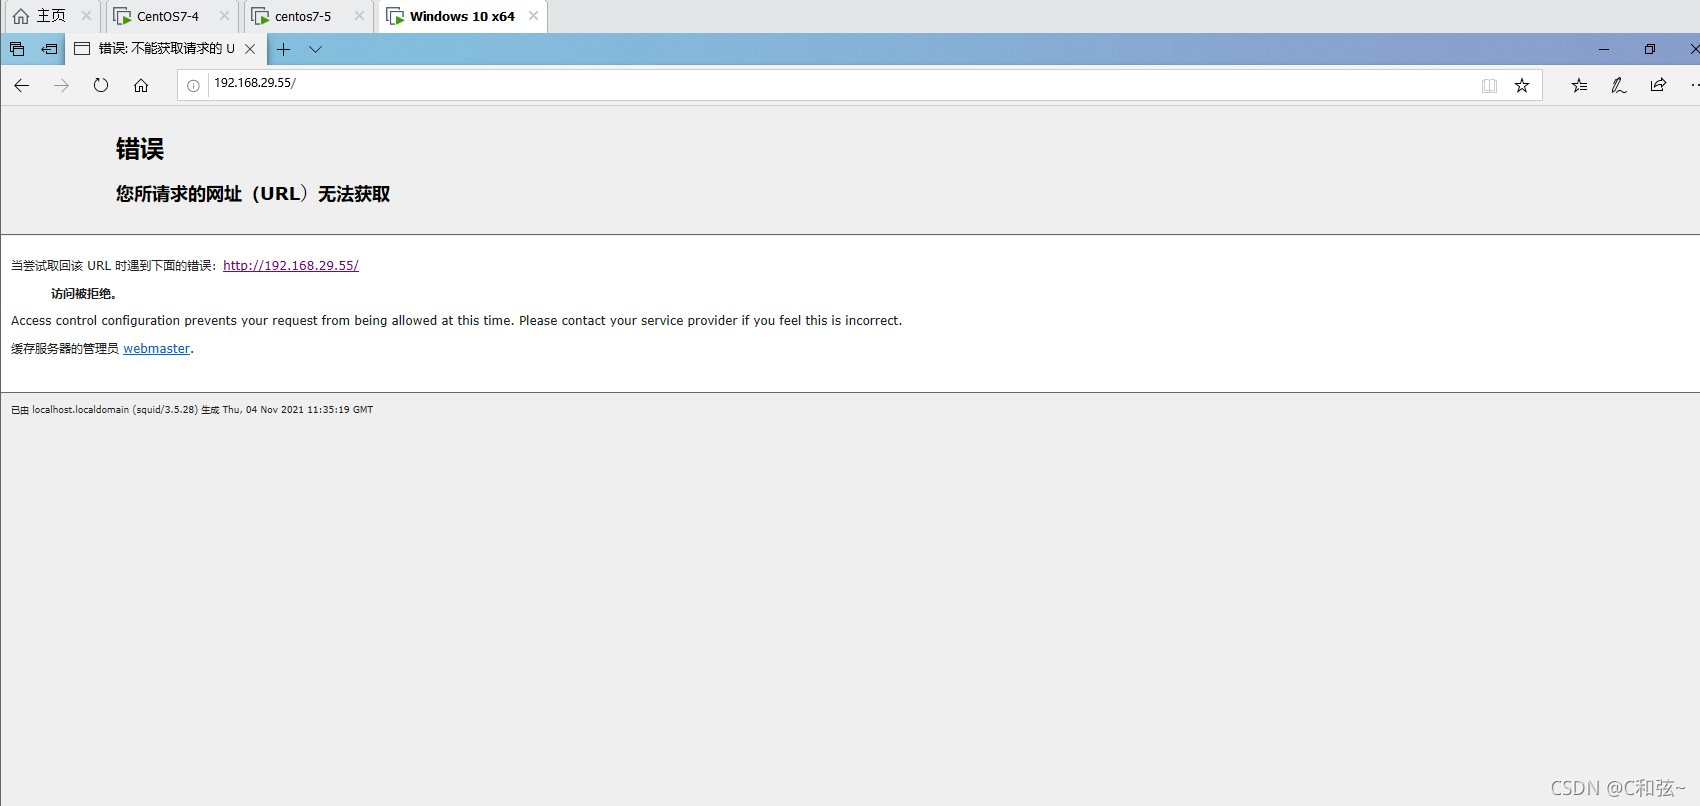
五 . Squid 日志分析
5.1代理服务器配置
yum install -y gd gd-devel pcre-devel

mkdir /usr/local/sarg

#将zxvf sarg-2.3.7.tar.gz压缩包上传到/opt目录下
tar zxvf sarg-2.3.7.tar.gz -C /opt/

cd /opt/sarg-2.3.7
./configure --prefix=/usr/local/sarg \
--sysconfdir=/etc/sarg \     #配置文件目录,默认是/usr/loca/etc
--enable-extraprotection       #额外安全防护

./configure --prefix=/usr/local/sarg --sysconfdir=/etc/sarg --enable-extraprotection

make && make install
vim /etc/sarg/sarg.conf
--7行--取消注释
access_log /usr/local/squid/var/logs/access.log #指定访问日志文件
--25行--取消注释
title "Squid User Access Reports" #网页标题
--120行--取消注释,修改
output_dir /var/www/html/sarg #报告输出目录
--178行--取消注释
user_ip no #使用用户名显示
--184行--取消注释,修改
topuser_sort_field connect reverse #top排序中,指定连接次数采用降序排列,升序是normal
--190行--取消注释,修改
user_sort_field connect reverse #对于用户访问记录,连接次数按降序排序
--206行--取消注释,修改
exclude_hosts /usr/local/sarg/noreport #指定不计入排序的站点列表的文件
--257行--取消注释
overwrite_report no #同名同日期的日志是否覆盖
--289行--取消注释,修改
mail_utility mailq.postfix #发送邮件报告命令
--434行--取消注释,修改
charset UTF-8 #指定字符集UTF-8
--518行--取消注释
weekdays 0-6 #top排行的星期周期
--525行--取消注释
hours 0-23 #top排行的时间周期
--633行--取消注释
www_document_root /var/www/html #指定网页根目录touch /usr/local/sarg/noreport
ln -s /usr/local/sarg/bin/sarg /usr/local/bin/
#运行
sarg #启动一次记录5.2 验证
在代理端
yum install httpd -y
systemctl start httpd

在squid服务器上使用浏览器访问 http://192.168.29.33/sarg,查看sarg报告网页。

版权声明
本文为[C和弦~]所创,转载请带上原文链接,感谢
https://blog.csdn.net/Ab960311/article/details/121127608
边栏推荐
- JSP学习2
- 查询2013年到2021年的数据,只查询到2020的数据,遇到了这个问题所进行的解决办法
- 服务器日志分析工具(识别,提取,合并,统计异常信息)
- Restful WebService和gSoap WebService的本质区别
- JDBC详解
- leetcode--357. Count the number of different figures
- findstr不是内部或外部命令解决方法
- Detailed tutorial on the use of smoke sensor (mq-2) (based on raspberry pie 3B +)
- Windos中安装labellmg教程
- Pycharm连接远程服务器并实现远程调试
猜你喜欢

使用itextpdf实现截取pdf文档第几页到第几页,进行分片
Research on recyclerview details - Discussion and repair of recyclerview click dislocation

Three point positioning based on ibeacons (wechat applet)
帆软调用动态传参的方法,在标题中设置参数

Chrome插件 之 Selenium IDE、XPath 安装

On the multi-level certificate based on OpenSSL, the issuance and management of multi-level Ca, and two-way authentication

There is a mining virus in the server

帆软实现一个单选按钮,可以统一设置其他单选按钮的选择状态

RecyclerView细节研究-RecyclerView点击错位问题的探讨与修复
poi操作word模板替换数据并且导出word
随机推荐
Chapter I review of e-commerce spike products
连接公司跳板机取别名
There is a mining virus in the server
PyMySQL
Mock测试
Promtail + Loki + Grafana 日志监控系统搭建
org.apache.parquet.schema.InvalidSchemaException: A group type can not be empty. Parquet does not su
微信小程序与低功耗蓝牙通信-往硬件端发送数据(三)
室内外地图切换(室内基于ibeacons三点定位)
使用DialogFragment的一些感受及防踩坑经验(getActivity、getDialog为空,cancelable无效等)
pthread_self()为何重复了
Call wechat customer service applet
Check in system based on ibeacons
Cdh6 based on CM management 3.2 cluster integration atlas 2 one
微信小程序基于udp协议与esp8266进行通信
Can global variables be defined in header files
Prediction of tomorrow's trading limit of Low Frequency Quantization
01-NIO基础之ByteBuffer和FileChannel
Logging module
DDT+Excel进行接口测试
