当前位置:网站首页>【 original 】 VMware Workstation implementation Openwrt soft routing, the ESXI, content is very detailed!
【 original 】 VMware Workstation implementation Openwrt soft routing, the ESXI, content is very detailed!
2022-08-09 10:29:00 【DCTANT】
I thought onlyESXITo be able toOpenwrt软路由,实现DHCP功能,其实不然,So long as the two Ethernet card,Whatever that nic,只需要能在win10Operating system identification got to go,这样比ESXINasty play driven easier,废话不多说,直接上教程.
1、在VMware WorkstationBinding the two nic,Of course is the bridge
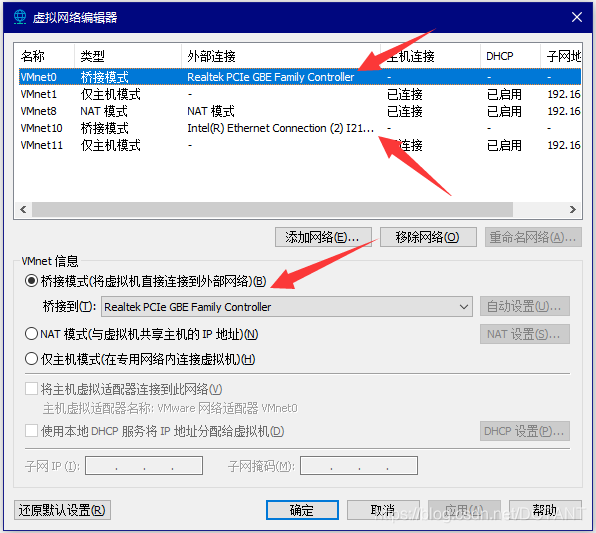
其中的VMnet0默认就有,Just need to bridge mode can be automatically change to the physical machine in the network card,I here is a piece of card realtek crab,Is another piece of melody, nic,The realtek crab card is attached to a router is a network,The cbi, nic connection is a laptop,没有网,这个要注意了,别搞混!
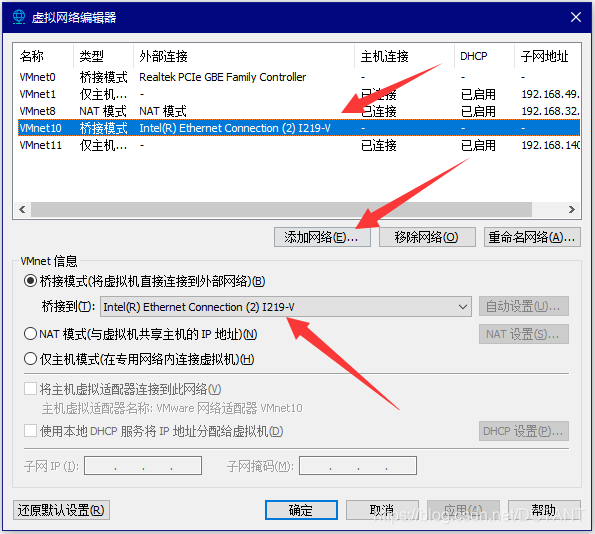
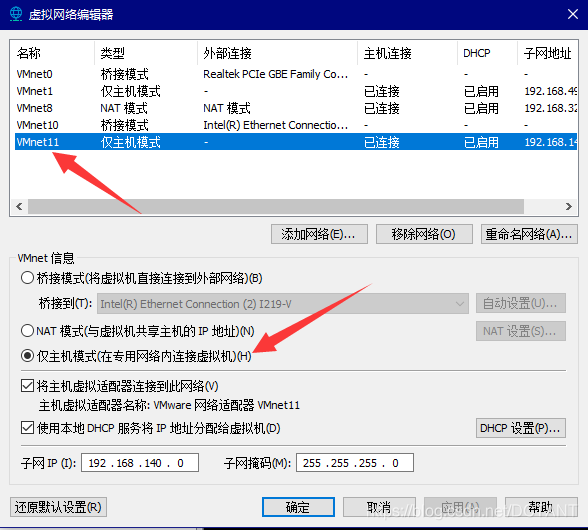
对于VMnet10The network configuration is not original,Need to add a network here,选择“桥接模式”,Choose to connect to the melody,I219-VThe physical network card,Then the two pieces of physical network card inVMware WorkstationThe binding is done,I here is a piece of an extra only host mode of the virtual machine network cardVMnet11,For the proprietary network use,Just to test the allocation effect,没有其他用途,不必深究.
2、找到Openwrt的x86镜像,并转为vmdk文件
![]()
I'm from baidu to find for a long time to find a2021年1月12号的openwrt的x86_64的Openwrt镜像文件,Of course this is not I compile,I don't have the right to put thisimg分享给你们,It to yourself to find
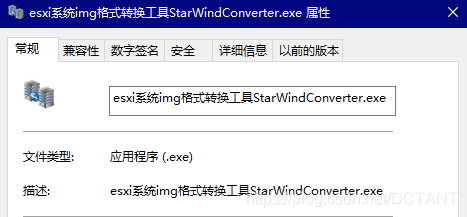
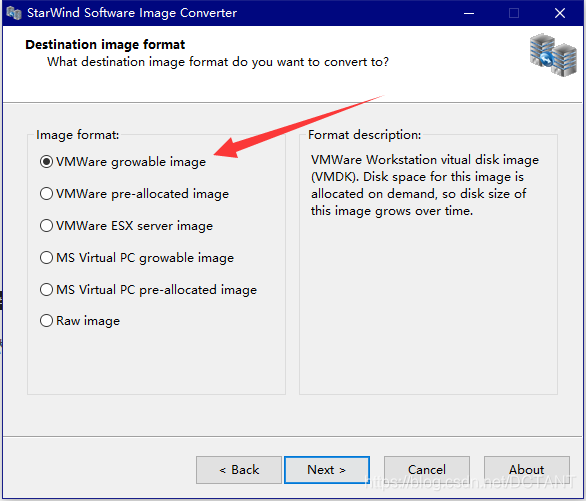
然后使用esxi系统img格式转换工具StarWindConverter.exe,将这个img文件转为vmdk(虚拟机硬盘文件)
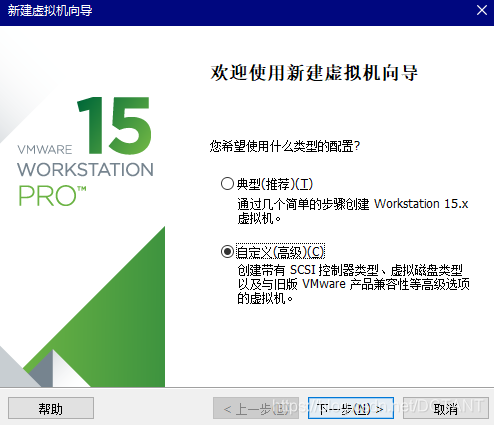
3、建立Openwrt虚拟机
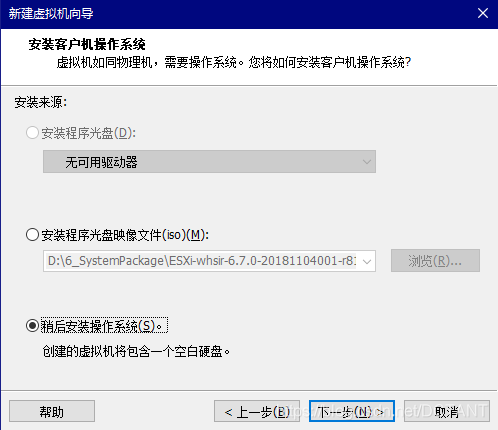
这里记得选择“稍后安装操作系统”
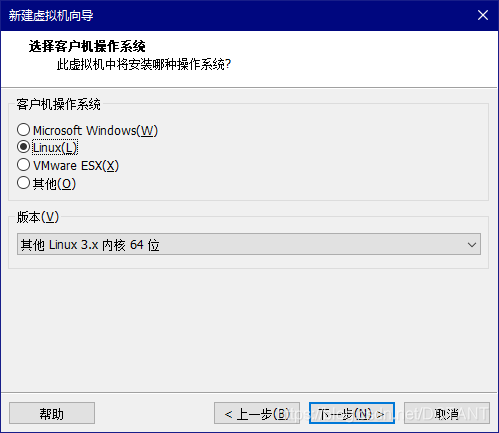
这里选择64位的Linux(注意:我现在的是x86_64位的img,是64位系统,如果是只有x86,则选择32位的Linux)
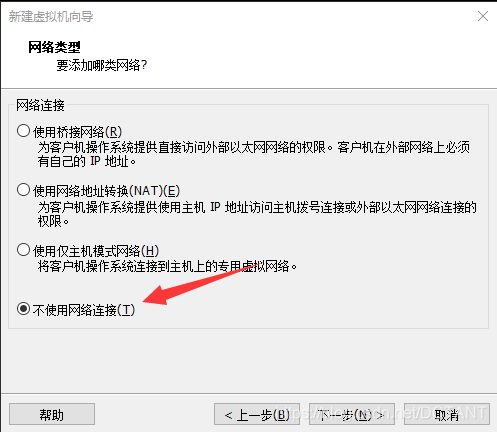
Simply choose not to use the network connection directly,Anyway, back to add
Here must choose to use the existing virtual disk
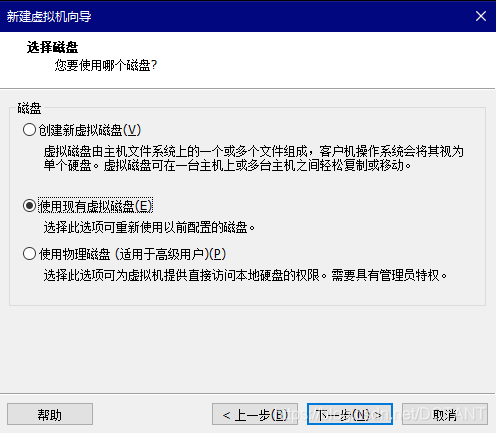
Find the translatevmdk文件

Maintain current format can be,The converted just is able to enhance the capacity of the hard drive,这个openwrt的硬盘2G空间就够了,It is not necessary to make into8T那么大

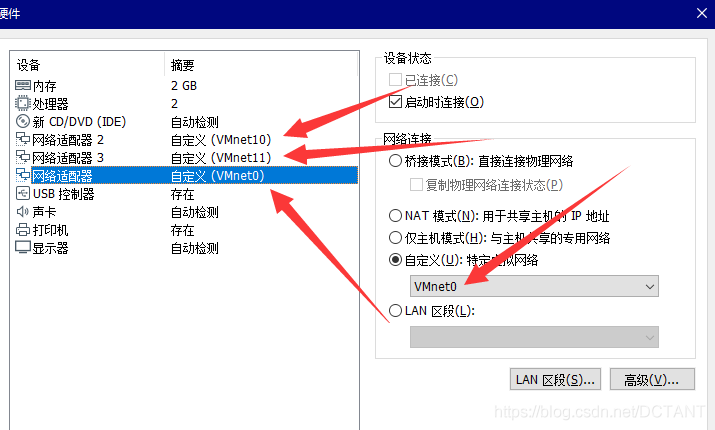
This step is a custom hardware is critical!!

4、自定义硬件,分配网卡

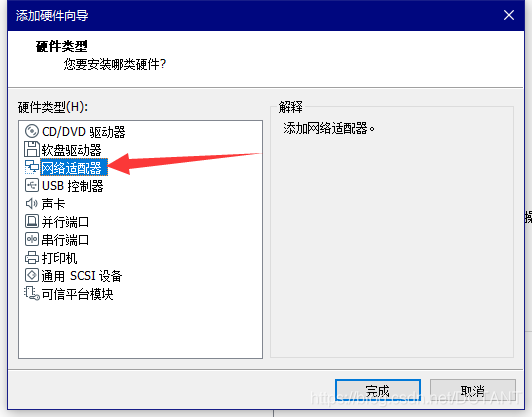
依次添加3块网卡,On the right side all select custom!!将VMware WorkstationBinding a good card to thisOpenwrt虚拟机,这样OpenwrtThe virtual machine can access to these three CARDS,Two bridge,一个仅主机模式(This is used for independent network testing)
5、运行Openwrt虚拟机,并修改配置文件
启动虚拟机,等个30秒左右OpenwrtActually had already started,Within the virtual machine press the enter key will appear to the interface
Check the networkifconfig,默认的ip地址是192.168.*.2
In the browser to access this address will enterOpenwrt的登录界面:

用户名是root,The default password ispassword
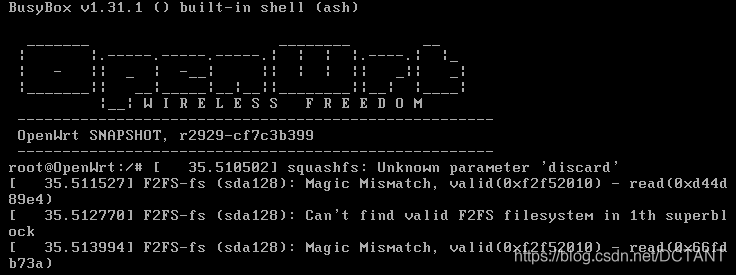
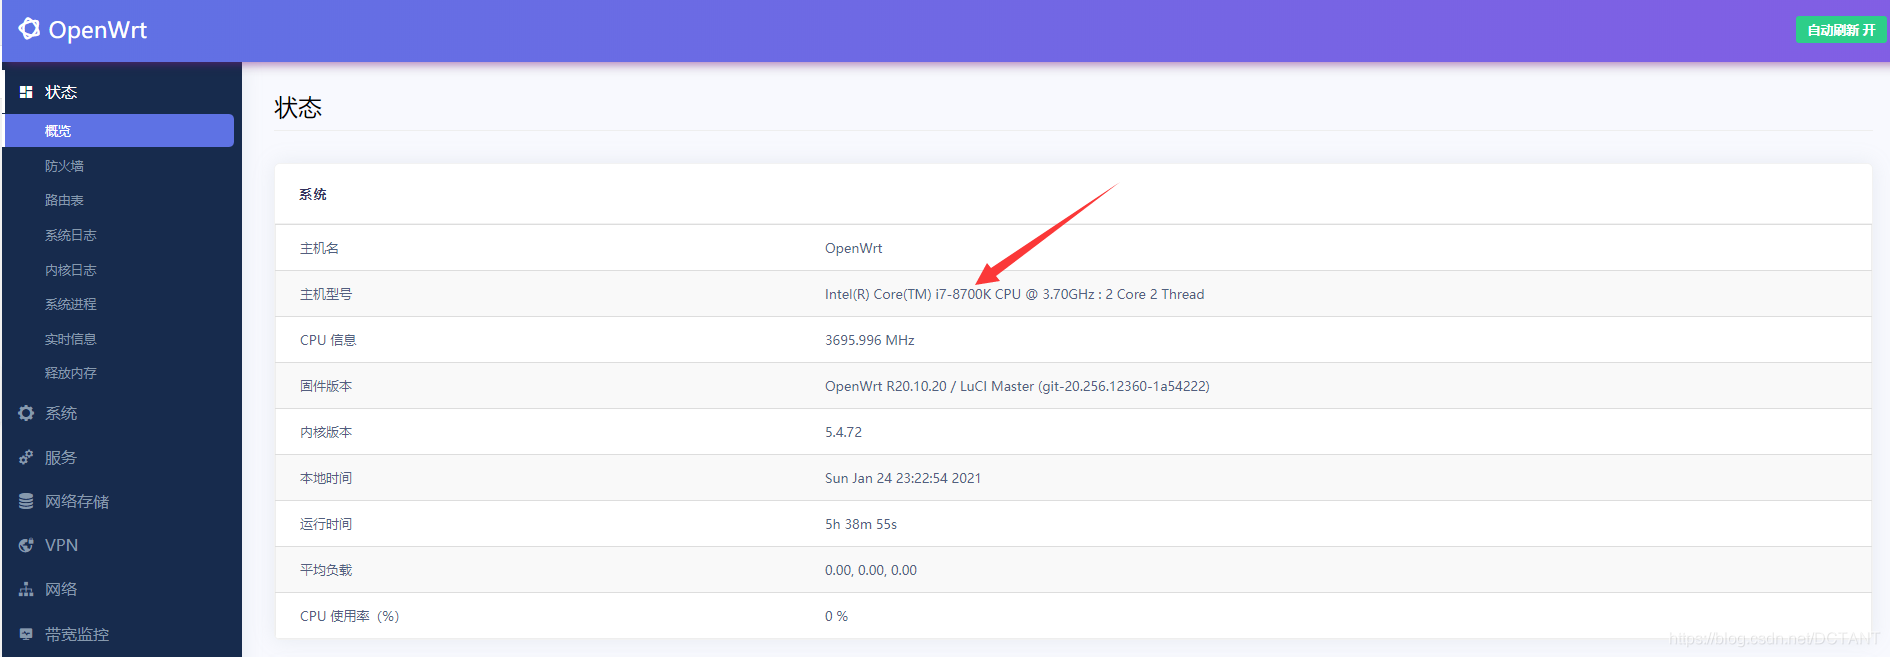
目前openwrt还无法使用,Because of its configuration file is totally wrong,But can already set up some things(8700K CPU的路由器,想想就爽)
The basic set of forwarding must accept!!!!Otherwise assign good port will be refused to visit,That couldn't surf the Internet,Card for me more than an hour,I don't think how laptop completely on the net,Are there was refused to!!
下面的wanSet to accept in order to make the layer of local area network (LAN) access toOpenwrt管理后台,否则只有OpenwrtIn the network equipment can enter into management under the background,This makes debugging difficult,Recommend all acceptance!
Then the most important thing is this turn,All other similar tutorial all have no:Filezilla连接Openwrt虚拟机,And then give out its configuration files,这样可以避免Linux新手在viKnock in the configuration file,Is too cheating!
在FilezillaClick on the upper left corner to increase a site
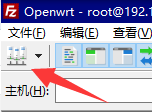
设置主机ip为192.168.*.2,即Openwrt的ip地址,Generally the last are2,用户名为root,General default password aspassword

找到/etc/config文件夹中的network这个文件,Right click to download to local
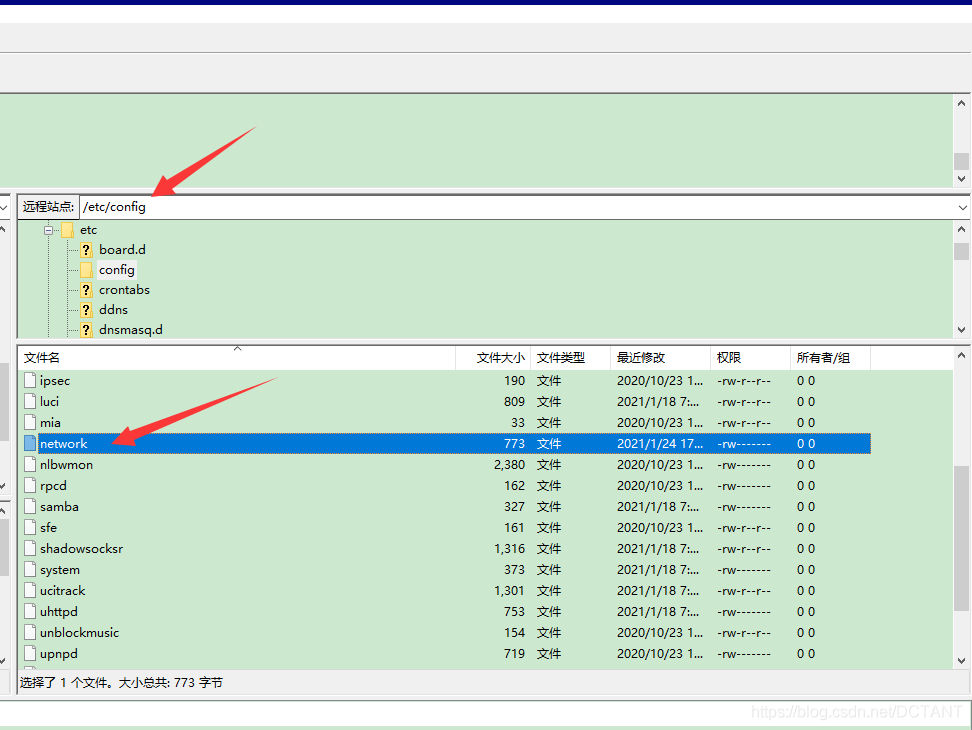
这时候的networkThe file is to let we kill the lamb,不然viThe anti human editors don't know how to waste our time
右键用notepad++打开,然后改成这样:
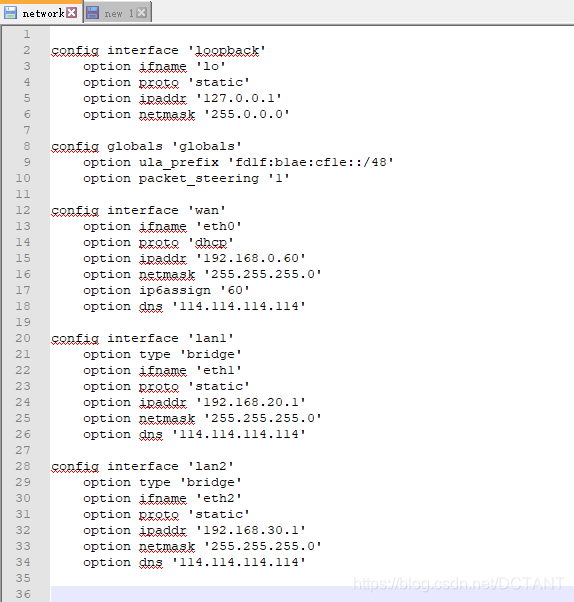
At the bottom of the code can copy:
config interface 'loopback'
	option ifname 'lo'
	option proto 'static'
	option ipaddr '127.0.0.1'
	option netmask '255.0.0.0'

config globals 'globals'
	option ula_prefix 'fd1f:b1ae:cf1e::/48'
	option packet_steering '1'

config interface 'wan'
	option ifname 'eth0'
	option proto 'dhcp'
	option ipaddr '192.168.0.60'
	option netmask '255.255.255.0'
	option ip6assign '60'
	option dns '114.114.114.114'

config interface 'lan1'
	option type 'bridge'
	option ifname 'eth1'
	option proto 'static'
	option ipaddr '192.168.20.1'
	option netmask '255.255.255.0'
	option dns '114.114.114.114'

config interface 'lan2'
	option type 'bridge'
	option ifname 'eth2'
	option proto 'static'
	option ipaddr '192.168.30.1'
	option netmask '255.255.255.0'
	option dns '114.114.114.114'
不过有一点需要注意,wan和lan1、lan2,对于eth0、eth1、eth2是否一一对应,If the binding is wrong it is finished.
我的wan对应eth0Is the bridge from where realtek crab nic,The piece of card is connected to the router with network,lan1对应的eth1Is the melody, nic,Is connected to the notebook is that so,lan2The corresponding is only host mode test card,If it's not all can need not configuration.
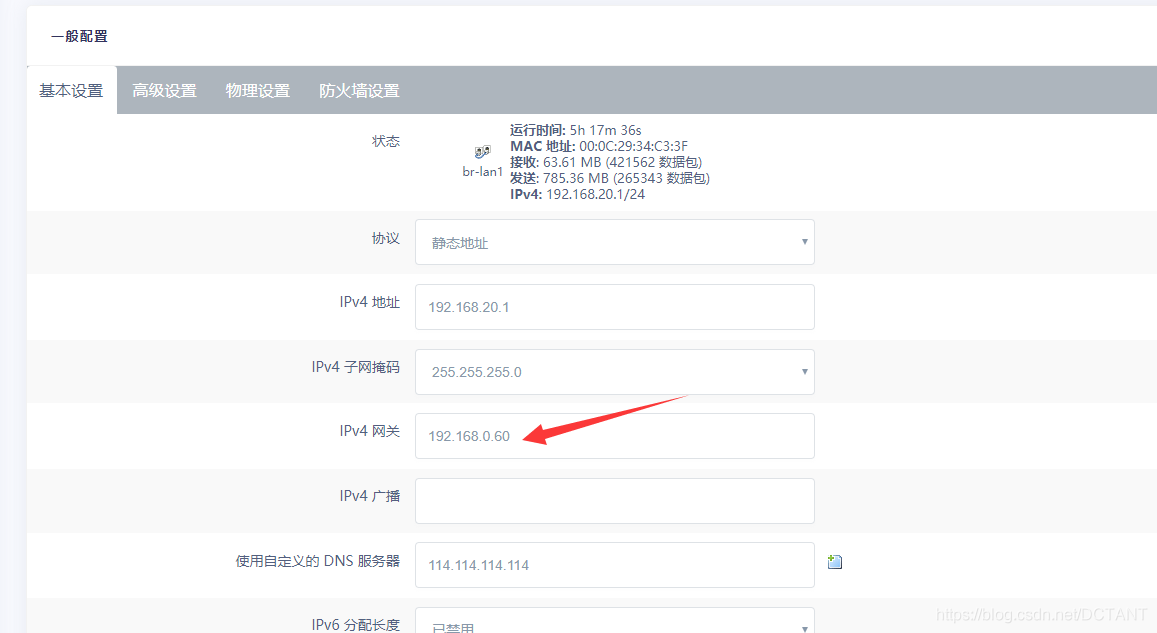
wan中的option ipaddr '192.168.0.60'是设置Openwrt的ip地址,Because I have obsessive-compulsive disorder,Don't want a virtual machine to occupy so onip地址,因此我换成了0.60,注意!!Your router may not be192.168.0.2,可能是192.168.1.2,也有可能是192.168.2.2等等,请不要盲目复制!!Need to be modified in the network according to his!!
lan1中的option ipaddr '192.168.20.1'是OpenwrtThe secondary distribution in the networkip地址的网关地址,也就是说,Connected to the equipment under the network card address is assigned to192.168.20.*
6、上传“network”文件并重启Openwrt
修改完后ctrl+s保存这个network文件,然后用Filezilla上传回Openwrt虚拟机中
在OpenwrtThe virtual machine console input:reboot,按回车,稍微等一会Openwrt就自己重启了
![]()
7、编辑DHCP设置
我们现在要访问OpenwrtThe background, it is not the input192.168.*.2了,现在换成了192.168.*.60(强迫症狂喜)
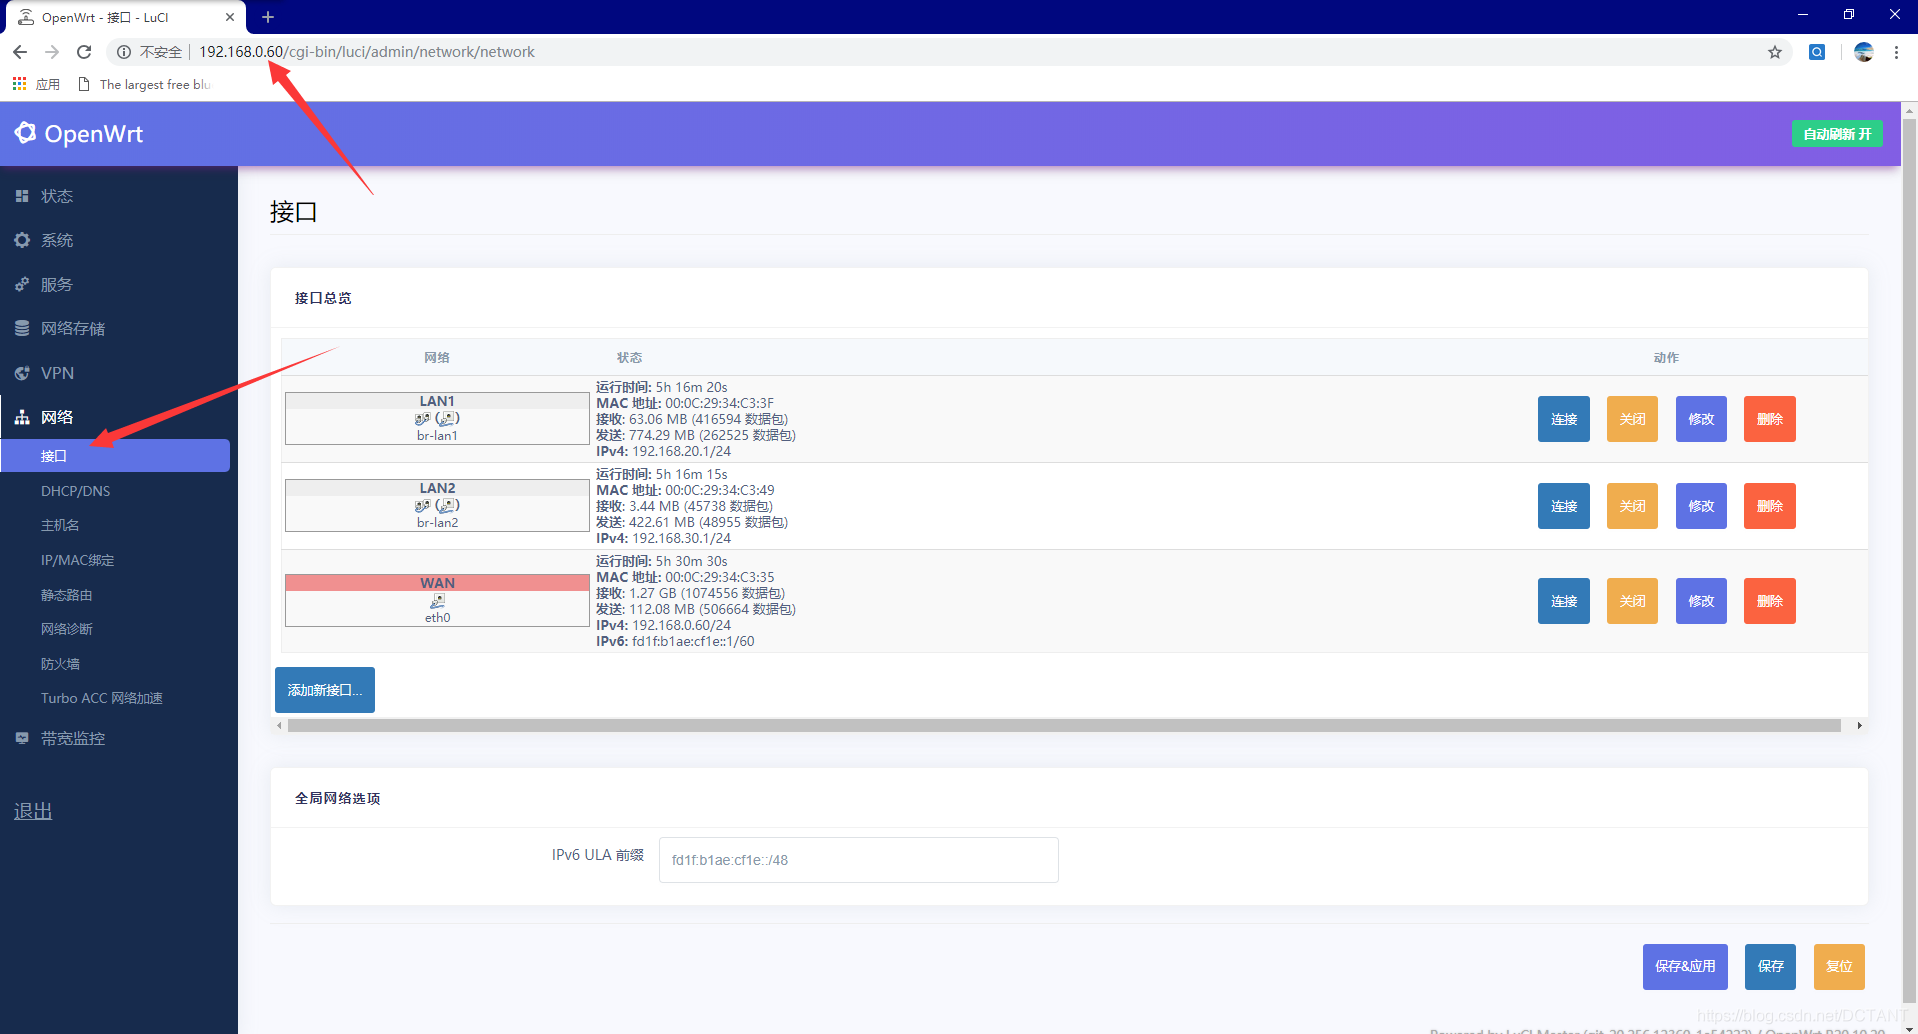
在lan1和lan2设置网关和DHCP

在接口-LAN1最底下有DHCP设置,Be sure to open hereDHCP服务器,Otherwise connected devices do not get toip地址,Have to lose your hands very trouble!
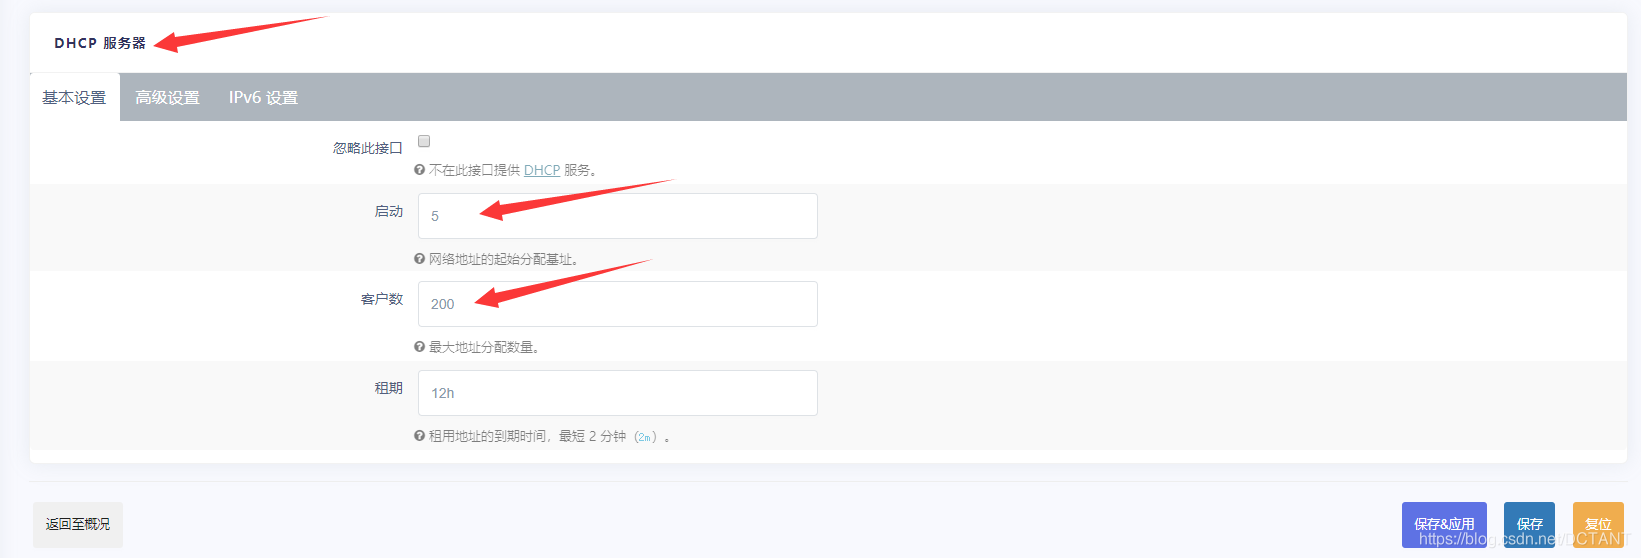
Do a good job in after click save&应用,这样OpenwrtThe configuration is done
8、测试结果
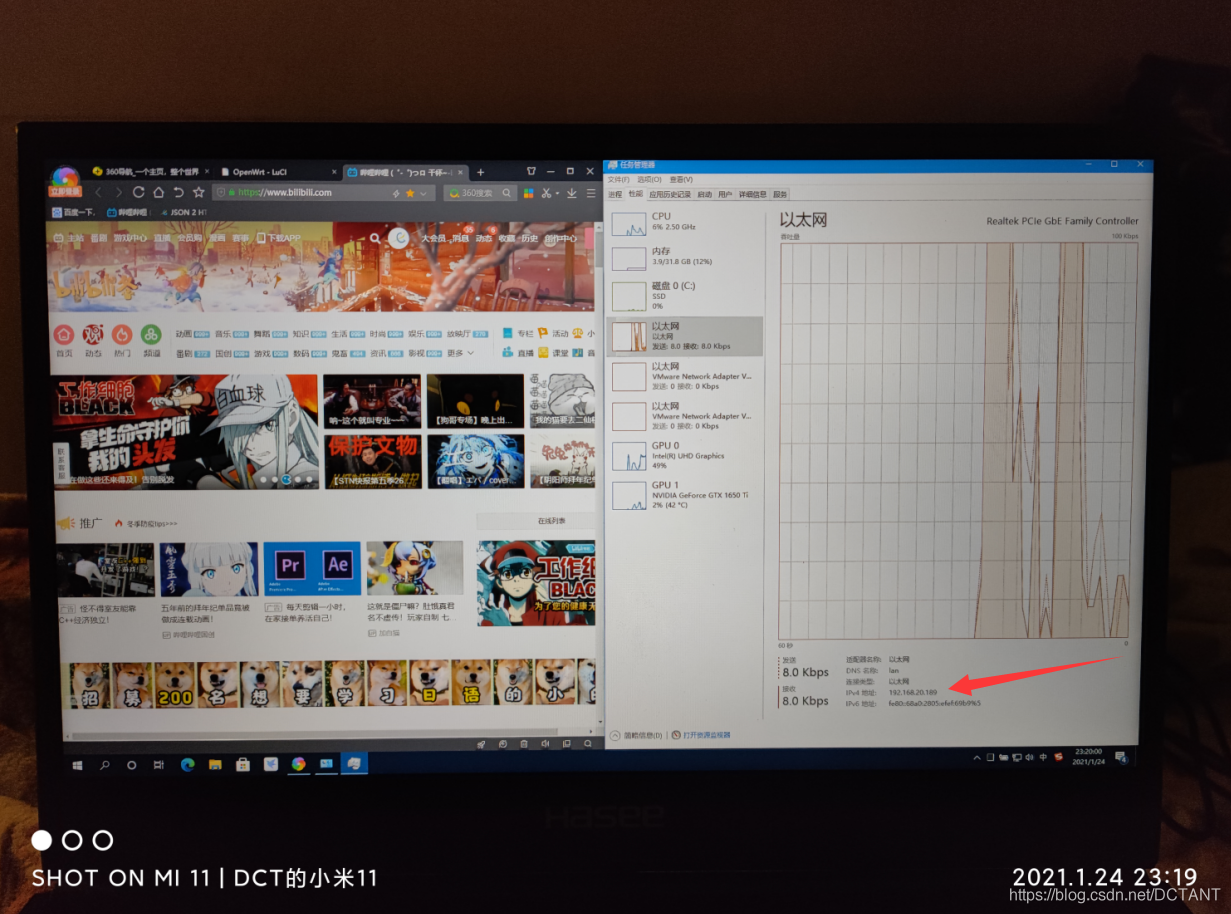
The first is a laptop


Laptop can normal Internet,且分配到的IP地址为:192.168.20.189
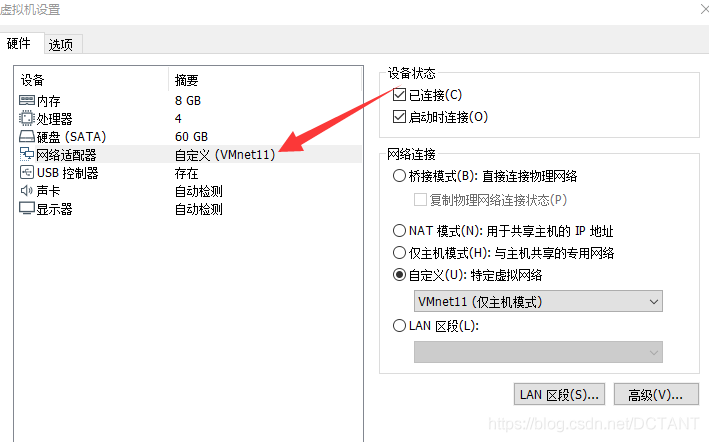
Then the testing proprietary network of virtual machine:

Of course this virtual machine network adapter Settings is to specify the only host mode proprietary network,也能正常使用
This thing for me one afternoon,Success is good is done,能摆脱ESXI就是件好事,Province being nic driver sick,哈哈!
边栏推荐
- Battery modeling, analysis and optimization (Matlab code implementation)
- 强化学习 (Reinforcement Learning)
- MySQL索引的B+树到底有多高?
- 对话跨国消费品牌DPO:数据安全合规从何做起?8.11直播见!
- 开源SPL,WebService/Restful广泛应用于程序间通讯,如微服务、数据交换、公共或私有的数据服务等。
- 分类预测 | MATLAB实现CNN-GRU(卷积门控循环单元)多特征分类预测
- 笔记本电脑使用常见问题,持续更新
- unix环境编程 第十五章 15.6 XSI IPC
- 单元测试2之实际结果检查的引用
- 百度云大文件网页直接下载
猜你喜欢
![[Halcon&定位] 解决Roi区域外的模板匹配成功](/img/ad/549c7e6336ef62469a7c71e6bfcb42.png)
![[项目配置] 配置Qt函数库和ui界面库的封装并调用的项目](/img/e9/d41f144a2f27e76f97cd6401d37578.png)


![[相机配置] 海康相机丢包配置环境](/img/e2/23209f09f1716a6b7e8808082f6aa4.png)

随机推荐
Cpolar内网穿透的面板功能介绍
Redis 缓存主动更新策略
unix环境编程 第十五章 15.6 XSI IPC
1002 写出这个数 (20 分)
深度学习--循环神经网络(Recurrent Neural Network)
VBA实战(11) - 工作表(Sheet) 操作汇总
Battery modeling, analysis and optimization (Matlab code implementation)
[Halcon&定位] 解决Roi区域外的模板匹配成功
MySQL和MyEclipse的数据库连接操作
unix环境编程 第十五章 15.7消息队列
Transformer+Embedding+Self-Attention原理详解
想了解API接口,这一篇就够了
[贴装专题] 基于多目视觉的手眼标定
OpenGL 2.0编程例子
学习NET-SNMP之二-----------VisualStudio编译Net-SNMP
一天半的结果——xmms on E2
开源SPL,WebService/Restful广泛应用于程序间通讯,如微服务、数据交换、公共或私有的数据服务等。
技术分享 | 如何模拟真实使用场景?mock 技术来帮你
集合与函数
自启服务mock联调跨域问题