当前位置:网站首页>Some basic knowledge of devexpress report development
Some basic knowledge of devexpress report development
2022-04-23 20:21:00 【First code】
ASP Project use DevExpress The developed report is really powerful and flexible , It's easy to use , It is also often used in projects , occasionally , After a long time, I don't have to , It's also easy to forget the operation , Then the development of record report is as follows :
1. install DevExpress
Reference resources :Devexpress 14.1 Installation record
DevExpress Once installed , stay VS On the control bar , One more DevExpress Feature plugin , That means you can directly build DevExpress The report is waiting
2. Project add reference
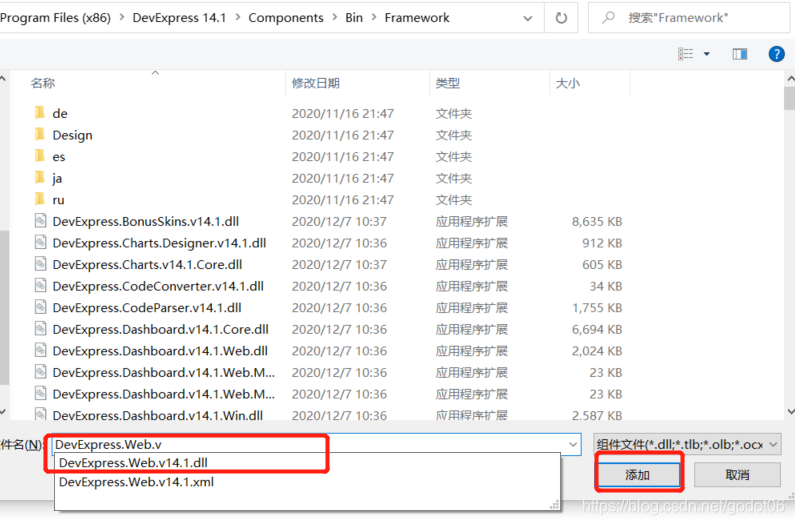
After the installation , Before we start building again , We need to add references to our project first , If it is ASP report form , We need to add the following two reference files :
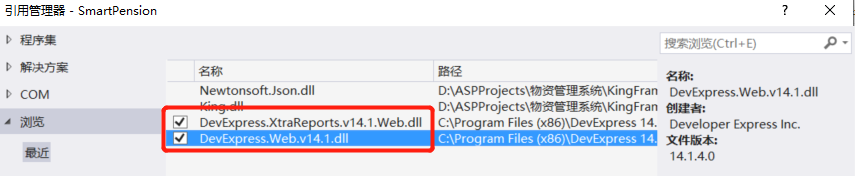
these two items. , stay DevExpress The installation directory bin/framework Next , Default installation path reference :C:\Program Files (x86)\DevExpress 14.1\Components\Bin\Framework\..
The way to add a reference is simple , Only need VS Right click the reference , Add application , choice Browse , Find... In the installation path bin/framework, Select two files in the screenshot .dll, There are more documents , You can use search to filter
3. New report
stay ASP Create a new report in the project , Generally, four files are required :
(1)ReportList.aspx Front end static web page , Display file for trigger not generated by report
(2)ReportList.js Corresponding to the report trigger file js file , Main task : One is to complete the of ReportList.aspx Rendering and processing of file data ; Second, trigger report generation ;
(3)ReportShow.aspx It is mainly used for DevExpress Report style file , complete DevExpress Some basic configurations of the report , Such as report button / Save some configuration properties, etc , Similar to manifest file ; But the key is this file ReportShow.aspx.cs The following completes the operation of sending a request to the back-end data , Get report data , Data binding for the fourth file .
(4)ReportShow.cs That's it DevExpress The core of the report , The design of report format and data binding should be completed .
Last four files , From the perspective of user request Publishing , Its execution sequence is basically from 1-4.
3.1 ReportList.aspx Front end static web page interaction interface
Complete condition filtering , Initiate reports and other operations , There is basically nothing to pay attention to , The only thing to note is that you need to specify the corresponding processing js file
Page reference code :
The effect of this page is , It mainly completes the front-end interactive page display and report triggering , Then the key point is to bind the corresponding js Treatment inlet
<%@ Page Language="C#" AutoEventWireup="true" CodeBehind="CompanyReport.aspx.cs" Inherits="FunnyPig.BookReport.CompanyReport" %>
<!DOCTYPE html>
<html xmlns="http://www.w3.org/1999/xhtml">
<head runat="server">
<meta http-equiv="Content-Type" content="text/html; charset=utf-8"/>
<title></title>
<meta name="renderer" content="webkit" />
<meta http-equiv="X-UA-Compatible" content="IE=edge,chrome=1" />
<meta name="viewport" content="width=device-width, initial-scale=1.0, minimum-scale=1.0, maximum-scale=1.0, user-scalable=0" />
<link rel="stylesheet" href="/UIAdmin/layui/css/layui.css" media="all" />
<link rel="stylesheet" href="/UIAdmin/style/admin.css" media="all" />
</head>
<body>
<div class="layui-fluid">
<div class="layui-card layui-row layui-col-space15">
<div class="layui-col-xs12 layui-col-md12">
<div class="layui-form layui-card-header layuiadmin-card-header-auto" lay-filter="lay-admin">
<div class="layui-form-item">
<div class="layui-inline">
<label class="layui-form-label"> Time of receiving orders :</label>
<input type="text" name="startTime" id="startTime" placeholder=" Please select the start time " autocomplete="off" class="layui-input layui-input-inline"/> —
<%--<input type="text" id="placeid" name="placeid" class="layui-hide" value="0"/>--%>
</div>
<div class="layui-inline">
<input type="text" name="endTime" id="endTime" placeholder=" Please select the end time " autocomplete="off" class="layui-input layui-input-inline"/>
</div>
<div class="layui-inline">
<button class="layui-btn layuiadmin-btn layui-btn-normal" id="searchBtn">
<i class="layui-icon layui-icon-search layuiadmin-button-btn"></i>
</button>
<input id="btnClose" type="button" value="button" class="layui-hide" onclick="loadClose()" />
</div>
</div>
</div>
</div>
<div class="layui-col-xs12 layui-col-md12">
<div class="layui-card">
<div class="layui-card-body">
<iframe id="conFrame" name="conFrame" style="width: 100%;" scrolling="no" frameborder="0"></iframe>
</div>
</div>
</div>
</div>
</div>
<script src="/UIAdmin/layui/layui.js"></script>
<script>
layui.config({
base: '/UIAdmin/' // The path of the static resource
, version: true
}).extend({
index: 'lib/index', // Main entrance module
CompanyReportMod: '{/}/SmartPension/BookReport/CompanyReportMod'// Daily report entry module
}).use(['index', 'CompanyReportMod'], function () {
var CompanyReportMod = layui.CompanyReportMod;
CompanyReportMod.init();
});
</script>
</body>
</html>
3.2 ReportList.js Report entry response entry
This is mainly done :
(1) Complete some processing of the above interactive page , Such as rendering some data , Or handle some request parameters , Used to request report data query ;
(2) Another key here is to trigger Dev Report generation entry , Specifies the entry file for report generation ;
layui.extend({
    comm: '{/}/UIAdmin/lib/CommonFunction'
});
layui.define(['index', 'comm', 'laydate', 'jquery', 'ztree', 'form', 'layer'], function (exports) {
    var $ = layui.jquery
        , form = layui.form
        , ztree = layui.ztree
        , layer = layui.layer
        , laydate = layui.laydate
        , comm = layui.comm;
    /** Get close to N God */
    function getRecentDay(day) {
        var today = new Date();
        var targetday_milliseconds = today.getTime() + 1000 * 60 * 60 * 24 * day;
        today.setTime(targetday_milliseconds);
        var tYear = today.getFullYear();
        var tMonth = today.getMonth();
        var tDate = today.getDate();
        tMonth = doHandleMonth(tMonth + 1);
        tDate = doHandleMonth(tDate);
        return tYear + "-" + tMonth + "-" + tDate;
    }
    function doHandleMonth(month) {
        var m = month;
        if (month.toString().length == 1) {
            m = "0" + month;
        }
        return m;
    }
    laydate.render({
        elem: '#startTime'
                , type: 'date'
                , value: getRecentDay(-30)
    });
    laydate.render({
        elem: '#endTime'
                , type: 'date'
                , value: new Date()
    });
    var index;
    var ifm = document.getElementById("conFrame");
    ifm.height = document.documentElement.clientHeight - 118;
    var obj = {
        init: function () {
            this.queryReg();// Initialize list data
        },
        queryReg: function () {
            $("#searchBtn").click(function () {
                index = layer.msg(' Report generation , Please later ...', { icon: 16, time: false, shade: 0.3 });
                var url = "CompanyReportShow.aspx?jsonData=";   //  Specify the entry file for report generation
                var parms = form.val("lay-admin");
                console.log(parms);
                url += JSON.stringify(parms);    //  The data request condition parameters are constructed
                $("#conFrame").attr("src", url);
            });
        }
    }

    window.loadClose = function () {
        layer.close(index);
    }
    exports('CompanyReportMod', obj);
})
3.3 ReportShow.aspx List configuration + Data request
(1) It is mainly used for DevExpress Report style file , complete DevExpress Some basic configurations of the report , Such as report button / Save some configuration properties, etc , Similar to manifest file ;
(2) The key is this file ReportShow.aspx.cs The following completes the operation of sending a request to the back-end data , Get report data , Data binding for the fourth file .
Listing configuration code , This can basically be copied , There's nothing extra to pay attention to :
<%@ Register Assembly="DevExpress.XtraReports.v14.1.Web, Version=14.1.4.0, Culture=neutral, PublicKeyToken=b88d1754d700e49a" Namespace="DevExpress.XtraReports.Web" TagPrefix="dx" %>
<!DOCTYPE html>
<html xmlns="http://www.w3.org/1999/xhtml" style="height:100%">
<head runat="server">
<meta http-equiv="Content-Type" content="text/html; charset=utf-8" />
<title></title>
<script src="/UIAdmin/layui/layui.js"></script>
<script>
layui.config({
base: '/UIAdmin/' // The path of the static resource
, version: true
}).extend({
index: 'lib/index'// Main entrance module
}).use(['index', 'jquery'], function () {
var $ = layui.jquery;
$("#btnClose", parent.document).click();
});
</script>
</head>
<body style="height:100%;margin:0px;padding:0px">
<form id="form1" runat="server" style="height:100%">
<div style="width:100%;height:100%">
<dx:ASPxDocumentViewer ID="ASPxDocumentViewer1" runat="server" Theme="DevEx" Height="100%">
<SettingsReportViewer PageByPage="true" />
<ToolbarItems>
<dx:ReportToolbarButton ItemKind="PrintReport" ToolTip=" Print " />
<dx:ReportToolbarSeparator />
<dx:ReportToolbarButton Enabled="False" ItemKind="FirstPage" ToolTip=" first page "/>
<dx:ReportToolbarButton Enabled="False" ItemKind="PreviousPage" ToolTip=" The previous page " />
<dx:ReportToolbarLabel ItemKind="PageLabel" Text=" The first :" />
<dx:ReportToolbarComboBox ItemKind="PageNumber" Width="65px">
</dx:ReportToolbarComboBox>
<dx:ReportToolbarLabel ItemKind="OfLabel" Text=" page common :" />
<dx:ReportToolbarTextBox ItemKind="PageCount" />
<dx:ReportToolbarButton ItemKind="NextPage" ToolTip=" The next page " />
<dx:ReportToolbarButton ItemKind="LastPage" ToolTip=" The last page " />
<dx:ReportToolbarSeparator />
<dx:ReportToolbarButton ItemKind="SaveToDisk" ToolTip=" preservation " />
<dx:ReportToolbarComboBox ItemKind="SaveFormat" Width="70px">
<Elements>
<dx:ListElement Value="xls" Text="EXCEL" />
<dx:ListElement Value="xlsx" Text="EXCEL 2010" />
<dx:ListElement Value="rtf" Text="WORD" />
<dx:ListElement Value="pdf" Text="PDF" />
<dx:ListElement Value="png" Text=" picture " />
</Elements>
</dx:ReportToolbarComboBox>
</ToolbarItems>
</dx:ASPxDocumentViewer>
</div>
</form>
</body>
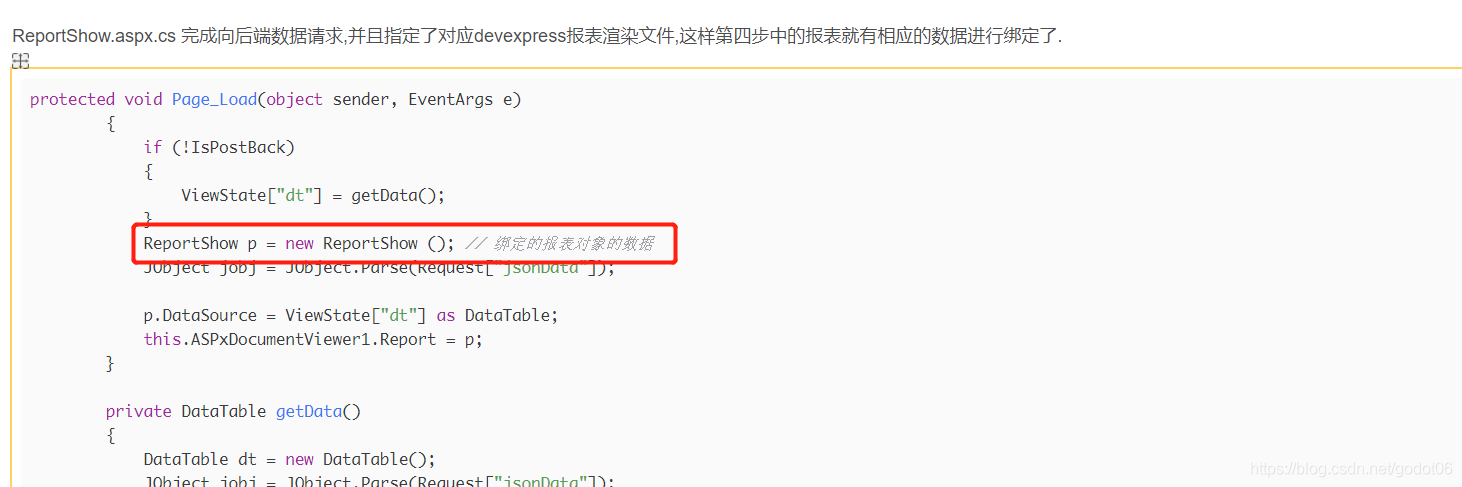
</html>ReportShow.aspx.cs Complete the back-end data request , And the corresponding devexpress Report render file , In this way, the report in step 4 will have corresponding data binding .
protected void Page_Load(object sender, EventArgs e)
        {
            if (!IsPostBack)
            {
                ViewState["dt"] = getData();
            }
            ReportShow p = new ReportShow (); //  The data of the bound report object
            JObject jobj = JObject.Parse(Request["jsonData"]);

            p.DataSource = ViewState["dt"] as DataTable;
            this.ASPxDocumentViewer1.Report = p;
        }

        private DataTable getData()
        {
            DataTable dt = new DataTable();
            JObject jobj = JObject.Parse(Request["jsonData"]);
            string strsql = "exec companyOrderReport @timeStart,@timeEnd";
            SqlCommand cmd = new SqlCommand(strsql);
            string startTime = "";
            string endTime = "";
            if (!string.IsNullOrEmpty(jobj.Value<string>("startTime")))
            {
                startTime = jobj.Value<string>("startTime");
            }
            else
            {
                startTime = DateTime.Now.AddDays(-1).ToString("yyyy-MM-dd");
            }
            if (!string.IsNullOrEmpty(jobj.Value<string>("endTime")))
            {
                endTime = jobj.Value<string>("endTime");
            }
            else
            {
                endTime = DateTime.Now.AddDays(1).ToString("yyyy-MM-dd");
            }
            cmd.Parameters.AddWithValue("@timeStart", startTime);
            cmd.Parameters.AddWithValue("@timeEnd", endTime);
            dt = King.DataBase.SqlServer.GetDataSet(cmd).Tables[0];
            dt.Columns.Add(" date ");
            foreach (DataRow dr in dt.Rows)
            {
                dr[" date "] = startTime + " to " + endTime;
            }
            return dt;
        }
3.4 ReportShow.cs Report design and data rendering
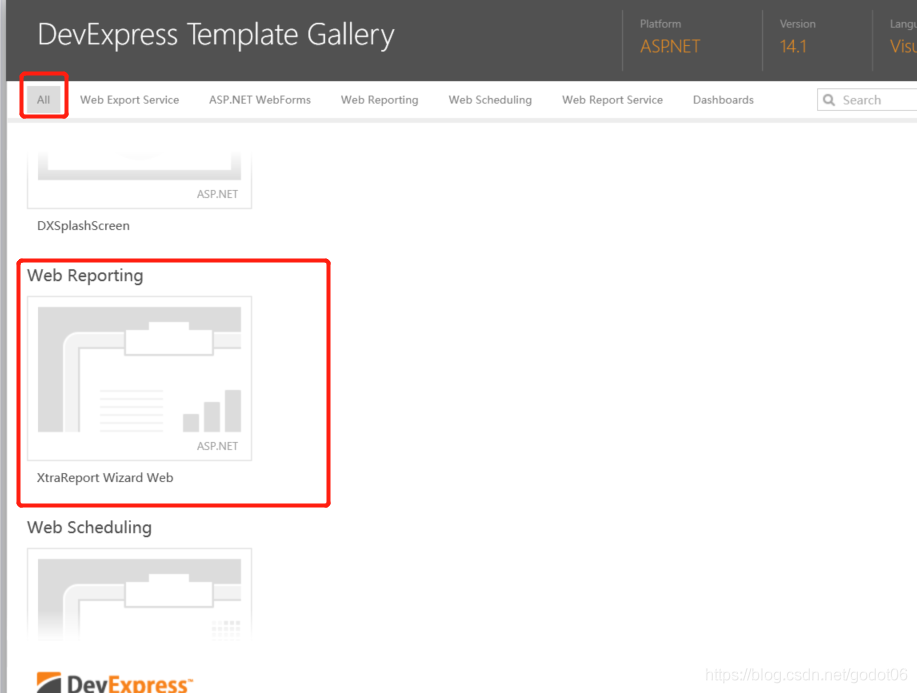
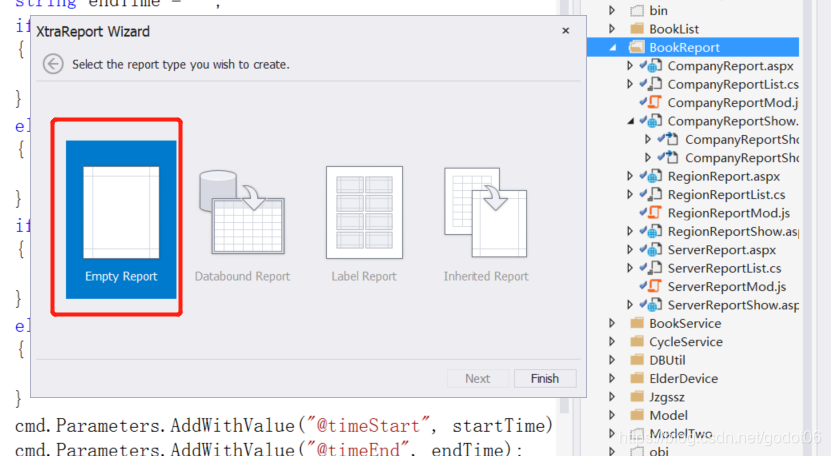
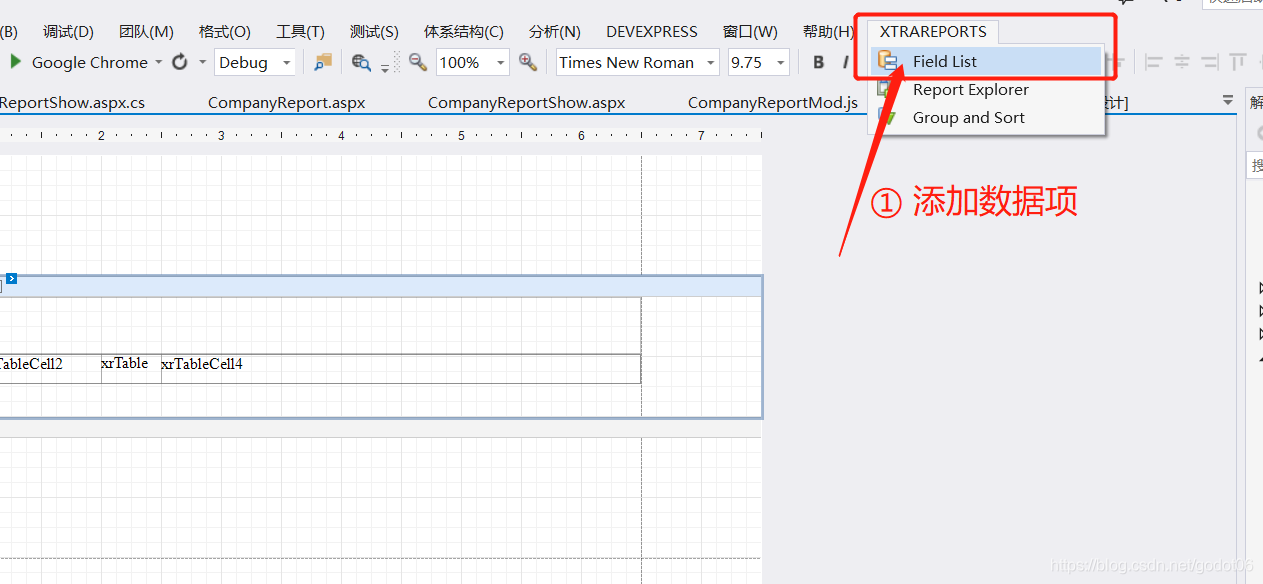
This new file is different from other new files , We need new DevExpress Report file , Then design reports and bind data in this file , The specific operation is as follows :
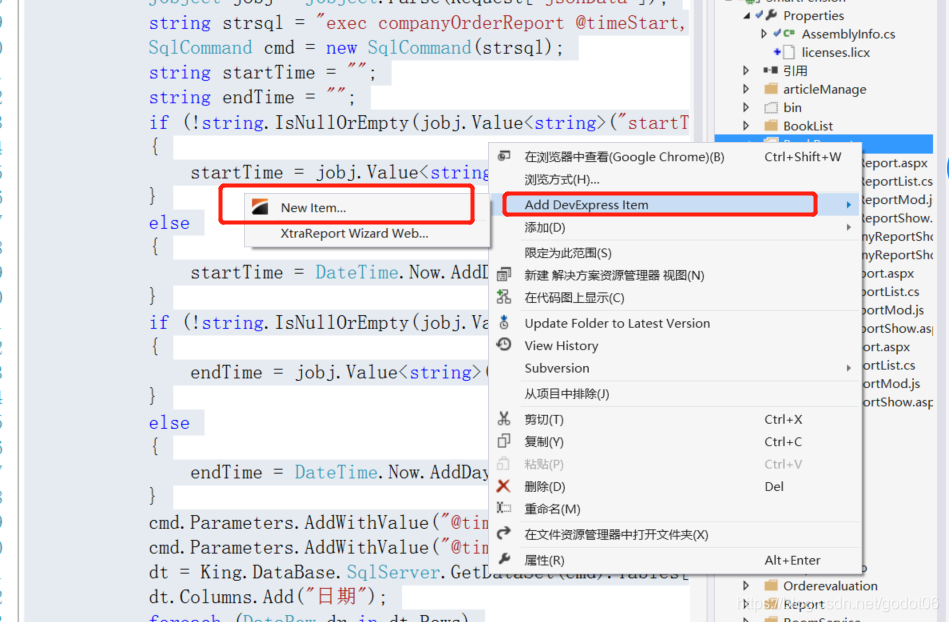
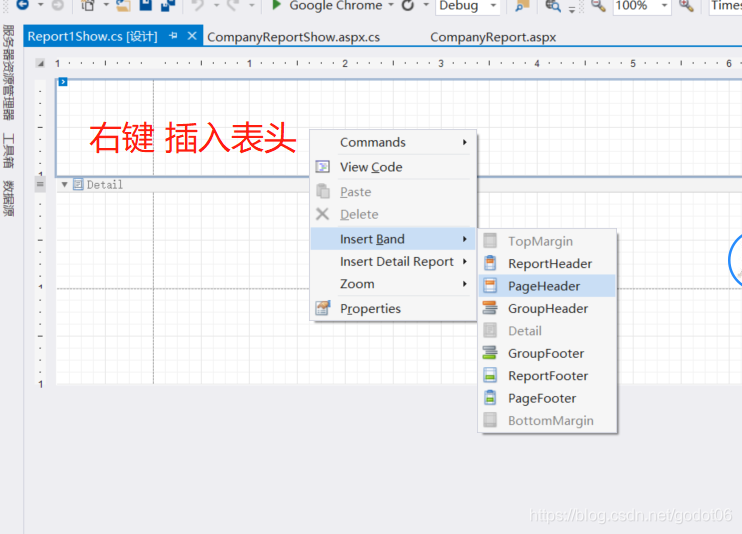
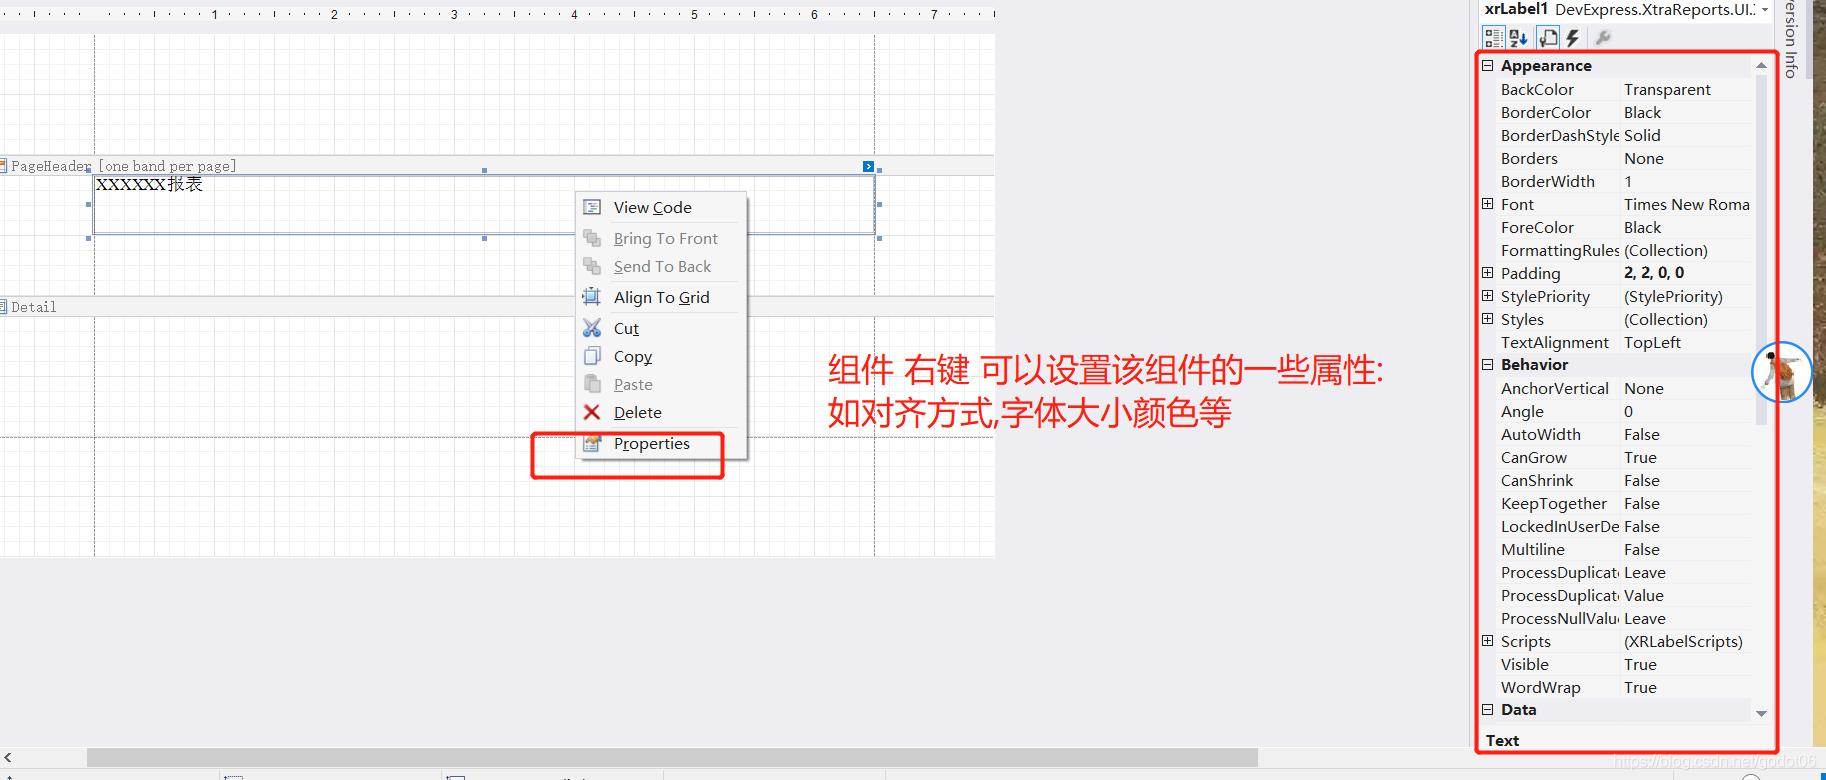
then , Just make a form , Click the tool on the left , choice XRLabel perhaps XRTable
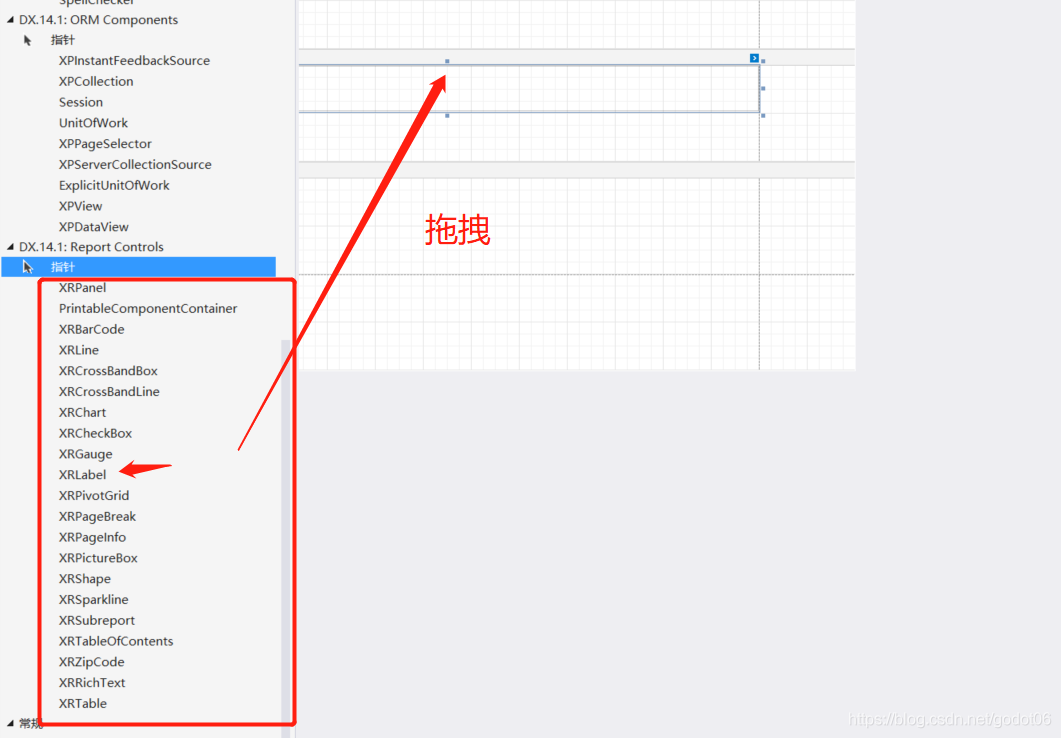
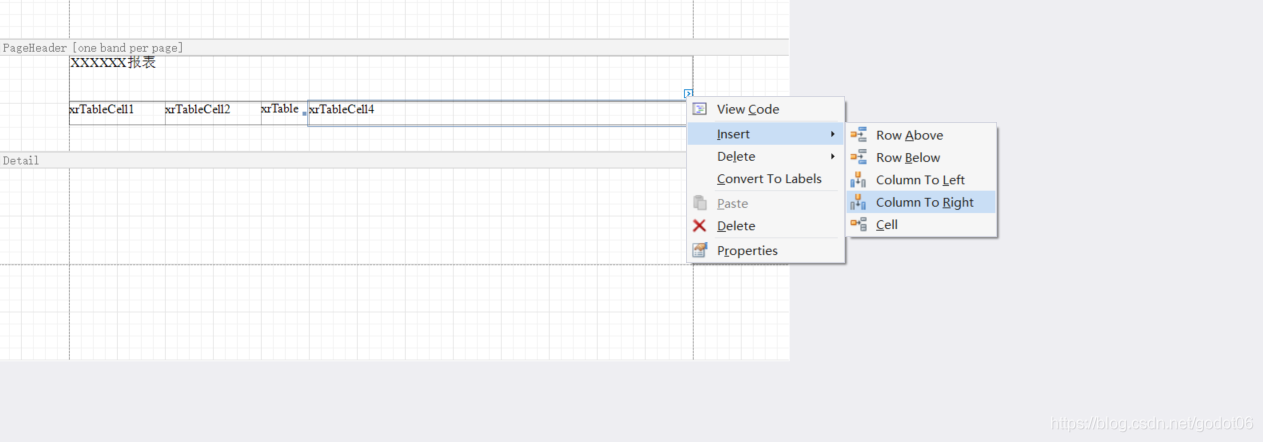
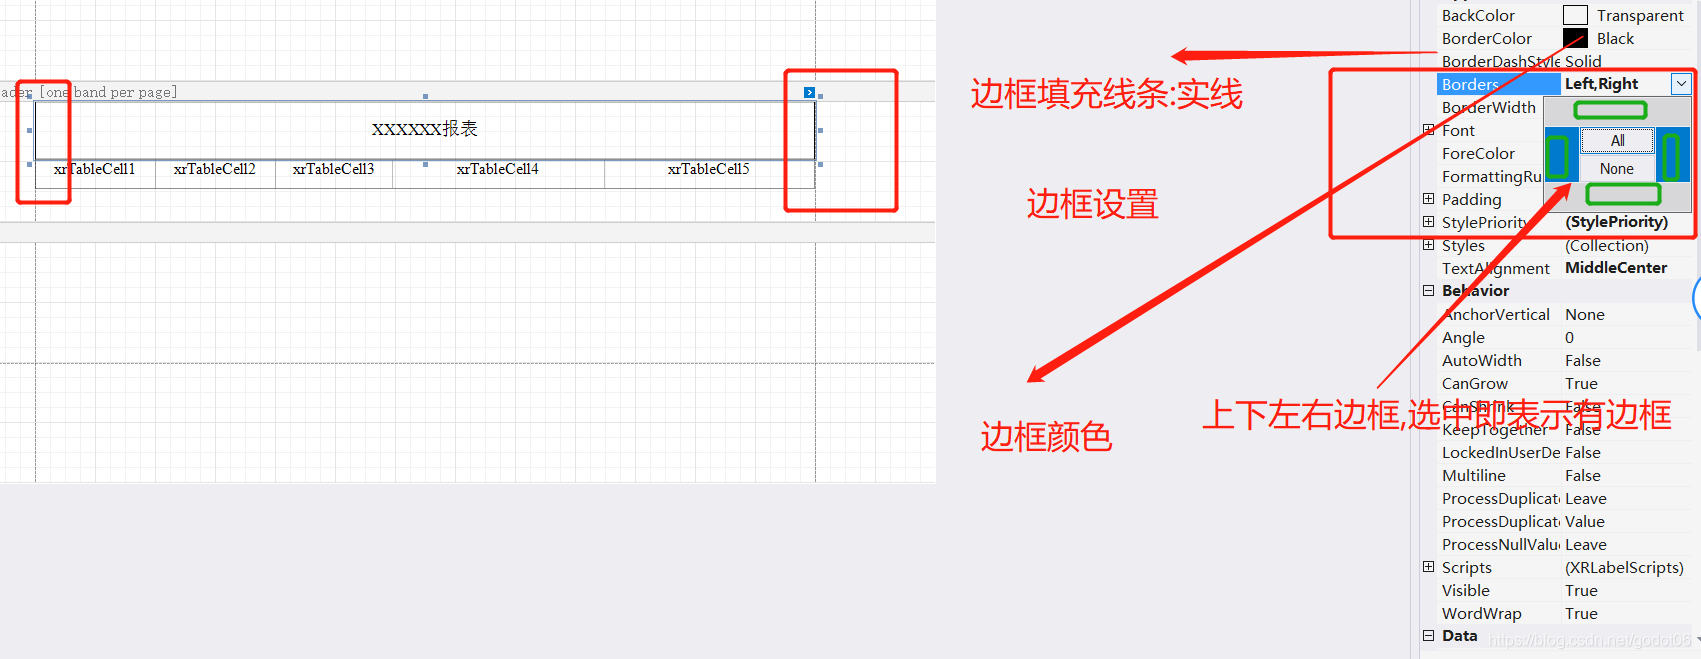
If there are not enough columns in the table , You can right-click insert Add columns left and right item
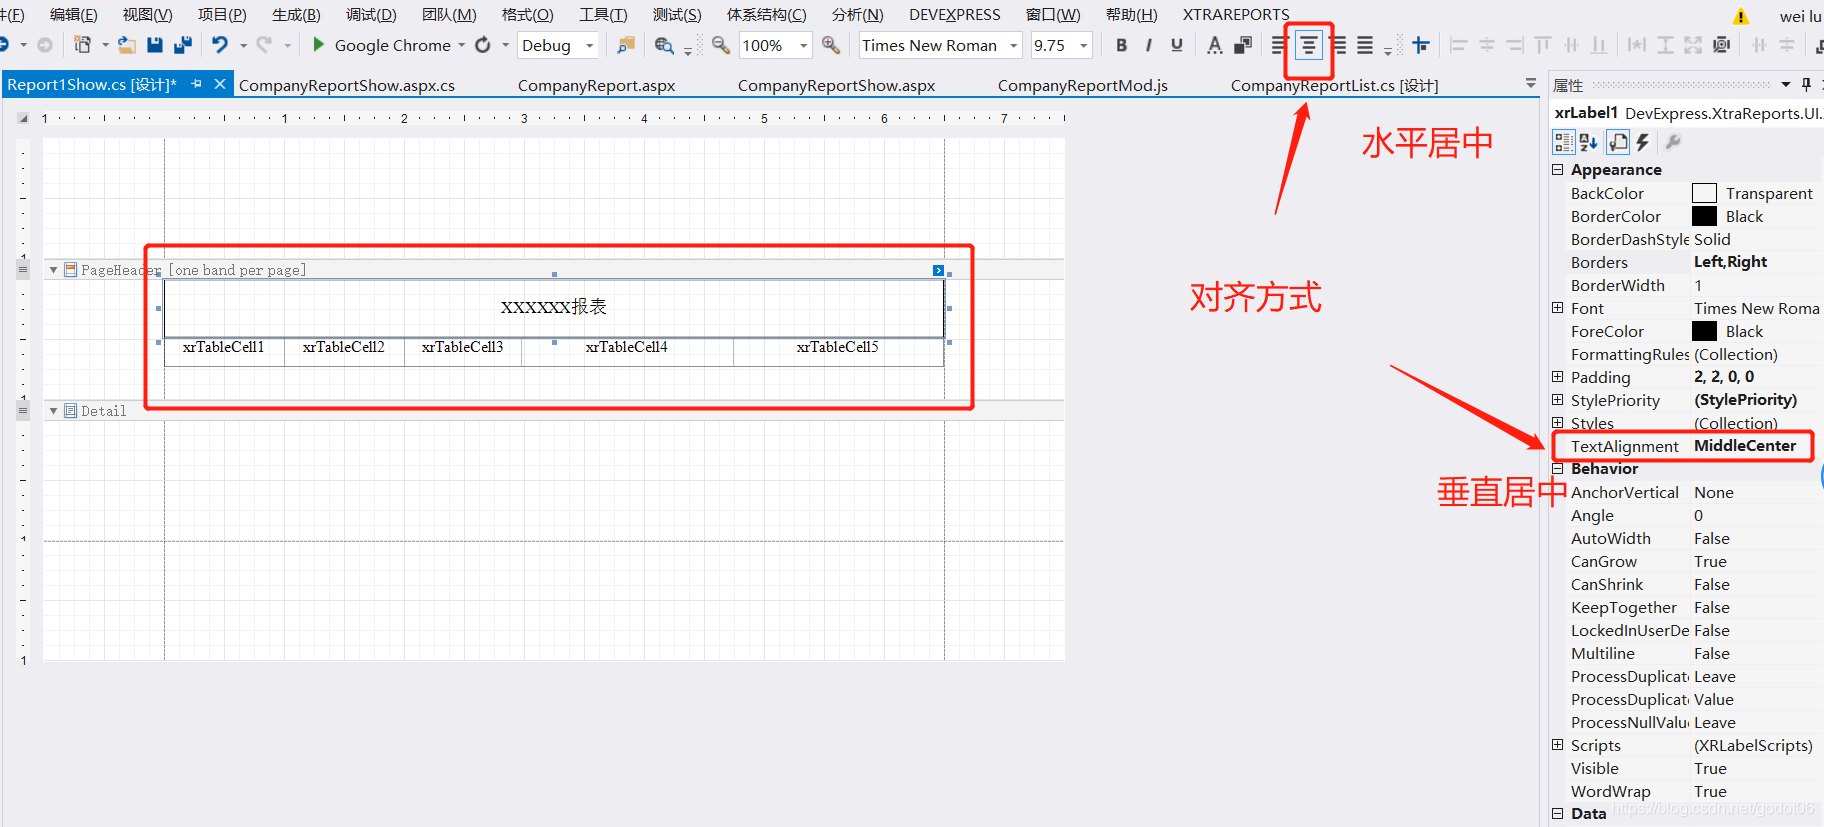
Tables generally also need to be centered and aligned with rectangles , Border design, etc ,
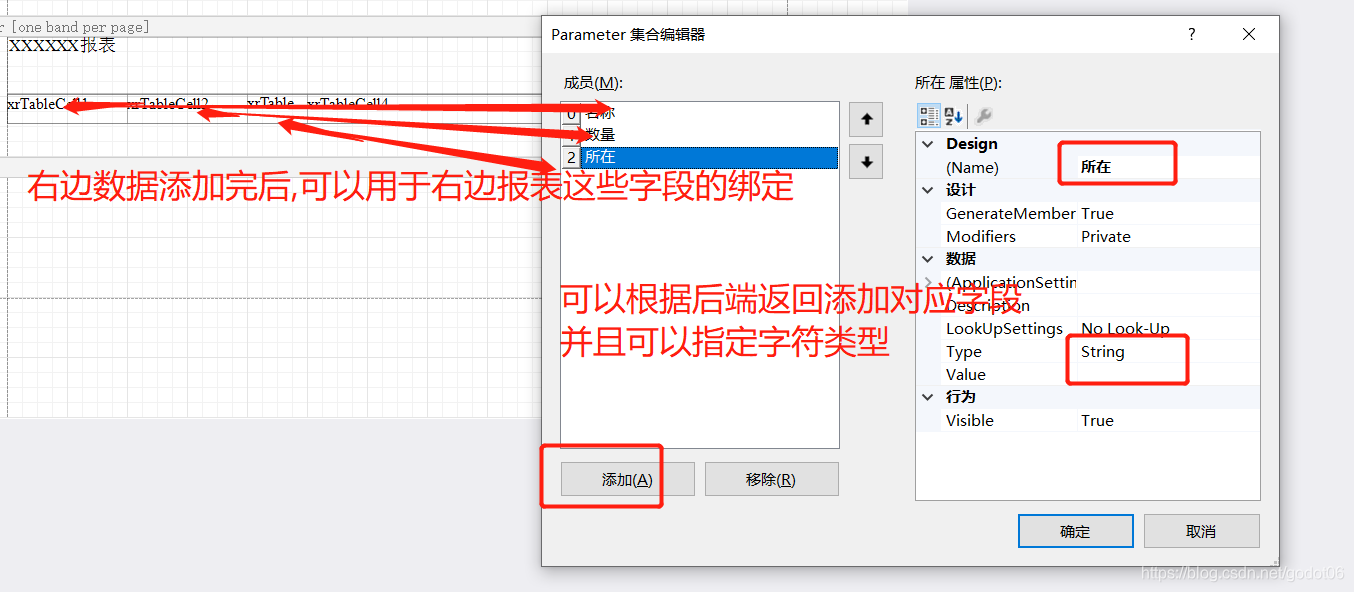
3.5 Data binding and rendering
If completed 3.4 Report design , You need to bind data to the column () In fact, the source of data has been requested on the previous page , And one of them is bound with a corresponding report)
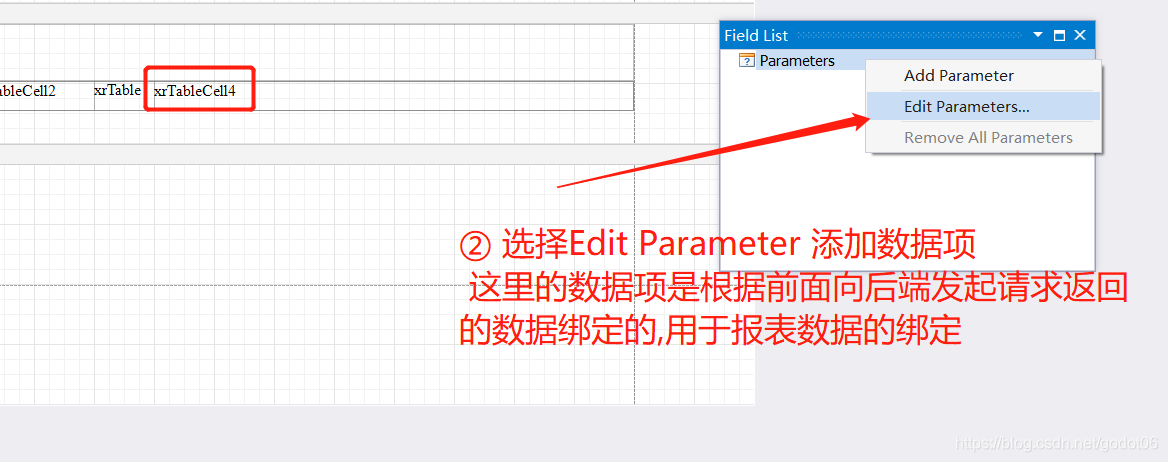
(1) Design binding data item
It needs to be based on 3.3 The data field name obtained after sending a request to the back end , You can add as many parameters as you need fields .

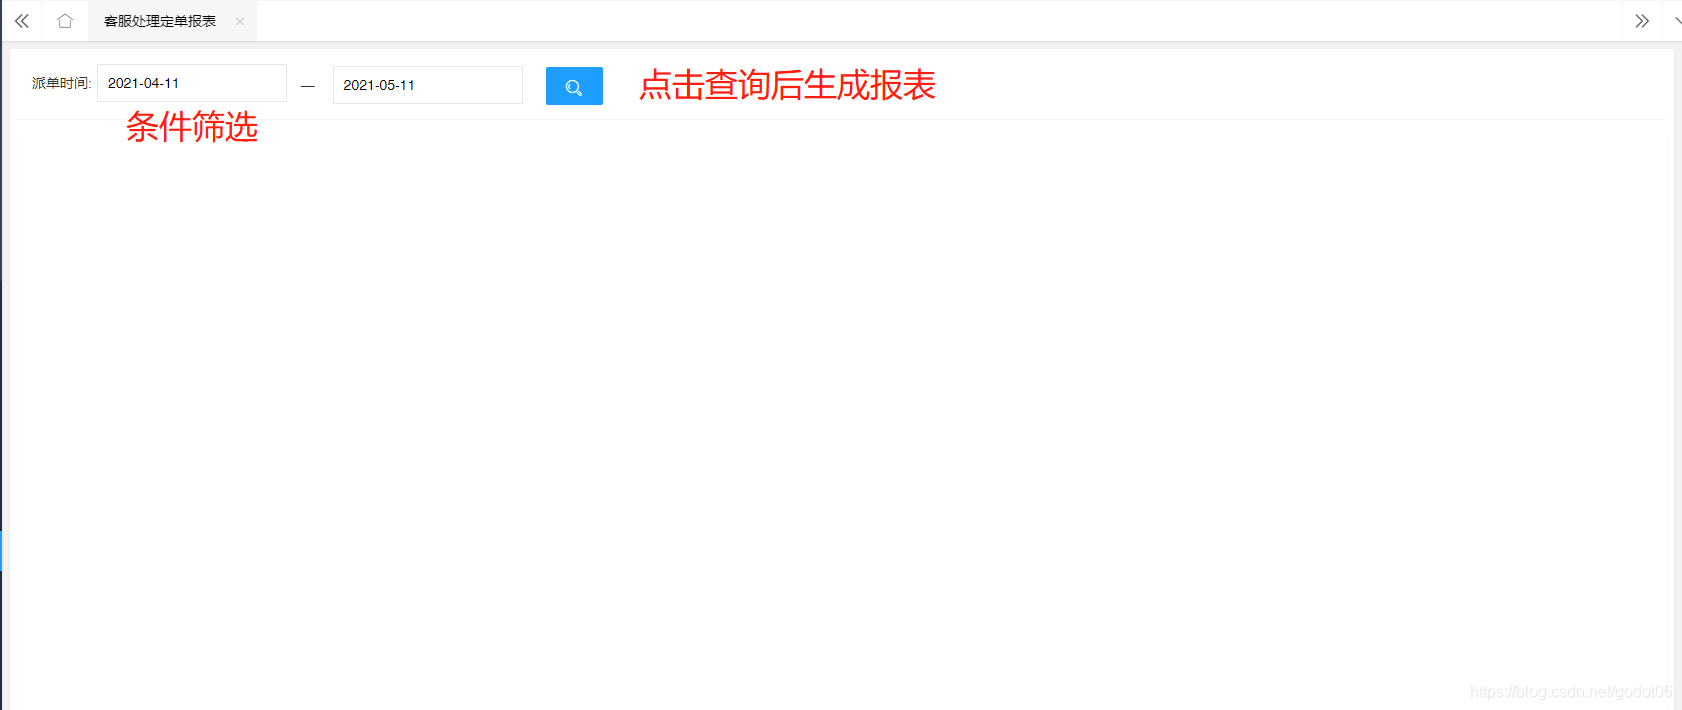
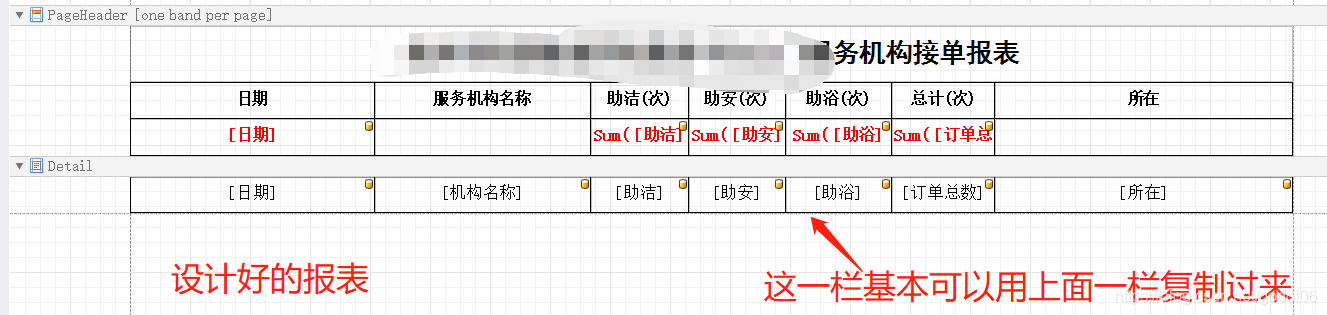
Last This is it. What the report looks like :
版权声明
本文为[First code]所创,转载请带上原文链接,感谢
https://yzsam.com/2022/04/202204210551268135.html
边栏推荐
- Computing the intersection of two planes in PCL point cloud processing (51)
- aqs的学习
- PCA based geometric feature calculation of PCL point cloud processing (52)
- Remote code execution in Win 11 using wpad / PAC and JScript 1
- Record: call mapper to report null pointer Foreach > the usage of not removing repetition;
- Why does ES6 need to introduce map when JS already has object type
- star
- Numpy Index & slice & iteration
- Remote code execution in Win 11 using wpad / PAC and JScript 3
- Zdns was invited to attend the annual conference of Tencent cloud basic resources and share the 2020 domain name industry development report
猜你喜欢
SQL Server Connectors By Thread Pool | DTSQLServerTP 插件使用说明

考研英语唐叔的语法课笔记
Servlet learning notes
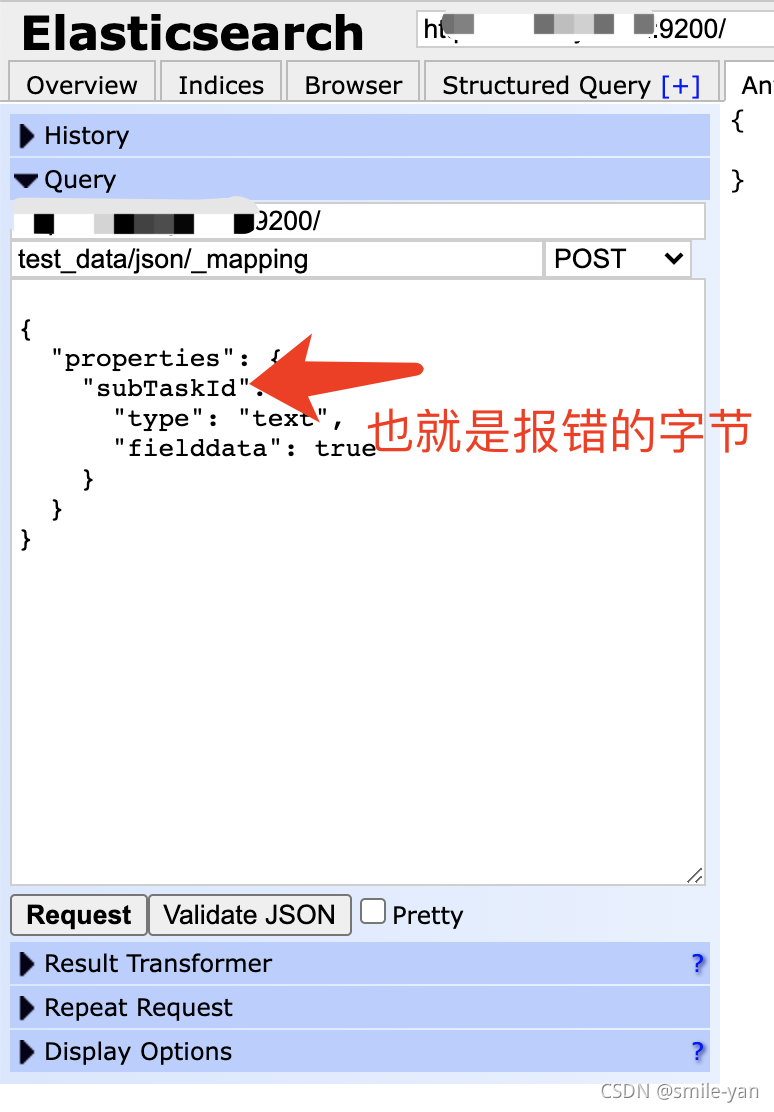
Es keyword sorting error reason = fielddata is disabled on text fields by default Set fielddata = true on keyword in order
aqs的学习
Actual measurement of automatic ticket grabbing script of barley network based on selenium (the first part of the new year)
Recommend an open source free drawing software draw IO exportable vector graph

Plato Farm元宇宙IEO上线四大,链上交易颇高
16MySQL之DCL 中 COMMIT和ROllBACK

Mysql database backup scheme
随机推荐
Wave field Dao new species end up, how does usdd break the situation and stabilize the currency market?
After route link navigation, the sub page does not display the navigation style problem
R语言使用timeROC包计算存在竞争风险情况下的生存资料多时间AUC值、使用cox模型、并添加协变量、R语言使用timeROC包的plotAUCcurve函数可视化多时间生存资料的AUC曲线
How about CICC fortune? Is it safe to open an account
Is the wechat CICC wealth high-end zone safe? How to open an account for securities
PCL点云处理之基于PCA的几何形状特征计算(五十二)
Latest investigation and progress of building intelligence based on sati
Still using listview? Use animatedlist to make list elements move
ArcGIS js api 4. X submergence analysis and water submergence analysis
Redis cache penetration, cache breakdown, cache avalanche
AQS learning
还在用 ListView?使用 AnimatedList 让列表元素动起来
NC basic usage 1
Operation of numpy array
star
Matlab analytic hierarchy process to quickly calculate the weight
Numpy - creation of data type and array
nc基础用法
Change the material of unity model as a whole
论文写作 19: 会议论文与期刊论文的区别