当前位置:网站首页>Machine vision series (02) -- tensorflow2 3 + win10 + GPU installation
Machine vision series (02) -- tensorflow2 3 + win10 + GPU installation
2022-04-23 07:33:00 【American Photography Technology】
In short video technology , Visual effects are currently the most widely used , Visual effects belong to the combination of machine vision and artificial intelligence technology .
Short video technology development , Computer vision is a factor that must be considered , Computer vision AI Handle , At present, China mainly depends on TensorFlow and Pytorch To achieve .
Tensorflow windows The installation of the , A lot of information is misleading , Beginners stop at a glance . This article helps beginners quickly build TensorFlow windows Application environment .Linux and Mac See the following chapters for the installation of the upper environment .

Most installation materials are installed first anaconda, cause TensorFlow Installation must be done with anaconda The illusion of . This installation does not use anaconda, Reduce the coupling of the installation .
A large number of subsequent chapters describe machine vision and related algorithms .
1、 Preposition
A、 If it is Win7, Be sure to patch ( this paper Win7 Also applicable ).
B、 See if your computer graphics card is N card , If it is N card , To install GPU edition , Otherwise, you can only install CPU edition .

C、 If GPU Version is too low , Need to upgrade driver , Otherwise, the installation version is too early ( Upgrading is described in the following topics ).
D、 Some are too old N card , Unable to upgrade driver , Can't install TensorFlow GPU Version or can only be installed TensorFlow GPU Early versions .
2、 Upgrade the graphics card driver , Also upgraded CUDA
2.1、 website
Go to the website below :
https://www.nvidia.com/download/index.aspx?lang=en-us
2.2、 Interface
Choose according to the personal computer system .
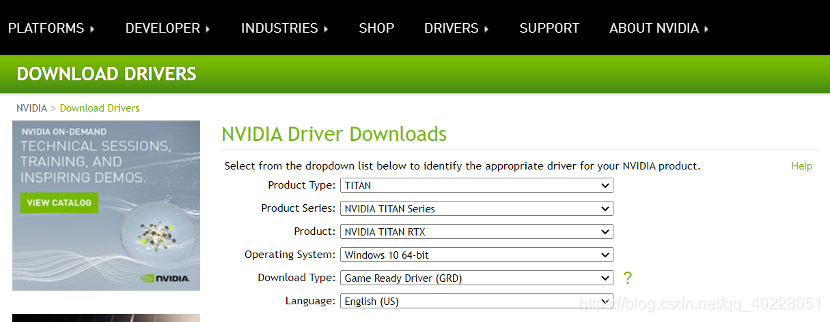
2.3、 download
Choose the right version , Download the graphics card driver .
2.4、 install
Just go to the next step . If the graphics card is too early , Installation may fail .
3、 View personal computers CUDA edition
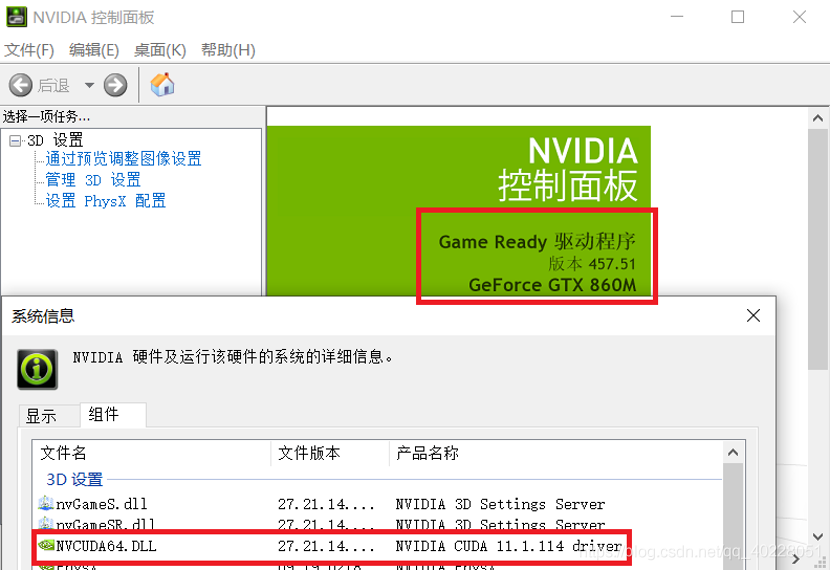
3.1、 open NVIDIA Control panel
Right click on the desktop , Right click menu , choice NVIDIA Control panel .

3.2、 Click on the component , see CUDA edition
4、 View the following correspondence
4.1、 Refer to the website :
https://docs.nvidia.com/cuda/cuda-toolkit-release-notes/index.html
https://tensorflow.google.cn/install/source_windows
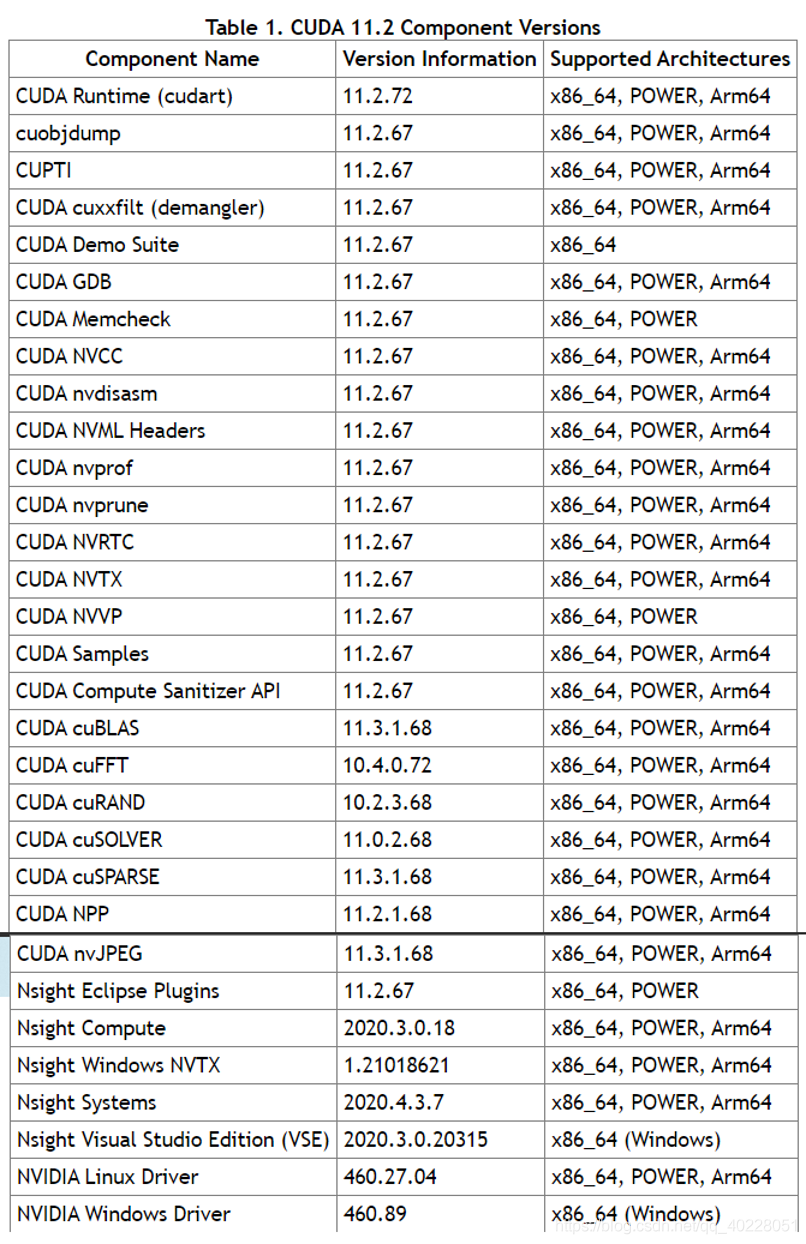
4.2、CUDA Version and name
|
|
||
| Component Name |
Version Information |
Supported Architectures |
| CUDA Runtime (cudart) |
11.2.72 |
x86_64, POWER, Arm64 |
| Cuobjdump |
11.2.67 |
x86_64, POWER, Arm64 |
| CUPTI |
11.2.67 |
x86_64, POWER, Arm64 |
| CUDA cuxxfilt (demangler) |
11.2.67 |
x86_64, POWER, Arm64 |
| CUDA Demo Suite |
11.2.67 |
x86_64 |
| CUDA GDB |
11.2.67 |
x86_64, POWER, Arm64 |
| CUDA Memcheck |
11.2.67 |
x86_64, POWER |
| CUDA NVCC |
11.2.67 |
x86_64, POWER, Arm64 |
| CUDA nvdisasm |
11.2.67 |
x86_64, POWER, Arm64 |
| CUDA NVML Headers |
11.2.67 |
x86_64, POWER, Arm64 |
| CUDA nvprof |
11.2.67 |
x86_64, POWER, Arm64 |
| CUDA nvprune |
11.2.67 |
x86_64, POWER, Arm64 |
| CUDA NVRTC |
11.2.67 |
x86_64, POWER, Arm64 |
| CUDA NVTX |
11.2.67 |
x86_64, POWER, Arm64 |
| CUDA NVVP |
11.2.67 |
x86_64, POWER |
| CUDA Samples |
11.2.67 |
x86_64, POWER, Arm64 |
| CUDA Compute Sanitizer API |
11.2.67 |
x86_64, POWER, Arm64 |
| CUDA cuBLAS |
11.3.1.68 |
x86_64, POWER, Arm64 |
| CUDA cuFFT |
10.4.0.72 |
x86_64, POWER, Arm64 |
| CUDA cuRAND |
10.2.3.68 |
x86_64, POWER, Arm64 |
| CUDA cuSOLVER |
11.0.2.68 |
x86_64, POWER, Arm64 |
| CUDA cuSPARSE |
11.3.1.68 |
x86_64, POWER, Arm64 |
| CUDA NPP |
11.2.1.68 |
x86_64, POWER, Arm64 |
| CUDA nvJPEG |
11.3.1.68 |
x86_64, POWER, Arm64 |
| Nsight Eclipse Plugins |
11.2.67 |
x86_64, POWER |
| Nsight Compute |
2020.3.0.18 |
x86_64, POWER, Arm64 |
| Nsight Windows NVTX |
1.21018621 |
x86_64, POWER, Arm64 |
| Nsight Systems |
2020.4.3.7 |
x86_64, POWER, Arm64 |
| Nsight Visual Studio Edition (VSE) |
2020.3.0.20315 |
x86_64 (Windows) |
| NVIDIA Linux Driver |
460.27.04 |
x86_64, POWER, Arm64 |
| NVIDIA Windows Driver |
460.89 |
x86_64 (Windows) |
4.3、 Graphics driver and CUDA Version selection

4.4、TensorFlow GPU Version and CUDA And Python And VS The relationship between

4.5、TensorFlow CPU Version and VS And Python The relationship between

5、 According to the above correspondence , Download the following file
5.1、 file
A、VS ( Microsoft visual studio development environment )
B、Python (TensorFlow Official development language )
C、CUDA ( NVIDIA data parallel computing platform )
D、CUDNN ( Neural network acceleration library )
5.2、 After downloading, the figure shows

6、 install VS

6.1、 explain
It is recommended that all tools be installed , need 40 Multiple G( Personal test ).
NVIDIA says it just needs to install C++ Desktop Develop Kit installation ( No test ).
6.2、 install
All the way to the next step .
7、 install Python
7.1、 Environmental variables

7.2、 Be careful ( During installation , You may have to wait )
above 5 Put a box on it “√”, And then click “Browse”, Custom installation path , And then click “Install”.
PS: The installation path should be in English , Don't have Chinese and spaces .

8、 modify Python Tools Pip Source
The installation process needs to be downloaded from the Internet , default Python Source abroad , Slow download .
Modified to domestic Ali's Python Source , Speed up the installation of the following steps .
8.1、PyPI Mirror image
PyPI (Python Package Index) yes Python Software repository for programming languages . Developers can use PyPI Find and install by Python Software developed and shared by the community , You can also upload your own library to PyPI .
8.2、Linux Next change pip Source ( It has nothing to do with this installation 、 Just skip )
Manual replacement python Of pip/pip3 Source .
- stay Linux Found in the system ~/.pip/pip.conf This file , If you don't have this file, create a file with the same name . If the system is connected ~./pip There is no such thing in this directory , Create a directory and create a pip.conf file .
- Add or modify the following to the file .
[global]
index-url = https://mirrors.aliyun.com/pypi/simple/
[install]
trusted-host=mirrors.aliyun.com
8.3、windows Next change pip Source
A、 Enter... In the address field of the file manager %appdata% Press enter to enter the current user's home directory .
B、 Create a new folder under the current folder pip.
C、 stay pip Create a new file in the folder pip.ini file .
D、 stay pip.ini Enter the following in the file .
[global]
index-url = https://mirrors.aliyun.com/pypi/simple/
[install]
trusted-host=mirrors.aliyun.com
9、 Install two plug-ins
9.1、 If during the following installation , Installation failed
If installation fails , Re executing the command can .
9.2、scipy library
stay power shell Under the window , Copy the following command to execute :
pip3 install scipy
9.3、numpy library
stay pwer shell Under the window , Copy the following command to execute :
pip3 install numpy
10、 install cuda
10.1、 install
Double click the... Downloaded above cuda file .
Just go to the next step , You can change the installation path , But it is not recommended to modify .
10.2、 test
open powershell, Execute the following command :
nvcc -V
Success will return to cuda Version number .
11、 install cudnn
11.1、 decompression
decompression cuDNN Compressed package , You can see bin、include、lib Catalog :

11.2、 Open Directory
Path is :C:\Program Files\NVIDIA GPU Computing Toolkit\CUDA\v11.1
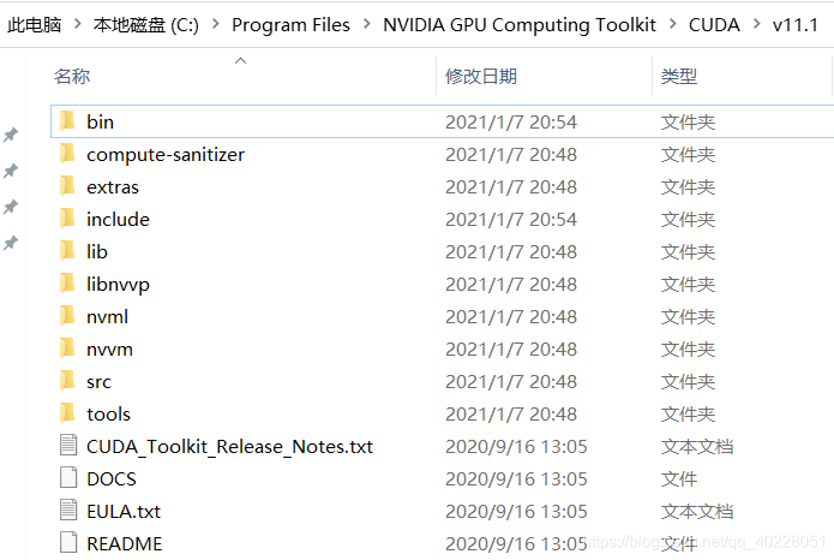
11.3、 Copy
Find the version directory you installed , open , find bin、include、lib Catalog ;
take 11.1 cuDNN The corresponding files in the compressed package are copied to cuda Of bin、include、lib Catalog .
Be careful : Is to copy files to bin、include、lib Catalog , Not a copy directory .
12、 environment variable
12.1、 Several variables
C:\Program Files\NVIDIA GPU Computing Toolkit\CUDA\v11.1
C:\Program Files\NVIDIA GPU Computing Toolkit\CUDA\v11.1\libnvvp
C:\Program Files\NVIDIA GPU Computing Toolkit\CUDA\v11.1\lib\x64
C:\Program Files\NVIDIA GPU Computing Toolkit\CUDA\v11.1\bin
12.2、 Set up ( Less , Will be submitted to the dll abnormal )

13、 test CUDA and CUDNN Is the installation successful
13.1、 Open Directory
C:\Program Files\NVIDIA GPU Computing Toolkit\CUDA\v11.1\extras\demo_suite
13.2、 start-up PowerShell
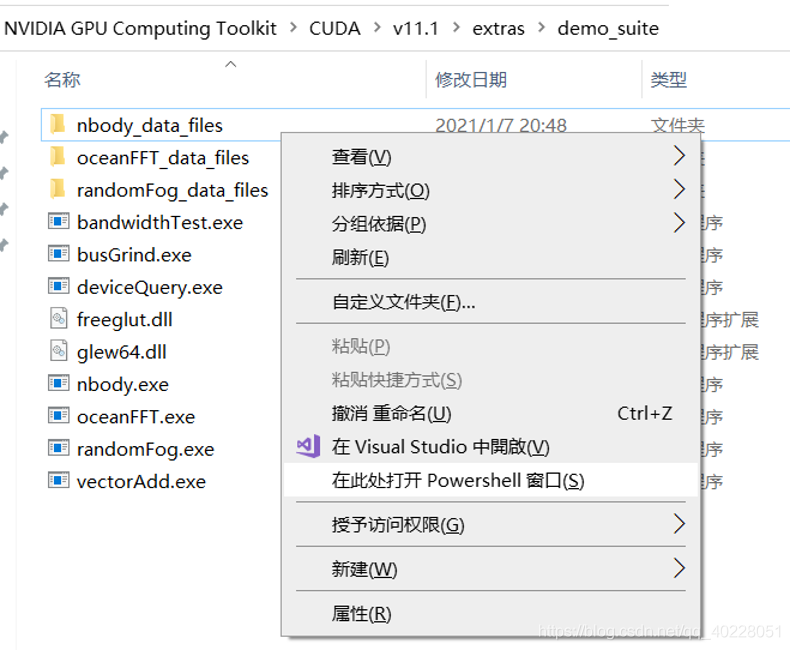
13.3、 test
Execute the following command :
.\bandWidthTest.exe

appear Pass On behalf of success .
14、 install tensorflow-gpu
stay PowerShell Window input the following command :
pip3 install tensorflow-gpu
15、 test
15.1、 open Python Environmental Science
stay PowerShell Enter the following command :
python
15.2、 Run the following code
import tensorflow as tf
a = tf.constant(2.0)
b = tf.constant(4.0)
print(a + b)
The following results represent success .

16、 Other
And the cloud platform 、 Big data related environment construction ,TensorFlow The installation of is simple .
But for beginners , It will take some time . The content of this article is , Hope to give beginners some useful enlightenment .
Pay attention to American Photography Technology , Feel the visual feast .
17、 Learning website
https://tensorflow.google.cn/install/source_windows
版权声明
本文为[American Photography Technology]所创,转载请带上原文链接,感谢
https://yzsam.com/2022/04/202204230614195034.html
边栏推荐
- USO technology was invited to share the technical framework and challenges of AI synthetic virtual characters at lvson2020 conference
- 大型体育赛事无线通信系统
- Typora操作技巧说明(一).md
- 传输层重要知识(面试,复试,期末)
- go语言映射操作
- 美摄科技受邀LVSon2020大会 分享《AI合成虚拟人物的技术框架与挑战》
- PyTorch 11. Regularization
- 可视化之路(十)分割画布函数详解
- Urban emergency management - urban emergency communication command and dispatching system
- pytorch:关于GradReverseLayer实现的一个坑
猜你喜欢


随机推荐
在项目中的定时作用
记录一下使用v-print中遇到的问题
关于短视频平台框架搭建与技术选型探讨
Emergency medical communication solution | mesh wireless ad hoc network system
AUTOSAR从入门到精通100讲(八十三)-BootLoader自我刷新
【无标题】制作一个0-99的计数器,P1.7接按键,P2接数码管段,共阳极数码管,P3.0,P3.1接数码管位码,每按一次键,数码管显示加一。请写出单片机的C51代码
机器视觉系列(02)---TensorFlow2.3 + win10 + GPU安装
Beifeng communication helps Zhanjiang fire brigade build PDT wireless communication system
基于openmv的无人机Apriltag动态追踪降落完整项目资料(labview+openmv+apriltag+正点原子四轴)
社区版阿里MQ普通消息发送订阅Demo
el-table 横向滚动条固定在可视窗口底部
无盲区、长续航|公专融合对讲机如何提升酒店服务效率?
可视化常见问题解决方案(七)画图刻度设置解决方案
Emergency communication system for flood control and disaster relief
美摄科技起诉天目传媒使用火山引擎侵权代码的声明
可视化之路(十一)matplotlib颜色详解
Intelligent communication solution of Hainan Phoenix Airport
Metro wireless intercom system
关于短视频技术轮廓探讨
自定义钉钉机器人进行报警