当前位置:网站首页>Devaxpress report replay: complete the drawing of conventional two-dimensional report + histogram + pie chart
Devaxpress report replay: complete the drawing of conventional two-dimensional report + histogram + pie chart
2022-04-23 20:24:00 【First code】
Recently, several projects need to draw exportable reports based on data , At present we are in C# The most handy component used in is DevExpress, This component can complete winform and B/S Program , The result is right , Powerful , Quick start , When exporting data , Multiple formats can be exported (xls/word etc. ).
1 Basic configuration
The production environment computer is installed before development DevExpress( We often use DevExpress14 edition ), The default installation is enough , Close during installation VS,DevExpress Will automatically give VS Generate relevant plug-ins .
2 Basic operation
Before creating a new report , The project needs some simple configuration and reference addition .
2.1 Basic configuration
web.config Need to add devexpress Some configuration of ( Look at the code , There are quite a lot of nodes to configure , You can directly copy the of other items , Unconfigured pages will also report web.config Some unconfigured errors )
2.2 Reference addition
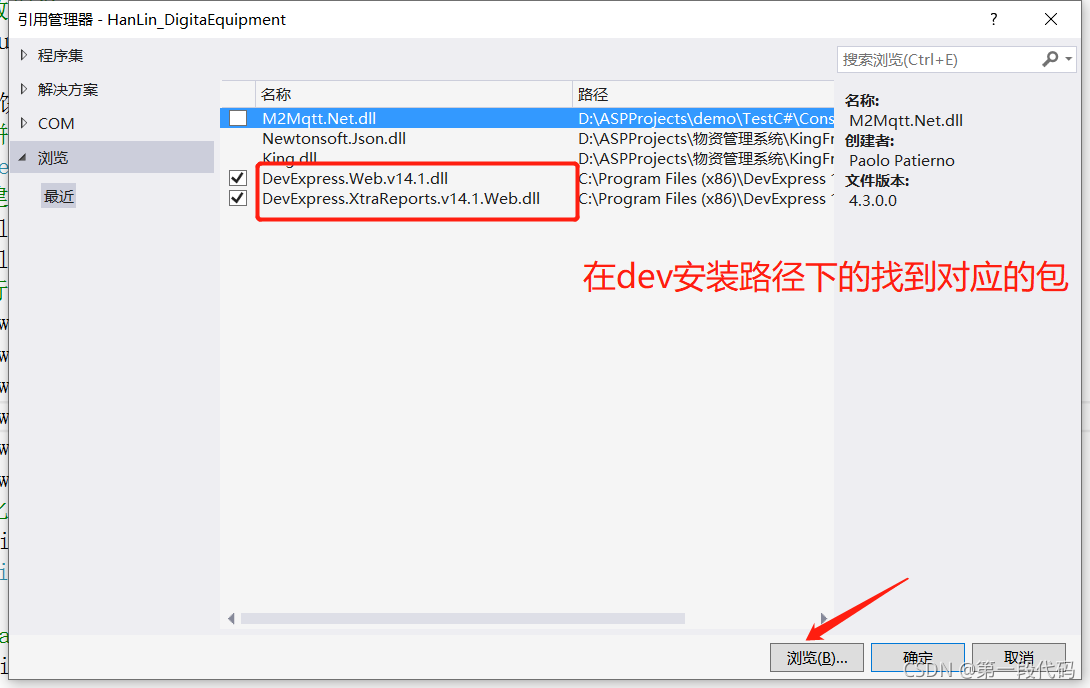
add to devexpress Some references to ( Running without reference will report an error ), There are two steps to adding references , First, you can directly put devexpress Copy the package inside to the solution , You can also copy... From other projects ( It is recommended to copy in advance , Do not copy subsequent deployment programs , After going online, there will also be errors due to lack of Package report loading ); The second solution is to add locally installed devexpress package , Just reference two , Here's the picture .
3 Report generation
Report production process , We usually have 3 Or 4 Code file , With TestReport Take the test report as an example :
TestList.aspx -- The front page of the page display ( The first page , Here you can complete some basic display and condition screening )
TestListMod.js -- Front page's js The handler , It is used for interactive processing and conditional parameter transfer of front-end pages
TestListReportShow.aspx -- Report display page : This page mainly completes two things :
One is to complete dev Loading and rendering of reports , It will be TestList.aspx Initiate report query to get a page embedded report generated according to the results ;
The second is to complete the processing of front-end generated reports and condition parameters , And send a data request to the back end , This part of the actual processing is in TestListReportShow.aspx.cs Can be processed in the program ; Furthermore, complete the generation of binding report , It is mainly to transfer the data obtained by the handler to the report component .
TestListReport.cs: This is the report component , Need new DevExpress file , Then set the report format ( What the form looks like , Font size, color, etc ), And bind according to the back-end data . This operation is simple and simple , It's all visual operations .
3.1 New report TestListReport.cs < Key steps in reporting , So let's start with >
Right click New choice Add DevExpress Item - new Item , choice Web Report, Fill file name ( Such as TestReport.cs), And then choose Empty Report.
(1) Report page setup
The size of the report needs to be set according to the page requirements , For example, whether it is horizontal , And paper size , common A4 paper , And edge adjustment .
Set the report page size : stay TestReport.cs Report page , The arrow starting at the upper left corner , Right click - attribute Properties, Then, in the property bar on the right, type , find Landscape Property and change to true( Indicates horizontal display ),

Select the paper size , Ibid , Property PaperKind: Choose a common paper , such as A4,A3,Leter etc. , Generally, these specifications of paper , The size is fixed , Select as needed , You can change the size of the bid report .
Adjust the edge , Sometimes I choose paper , However, the edge margin may still affect the size of the paper , This is the time , You can move the edge lines on both sides of the report , You can adjust the margin

(2) Report content settings
This is mainly based on the project requirements and data , Design report ( Actually sum execl Table settings are similar ), Here you can use the toolbar on the left , Drag common components to the report .
Before dragging , To sort out the contents of the report page , It is mainly divided into PageHeader/ Detail /ReportFooter etc. , You can add or delete as needed ( Right click Add / delete Insert Band You can see that ), Generally, there are PageHeader The title section and Detail Content details section .
(2-1)PageHeader The title part can be set according to your own report and data requirements , Many times it may be static text , So just drag and drop from the toolbar on the left xrLabel perhaps xrChart Wait for settings .
Components generally have no borders , You can right-click - attribute - find Borders- choice all Just go . There are also some attributes, such as font color and size , Just adjust it to the right .
There's one thing to pay attention to in this place ,PageHeader After setting up , Don't leave any blank space under this part , Leaving it will lead to and the following detail There will be a section in the middle .

(2-2)Detail The content part :
This part needs to set up the table according to your own data , It's best to think well when setting , And with the head Header Correspond well .
The key here is , Static setting is finished , The data needs to be bound and rendered .
a. Set data source
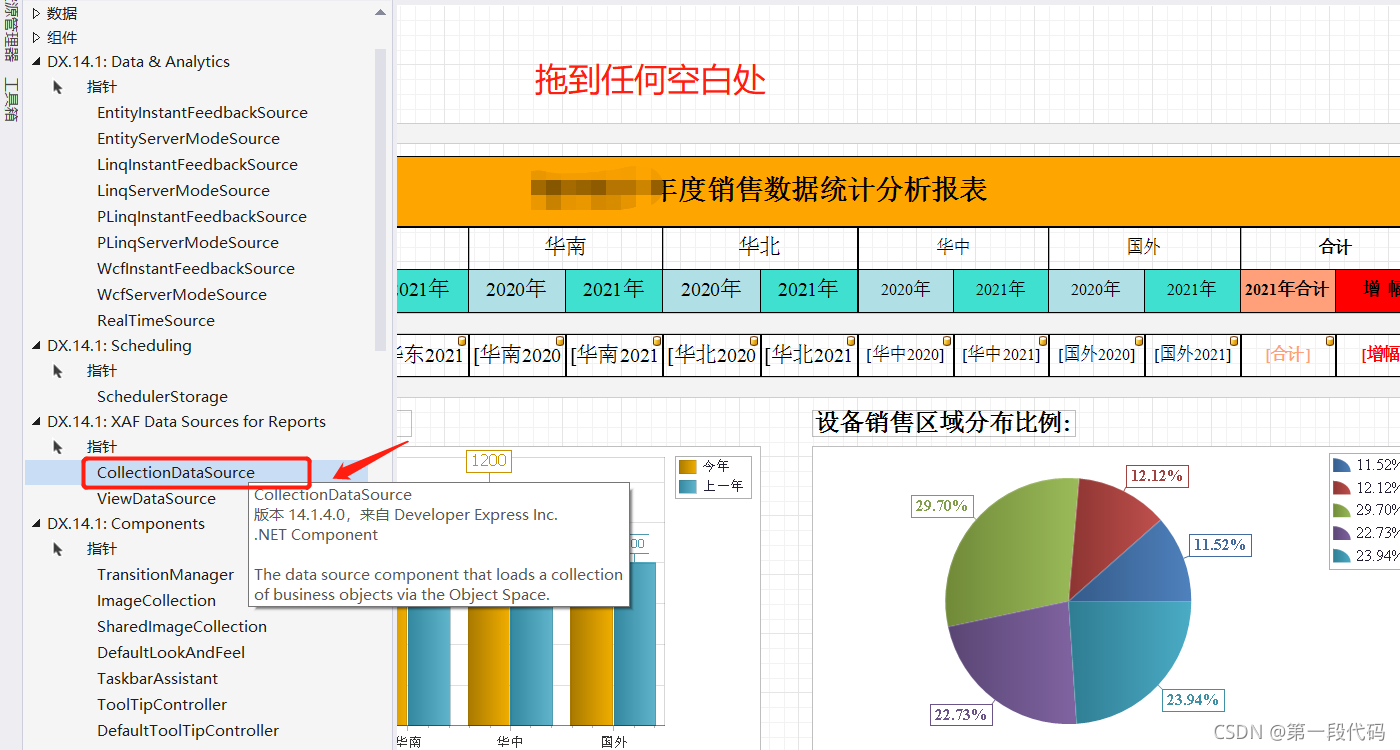
First, you need to set the data source , In the report control , Drag and drop CollectionDataSource
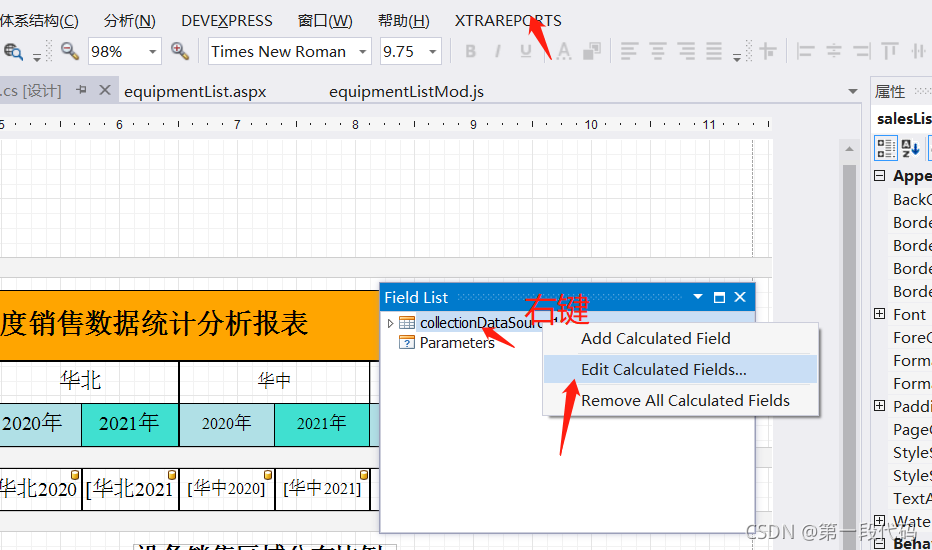
After dragging , stay VS Click... Above the control panel XTRAEPORTS, And then click field list, You can see the data source component we just dragged CollectionDataSource name ,

Then right-click on it to edit , Add the value required by our report ( This value , In fact, the back-end requests data return for report data filling , How data comes and binds , I'll talk about it later )

b. Data table binding data source
step a Finished setting the data source , In this step, you need to bind the data source and report data .
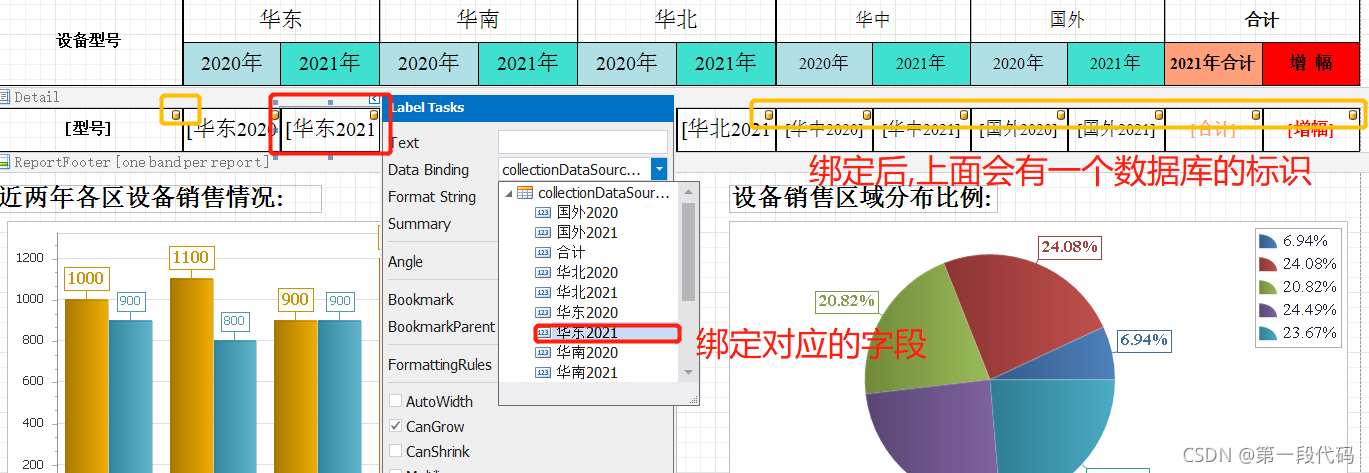
What needs to be noticed here , Generally, we construct a two-dimensional data table , Then bind the report column and data source one by one , All data rows are rendered on the page , The operation of binding data is shown in the figure .
Click on the data column , You can see a blue box with an arrow in the upper left corner , After clicking , Appear one Data Binding Drop down to select the data field corresponding to the data source .

The actual rendering effect after data binding

c. Supplementary knowledge
dev The above two steps can complete the rendering of data , Besides, it can be like execl Do a simple statistical summary and other operations , A column has been summarized as an example :
Select the column to summarize , Find the blue arrow box at the top left , Select after clicking Summary Set it up

Report operation is basically on the road , There are also some fine configurations , You can optimize , For example, adjust the font color, etc .
reference :
About devexpress report form XtraReport, Dynamically modify the report style, dynamically add data and use it
DevExpress Of XtraReport And Microsoft RDLC The use and comparison of reports
3.2 Report display page : TestListReportShow.aspx < The second key step of the report >
complete devexpress Report component html Tag insertion ( Statement ) and Complete the request for data from the back-end database for TestListReport Data source settings .
a. Static report component label declaration :
This part is simple , Just copy the component code to TestListReportShow.aspx Just the page ( It can be copied directly from other pages );

b. Complete the most critical report data requests and TestListReport Data source settings
This operation ,C# Of TestListReportShow.aspx Web files can also realize logical processing , He was in TestListReportShow.aspx.cs Write logic code in , Can directly operate the database and related logic processing . Specific operation logic , Here's the picture

Here is the bound p.DataSource The data in is TestListReport.cs Those set in the report ( Fields and values )
Besides , There's one thing I didn't say ,JObject jobj = JObject.Parse(Request["jsonData"]); In fact, it is to obtain the request parameters of the front-end page , After getting the parameters , Developers can filter the data acquisition conditions according to parameters .
3.3 Frontmost page setup and frontmost processing js- TestList.aspx & TestListMod.js
Actually here , Basically, just follow the normal logic , Front page estList.aspx Just design according to requirements , It is mainly to complete the interactive design or processing of screening conditions ;
Front-end processing js-TestListMod.js It is mainly to get the front-end page TestList.aspx Filter parameters for , Then after simple treatment , Carry the processed request parameters to the report back end TestListReportShow.aspx Initiate request . Just make a request , No results , So just forward some request addresses . The final results , In fact, through the above 3-1TestListReport.cs and 3-2TestListReportShow.aspx&TestListReportShow.aspx.cs Accomplished .


The above steps can be combined to complete the development of the report .
4 Advanced report development : Complete the development of visual graphics such as histogram and pie chart -XRChart
Recently, the demand for reports has increased , Unlike regular forms , Here we need to add some visual graphics , Commonly used Echart draw , Go through DevExpress And didn't , After finishing , The discovery is also quite simple , and Echarts similar , It's all through Serise Accomplished , And then Serise Add to the corresponding report .
Let's take histogram and pie chart as examples , The steps are mainly divided into two :( operation TestListReport.cs and TestListReportShow.aspx.cs)
(1)TestListReport.cs Report area ,
It mainly completes a component XRChart The drag and drop , For example, drag a pie chart / The histogram component used to ,( Drag and drop components as mentioned above ), You don't have to set so many , Dragging it in will , direct finish that will do , Don't press devexpress Guide step by step ( Of course, if you want to do a static demonstration, you can follow the instructions step by step , This will result in a static prototype ).
Drag as shown in the figure :( Some other configurations in the drag process can be tried by yourself )

(2)TestListReportShow.aspx.cs Complete graphics data rendering in .
Before processing , In fact, we need to understand that , The above drag and drop is actually a container that helps us generate two components , Now we need to render the data into the container by writing code .( Follow Echarts similar )
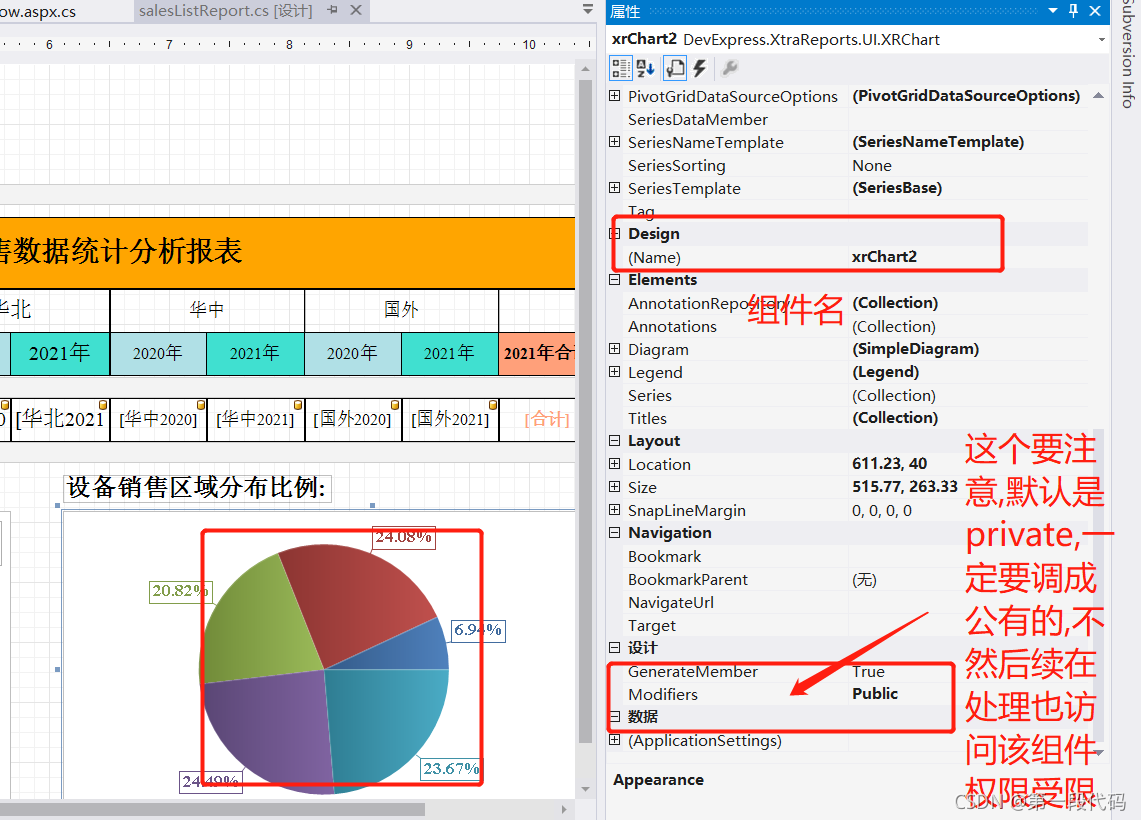
Since it's a container , Then we need to know the identification of these two containers in the future . such as id What is it , It's not really called id, Is a component variable name , You can modify the definition yourself , View component name , You can click on the component , Right click Properties , stay name Find the name of the component in the property , And modify the access permission to public.
Graphics rendering code can be written in TestListReportShow.aspx.cs in , Follow Echarts similar , It's all statements Serise Then add it to the report canvas .
if (!IsPostBack)
{
ViewState["dt"] = getData();
}
salesListReport p = new salesListReport();
JObject jobj = JObject.Parse(Request["jsonData"]);
// Report data source
p.DataSource = ViewState["dt"] as DataTable;
#region The pie chart
// Build the data source of the pie chart object table
DataTable table = new DataTable("Table1");
// First build the columns
table.Columns.Add("Name", typeof(String));
table.Columns.Add("Value", typeof(Int32));
// Fill each column with rows
table.Rows.Add(new object[] { " East China ", 1000 });
table.Rows.Add(new object[] { " The north China ", 1200 });
table.Rows.Add(new object[] { " south China ", 900 });
table.Rows.Add(new object[] { " Central China ", 1500 });
table.Rows.Add(new object[] { " Huaxi ", 998 });
table.Rows.Add(new object[] { " Abroad ", 900 });
// Instantiate pie chart objects
Series pieSeries = new Series(" Distribution of sales area ", ViewType.Pie);
SeriesPoint pSeriesPoint;
// Traverse DataTable, Bind each row object to pSeriesPoint On
for(int i = 0; i < table.Rows.Count;i++)
{
// find DT in Name Fields and Vlaue The data of
string name = table.Rows[i]["Name"].ToString();
double value = Convert.ToDouble(table.Rows[i]["Value"].ToString());
// utilize pSeriesPoint Organize data
pSeriesPoint = new SeriesPoint(name, value);
pieSeries.Points.Add(pSeriesPoint);
}
// Set the new pie chart object Argument Legend name ArgumentAndValues Legend name and value
pieSeries.LegendPointOptions.PointView = PointView.Argument;
//pieSeries.Label.Font = new Font(" Song style ", 8); new System.Drawing.Font("Times New Roman", 15.75F, System.Drawing.FontStyle.Bold, System.Drawing.GraphicsUnit.Point, ((byte)(0)));
pieSeries.Label.Font = new System.Drawing.Font("Times New Roman", 12);
pieSeries.Label.LineLength = 10; // The line length of the pie chart identification The length will affect the display size of the pie chart
// Set mouse hover display toolTip It doesn't work after the test
//pieSeries.ToolTipEnabled = DevExpress.Utils.DefaultBoolean.True;
// Set data source
pieSeries.DataSource = table;
// Add pie chart in report space New pie chart object xrChart2 Is the name of the pie chart space in the report , Need to be set to public
p.xrChart2.Series.Add(pieSeries);
// PaletteName Corresponding dev Chart Chart Set the appearance in the panel Platte Hue theme selection value
p.xrChart2.PaletteName = "Blue";
#endregion
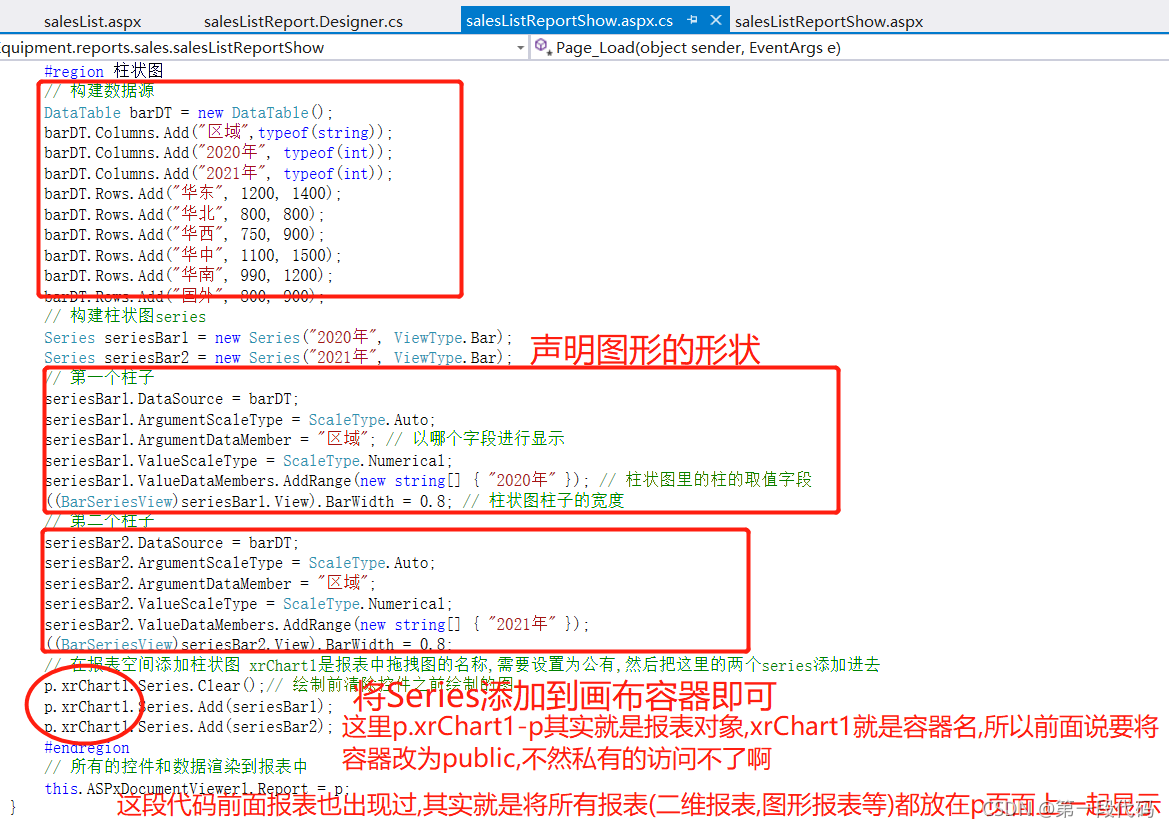
#region Histogram
// Building data sources
DataTable barDT = new DataTable();
barDT.Columns.Add(" Area ",typeof(string));
barDT.Columns.Add("2020 year ", typeof(int));
barDT.Columns.Add("2021 year ", typeof(int));
barDT.Rows.Add(" East China ", 1200, 1400);
barDT.Rows.Add(" The north China ", 800, 800);
barDT.Rows.Add(" Huaxi ", 750, 900);
barDT.Rows.Add(" Central China ", 1100, 1500);
barDT.Rows.Add(" south China ", 990, 1200);
barDT.Rows.Add(" Abroad ", 800, 900);
// Build a histogram series
Series seriesBar1 = new Series("2020 year ", ViewType.Bar);
Series seriesBar2 = new Series("2021 year ", ViewType.Bar);
// The first pillar
seriesBar1.DataSource = barDT;
seriesBar1.ArgumentScaleType = ScaleType.Auto;
seriesBar1.ArgumentDataMember = " Area "; // Which field to display
seriesBar1.ValueScaleType = ScaleType.Numerical;
seriesBar1.ValueDataMembers.AddRange(new string[] { "2020 year " }); // The value field of the column in the histogram
((BarSeriesView)seriesBar1.View).BarWidth = 0.8; // The width of the histogram column
// Second column
seriesBar2.DataSource = barDT;
seriesBar2.ArgumentScaleType = ScaleType.Auto;
seriesBar2.ArgumentDataMember = " Area ";
seriesBar2.ValueScaleType = ScaleType.Numerical;
seriesBar2.ValueDataMembers.AddRange(new string[] { "2021 year " });
((BarSeriesView)seriesBar2.View).BarWidth = 0.8;
// Add a histogram in report space xrChart1 Is the name of the drag graph in the report , Need to be set to public , Then put the two here series Add in
p.xrChart1.Series.Clear();// Figure drawn before clearing the control before drawing
p.xrChart1.Series.Add(seriesBar1);
p.xrChart1.Series.Add(seriesBar2);
#endregion
// All controls and data are rendered to the report
this.ASPxDocumentViewer1.Report = p;dev Graphical report reference
DevExpress Control Chart Histogram 、 Broken line diagram 、 Fan chart
DevExpress chart Make a bar chart and draw a line chart on it
DevExpress Official column 、 Point and indicator selection palette color selection and writing
C#Winform Application in DevExpress Provided ChartControl Control to draw a pie chart
DevExpress Custom bar and pie chart colors
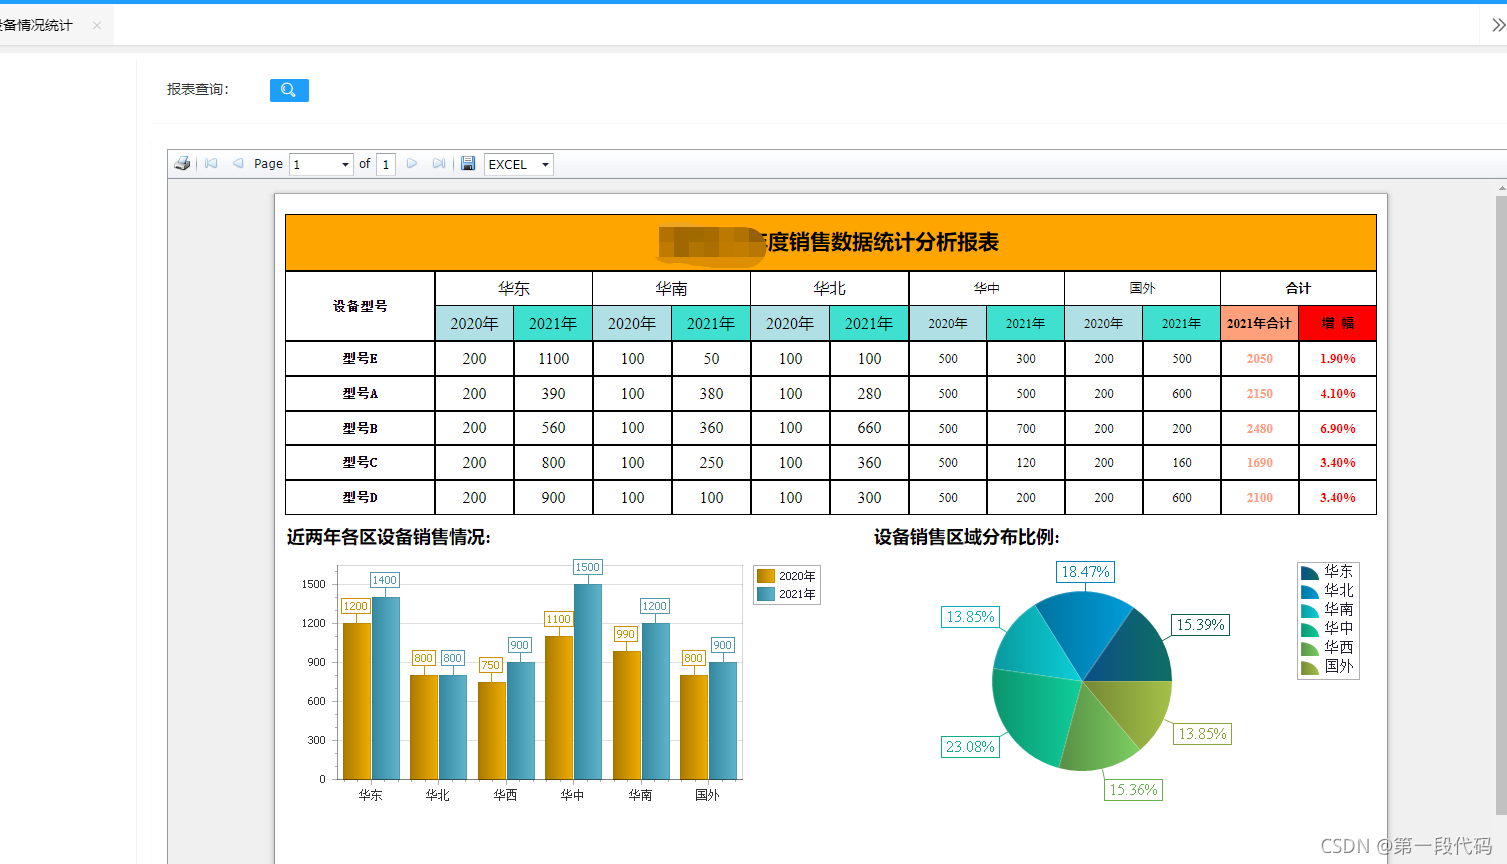
The final report shows the effect :
版权声明
本文为[First code]所创,转载请带上原文链接,感谢
https://yzsam.com/2022/04/202204210551267909.html
边栏推荐
- ABAQUS script email auto notification
- Development of Matlab GUI bridge auxiliary Designer (functional introduction)
- DNS cloud school rising posture! Three advanced uses of authoritative DNS
- Error reported by Azkaban: Azkaban jobExecutor. utils. process. ProcessFailureException: Process exited with code 127
- Shanghai responded that "flour official website is an illegal website": neglect of operation and maintenance has been "hacked", and the police have filed a case
- The flinkcdc reports an error: but this is no longer available on the server
- Commit and rollback in DCL of 16 MySQL
- Tensorflow 2 basic operation dictionary
- Wave field Dao new species end up, how does usdd break the situation and stabilize the currency market?
- Linux64Bit下安装MySQL5.6-不能修改root密码
猜你喜欢

Building the tide, building the foundation and winning the future -- the successful holding of zdns Partner Conference
Browser - learning notes
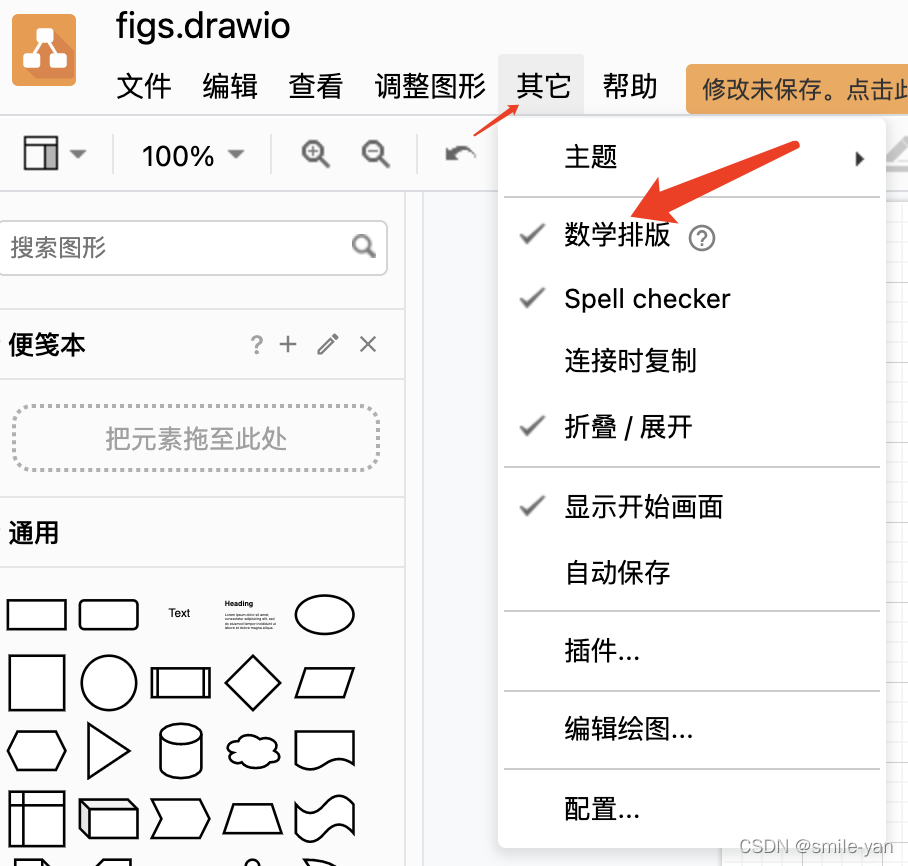
Recommend an open source free drawing software draw IO exportable vector graph
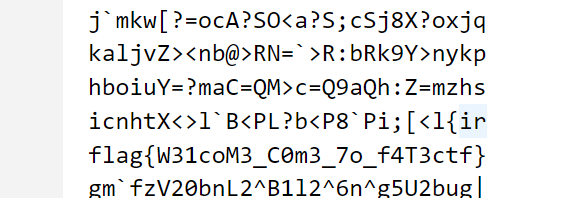
2022dasctf APR x fat epidemic prevention challenge crypto easy_ real
![[graph theory brush question-4] force deduction 778 Swimming in a rising pool](/img/e3/a8cd9fc7773843e9e8ee6a6eba123f.png)
[graph theory brush question-4] force deduction 778 Swimming in a rising pool
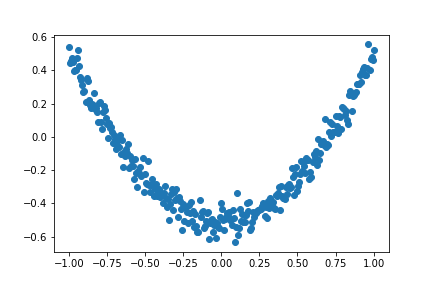
Don't bother tensorflow learning notes (10-12) -- Constructing a simple neural network and its visualization

Scripy tutorial - (2) write a simple crawler
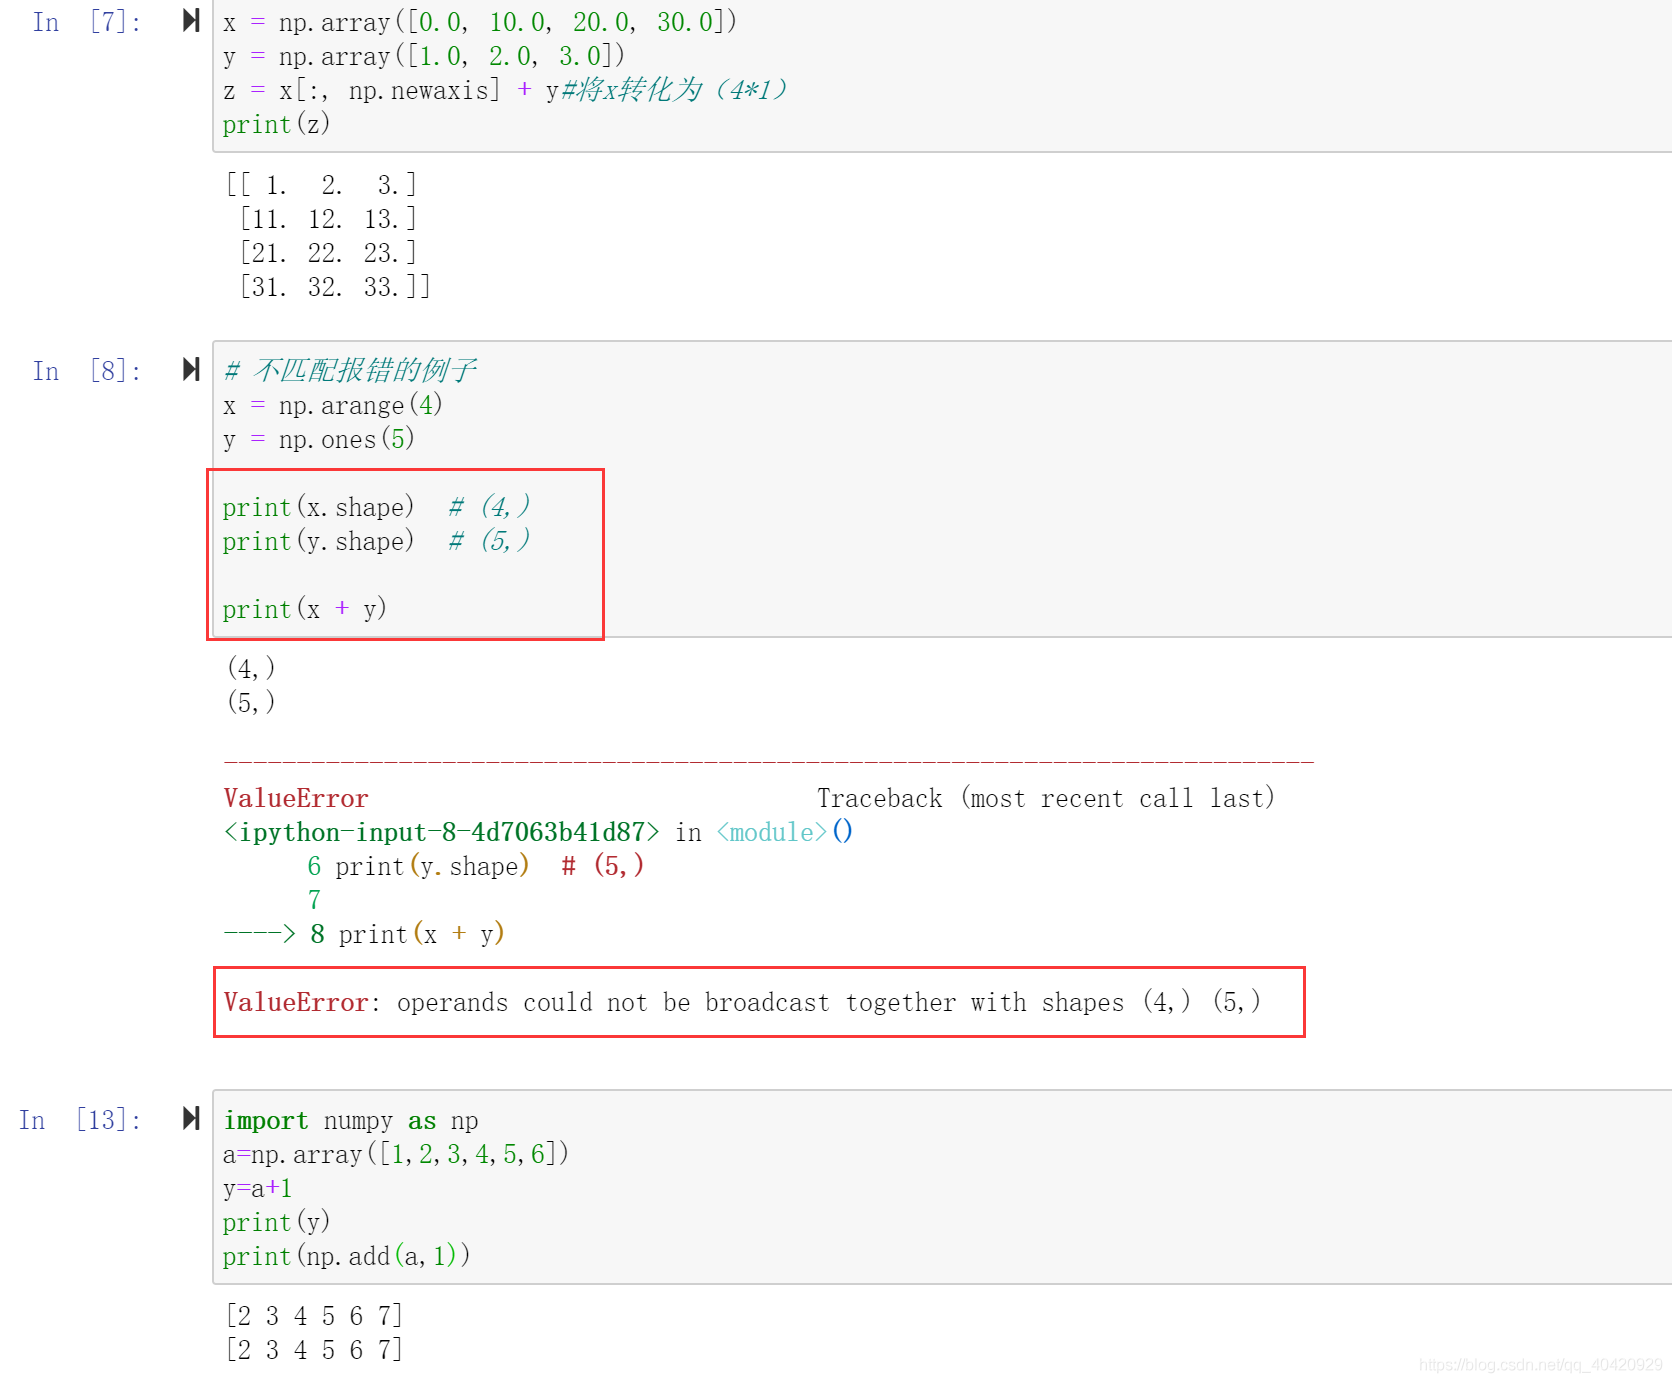
Numpy mathematical function & logical function
Some basic configurations in interlij idea

A useless confession artifact
随机推荐
Still using listview? Use animatedlist to make list elements move
Redis的安装(CentOS7命令行安装)
[PTA] l1-002 printing hourglass
Commit and ROLLBACK in DCL of 16mysql
Don't bother tensorflow learning notes (10-12) -- Constructing a simple neural network and its visualization
Recognition of high-speed road signs by Matlab using alexnet
How about CICC fortune? Is it safe to open an account
[latex] 5 how to quickly write out the latex formula corresponding to the formula
【问题解决】‘ascii‘ codec can‘t encode characters in position xx-xx: ordinal not in range(128)
Paper writing 19: the difference between conference papers and journal papers
. Ren -- the intimate artifact in the field of vertical Recruitment!
Es keyword sorting error reason = fielddata is disabled on text fields by default Set fielddata = true on keyword in order
Tensorflow 2 basic operation dictionary
[PTA] l1-006 continuity factor
Shanghai responded that "flour official website is an illegal website": neglect of operation and maintenance has been "hacked", and the police have filed a case
Introduction to link database function of cadence OrCAD capture CIS replacement components, graphic tutorial and video demonstration
16MySQL之DCL 中 COMMIT和ROllBACK
selenium.common.exceptions.WebDriverException: Message: ‘chromedriver‘ executable needs to be in PAT
Investigate why close is required after sqlsession is used in mybatties
[graph theory brush question-5] Li Kou 1971 Find out if there is a path in the graph