当前位置:网站首页>基于pytorch搭建GoogleNet神经网络用于花类识别
基于pytorch搭建GoogleNet神经网络用于花类识别
2022-04-23 19:29:00 【秃头小苏】
作者简介:秃头小苏,致力于用最通俗的语言描述问题
往期回顾:卡尔曼滤波系列1——卡尔曼滤波 基于pytorch搭建AlexNet神经网络用于花类识别
近期目标:拥有5000粉丝
支持小苏:点赞、收藏、留言
基于pytorch搭建GoogleNet神经网络用于花类识别
写在前面
前面已经出过基于pytorch搭建AlexNet神经网络用于花类识别和基于pytorch搭建VGGNet神经网络用于花类识别的文章,建议阅读此文章前先行阅读前两篇。
这篇文章用到的网络结构时GoogleNet,因此你需要对GoogleNet的结构有较清晰的了解,不清楚的戳此图标***了解详情。
和上一篇相同,本篇不会对实现花类识别的每一个步骤进行讲解,只针对GoogleNet的网络搭建细节进行阐述,大家可自行下载代码进一步研究。
GoogleNet网络模型搭建
GoogleNet的结构乍一看还是挺复杂的,但是其中有大量的重复结构,即Inception结构。我们可以将Inception结构封装成一个类在进行调用,这样会大大提高代码的可读性。Inception类的定义如下:
class Inception(nn.Module):
    def __init__(self, in_channels, ch1x1, ch3x3red, ch3x3, ch5x5red, ch5x5, pool_proj):
        super(Inception, self).__init__()

        self.branch1 = BasicConv2d(in_channels, ch1x1, kernel_size=1)

        self.branch2 = nn.Sequential(
            BasicConv2d(in_channels, ch3x3red, kernel_size=1),
            BasicConv2d(ch3x3red, ch3x3, kernel_size=3, padding=1)   # 保证输出大小等于输入大小
        )

        self.branch3 = nn.Sequential(
            BasicConv2d(in_channels, ch5x5red, kernel_size=1),
            BasicConv2d(ch5x5red, ch5x5, kernel_size=5, padding=2)   # 保证输出大小等于输入大小
        )

        self.branch4 = nn.Sequential(
            nn.MaxPool2d(kernel_size=3, stride=1, padding=1),
            BasicConv2d(in_channels, pool_proj, kernel_size=1)
        )

    def forward(self, x):
        branch1 = self.branch1(x)
        branch2 = self.branch2(x)
        branch3 = self.branch3(x)
        branch4 = self.branch4(x)

        outputs = [branch1, branch2, branch3, branch4]
        return torch.cat(outputs, 1)
这里我不想做过多的解释,大家自己对照着GoogleNet的理论看应该也能很好的理解,但这里我把这个类传入的参数做一个简单的解释,其实就对应着Inception结构的一些参数,如下图所示:

这里再谈谈BasicConv2d这个东东,这个其实也是我们定义的类,定义如下:
class BasicConv2d(nn.Module):
    def __init__(self, in_channels, out_channels, **kwargs):
        super(BasicConv2d, self).__init__()
        self.conv = nn.Conv2d(in_channels, out_channels, **kwargs)
        self.relu = nn.ReLU(inplace=True)

    def forward(self, x):
        x = self.conv(x)
        x = self.relu(x)
        return x
这个就更好理解了,其把卷积和后面的Relu激活封装到了一起
值得一提的是在GoogleNet网络中,还存在着两个结构相同的辅助分类器,为了简化代码,我们也将其封装成类,如下:
class InceptionAux(nn.Module):
    def __init__(self, in_channels, num_classes):
        super(InceptionAux, self).__init__()
        self.averagePool = nn.AvgPool2d(kernel_size=5, stride=3)
        self.conv = BasicConv2d(in_channels, 128, kernel_size=1)  # output[batch, 128, 4, 4]

        self.fc1 = nn.Linear(2048, 1024)
        self.fc2 = nn.Linear(1024, num_classes)

    def forward(self, x):
        # aux1: N x 512 x 14 x 14, aux2: N x 528 x 14 x 14
        x = self.averagePool(x)
        # aux1: N x 512 x 4 x 4, aux2: N x 528 x 4 x 4
        x = self.conv(x)
        # N x 128 x 4 x 4
        x = torch.flatten(x, 1)
        x = F.dropout(x, 0.5, training=self.training)
        # N x 2048
        x = F.relu(self.fc1(x), inplace=True)
        x = F.dropout(x, 0.5, training=self.training)
        # N x 1024
        x = self.fc2(x)
        # N x num_classes
        return x
这样一切准备工作即已做好,我们就可以来定义我们的GoogleNet网络了:
class GoogLeNet(nn.Module):
    def __init__(self, num_classes=1000, aux_logits=True):
        super(GoogLeNet, self).__init__()
        self.aux_logits = aux_logits

        self.conv1 = BasicConv2d(3, 64, kernel_size=7, stride=2, padding=3)
        self.maxpool1 = nn.MaxPool2d(3, stride=2, ceil_mode=True)   #ceil_mode=True表示求得的特征为小数时,向上取整

        self.conv2 = BasicConv2d(64, 64, kernel_size=1)
        self.conv3 = BasicConv2d(64, 192, kernel_size=3, padding=1)
        self.maxpool2 = nn.MaxPool2d(3, stride=2, ceil_mode=True)

        self.inception3a = Inception(192, 64, 96, 128, 16, 32, 32)
        self.inception3b = Inception(256, 128, 128, 192, 32, 96, 64)
        self.maxpool3 = nn.MaxPool2d(3, stride=2, ceil_mode=True)

        self.inception4a = Inception(480, 192, 96, 208, 16, 48, 64)
        self.inception4b = Inception(512, 160, 112, 224, 24, 64, 64)
        self.inception4c = Inception(512, 128, 128, 256, 24, 64, 64)
        self.inception4d = Inception(512, 112, 144, 288, 32, 64, 64)
        self.inception4e = Inception(528, 256, 160, 320, 32, 128, 128)
        self.maxpool4 = nn.MaxPool2d(3, stride=2, ceil_mode=True)

        self.inception5a = Inception(832, 256, 160, 320, 32, 128, 128)
        self.inception5b = Inception(832, 384, 192, 384, 48, 128, 128)

        if self.aux_logits:
            self.aux1 = InceptionAux(512, num_classes)
            self.aux2 = InceptionAux(528, num_classes)

        self.avgpool = nn.AdaptiveAvgPool2d((1, 1))    #自适应的平均池化,将特质图大小变成1x1
        self.dropout = nn.Dropout(0.4)
        self.fc = nn.Linear(1024, num_classes)
        if init_weights:
            self._initialize_weights()

    def forward(self, x):
        # N x 3 x 224 x 224
        x = self.conv1(x)
        # N x 64 x 112 x 112
        x = self.maxpool1(x)
        # N x 64 x 56 x 56
        x = self.conv2(x)
        # N x 64 x 56 x 56
        x = self.conv3(x)
        # N x 192 x 56 x 56
        x = self.maxpool2(x)

        # N x 192 x 28 x 28
        x = self.inception3a(x)
        # N x 256 x 28 x 28
        x = self.inception3b(x)
        # N x 480 x 28 x 28
        x = self.maxpool3(x)
        # N x 480 x 14 x 14
        x = self.inception4a(x)
        # N x 512 x 14 x 14
        if self.training and self.aux_logits:    # eval model lose this layer
            aux1 = self.aux1(x)

        x = self.inception4b(x)
        # N x 512 x 14 x 14
        x = self.inception4c(x)
        # N x 512 x 14 x 14
        x = self.inception4d(x)
        # N x 528 x 14 x 14
        if self.training and self.aux_logits:    # eval model lose this layer
            aux2 = self.aux2(x)

        x = self.inception4e(x)
        # N x 832 x 14 x 14
        x = self.maxpool4(x)
        # N x 832 x 7 x 7
        x = self.inception5a(x)
        # N x 832 x 7 x 7
        x = self.inception5b(x)
        # N x 1024 x 7 x 7

        x = self.avgpool(x)
        # N x 1024 x 1 x 1
        x = torch.flatten(x, 1)
        # N x 1024
        x = self.dropout(x)
        x = self.fc(x)
        # N x 1000 (num_classes)
        if self.training and self.aux_logits:   # eval model lose this layer
            return x, aux2, aux1
        return x
注意事项
这部分谈谈GoogleNet网络模型搭建和使用的注意事项。我们知道在GoogleNet中有两个辅助分类器,但这两个辅助分类器是只在训练时使用的,测试时不使用。【测试时令参数self.training and self.aux_logits的值为False】由于训练时使用了两个辅助分类器,因此有三个输出
在预测过程中,我们也不需要我们的辅助分类器,在加载模型参数时需要设置strict=False
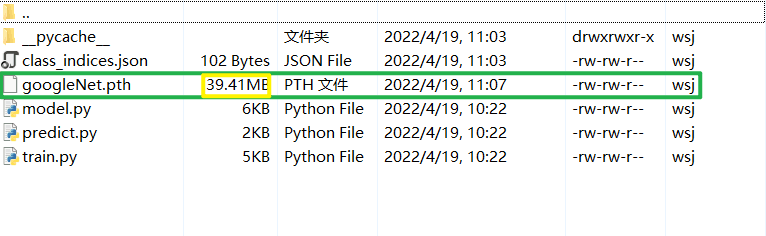
训练结果展示
本篇文章不再详细讲解训练步骤,和基于pytorch搭建AlexNet神经网络用于花类识别基本一致。这里展示一下训练结果,如下图所示:

其准确率达到了0.742,我们可以再来看看我们保存的GoogleNet模型,如下图,可以看出GoogleNet的参数相对于VGG可以说是少了许多许多,这和我们的理论部分也是契合的
小结
对于这一部分我强烈建议大家去使用Pycharm的调试功能,一步步的看每次运行的结果,这样你会发现代码结构特别的清晰。
参考视频:https://www.bilibili.com/video/BV1r7411T7M5/?spm_id_from=333.788
如若文章对你有所帮助,那就
咻咻咻咻~~duang~~点个赞呗
版权声明
本文为[秃头小苏]所创,转载请带上原文链接,感谢
https://blog.csdn.net/qq_47233366/article/details/124352606
边栏推荐
- The most detailed network counting experiment in history (2) -- rip experiment of layer 3 switch
- MFC obtains local IP (used more in network communication)
- An idea of rendering pipeline based on FBO
- Speculation on the way to realize the smooth drag preview of video editing software
- Using oes texture + glsurfaceview + JNI to realize player picture processing based on OpenGL es
- Command - sudo
- 考试系统进入试卷优化思路
- Why is the hexadecimal printf output of C language sometimes with 0xff and sometimes not
- Thoughts on the optimization of examination papers in the examination system
- 视频理解-Video Understanding
猜你喜欢
MySQL syntax collation (4)
Intuitive understanding of the essence of two-dimensional rotation
JVM的类加载过程
Zero cost, zero foundation, build profitable film and television applet

OpenHarmony开源开发者成长计划,寻找改变世界的开源新生力!

MySQL syntax collation (2)
![[报告] Microsoft :Application of deep learning methods in speech enhancement](/img/c1/7bffbcecababf8dabf86bd34ab1809.png)
[报告] Microsoft :Application of deep learning methods in speech enhancement
Command - sudo
Pdf reference learning notes
![[webrtc] add x264 encoder for CEF / Chromium](/img/3f/9bf73d6d2aec14ba94dfc6734eb6ac.png)
[webrtc] add x264 encoder for CEF / Chromium
随机推荐
JS calculation time difference
@Analysis of conditional on Web Application
Prefer composition to inheritance
Use of fluent custom fonts and pictures
一个简单的(基于redisson的)分布式同步工具类封装
Coordinate conversion WGS-84 to gcj-02 and gcj-02 to WGS-84
Inject Autowired fields into ordinary beans
2021-2022-2 ACM集训队每周程序设计竞赛(8)题解
Go modules daily use
Application of DCT transform
Openlayers 5.0 discrete aggregation points
ArcMap connecting ArcGIS Server
Speculation on the way to realize the smooth drag preview of video editing software
C语言的十六进制printf为何输出有时候输出带0xFF有时没有
Zero base to build profit taking away CPS platform official account
Easy mock local deployment (you need to experience three times in a crowded time. Li Zao will do the same as me. Love is like a festival mock)
[webrtc] add x264 encoder for CEF / Chromium
Strange passion
Grafana 分享带可变参数的链接
Command - sudo