当前位置:网站首页>父子节点数据格式不一致的树状列表实现
父子节点数据格式不一致的树状列表实现
2022-08-11 05:29:00 【wendZzz】
背景

后端返回的数据格式已经是树状结构了,但是其中父节点的数据格式和子节点的不一样,例如下图: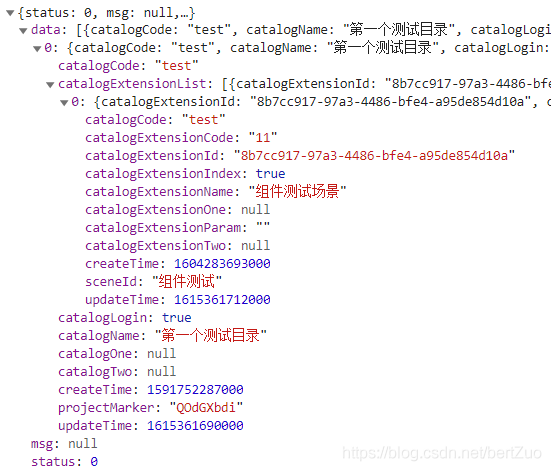
很清晰看出,在ts中抽象出interface,则分别是:
// 父
export interface ICatalogModel {
    catalogCode: string;
    catalogName: string;
    projectMarker: string;
    catalogLogin: boolean;
    catalogOne ? : string;
    catalogTwo ? : string;
    catalogExtensionList ? : IPageModel[];
    [k: string]: any;
}
// 子
export interface IPageModel {
    catalogCode: string;
    sceneId: string;
    catalogExtensionCode: string;
    catalogExtensionId: string;
    catalogExtensionName: string;
    catalogExtensionParam: string;
    catalogExtensionIndex: boolean;
    catalogExtensionOne ? : string;
    catalogExtensionTwo ? : string;
    [k: string]: any;
}
实现
首先是定义三个变量,数组treeList和tableList,map对象treeMap。treeList用来存放后端返回值,根据treeList进行数据格式化,生成treeMap,再根据map对象生成tableList,tableList是页面上渲染的平级列表。
1、调用后端接口获取list数据
getList() {
    Catalog.query(this.projectMarker).then((res) => {
        if (res.status === 0) {
            const treeList = res.data || [];
            const treeMap: ICatalogMap = {};
            const tableList: ITableRow[] = [];

            this.setCatalogMap(treeList, treeMap, 0);
            this.setCatalogList(treeMap, tableList);

            this.treeMap = treeMap;
            this.tableList = tableList;
            this.treeList = treeList;
        }
    });
},
setCatalogMap方法是根据treeList生成map对象,map对象的key是父节点数据中唯一字段catalogCode,子节点数据中唯一字段catalogExtensionCode。
2、生成map对象
setCatalogMap(list: ICatalogModel[], catalogMap: ITableRow, level: number) {
    list.forEach((item, index) => {
        catalogMap[item.catalogCode] = item;
        item.level = level;
        if (item.catalogExtensionList && item.catalogExtensionList.length > 0) {
            // 无法递归,子节点数据格式和父节点数据格式不一致
            item.catalogExtensionList.forEach((childItem, childIndex) => {
                childItem.level = level + 1;
                catalogMap[`${childItem.catalogExtensionCode}`] = childItem;
            });
        }
    });
},
将后端返回的数据循环,先找出所有的父节点数据,catalogMap[item.catalogCode] = item 即生成了以catalogCode为key的map对象,额外给每个对象新增一个level字段,表示层级,父节点数据都是0。
当数据中存在children时,如果此时父子数据格式相同就可以直接使用递归,this.setCatalogMap(item.catalogExtensionList, catalogMap, level+1)。但我这儿因为数据格式的固定,只有两级且格式不一致,也正因如此,map对象的格式要包容点,所以需要分别处理,虽然处理逻辑一致。ITableRow如下(any的美化写法):
interface ITableRow {
    [propName: string]: any;
}
3、生成平级列表对象数组
setCatalogList(catalogMap: ICatalogMap, tableList: ITableRow[]) {
    Object.keys(catalogMap).forEach((key) => {
        const item = catalogMap[key];
        if (this.treeMap[key]) {
            item.isOpen = this.treeMap[key].isOpen;
            item.isShow = this.treeMap[key].isShow;
        } else {
            item.isOpen = true;
            item.isShow = true;
        }
        if (item.level === 0) {
            tableList.push(item);
            if (item.catalogExtensionList && item.catalogExtensionList.length > 0) {
                item.catalogExtensionList.forEach((childItem) => {
                    tableList.push(childItem);
                });
            }
        }
    });
},
将map对象转换成页面上渲染的tableList,为了满足table列表的树状展示,需要新增自定义字段,父子节点数据上新增isOpen和isShow字段,isOpen用于控制切换父级前端的展示收起图标按钮,isShow用于展示当前父节点下所有子节点的隐藏和显示。
先循环整个map对象,catalogMap[key]即拿到一行的完整数据,这里放在父子节点判断之前处理就是为了给每一行都新增这两个字段。当level为0时就是父节点,直接将那一行数据塞入tableList,父节点的children中存在数据时再循环孩子节点,如果数据格式一致此时也应该写成递归。
4、父级上展开收起按钮图标的切换事件
tabNode(node: ICatalogModel) {
    this.treeMap[node.catalogCode].isOpen = !this.treeMap[node.catalogCode].isOpen;
    this.statusChange(node, node.isOpen);
},
statusChange(data: ICatalogModel, status: boolean) {
    if (data.catalogExtensionList) {
        data.catalogExtensionList.forEach((childEl: any) => {
            childEl.isShow = !!status;
        });
    }
},
5、页面
用的公司的UI库,其实就是封装的elementUI。
<el-table ref="table" :data="tableList" :row-class-name="cellClass">
    <el-table-column label="名称">
        <template slot-scope="scope">
            <div :class="$style.categoryLayout" :style="{'paddingLeft': 40 * scope.row.level + 'px'}">
                <template v-if="scope.row.catalogExtensionList && scope.row.catalogExtensionList.length>0">
                    <i :class="['icon-open', $style.tab]" v-if="scope.row.isOpen" @click="tabNode(scope.row)"></i>
                    <i :class="['icon-close', $style.tab]" v-else @click="tabNode(scope.row)"></i>
                </template>
                <template v-else>
                    <i :class="['icon-empty', $style.lastTab]"></i>
                </template>
                <div :class="$style.title" v-if="scope.row.level===0">{
   {scope.row.catalogName}}</div>
                <div :class="$style.title" v-else>{
   {scope.row.catalogExtensionName}}</div>
            </div>
        </template>
    </el-table-column>
    <el-table-column label="操作" width="300" align="center">
        <template slot-scope="scope">
            <span class="operate" @click="doNode(scope.row, 'delete')">删除</span>
        </template>
    </el-table-column>
</el-table>
这里的row-class-name就是个每一行添加个class,根据每一行的isShow值判断是否显示或隐藏。
cellClass({
    row,
    rowIndex
}: ITableRow) {
    if (!row.isShow) {
        return "rowNone"; // rowNone就是隐藏的class
    }
},
至此,父子节点数据结构不一致的树状列表就实现了。
我原本想着写到这里就发文出来,但是因为的确忙的缘故搁置了,有没想到后来需求改变了,后端返回的数据仍然是父子节点数据结构不一致,但有两级菜单。
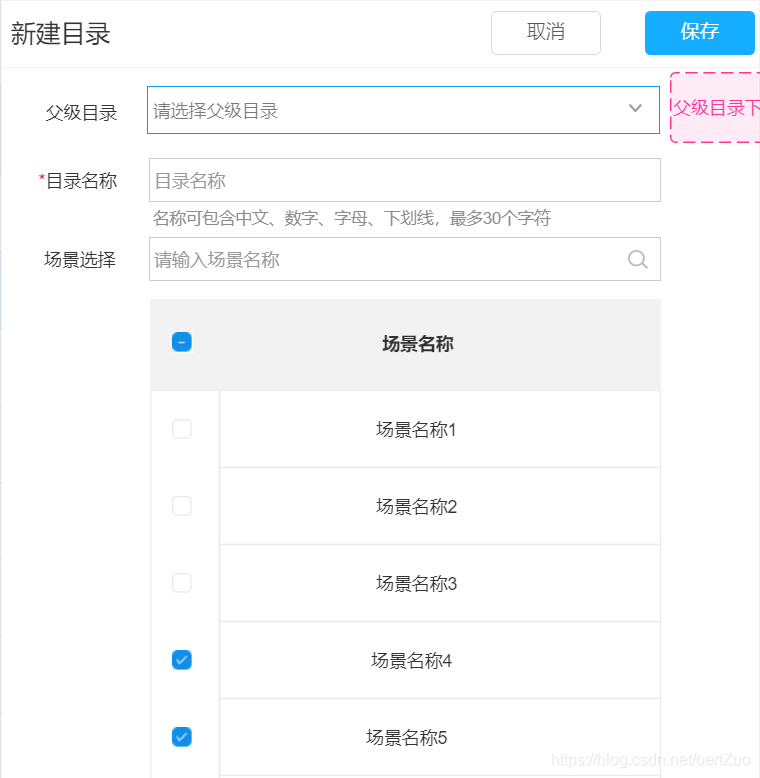
新建时不选择父级菜单就是默认创建一级菜单,菜单下可以挂场景也可以挂二级菜单。效果图如下:
后端返回的数据结构也发生了改变,如下:
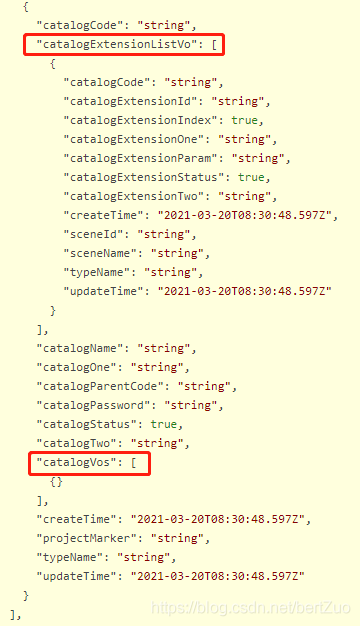
catalogExtensionListVo中存放直接挂载的场景列表数据,catalogVos中存放二级目录数据,二级目录数据结构和一级目录的一样。
主要修改的就是setCatalogMap和setCatalogList这两个方法,因为存在二级目录,简单点的实现就是采用递归。
setCatalogMap(list: ICatalogModel[], catalogMap: ITableRow, level: number) {
    // 父级目录
    list.forEach((item) => {
        if (item.catalogCode) {
            catalogMap[item.catalogCode] = item;
            item.level = level;

            // 处理场景
            const scenes = item.catalogExtensionListVo;
            if (scenes && scenes.length > 0) {
                scenes.forEach((sceneItem: any) => {
                    sceneItem.level = level + 1;
                    catalogMap[sceneItem.catalogExtensionId] = sceneItem;
                });
            }

            // 子目录
            const children = item.catalogVos;
            if (children && children.length > 0) {
                this.setCatalogMap(children, catalogMap, level + 1);
            }
        }
    });
},
setCatalogList(catalogMap: ICatalogMap, tableList: ITableRow[]) {
    Object.keys(catalogMap).forEach((key) => {
        const item = catalogMap[key];
        if (this.treeMap[key]) {
            item.isOpen = this.treeMap[key].isOpen;
            item.isShow = this.treeMap[key].isShow;
        } else {
            item.isOpen = true;
            item.isShow = true;
        }
        tableList.push(item);
    });
},
目录展开收起的图标按钮的事件也需要相应的修改:
statusChange(data: ICatalogModel, status: boolean) {
    const scenes = data.catalogExtensionListVo;
    if (scenes && scenes.length > 0) {
        scenes.forEach((sceneEl: any) => {
            sceneEl.isShow = !!status;
        });
    }

    const children = data.catalogVos;
    if (children && children.length > 0) {
        children.forEach((child: any) => {
            child.isShow = !!status;
            this.statusChange(child, status);
        });
    }
},
至此,最新的需求实现了,距离本文开篇第一字落下的时间已经过去了一周,但是前两天实现另一个模块时也有树状列表的实现,索性这儿一并整理了。
需求背景是展示部门和用户的树状列表,没有层级限制,部门下可以一直挂载子部门。效果图如下:
![[55]](/img/7d/a4dc3bd4fe62f7f9baf5c05c1d5b9d.png)
后端返回的数据结构很贴心就是已经实现好的树状结构,如下:
![[44]](/img/2c/375f674ae5ca6b6bf5a39af76faa03.png)
userClientVos中存放部门下用户数据,children中存放子部门数据。
这里偷偷懒,采用elementUI封装的树状控件,参考如下:
看自定义节点内容那段,这个组件需要的数据格式这样的:
const demo = [{
    label: "1",
    children: [{
        label: "11",
        children: [
            label: "111",
            children: []
        ],
    }, ],
}, ];
所以最大的问题就是如何将后端目前用户和部门数据不在一个字段里这样的数据格式,改成在一个children字段中。
转换个map对象就可以轻松实现原列表的修改:
setDeptMap(list: ITableRow[], treeMap: ITableRow) {
    list.forEach((item) => {
        treeMap[`dept_${item.deptCode}`] = item;

        if (item.children.length > 0) {
            this.setDeptMap(item.children, treeMap);
        }
        if (item.userClientVos) {
            item.userClientVos.forEach((user: any) => {
                user.deptName = item.deptName;
                treeMap[`user_${user.userCode}`] = user;
                item.children.push(user);
            });
        }
    });
},
没啥好详解的,好好读代码。
边栏推荐
猜你喜欢

OpenMLDB v0.5.0 released | Performance, cost, flexibility reach new heights
Day 77
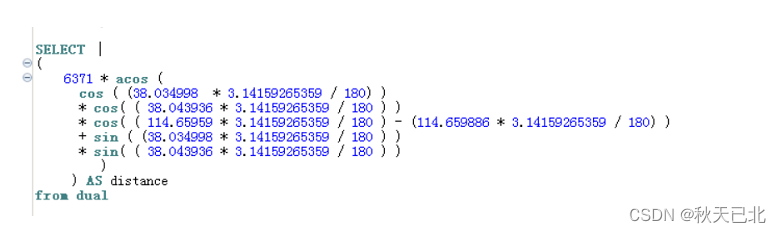
经纬度求距离
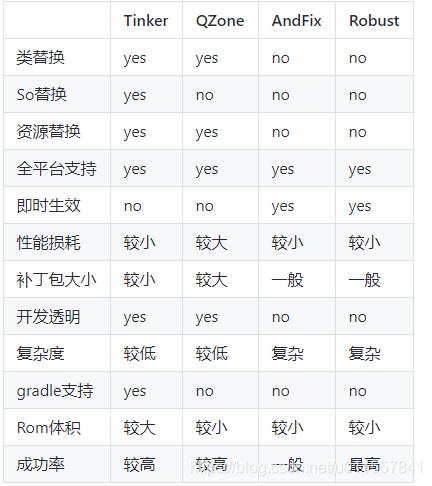
Tinker的自我介绍
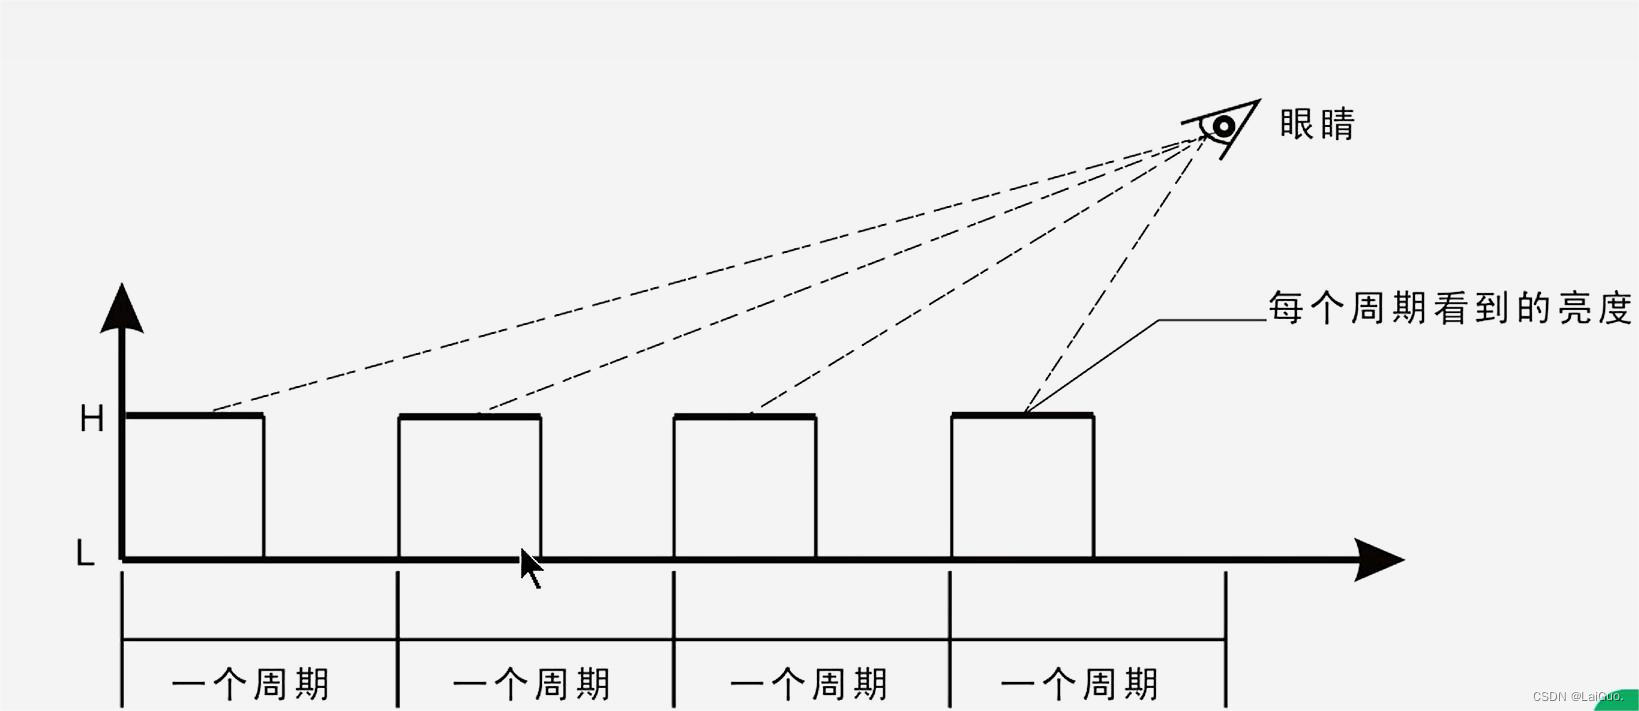
STM32学习笔记(白话文理解版)—小灯的点亮、闪烁、呼吸
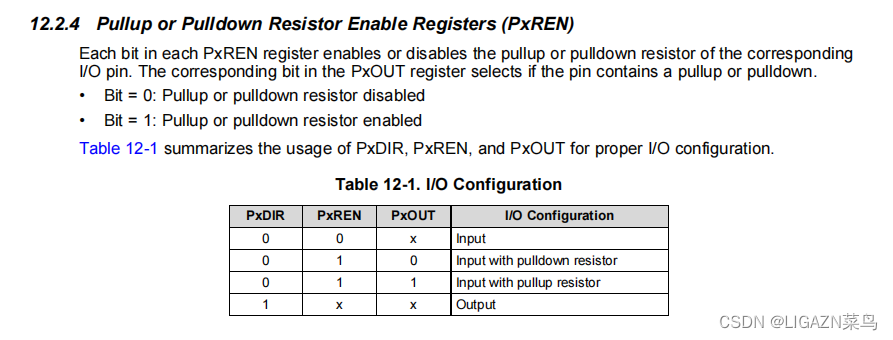
MSP430学习总结(二)——GPIO
Intelligent risk control China design and fall to the ground
The Summer of Open Source 2022 is coming | Welcome to sign up for the OpenMLDB community project~

无效的修订:3.18.1-g262b901-dirty
厂商推送平台-华为接入
随机推荐
2021-09-11 C语言 变量与内存分配
C语言中switch的嵌套
Day 86
typescript学习日记,从基础到进阶(第二章)
开源机器学习数据库OpenMLDB贡献者计划全面启动
字节(byte)和位(bit)
JS case exercise (classic case of teacher pink)
He Kaiming's new work ViTDET: target detection field, subverting the concept of layered backbone
批量快速修改代码的正则表达式替换
Day 87
Jetpack之dataBinding
Node stepping on the pit 80 port is occupied
MSP430学习总结(二)——GPIO
活动预告 | 4月23日,多场OpenMLDB精彩分享来袭,不负周末好时光
Tinker接入全流程---配置篇
Visual studio2019 configuration uses pthread
编译异常解决
C language implementation guess Numbers (with source code, can be directly run)
The role of the port
stack stack